An Introduction to TIA Portal’s Version Control Interface Using Git and Github

Introduction
Version control is a fundamental aspect of modern software development and project management. As automation engineers and programmers collaborate on intricate projects, ensuring seamless coordination, tracking changes, and preserving an organized history of revisions becomes imperative. The challenges arise when multiple individuals work simultaneously on the same project, leading to potential conflicts, unclear accountability for modifications, and difficulties in identifying and rectifying issues. This is where Version Control Interfaces come into play, providing a systematic approach to managing project files and codebase changes efficiently.
The Version Control Interface (VCI) in TIA Portal serves as a bridge between automation engineering projects and version control systems like Git and GitHub. VCI empowers engineers to seamlessly manage their project files, track modifications, and facilitate team collaboration. This interface simplifies the process of integrating version control into automation projects, program blocks are automatically converted to XML files and organized following the project’s structure. VCI ensures that every change made to the project is captured, attributed, and documented, providing a comprehensive history of the project's development lifecycle.
In this tutorial, you will learn how to integrate the Version Control Interface (VCI) within the TIA Portal environment, utilizing Git and GitHub as the underlying version control system. The tutorial begins with creating a GitHub repository, configuring Git, and establishing the connection between the local and GitHub repositories. Then, the focus shifts to the TIA Portal configuration, where you'll understand how to configure the VCI workspace, synchronize project elements, and manage modifications. Additionally, the tutorial introduces the VCI Git Connector Add-in, demonstrating how to automate commit and push operations directly from the TIA Portal interface.
Prerequisites
To follow this tutorial, you will need an installation of TIA Portal. We will use the latest versions to date (v18), but you can use any other version. No additional hardware or software is required.
Version Control Interface in TIA Portal
Let’s start by opening your GitHub profile. If you don’t already have one, create an account on GitHub’s website. On your profile, copy the HTTPS link to your repository.

After that, we need to configure Git. Open a command prompt and type the following command
- git init c:\Git_repository
This command will create and initialize a git repository at the specified location. This folder will contain all the files shared between TIA Portal and Git/GitHub.

Next, we need to type the following command to configure the username of this Git instance. Here, I set the username to “Redouane.”
- git config –global user.name Redouane

The same logic applies to the user’s email. Type the following command to add the user’s email in the Git instance. I am using a fake email address in this example. Be sure to add a valid one.
- git config –global user.email redouane@email.com

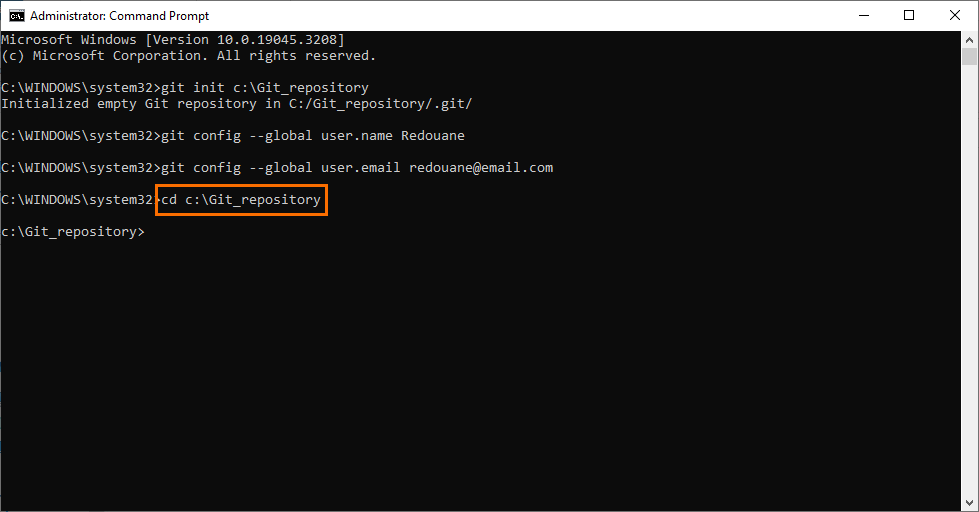
The last step is to link this Git session to the GitHub repository. First, we need to move to the Git repository we created with the following command
- cd c:\Git_repository
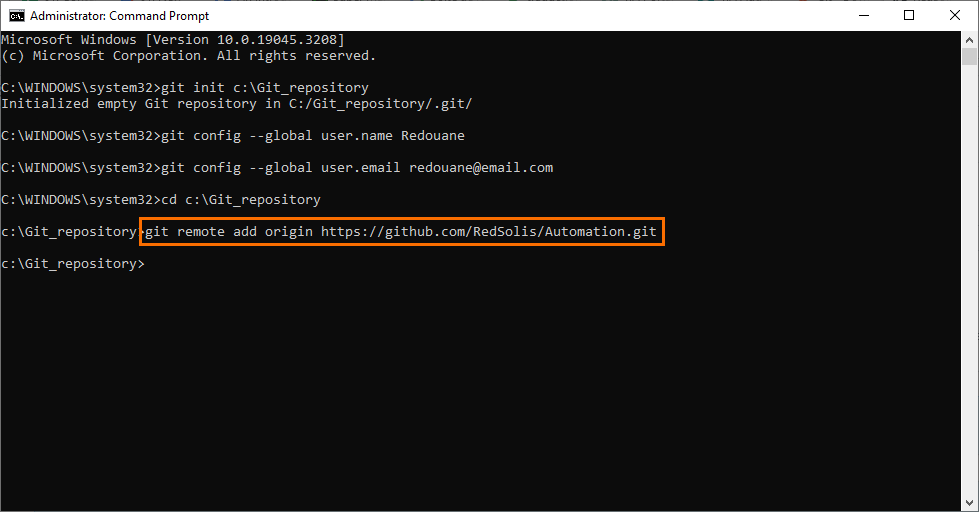
Then, we use the following command to link this repository with the GitHub repository
- git remote add origin <Link to your GitHub repository>
We are done configuring the Git side. We can move to the TIA Portal configuration. Open TIA Portal and create a new project with your chosen CPU. We will keep the main program empty by default for now.
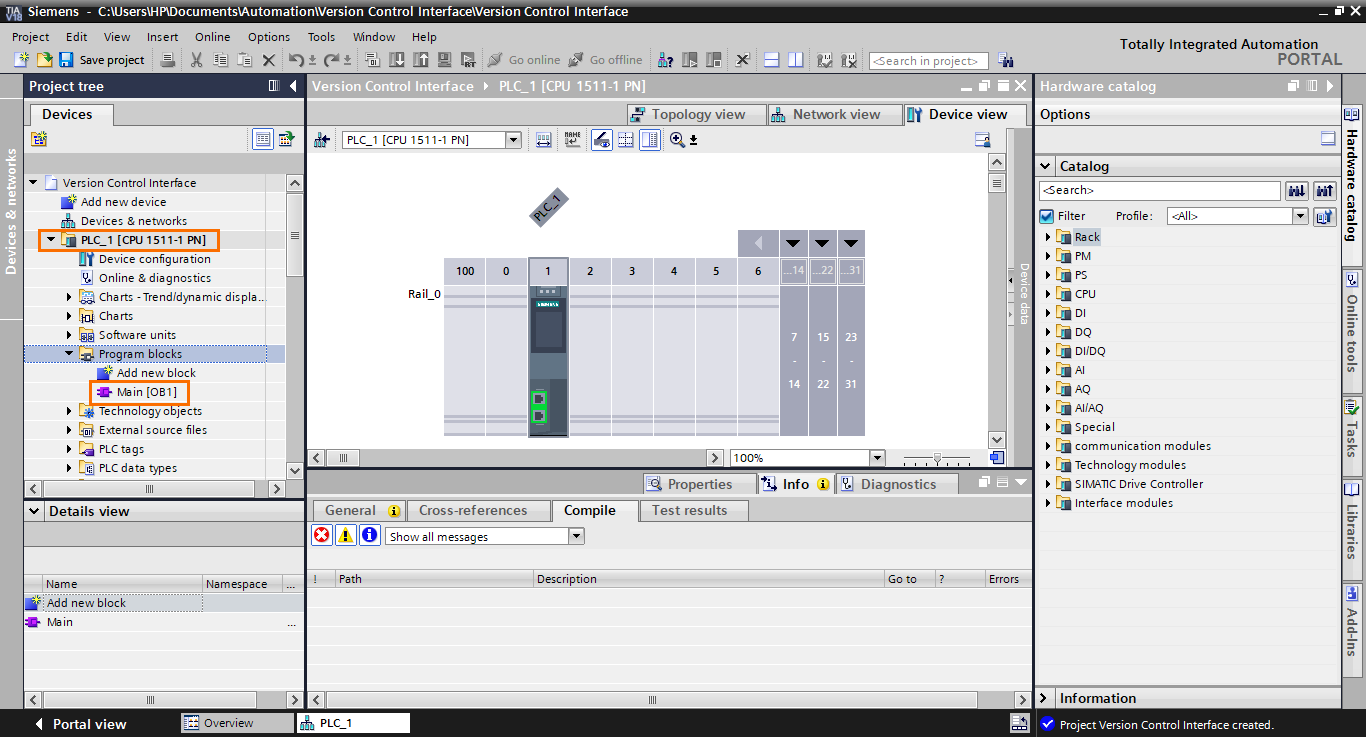
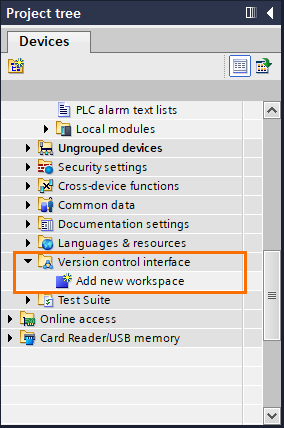
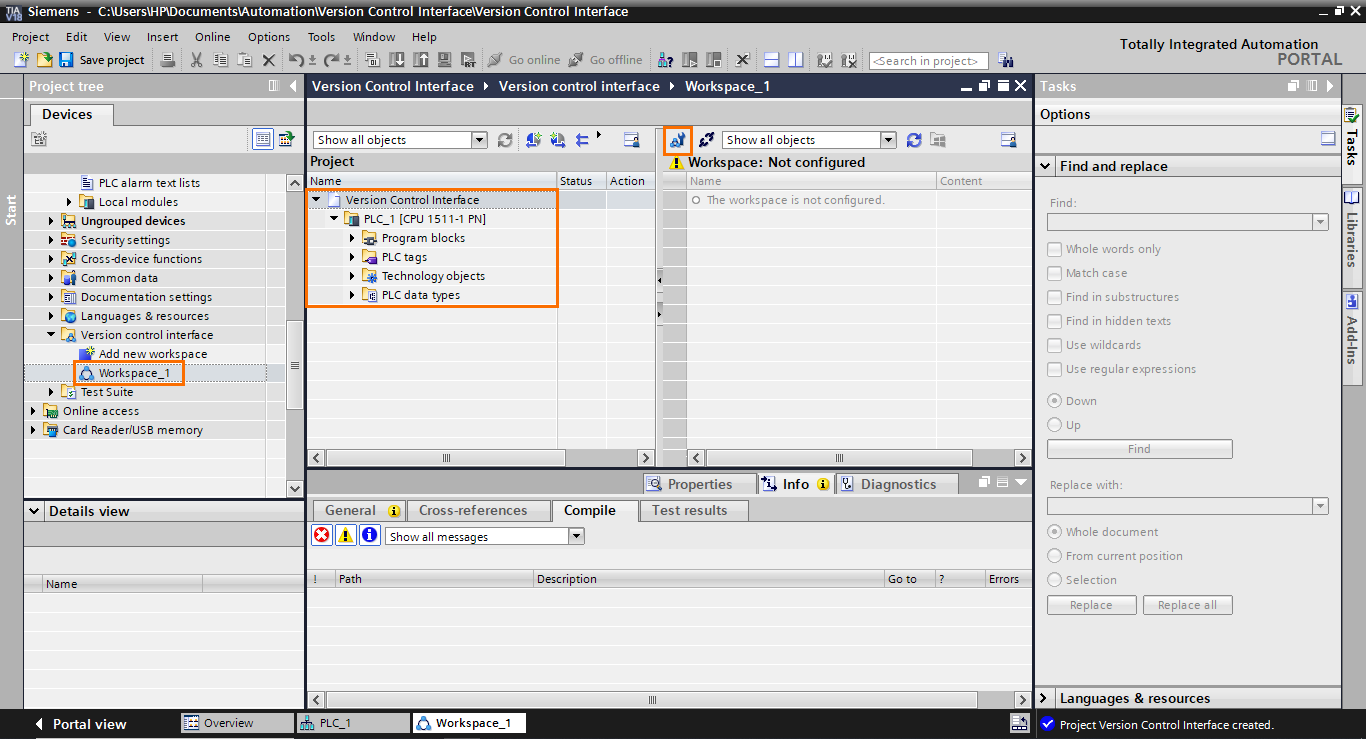
Scroll down your project tree and open the “Version control interface” folder. Version Control Interface (VCI) streamlines project management by integrating with version control systems like Git/GitHub. As automation engineers and programmers collaborate on projects, VCI tracks changes to project files, offering transparency into who made modifications and when. This enables teams to maintain an organized history of revisions, simplifying the process of identifying and rectifying issues. The interface facilitates collaboration by allowing multiple users to work simultaneously, automatically merging changes and providing tools to resolve potential conflicts.
Click on “Add new workspace.”
The VCI workspace is split into two parts. The left side contains all the program elements and blocks of your TIA Portal project, such as Program blocks, PLC tags, Technology objects, and PLC data types. The right side contains the folders and files created by VCI. PLC objects will be turned into XML files inside this folder. Since we already created a Git repository, we will select it as the VCI folder; This way, the VCI files will be ready to use directly in Git.
To configure the VCI folder, click the “Workspace Configuration” button.
A small “Configure workspace” window will open. In the “Workspace path” section, we need to specify the path to the Git repository we created previously. Click on the “three dots” button to select the folder.
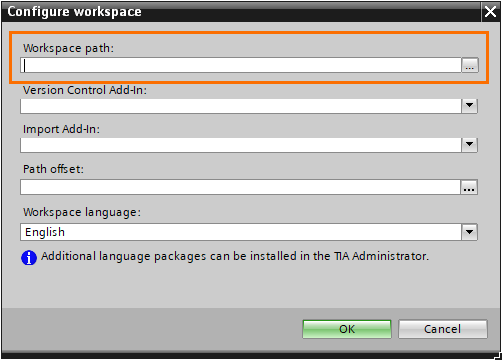
Be sure to have the right path to the Git repository. Once done, click on “OK.”

The VCI/Git folder is now configured. The next thing to do is to add the PLC station to the workspace. Select the PLC station, drag it to the workspace, and drop it.
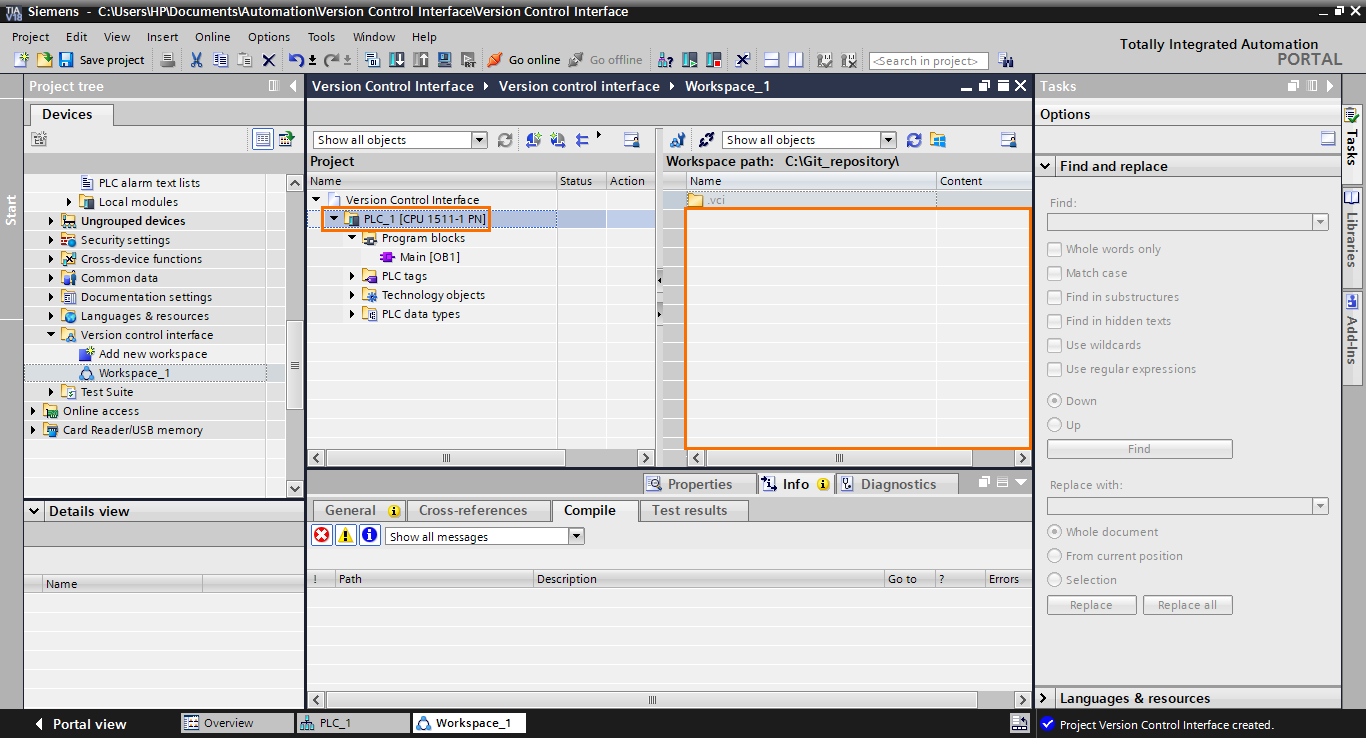
A folder named “PLC_1” will appear in the workspace containing all the files of your program elements. Also, status icons will appear on the project side. VCI compares the project blocks with the VCI files; if they are identical, it will indicate it with green icons.

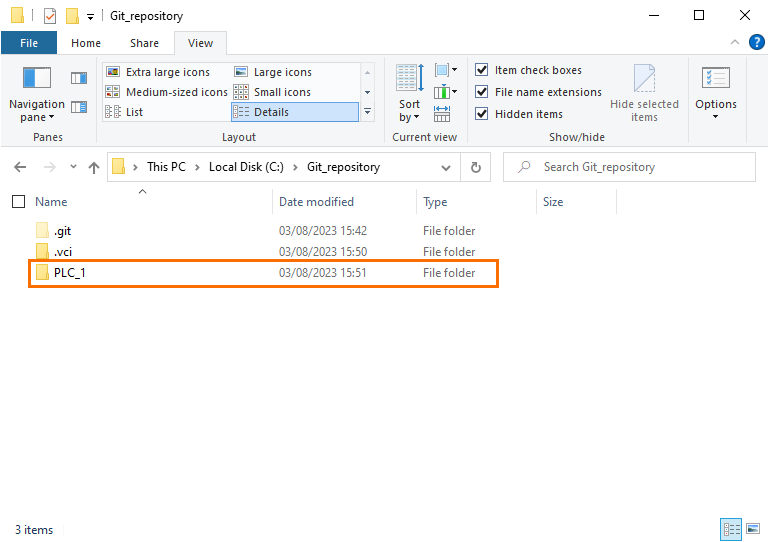
You can browse to the VCI/Git folder, you should find all the files folders containing the XML files of your program.
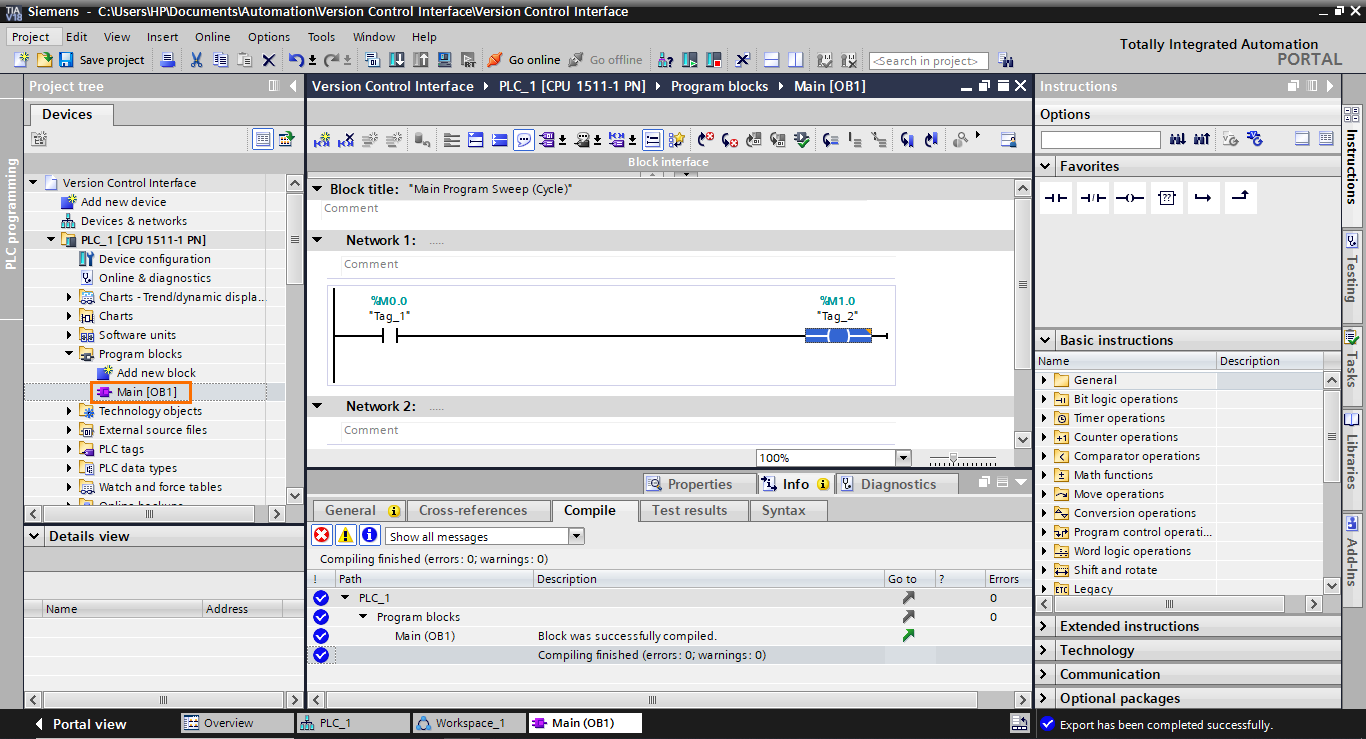
Now let’s add a modification to the main program. Open it and reproduce the following program (Or any program of your choice).
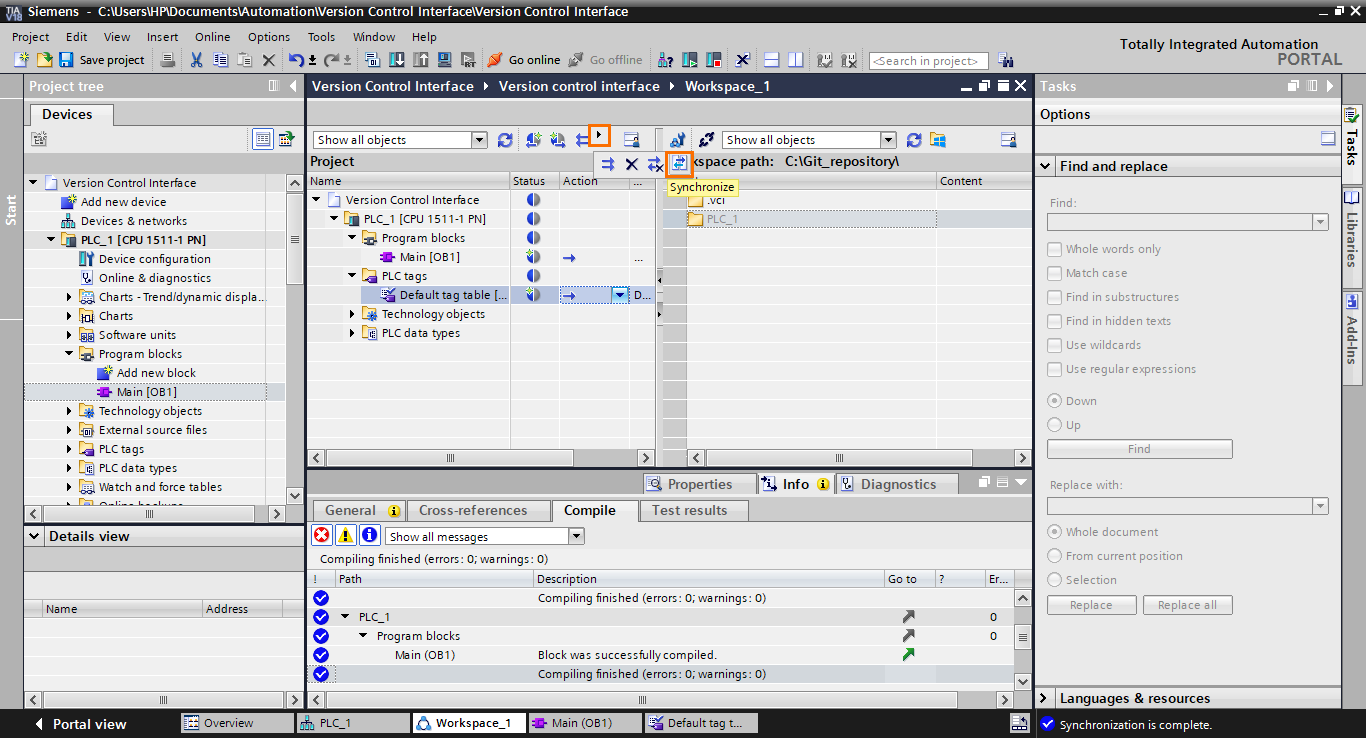
Let’s go back to the VCI workspace. Since we introduced a modification, the status icons on the project side turned grey/blue. Indicating that these elements are not identical to the VCI files.

To synchronize the project side with the workspace, we must first select the export action on each nonsimilar element. Click on the “Action” section next to the main block and select “Export.”

And repeat the same step for the tag table.

Once done, click on the “Synchronize” button to apply the export actions.
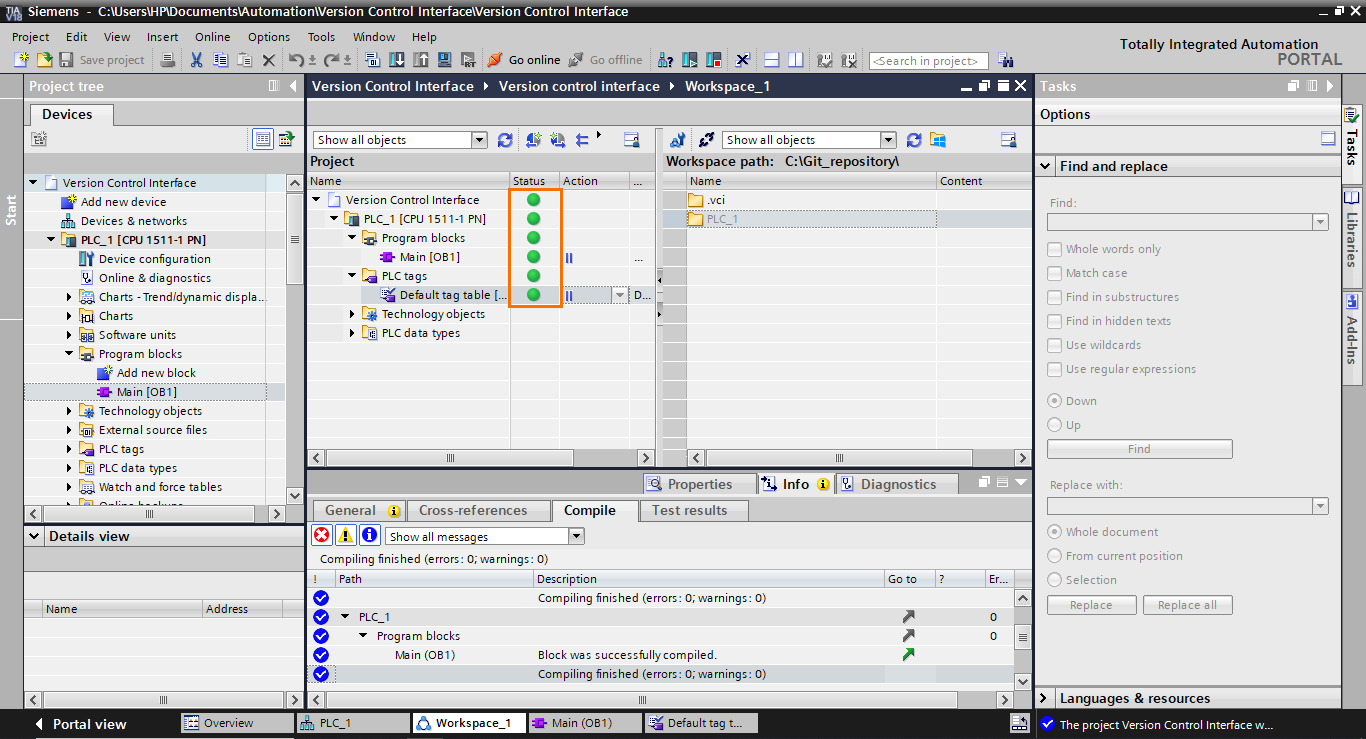
The VCI workspace is updated, and the status icons should revert to green.
The VCI files have been generated, we can now create a Git commit and push (upload) it to the GitHub repository.
Open a common prompt and move to the VCI/Git repository with the “cd” command.

In Git, "add" and "commit" are fundamental commands in the version control process. "Add" refers to the action of staging changes made to your files, essentially preparing them for inclusion in the upcoming commit. This allows you to choose which changes to include selectively. Once changes are added, you "commit" them, creating a snapshot of the staged changes and a descriptive message. Commits represent milestones in the project's history and enable you to track and manage the evolution of your codebase over time.
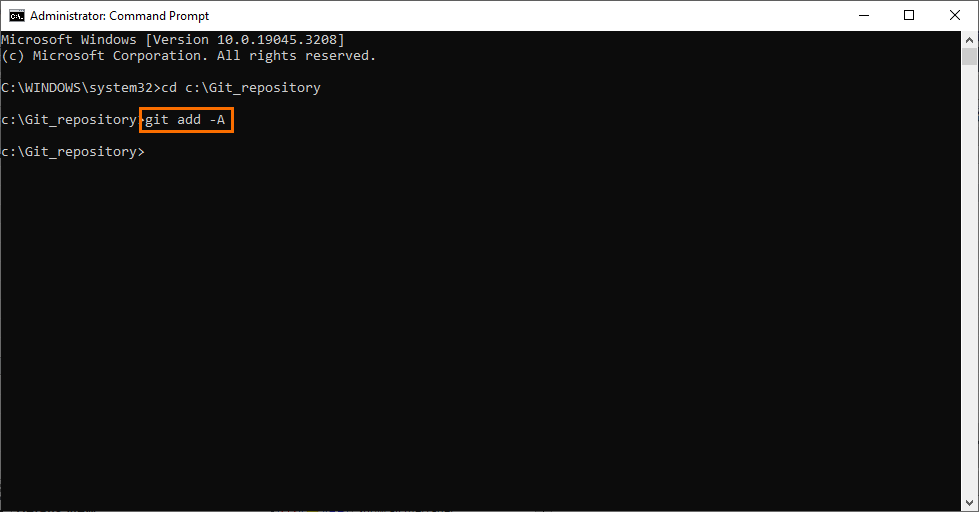
Here, we will use the “git add -A” command to add all the files in the repository (with the -A argument)
- git add -A
Then, we will commit the added files with the following command
- git commit -m first
The “-m” argument adds a message to the commit. Here we’ll use “first” as the message to specify that it is the first commit.

The commit is created; we have now to push it to GitHub. To do this, we will use the following command
- git push –set-upstream origin master

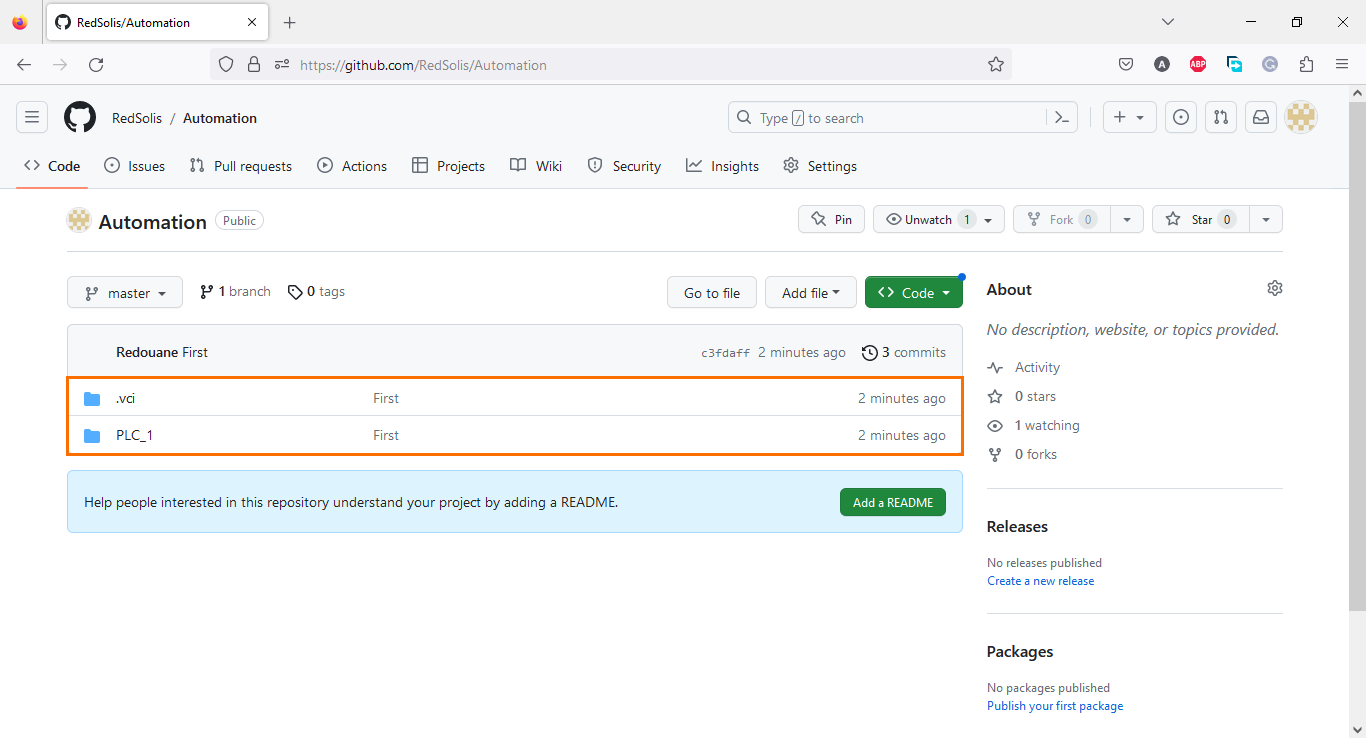
If we go to the GitHub repository, we will find the folders we committed with the right commit message.
VCI Git Connector - TIA Portal add-in
So far, we've covered how VCI and Git work and interact using manual commands. It is possible to automate Git operations directly from TIA Portal using an Add-in. This allows you to perform Git operations directly from the VCI interface and offers options for automating the commit and push process.
First, we need to install the VCI Git Connector Add-in. You can find its download page here. Once on the page, click on the “Add-in for TIA Portal V16-V18” link to download the add-in.

Once downloaded, go to the “Add-Ins” folder in your TIA Portal repository and copy the add-in into it.

Next, go to the “Add-Ins” tab in TIA Portal, right-click the add-in, and click “Activate.”

After that, we need to add the add-in to the VCI. Go back to the workspace, and click on the workspace configuration button. Then, in the “Version Control Add-in” section, select the “Git” add-in.

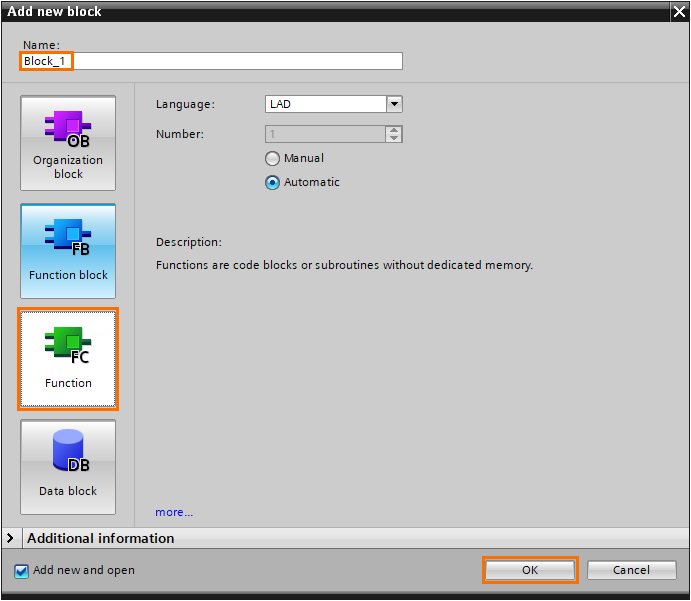
Let’s introduce another modification and commit/push it using the Git add-in. Click on “Add new block.”

We will add an FC block that will serve as a modification. Select “Function”, give a name to the block, and click on “OK”
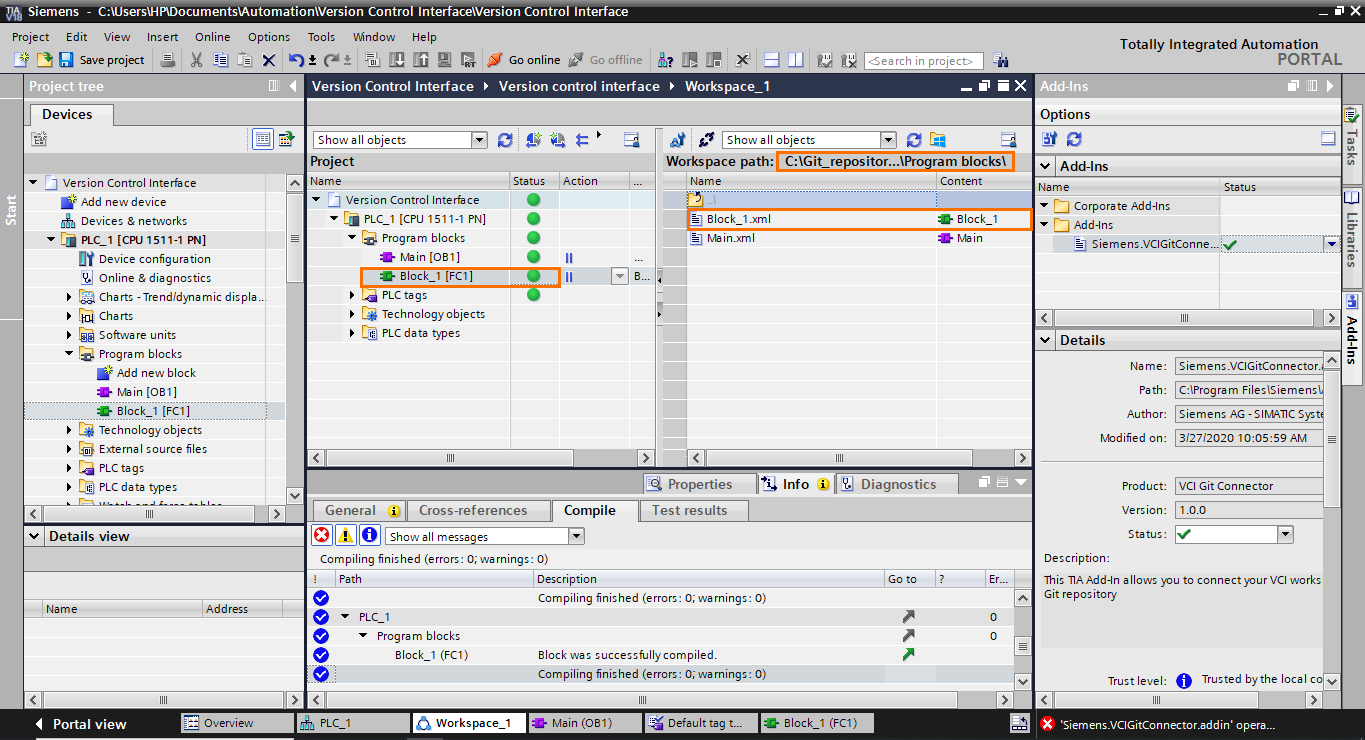
If we go back to the VCI, we will find that it has no status icon because it is not present in the VCI/Git folder. Open the “PLC_1/Program blocks” folders in the workspace so we can add the function to it.

Drag and drop the function in the “Program blocks” folder in the workspace.
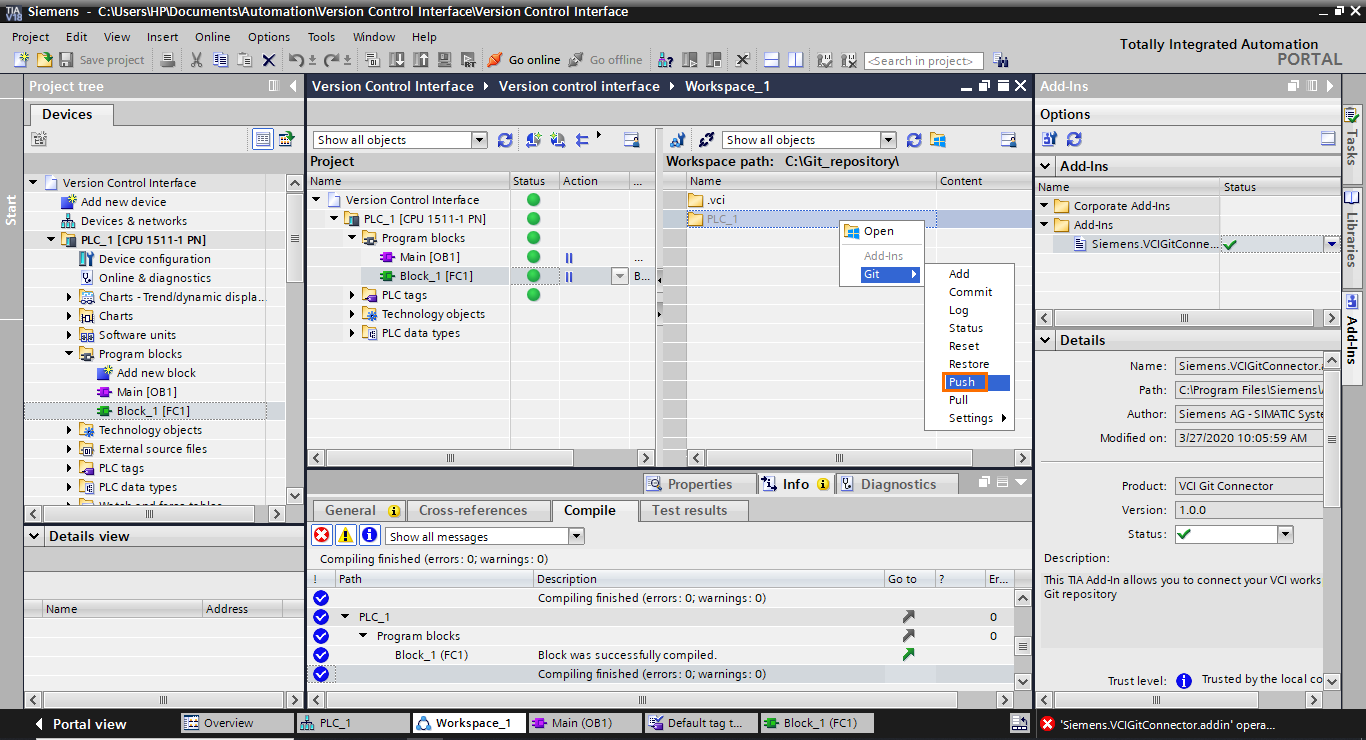
Now we will perform Git command from the workspace. Return to the root folder and right-click on the “PLC_1” folder. You can notice that there is a “Git” section (from the add-in). Inside it, You will find all the most common Git commands, including add, commit, push, and pull (pull is used to retrieve the last commit from the GitHub repository). Select “Add” to add the folder in Git.
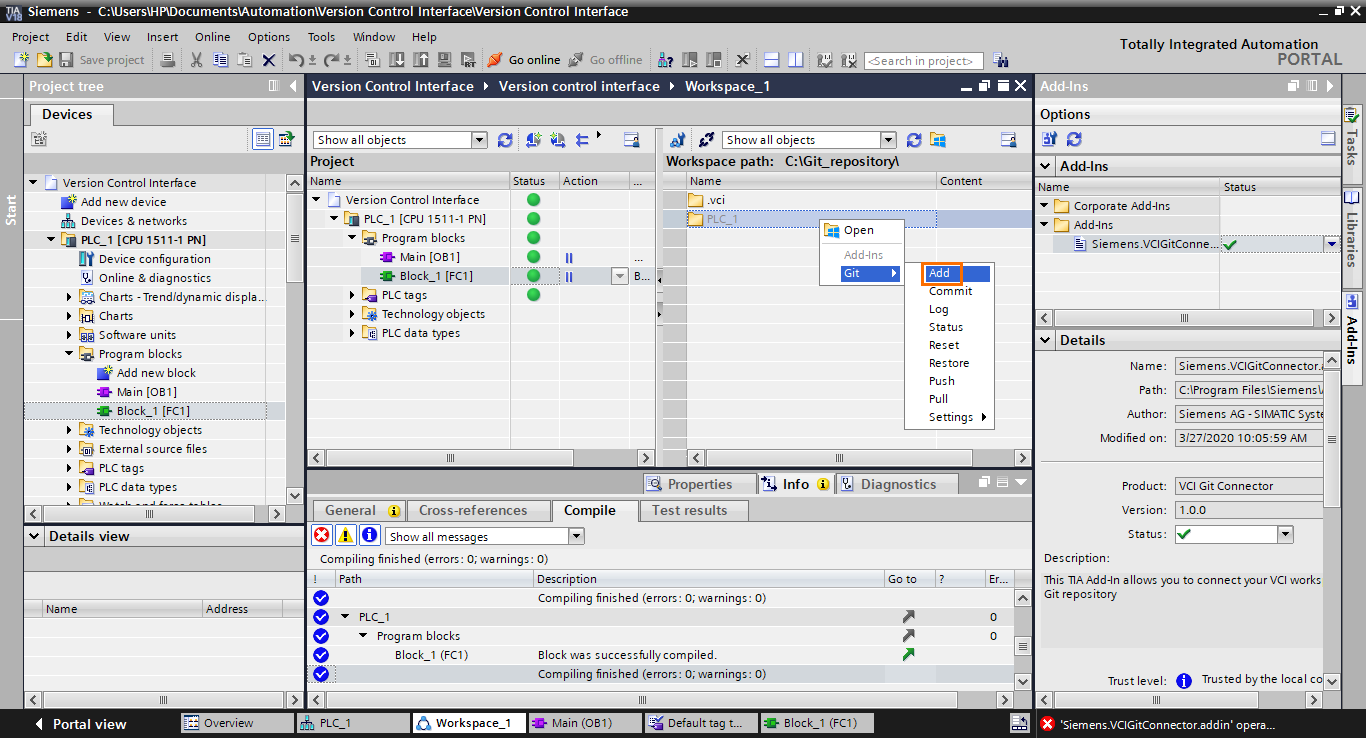
Once added, repeat the same operation but select “Commit” instead to create a new Git commit.

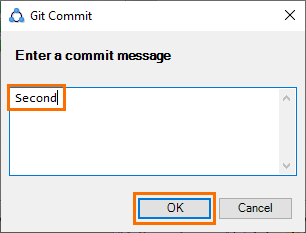
A small window will open asking you to add a commit message. Type “Second” as the message and click on “OK”.
Now that we have a second commit, we need to push it to the GitHub repository. Repeat the same operation one last time but select the “Push” option.
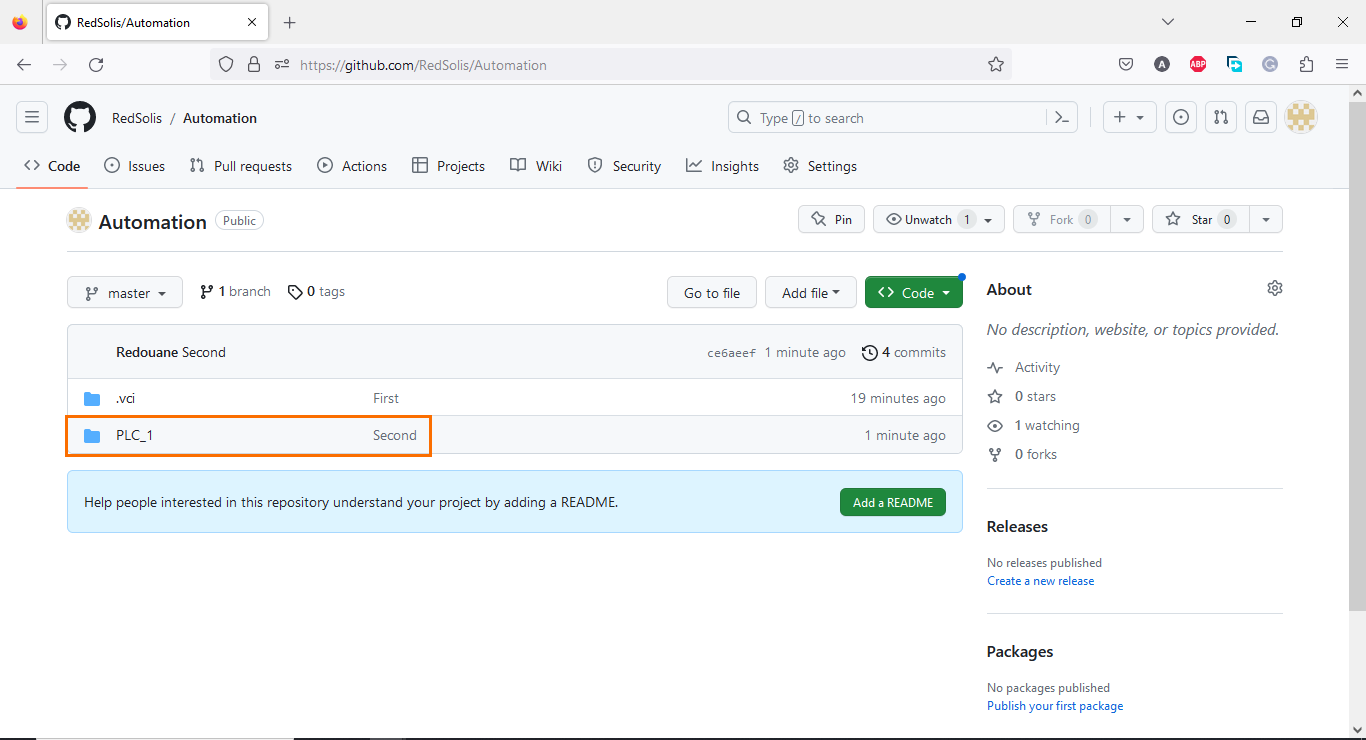
Then, we can go back to the GitHub repository. We will find that the “PLC_1” folder has been update with the second commit.
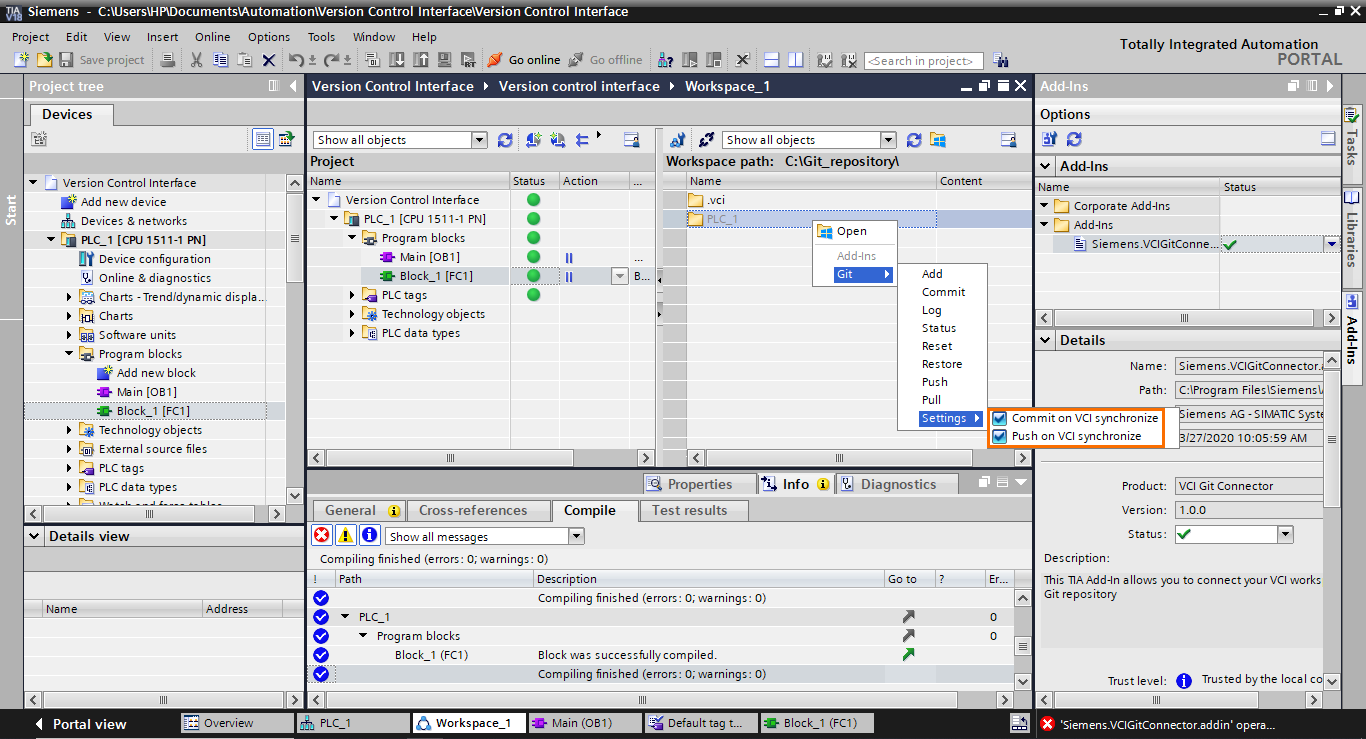
We can automate this whole process by enabling the "Commit/Push on VCI synchronization" options. Each time a VCI synchronization is performed, this will automatically create a commit and push it to GitHub. To do this, right-click on the “PLC_1” folder, go to the settings, and enable both the “Commit on VCI synchronization” and “Push on VCI synchronization” checkboxes.
Conclusion
This tutorial taught you how to effectively integrate the Version Control Interface into TIA Portal projects and leverage Git/GitHub for streamlined version control. You began by setting up Git by initializing a repository and linking it to your GitHub repository. You configured the VCI workspace in TIA Portal, integrated it with your Git repository, and synchronized your project with the VCI files. You discovered the significance of status icons indicating changes, and you learned how to add, commit, and push changes to your GitHub repository using manual Git commands. Additionally, you explored the potential of the VCI Git Connector Add-in to automate these processes directly from TIA Portal, simplifying your version control workflows.
Utilizing version control offers numerous benefits and advantages for automation engineers. The ability to track changes and maintain an organized history of revisions enhances project transparency and accountability. Collaboration becomes smoother as team members work concurrently on projects, with automated merging and conflict resolution mechanisms simplifying the process. Version control safeguards against data loss and provides the means to revert to previous versions, ensuring project stability. The integration of version control with TIA Portal not only fosters efficient teamwork but also empowers engineers to confidently manage their automation projects, enabling innovation and continuous improvement.
