FactoryTalk View Studio ME & SE - Object Animation Through Tags Tutorial Faceplates Image Library

Introduction
Animations in FactoryTalk View Studio Machine & Site Edition are critical in all HMI applications. They allow the programmer to create objects which will alert the operator of the status of a certain element, draw attention to themselves upon a change & make sure that the proper state of a certain object is portrayed by the application. Furthermore, properly designed animations are pleasing to the user & will make your application stand out.
FactoryTalk View Studio wasn’t meant to create complex animations or transitions. However, through the clever use of the Image Library, it’s possible to animate any object to the needed degree. In this article, we will be looking at two key ways you may animate objects within FTView Studio: through the animation property as well as through the swap of images.
Using the FactoryTalk View Studio Animation Object Property
By right-clicking an object, you may choose to add an animation property to it. Among your choices, you may choose to alter color, position, visibility, rotation, etc. Some of my personal favorites & most used are Visibility, Color & Fill.
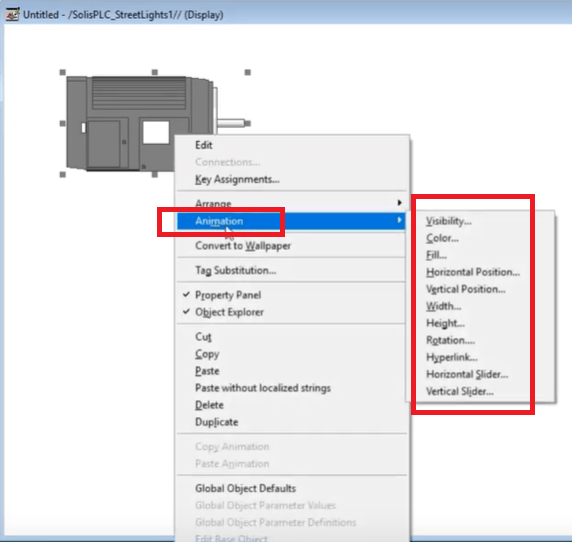
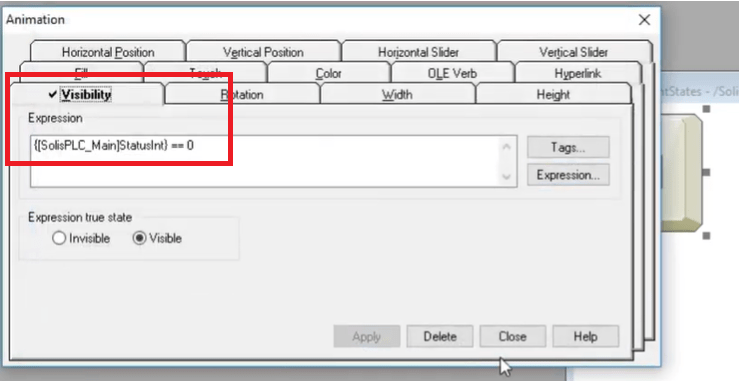
By selecting “Color”, the user will be prompted to enter an expression which will provide the object with a value which will dicatate the color. The logic behind this is straghtforward: if the expression evaluates to 0, the object will be color “A”, if the expression evaluates to 1, the object will be of color “B”, etc. In most cases, the expression is simply a PLC based tag which is read by the application & changes based on difference conditions written by the PLC programmer. You aren’t limited to a certain number of colors as far as know, but there’s probably a limit…
Configuring the transition needs to be done within the same panel of FactoryTalk View Studio. By choosing the appropriate row within the selector, the user will define the value, color as well as the fill for the object. These will be used when the expression is evaluated to that specific value. Each row represents a unique value.

Testing the FactoryTalk View Studio ME Animation Through RSLogix 5000
Now that we have the animation property in place, we can tie a tag into the experession (already compled above) & see if the object changes. By creating simple PLC logic based on the XIC Instruction as well as a MOV Instruction, we can simulate conditions which will occur in our code & transition the object between states. the image below showcases the transition of our motor into a StatusInt = 1 which fills the motor image with a green color.

Leveraging Multiple Images Through Visibility
The method of using the “Visibility” property of an image can be compared to a “gif” file. In other words, a PLC based tag is used to create a sequence of images & make it seem like there’s animation on the screen. The reality is that images are being exposed based on certain logic.
The advantage of this method over the “Fill” property is that it’s much more versatile in nature. You may choose to add an image with a shade, different gradient or to change to a new image altogether. The drawback is that changing images takes more memory for the application which means that you can’t have as many transitions as you would with the “Fill” property. Make sure to be aware of this limitation and choose accordingly. The rule of thumb is that if you can get away with just a color change, use a “Fill”. If that’s not possible, leverage the “Visibility” property to animate the abject.
The object we’re working with has 4 separate images layered on top of each other. Each image represents a key on the keyboard. Through thevisibility property, the programmer may animate the sequence and make it seem like a different key is being displayed. Here’s the logic for the first image:
Note that this method is slightly more tedious as the programmer will need to set a different value for each image; it’s not possible to create this from a single menu option. Each image should have a unique identifier upon which the property will draw the visible object.
Conclusion
Animating FactoryTalk View Studio ME & SE based objects isn’t complicated. However, the technique isn’t explicit and requires some planning. Today, we’ve covered two methods which leverage the “Fill” and the “Visibility” properties of an object. The fill method is much simpler to execute, but will only change the color of the object. The visibility property will allow a much more versatile animation, but will take a larger toll on the application as the count of images increases on a specific screen.
Leveraging these tools in FactoryTalk View will make your application much more appealing to the operators as well as your customers.
