HMI Design - Best Practices for Effective HMI Screens

HMI Design Introduction
HMI Design is the practice of building HMI screens that are intuitive to the end user, pleasing to the eye and are efficient to operate. As control systems within manufacturing are migrated from traditional push button designs to primarily operated from HMI displays, HMI Design has become trivial to any new installation.
Although there is a wide range of HMI based systems, the basic principles of good design remain the same. Different industries may dictate different patterns of layout for their systems, but the good practices remain.
HMI Systems - Choosing the Right HMI Hardware
HMI screens can vary in size, color, button availability and user inputs. We should explore each one of these parameters and go over their impact on the hmi design.
Screen Size / Color
Most Original Equipment Manufacturers (OEMs) offer HMI screens of different sizes. For example, the Allen Bradley PanelView 7 line has screens ranging from 4 inches to 15 inches in diagonal. Although the smaller screens will come at a much lower cost, it is important to note that they won’t be suited for designs that involve large systems or ones with a lot of detail.
![HMI Design - Terminal Selection [PanelView 7 Terminals from Allen Bradley]](https://cdn.prod.website-files.com/63dea6cb95e58cb38bb98cbd/6415d9eed18f1b3d646a8207_603ee828fe76d27f810ef268_PanelView7.jpeg)
Screen Size will generally dictate how intricate the HMI design can be. It is usually possible to migrate a design that was designed for a smaller screen onto a bigger HMI, but not the other way around. In other words, it’s not advised to shrink the elements designed for a larger screen; it’s always best to create additional pages that would break down the hmi screens.
Although OEMs do not typically restrict the number of elements on a specific screen, dedicated smaller screens generally have less RAM than larger ones. This leads to additional latency issues when a large number of elements are added.
Takeaways:
- Select a screen size that is appropriate for the system.
- Do not migrate an HMI design used on a larger screen onto a smaller screen; re-design individual screens instead.
On Terminal Push Buttons vs Touch Screen
Although these types of terminals are becoming less common, we still see Siemens, Allen Bradley as well as several other OEMs release HMI terminals that support push buttons. These push buttons enable a different HMI design that relies on these inputs. Furthermore, Allen Bradley still supports terminals on which the navigation is primarily accomplished through push buttons.
These terminals will have different configurations than pure touch screen counterparts. The reason is that you typically want to take advantage of these functionalities for navigation, key functions or otherwise. Therefore, the hmi design will differ.
Takeaways:
- Minimize the use of external push buttons for HMI controls; in our experience, it’s best to utilize the touch screen feature for all HMI designs.
- HMI programs that use physical buttons aren’t easy to migrate to touch screen ones. Plan your software accordingly.
User Inputs
HMI Terminals come in many flavors; we’ll explore them in much more detail below. However, it’s important to note that HMI terminals may utilize various devices as inputs to the terminal. These variations will impact the design and the overall layout of the terminal. An example would be the capability of an Allen Bradley PanelView Standard HMI being capable of a single PLC connection. The design may require the engineer to create a separate entry of the data through the same PLC. The tradeoff is that the HMI design will need to update at a different rate and monitor the connection; therefore, it may reduce the latency of the HMI terminal.
Other inputs may include communication protocols (RS232, EtherNet, PROFIBUS, ControlNet, DeviceNet,
Takeaways:
- A higher number of inputs will increase the price of an HMI. However, these inputs may be necessary for the system. We recommend going through the engineering design prior to making the decision of what to include.
-
Local vs Distributed
HMI Design will differ depending on the nature of the HMI terminal. A distributed solution will typically involve a much higher number of connections and areas. This will in turn dictate a larger number of tags to display, more screens to include and a difference in controls. Dense HMIs will be typically accessed using a keyboard and mouse while traditional, on machine HMIs, are accessed using the touch screen.
![HMI Design - Distributed SCADA / HMI Solution [Inductive Automation Ignition Platform]](https://cdn.prod.website-files.com/63dea6cb95e58cb38bb98cbd/6415d9eed18f1b14736a8203_603eeab0a78e809fc73902ed_IgnitionHMI.png)
Takeaways:
- The design of an HMI screen will differ depending on the structure of data used by the HMI. The design patterns will differ for a local machine HMI versus a distributed one.
HMI Design - Key Elements
As mentioned above, an HMI screen must be intuitive, easy to navigate and provide adequate control / view of the process. In this section, we’ll cover the key elements you will find on most HMI terminals, discuss their utility and best practices of HMI design for each one of those elements.
HMI Navigation Design
A typical HMI will host at least 10 different screens. From our experience, here’s a typical breakdown:
- Overview | The screen used to see the high level status of a process / area.
- Control | The screen used to change key parameters of a process / area.
- Settings | The screen used to change application / control level parameters.
- Area 1 - n | The screen used for a certain area of the process.
- Control Face Please | Pop-Up screens used to change / view certain setpoints of a specific device (Ex: motor, valve, pump, tank, etc.)
Based on the above, it is critical to design a navigation system that would make your HMI efficient. We approach our designs in one of two ways: “Shallow” vs “Deep”.
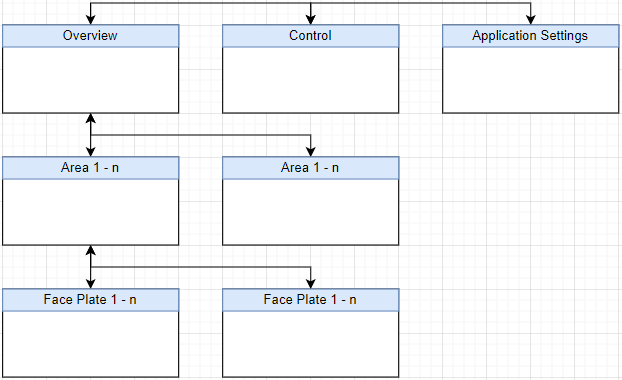
HMI Navigation - Shallow Design
A shallow HMI design will utilize the top level navigation as an access point to most elements. In other words, the user will access every screen of the HMI from the “Overview” screen. Here’s the nested layout of each screen based on this layout, followed by a small diagram.
> Overview
> Control
> Application Settings
> Area 1
> Area n
> Face Plate 1
> Face Plate n

HMI Navigation - Deep Design
A deep design will prioritize access to screens based on the top level screen. As the user drills down into each area of the process, they can navigate deeper into each screen, face plate and configuration menu. This HMI design prevents the user from navigating from one area to another without going back to the root menu The next layout, as well as the diagram are as follows.
> Overview
>>> Area 1
>>>>> Face Plate 1
>>>>> Face Plate n
>>> Area n
> Control
> Application Settings
HMI Navigation - Hybrid / System-Based Model
From our experience, sticking to a single paradigm covered above isn’t ideal. The layout of the navigation will be system dependent on and differ between systems. For example, it may be beneficial to navigate between areas from within those overview screens if they are related. Similarly, you may want to include certain face plates on the main screen if they are critical to the operation of the system.
HMI Navigation - Menu Design
Now that we have a general layout in place, we need to adhere to certain design principles of the navigation menu. We see a lot of poor designs and thus want to emphasize certain elements that you should take into account when building your menu.
1. Navigation Buttons
- Size: At least 2cm x 1.5cm on a touch screen system. Can be smaller on a mouse / keyboard controlled system.
- Color: Navigation items should be in a neutral color (ex: blue, green). The current page should have a highlight to let the user know where they are.

- Inaccessible Items: The menus that aren’t available to the current user due to permissions, access level or system status should be greyed out.

2. Layout, Position and Dropdowns
- Top vs Bottom Navigation: Both are acceptable practices. However, we’ve observed that operators that utilize the HMI using their fingers tend to push other buttons if the navigation is located at the top. Therefore, we recommend using bottom navigation bars in a machine based system and top navigation in a distributed mouse / keyboard controlled system.
- Side Navigation: A number of applications have been designed using side navigation. Although this layout may work in web-design, it’s not widespread in manufacturing. We recommend to stay away from this design pattern at this time as it is not intuitive for most operators.
- Drop-Downs: Navigation items that expand need to be labeled as such. We recommend using a “>” symbol on every button that is used as a drop down. Furthermore, these items need to be non-clickable on their own unlike the items we see in many web designs.
HMI Display Design
An HMI display can be as complex or as simple as the system dictates. From our experience, a single HMI screen, or display, should provide the information necessary, but not overwhelm the operator. A complex system must be broken down into subsystems if it requires a wide range of tags. A physical layout of the control system can be utilized for HMI design.
Example: Food processing manufacturing plant HMI design
Step 1 - Plant Overview
- A high level status of each area and critical assets.
Step 2 - Area Overview / Control
- An Area overview screen for each manufacturing zone: production, packaging, refrigeration.
- A control scheme that allows the user to set high-level parameters for each production area. Ex: temperature, production rates, etc.
Step 3 - Line Overview / Control
- Each production / packaging line should have a high level overview screen from which the user can see the status of each asset, start / stop the line and adjust parameters of an asset.
Step 4 - Asset Overview / Control
- Each asset on a production line (case packer, filler, palletizer, barcode scanner) should have an overview and control screen. These screens allow the operators to monitor the status of the asset and change granular parameters such as the size of the case, the speed of each motor, etc.
Using HMI Faceplates
As discussed above, faceplates are an excellent way to create an interface for a wide range of elements on an HMI screen. These elements can be motors, valves, pumps, and more. A faceplate can be designed as a pop-up that is brought on top of the main screen as needed. Such design allows the programmer to create an interface where the operator can monitor the data on the main screen while making adjustments to a secondary screen.
Ex: as the operator looks at the main line overview screen, they may choose to adjust the speed of certain conveyor belts to slow down production downstream.
- Position: we typically recommend to center the faceplates within the parent screen. However, there may be exceptions in which the parent screen elements are hidden.
- Size: we typically recommend making the pop-up screen half the size of the parent screen. However, this depends on the requirements of the system they’re used in.
Conclusion on HMI Designs
An HMI Design requires the engineer to consider many aspects of hardware and software. The goal is to deliver an experience that is intuitive, efficient and system specific. When choosing an HMI terminal, it's important to consider the requirements of the protocols, the features of the hardware, and system parameters. When creating HMI screens, the user must consider the navigation layout and the screen layout before designing the system. The navigation will dictate how the user moves between the various screens while the screen design will dictate how efficient the usage will be.
HMI design is an art. However, it does follow multiple base principles that can be seen across different industries.
