HMI / PLC Fundamentals - Linking Studio 5000 Tags to a PanelView Plus 1000 HMI Terminal Tutorial

Introduction
In this tutorial, we will be covering the process of establishing a link between a PLC running v30.11 firmware and a PanelView Plus 1000 HMI Terminal running v5.10 firmware. This is a very important process in creating an HMI application and allowing the engineer to control PLC based tags from the HMI terminal.
The tutorial is broken down in several sections, but we will be going back and forth between the Studio 5000 and FactoryTalk View Studio ME interfaces as we move forward.
At the end of this tutorial, you should have a connection between the two software packages mentioned above and as they are downloaded to their respective hardware, a connection will be established and the user may use the HMI to control a process established by the PLC.
FactortTalk View Studio ME – Communication Setup
At the start of every FactoryTalk View Studio application, we need to specify the link which specifies the IP address of the PLC to which we will be talking. This configuration can be found through FactoryTalk Linx within the “Explorer” window in a new or existing application.
Note: FactoryTalk View Studio will configure FactoryTalk Linx which will be running on the terminal. This instance of Linx is separate from the RSLinx running on your personal computer. Do not confuse the two.
Within the Communication Setup, you will need to add your PLC to the communications tree and specify a name which will be used for tags.
- Verify that your PLC is displayed under a communications driver. If that’s the case, you can select it.
- If the PLC is not listed, you will need to right-click the appropriate driver and create a new PLC instance based on what you’re working with. In the example we’re working with today, a 1769-L24ER-QB1B CompactLogix PLC is used.
- Once you can locate the PLC in the tree, highlight it.
- Within the “Device Shortcuts” window, click on “Add”.
- Give your PLC a short name. In the example we’re working with, the name given to the PLC is “TestPLC”.
- Click on “Apply”.
- Click on “Copy from Design to Runtime”.
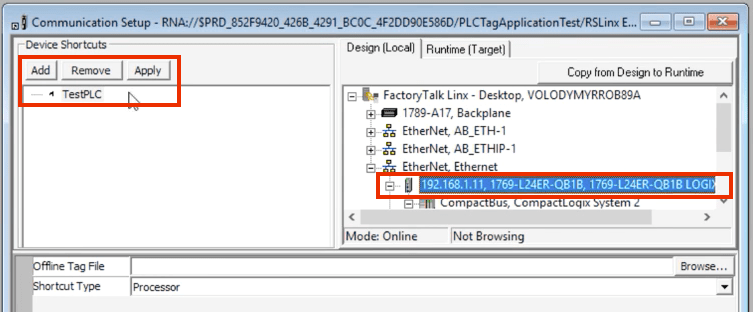
Note 1: For a CompactLogix PLC you should select the top level PLC instead of the drilled down version through the backplane. For a ControlLogix PLC, the opposite should be selected. Drill down through the backplane and select the PLC unit.
Note 2: The “Copy from Design to Runtime” button applies the same settings to the “Runtime” tab. This feature is used when the test PLC is located on a different network than it will be in the production environment. In most cases, the networks will be the same.
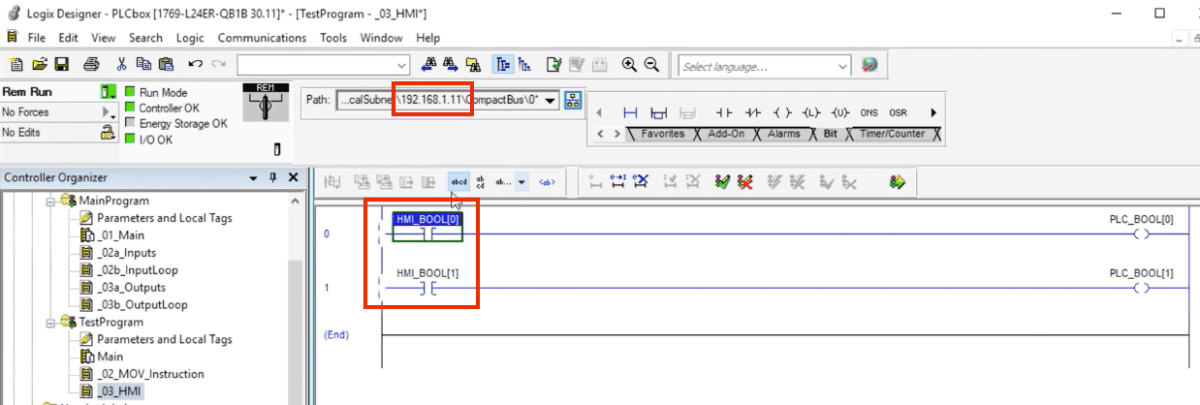
Studio 5000 – Creating PLC to HMI Tag Structures
On the PLC side, we will be using Studio 5000, as previously mentioned, to create our program. We need to have a tag structure before we start linking from the HMI. It’s possible to pre-link the tags prior to having the program, but you won’t be able to link them through the “online” feature in FactoryTalk View Studio.
The tag structure shown in the example is straightforward; it’s an array of booleans and is labeled as HMI_BOOL[0]… The HMI application will toggle these bits and read some of them back for display purposes.
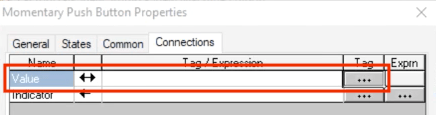
FTView Studio ME – Adding the Tag to the Momentary Push Button
Now that we have created our tags, we need to populate them within a push button Connection window. Here’s the procedure to do just that:
- Create a new push button object (or anything else you’d like to link).
- Launch the “Properties” menu of the object.
- Navigate to the “Connections” tab.
- Click on the “…” under the Tag column for the “Value” modifier.
At this point, you should have a “Tag Browser” window appear on your screen. This window allows one to select the appropriate tag for the Value property as well as many others for the objects within FactoryTalk View Studio. The “Tag Browser” can also be found on the left-hand side Explorer window without being linked to any specific tag.
At the top level, you should notice the HMI. Right-clicking the object and selecting “Refresh All Folders” should display a section labeled as the name of the PLC. Expanding this section will reveal another folder labeled “online”. Within this folder, one should be able to find the appropriate tags we had previously configured.
- Navigate to the proper tag.
- Verify that the string within the “Selected Tag” is what you’d expect.
- Click on “Apply”

Note 1: If you don’t see the “online” folder, you may have a problem with your communication setup. Make sure that the PLC, as well as the computer, are on the same network, all the network cables are working, etc.
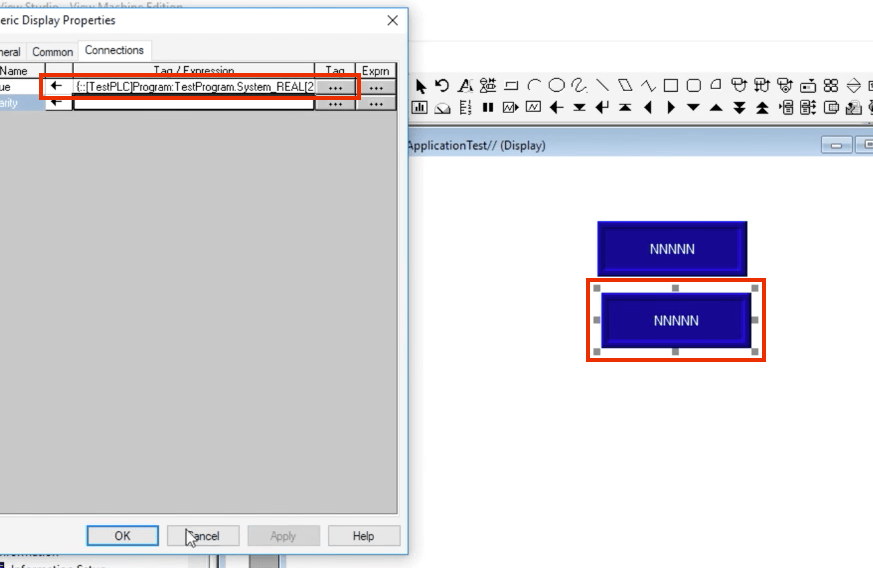
FTView Studio ME – Reading REAL Data from the PLC
Sending data from the PLC to the HMI requires the same setup as the above. The only difference is that we’re using an output object, numeric display, as the target.
Add a new object to the screen and follow the same procedure as we did before to set up the tag links.
Conclusion
Knowing how to establish communications over EtherNet from your PLC to the HMI is critical. The method outlined above is used in plants all over the world to send data in a reliable fashion for operator controls. Once learned, the same procedure can be reapplied to all the subsequent PanelView monitors you’re working with.
