Raspberry Pi Ignition Edge Installation | Industrial SCADA Inductive Automation Tutorial NOOBS IoT

Introduction
SCADA & HMI applications allow the users to interact with a PLC and analyze the data of a system. These technologies have been quickly evolving over the years & have become an integral part of the manufacturing floor. As control systems, we must have expertise in this area.
There are many solutions when it comes to SCADA. Rockwell, Siemens, GE, ABB, Inductive Automation and many other players have an offering in this field. Although they’re different in their implementation, the principles remain the same and can be leveraged from one platform to another.
In most of our tutorials, we’ve leaned toward Rockwell Automation and their FactoryTalk View ME/SE platform for SCADA & HMI development. Although they’re excellent offerings, the barrier to entry for learning purposes is high. The hardware and software costs are high thus making these systems difficult to learn outside of a work environment. On the flip side, Inductive Automation, has an excellent platform called Ignition which provides an unlimited two hour trial that can be reset indefinitely.
In this tutorial, we will be kicking off a series on Ignition Edge which is an IoT Edge platform for Ignition and can be installed on a Raspberry Pi. We will go over the hardware as well as software requirements and all the steps necessary to install everything on the Pi.
Raspberry Pi Hardware Requirements
1. We will need a few components in order to get Ignition Edge installed. The most obvious component is a Raspberry Pi. At the time of this tutorial, it’s recommended to purchase the 4GB of RAM Raspberry Pi as Ignition Edge can utilize more or less memory based on the application. That being said, the 1GB Raspberry Pi will be just fine.
Amazon Links

2. Based on the heat dissipated by the Raspberry Pi and the fact that Ignition Edge will typically run at all times, it’s recommended to purchase the heat-sink & fan combo for the board.
Raspberry Pi Heat-Sink, Fan & Enclosure
3. We will need an SD Card to store the Raspberry Pi OS as well as the Ignition Edge Software. 16GB should be plenty, but if you plan on installing a local database, it’s recommended to invest in more space.
4. Other Industrial Equipment such as an EtherNet switch, 5VDC Micro-USB Power Supply, EtherNet RJ45 cable & an HDMI cable are needed.
Step 1 – Installing NOOBS onto the SD Card
Step 1.1 – Download NOOBS
NOOBS stands for New Out of the Box Software. It’s the operating system installer which contains Raspbian, the OS of a Raspberry Pi. You can download NOOBS from the official Raspberry Pi website here: NOOBS Download. It’s recommended to use the “Offline and network install” file as we’ve personally experienced issues with network interruption while installing the other version.
Step 1.2 – Format the SD Card
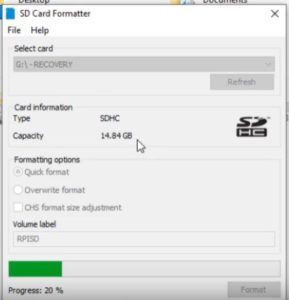
The SD Card we’ve selected for our project must be formatted prior to installing NOOBS onto it. The format of the SD Card MUST be FAT32. If the format is incorrect, the software will not be read properly. The software of choice for this step is “SD Card Formatter”; it’s a simple tool available for Mac and Windows. Download here: SD Card Formatter.
Once downloaded & installed, launch the SD Card Formatter, select the right destination & format your card. Note that this process will erase all the files on the SD Card; create a backup before formatting.
Step 1.3 – Transferring NOOBS onto the SD Card
Now that the SD Card has been formatted, Unzip the contents of the NOOBS archive onto the SD Card. You may also Unzip into a local folder and transfer the files onto the SD Card.
Step 2 – Installing Raspbian onto Raspberry Pi
Step 2.1 – Preparing the Hardware
Install the SD Card in the Raspberry Pi. Connect a Keyboard, Mouse & a Monitor to the Raspberry Pi. Lastly, place the Raspberry Pi on a secure surface and install the power cable. Make sure not to touch the components of the Raspberry Pi while it’s running as the board may be sensitive to static electricity. As mentioned above, secure the Raspberry Pi into an encosure if possible.
Step 2.2 – Install Raspbian
Once powered-on, the Raspberry Pi will go through a boot sequence and land on an installation manager. This window will allow you to install Raspbian. Chose the option & give the board 10-30 minutes to finalize the install. Do not power-down the board during this time as this will stop the process and may corrupt the files.
[Optional] Step 2.3 – Set Static IP
In most real-world scenarios, Ignition Edge would be deployed into the field on a device with a fixed IP address. This simplifies network infrastructure and provides a secure path between components. The Raspberry Pi has two interfaces: Wireless and Physical. In our case, we’ve setup the device to use the wireless connection to connect to the internet and the physical interface to connect to the private PLC network. Here are the steps to give the Raspberry Pi a static IP address:
- Launch the command terminal
- Open the “dhcpcd.conf” file with the following command:
- sudo nano /etc/dhcpcd.conf
- Scroll down to the section labeled as “#static IP configuration”
- De-comment the IP address by removing the “#” at the start of the line.
- Change the IP address to match your network configuration.
[Optional] Step 2.4 – Install a Remote Dektop Client
The Raspberry Pi requires a separate keyboard, mouse and monitor until you’ve setup a remote desktop application through which you can control the device. Out of the box, there’s a software package available to do so, but it’s highly restrictive. Here are the steps to take in order to install a proper package for remoting into the Raspberry Pi.
- “sudo raspi-config”
- Set the Enable Boot to Desktop” to “Desktop Log-In as user “pi” at the graphical desktop”.
- Uninstall RealVNC through “sudo apt-get purge realvnc-vnc-server”
- Install XRDP through “sudo apt-get install xrdp”
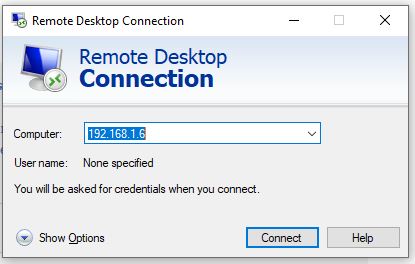
The device will have to be rebooted after the installation through the “sudo reboot” command or by using the menu. After the reboot, you may launch a remote connection from your main computer & enter the IP address of the Raspberry Pi to connect. The default login credentials are pi/raspberry.
Step 3 – Installing Ignition Edge onto Raspberry Pi
Now that our Raspberry Pi is ready and accessible through a Remote Desktop connection, we can install Ignition Edge onto it.
Step 3.1 – Downloading the Files
Ignition is available in two versions: Full and Edge. The full installation of Ignition is what would be deployed onto a production server in a manufacturing environment. Edge is the version which will typically reside closer to the field devices and provide a link to the main server. Although we recommend that you become familiar with both, Edge is extremely capable and plenty for practicing development.
You can find the right file through this link; make sure to download the ARM version for the Raspberry Pi.
Step 3.2 – Installing Ignition Edge
- Navigate to the “Download” folder with “cd Downloads”
- Unzip the downloaded file into a separate folder.
- “sudo unzip ./Ignition-Linux-…” Note: press tab after you’ve typed in the start of the name; Linux will complete the name as it changes with the version.
- Allow the Pi to complete the installation.
Step 4 – Launch & Access Ignition
Step 4.1 – Launch the Client
- Navigate to the folder you’ve unzipped your Ignition Edge into
- Issue the following command to make the files executable: “sudo chmod +x ignition.sh ignition-gateway gcu.sh”
- Start Ignition Edge with “sudo ./ignition.sh start”
Step 4.2 – Verify the Client
- Open “Chromium”, the Raspberry Pi browser.
- Launch http://localhost:8088
- If you’re presented with the login screen for Ignition Edge, everything has been successfully installed.
Conclusion
Ignition Edge is an excellent platform for SCADA & HMI development. It’s highly customizable, filled with features & provides the user with a full trial which is resettable indefinitely. From an automation standpoint, Ignition Edge is capable of pulling data from PLCs of different platforms, provides versatile graphics for HMI development and is able to process large quantities of data.
In this tutorial, we’ve kicked off the series on Ignition development and installed the required software onto our Raspberry Pi
