Understanding SCL Instruction Data Types and Tag Information

Introduction
If you want to get faster at PLC programming in the SCL language, in addition to practicing over and over, you need to know some tricks to level up your speed beyond what it is now. To do this, you can learn how to surround program code with structural elements and be aware of SCL instructions data types and how to modify them, especially in IEC timers and counters. Also, by reading this tutorial, you will learn how to display and hide tag information in the SCL editor to evaluate your application code while typing it to speed up your programming.
Prerequisites
What you will need to follow along with this tutorial are
- An installation of TIA Portal software on your computer. The TIA Portal version 16 will be utilized in this tutorial; however other TIA Portal versions are also acceptable.
- An understanding of how to create an SCL block in the TIA Portal.
- An understanding of SCL Elements, and
- An understanding of using SCL instructions.
Putting structure elements around program code
You can choose to use the following structure elements to enclose your program code:
- Ranges
- REGION
- Comment section
- /**/
- Control structures
- IF … THEN
- WHILE … DO …
- FOR … TO … DO …
- CASE … OF …
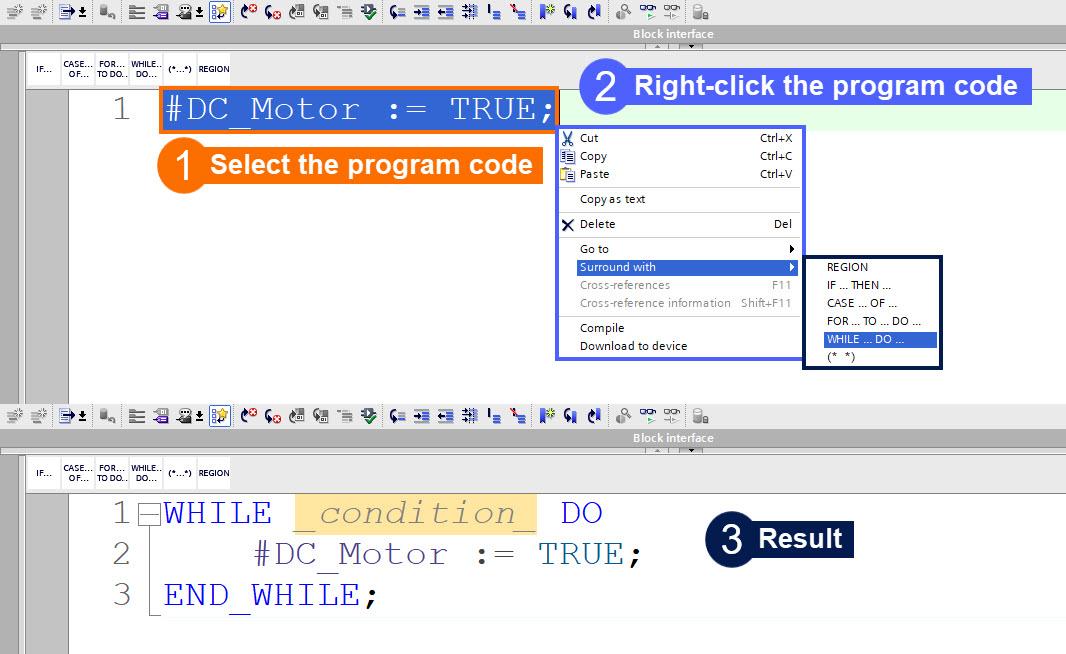
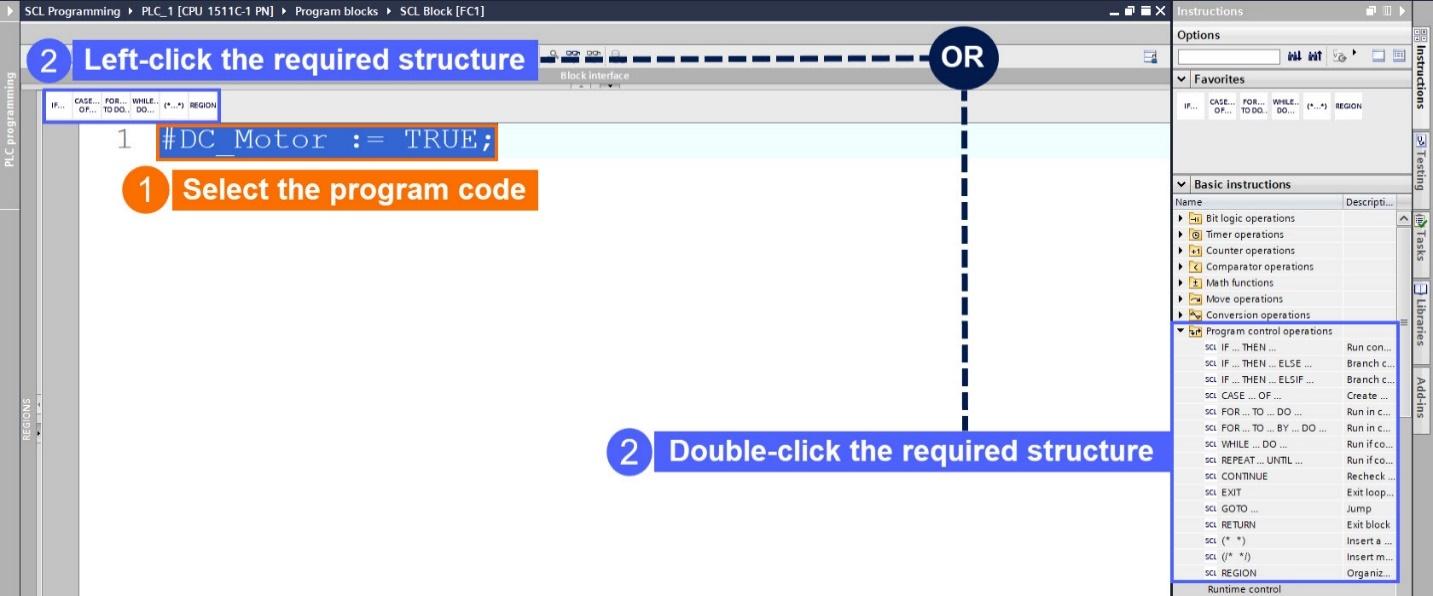
To encircle your application code with a structure element, do the following:
- Specify the program code you want to be surrounded by a structural element.
- Right-click on the chosen application code.
- When the shortcut menu appears, under "Surround with," choose the needed structure element.
- As an alternative, you may choose the required structure element from the "Favorites" section or the "Instructions" task card in the "Basic instructions > Program control operations" pane.
Basic details on the SCL instruction data types
The SCL instructions you use for block programming compute function values using certain data types. Particular SCL instructions can only be used with a specified data type. These instructions cannot be altered in terms of data type. However, most SCL instructions allow for the usage of several data types. You can distinguish between the following two categories of such instructions:
- Instructions for which the data type of the input parameters determines the data type of the function value. It is correct for the majority of instructions.
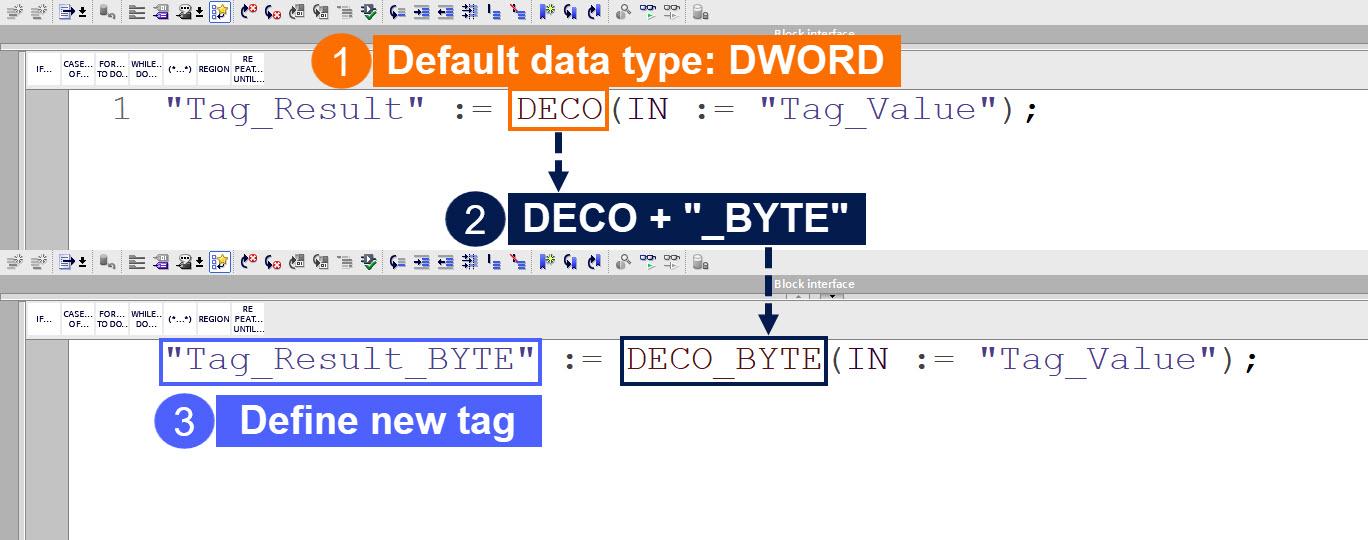
- Instructions that use the default data type, as listed in table 2.1. If the default data type is incompatible with the input parameter's data type, you will need to modify it. The following syntax can always be used to alter the data type: _<data type>
Instruction
Default data type
CEIL
DINT
DECO
DWORD
FLOOR
DINT
NORM_X
REAL
PEEK
BYTE
SCALE_X
INT
TRUNC
DINT
CONCAT
STRING
T_DIFF
TIME
Table 2.1: List of instructions that use the default data type
Changing the data type of an SCL instruction
The steps to add an SCL instruction and modify its data type are as follows:
- Use the drag-and-drop method to add the instruction to the program where needed.
- The operands for the instruction must be specified. The input parameters are utilized to determine the data type of the function value, or the instruction default data type is applied.
- Include the "_<data type>" string after the instruction name. The "_<data type>" denotes the data type required for the instruction.
For example, you want to change the decode (DECO) instruction default data type. As you have learned from table 2.1, when you introduce the decode instruction into the program, data type DWORD is assigned as the default. To change the data type from DWORD to BYTE, modify the application code as shown in figure 3.1.
Modifying IEC timer and IEC counter data type
An instance data block is necessary for IEC timers and IEC counters, which are internal system function blocks. The instance data blocks can be created as single or multi-instance. Depending on the corresponding instruction, the data type of the instance data block is determined. However, depending on your needs, you may execute the instructions with various data types on the S7-1200 and S7-1500 CPU series.
If the newly configured data type of the instance data block differs from the data type of the input parameter, an implicit conversion is performed if feasible. You will get an error notice if the conversion is not possible.
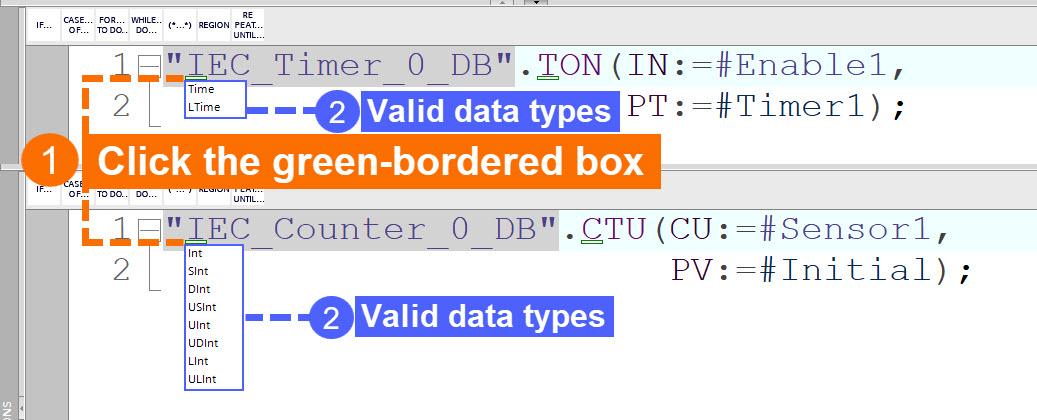
To alter the data type of an IEC counter or IEC timer instance data block, perform these steps:
- Open the block where the IEC counter or IEC timer is called. You will see a green-bordered box near the name of the instance data block.
- Left-click the green-bordered box, and the proper data types for the instance data block are displayed in a drop-down list box.
- Choose the data type you want.
Showing or concealing tag information
Whether the operands are expressed in symbolic or absolute form, you can display and conceal simple or hierarchical comments utilized to document global tags. The PLC tag table is where you can get this data.
You may view the tag information for all blocks or for particular blocks that have been opened. When you choose to show the tag data for all programming blocks, the tag information for every block that is open right now and every block that will be opened in the future is displayed.
You can re-hide the tag information at any moment. If the tag information has been hidden for all blocks, you may re-display it for particular ones you have opened.
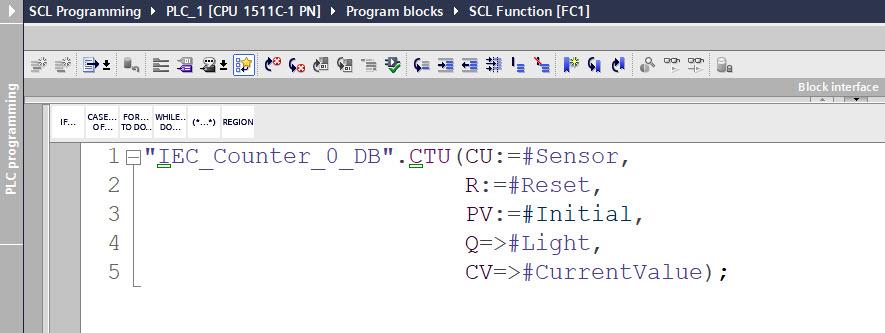
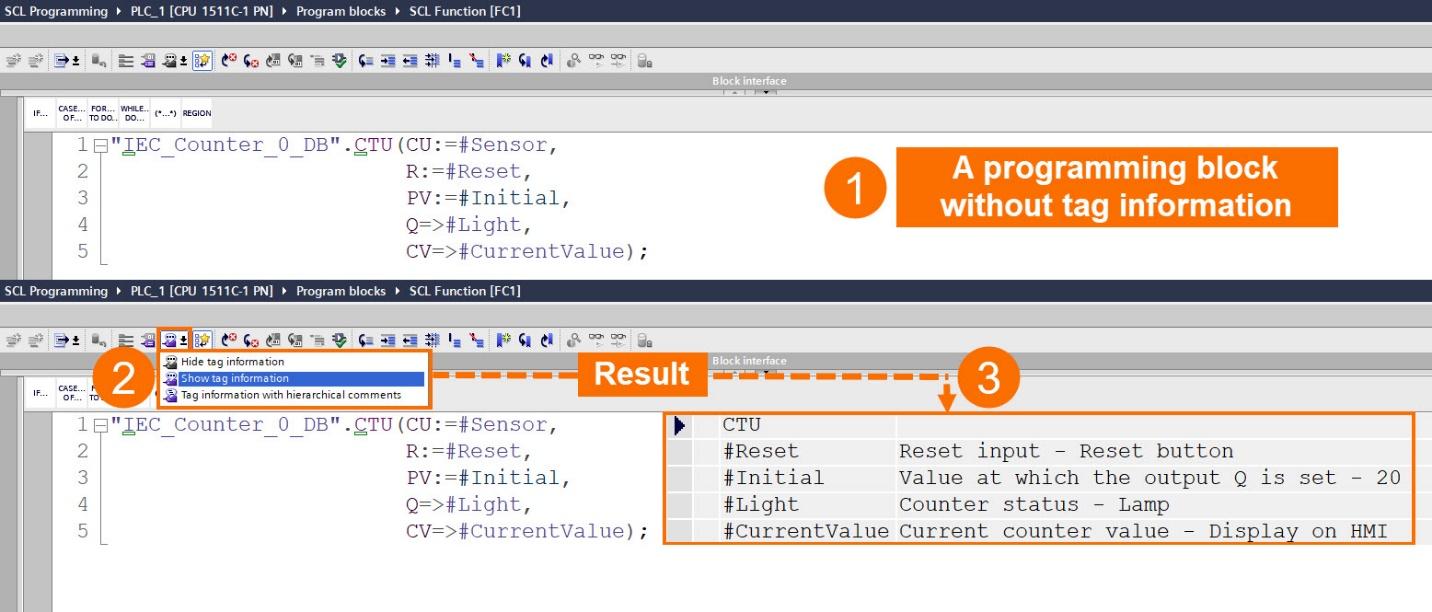
You can understand from figure 5.1 that this programming block (SCL Function [FC1]) doesn’t show tag information.
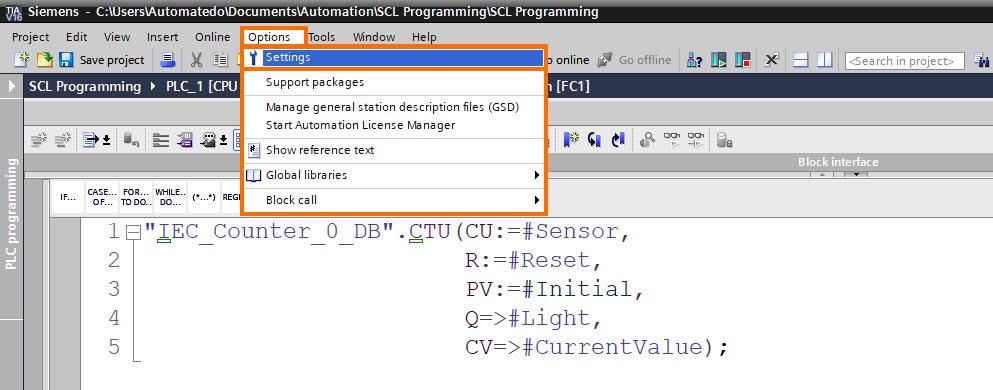
To show or conceal the tag information for all blocks, follow these steps:
- Choose the "Settings" item from the "Options" menu. By doing so, the "Settings" window appears in the workspace.
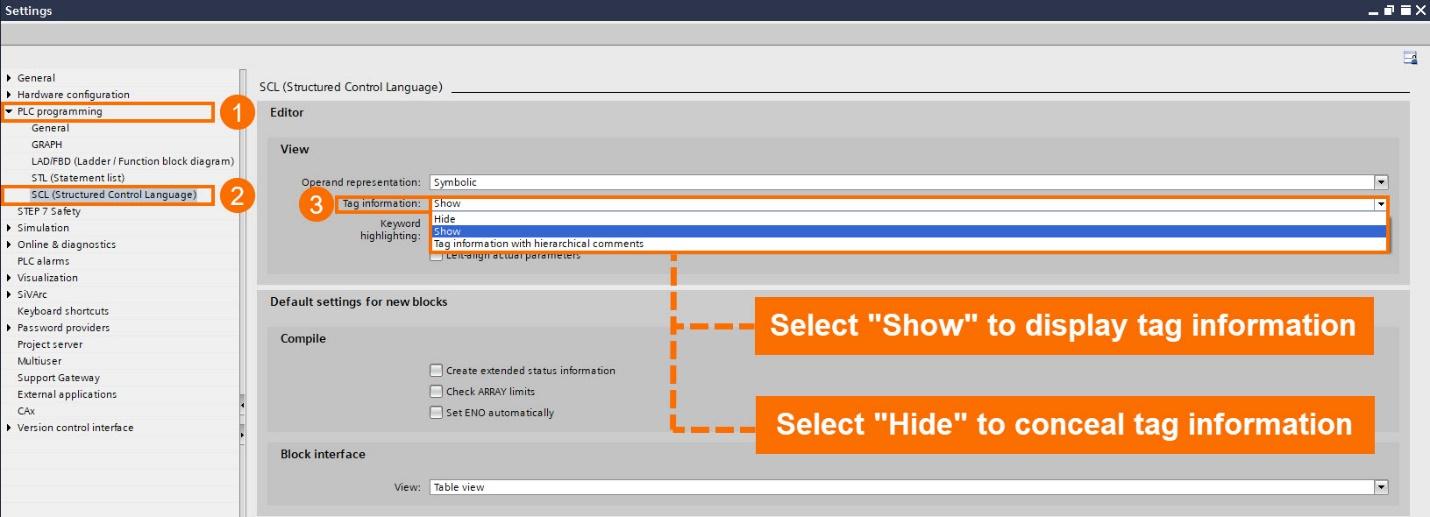
- Choose the "PLC programming" group from the area navigation on the left pane and select the SCL item.
- If you wish to reveal the tag information (display simple comments), pick the "Show" option in the "Tag information" drop-down list.
- To conceal the tag information, use the "Hide" option from the "Tag information" drop-down list.
As a result, all blocks have their tag information displayed or concealed. When you access the blocks from now on, the tag information is displayed or concealed based on the chosen configuration.

To display or conceal tag information for an opened block, follow the instructions below:
- If you want to display simple comments (show the tag information), choose the "Show tag information" item from the drop-down selection that says "Shows the tag information". You can find it in the SCL editor toolbar.
- Choose the "Hide tag information" item from the "Hides the tag information" drop-down list if you wish the tag information to be hidden.
Parameter list expansion and reduction
In SCL, when you add instructions (or block calls) that are system-internal function blocks, the syntax and the parameter list are added to the SCL program, along with placeholders for the actual parameters. When you modify other instructions, the optional parameters that are not utilized are deleted from the parameter list to facilitate the reading of the program code. These optional parameters are always restorable. Once you have completed assigning the parameters, you may also consciously minimize the list of parameters.
For example, when you insert a timer on-delay (TON), an IEC timer, to the SCL program, you decide to add tags to necessary parameters only (IN and PT parameters) and leave optional parameters unassigned (Q and ET parameters).
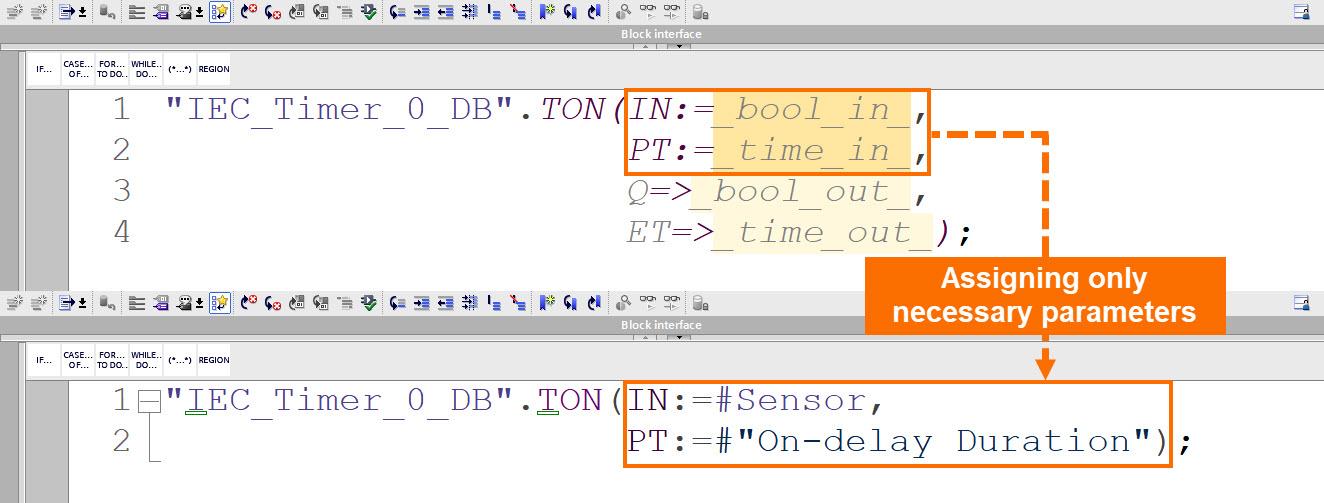
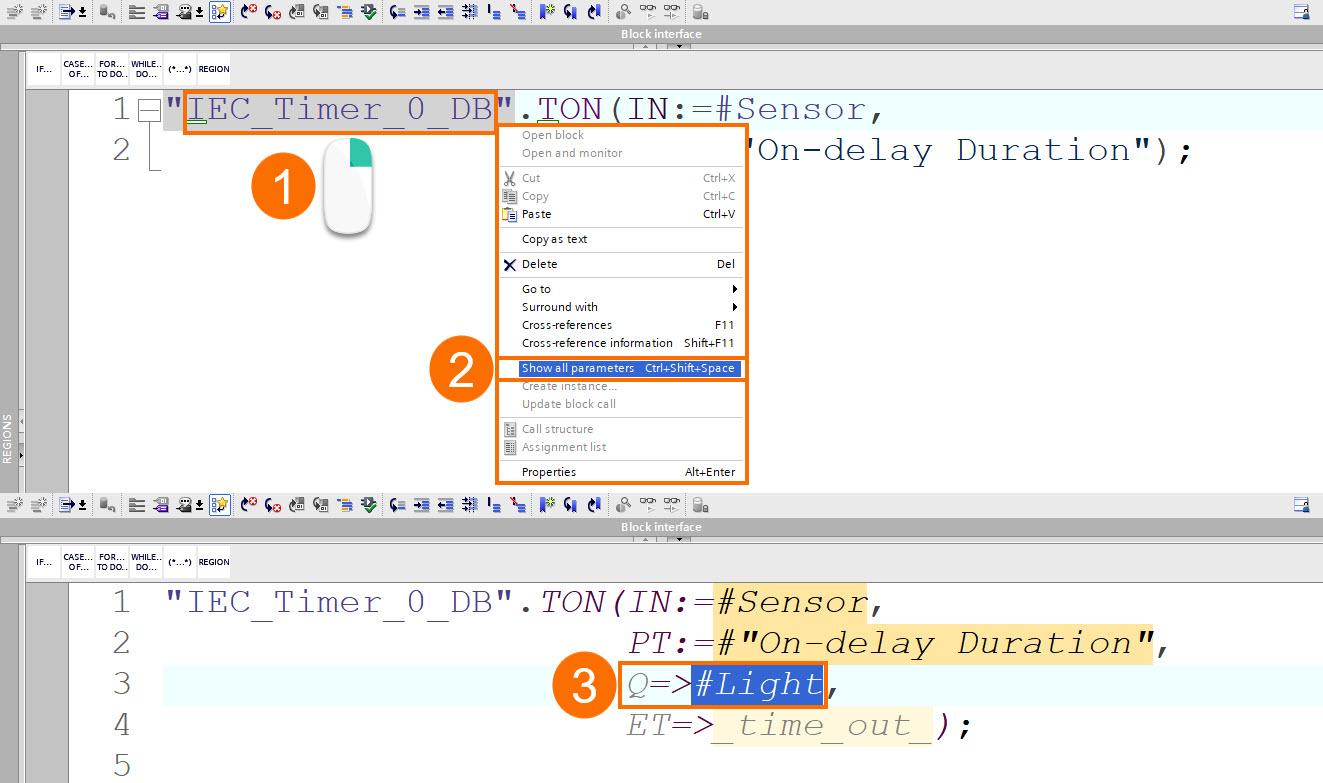
Based on the application you program for, if you want to turn back to your timer instruction and assign a tag to your Q parameter, do the following steps to expand the parameter list first:
- Right-click on the instruction or a block that is called.
- Choose the item "Show all parameters" from the shortcut menu or use the sequence key <Ctrl+Shift+Space bar>. The parameter list is once more shown in its entirety. Now, you can add a tag to the Q parameter as intended.
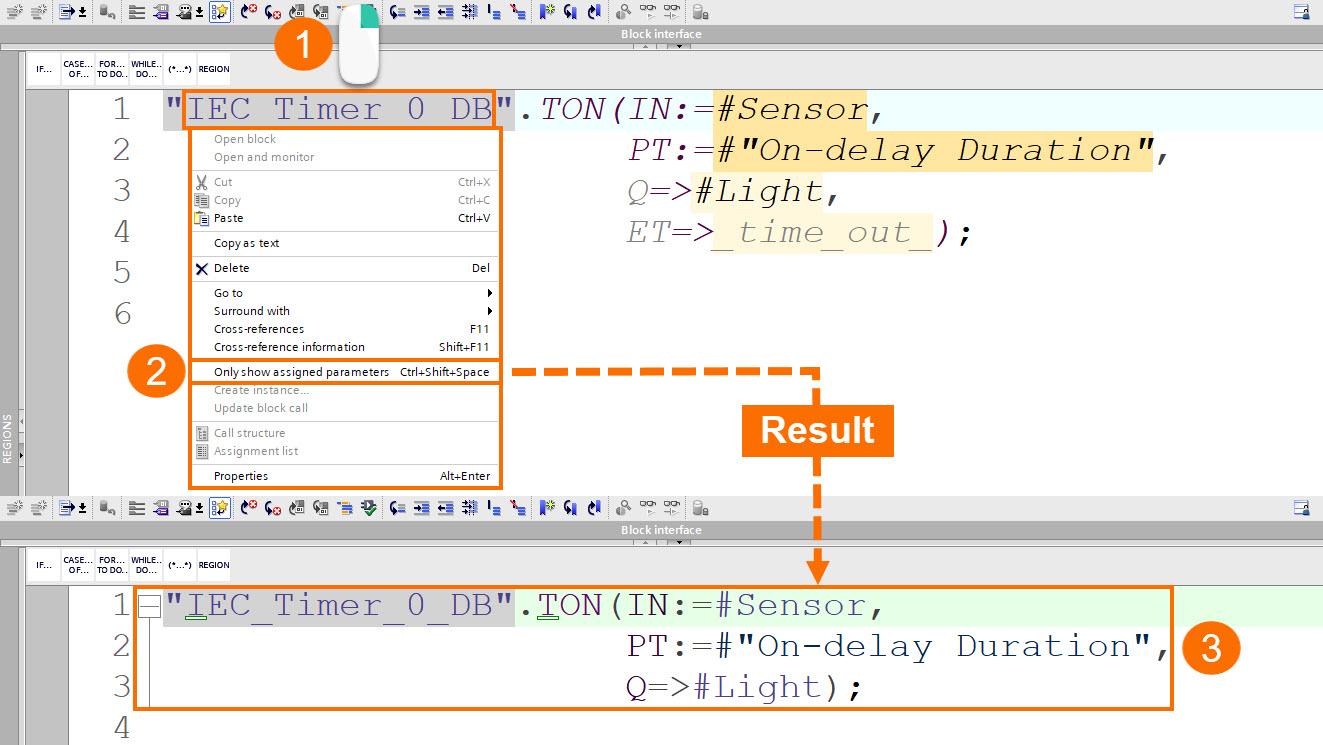
When you are done assigning tags to the parameters, take the following actions to condense the parameter list:
- Right-click on the instruction or a block that is called.
- Choose the item "Only show assigned parameters" from the shortcut menu or use the sequence key <Ctrl+Shift+Space bar>. All optional parameters that aren't utilized become hidden.
Conclusion
This tutorial discussed the tips that can be used to boost your programming speed in SCL. You learned what types of structure elements (ranges, comment sections, and control structures) use to surround the program code.
Also, you got familiar with the basic details of SCL instructions data types: Instructions that use the default data type and instructions for which the input parameters data type determines the data type of the function value. In continuation, you learned how to modify the data type of an SCL instruction using the "_<data type>" syntax.
Finally, you understood how to display and hide tag information for programming blocks. And you learned how to expand and reduce the parameter list so you can debug your application code while you are typing it in the SCL editor to finalize your PLC programming much faster.
