Understanding and Using SCL Regions in TIA Portal

Introduction
You may need to structure your program code in regions when programming PLCs using an advanced language such as SCL. It helps you not only to enhance the clarity of your code but also enables you to troubleshoot your code more efficiently.
Prerequisites
What you will need to follow along with this tutorial are:
- An installation of TIA Portal software on your computer. The TIA Portal version 16 will be utilized in this tutorial; however other TIA Portal versions are also acceptable.
- An understanding of how to create an SCL block in the TIA Portal.
- An understanding of SCL Elements.
- An understanding of using SCL instructions
Utilizing regions
SCL allows you to organize your application code into regions. It makes your program more understandable since you may combine relevant elements of the program and can collapse and expand regions as required.
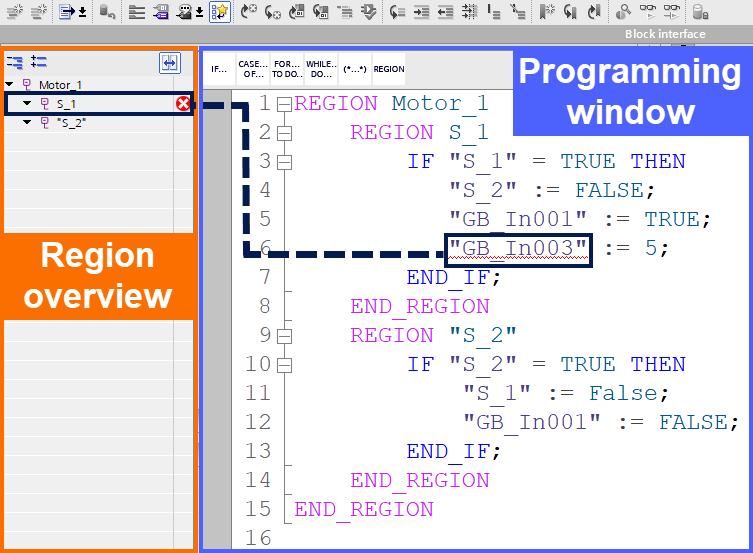
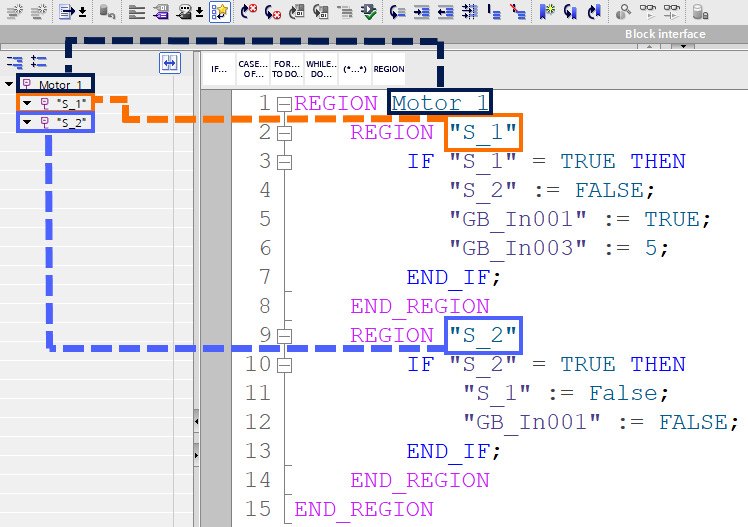
For quick navigation within the regions, a region overview is accessible. The region overview is shown adjacent to the program window and can be presented or concealed as desired. The region overview also displays the regions with syntax mistakes. It helps you to go to incorrect code spots rapidly and correct issues.
The programming window and the region overview are displayed in figure 1.1.
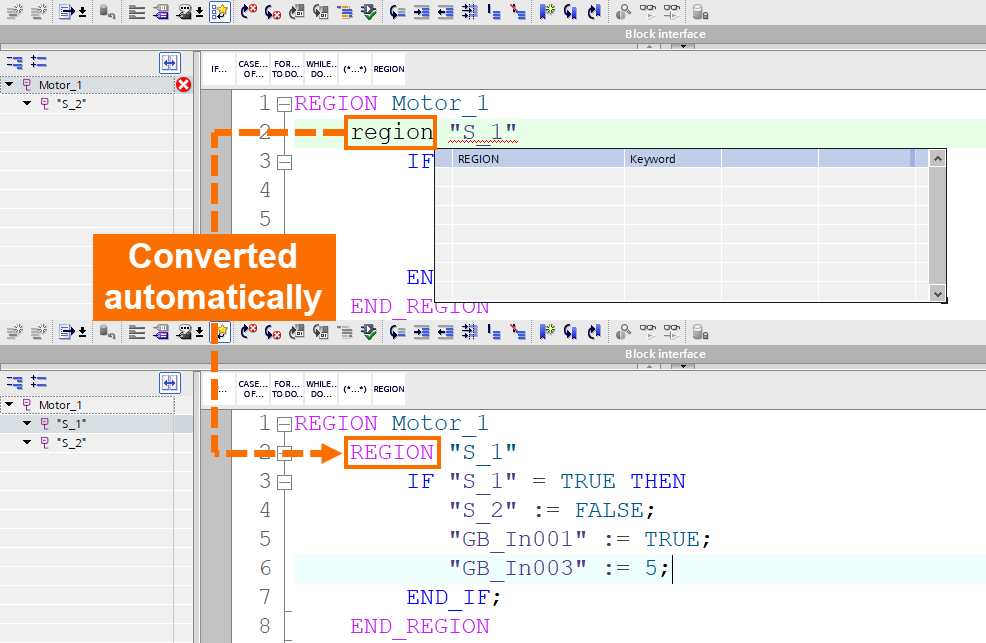
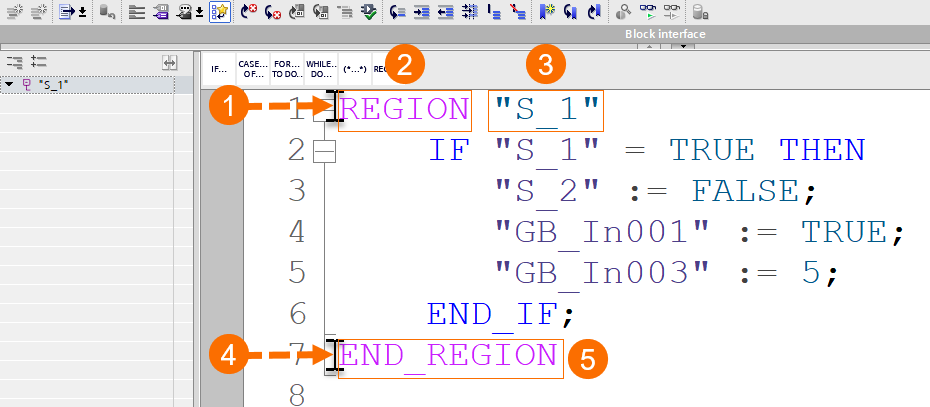
Include the keywords "REGION" and "END_REGION" around a program segment to summarize it for a region. The keywords notation can also be "region" and "end_region" or "Region" and "End_Region", depending on your preferences in the keyword highlighting. The keywords are automatically transformed into the notation that fits the present configuration.
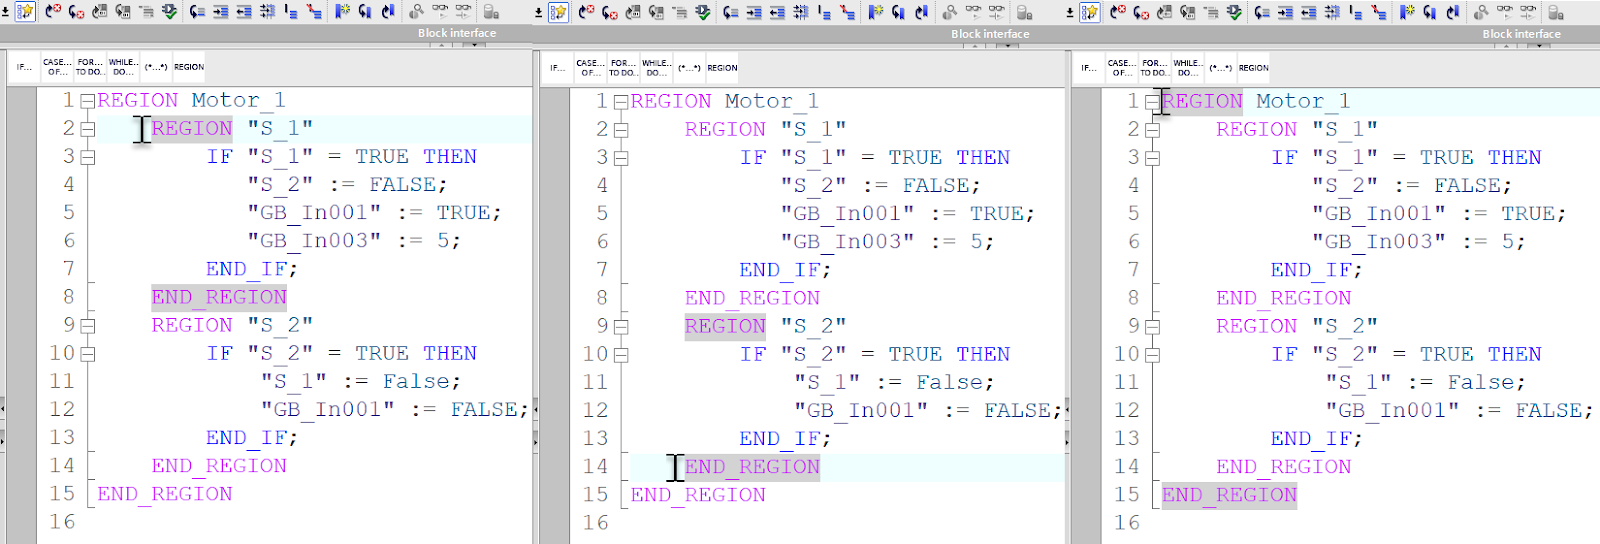
Click either "REGION" or "END_REGION" to locate the "REGION" and "END_REGION" keywords that go together. As a consequence, both terms are highlighted in color.
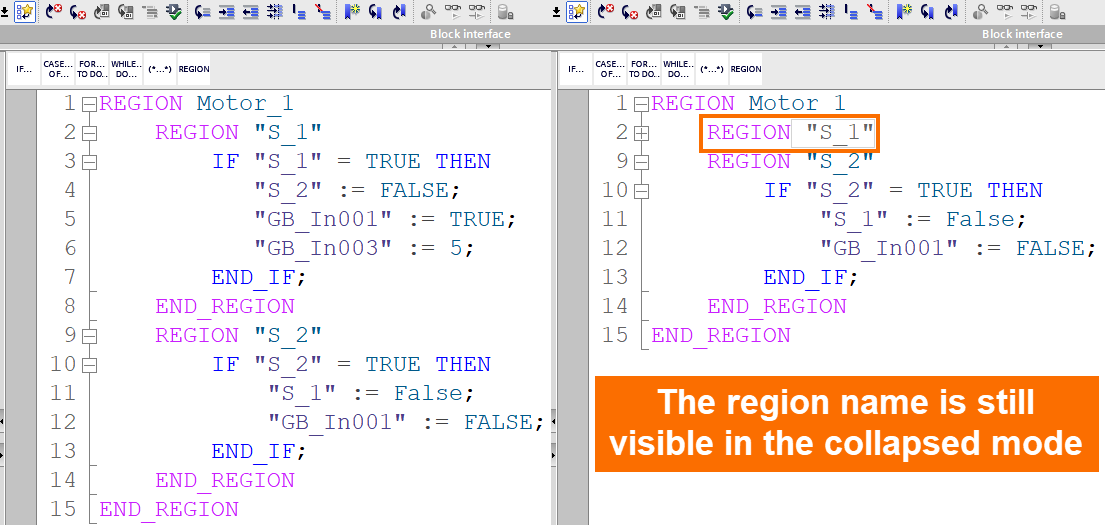
It is possible to name each region (although it is optional to provide a name). It offers the following benefits:
- When a region is collapsed, the name is still visible. It enables you to maintain your program code overview.
- You can recognize the regions in the region overview more readily and go to particular regions.
- The name can be translated into additional project languages if it is added as a multilingual comment. To accomplish so, use the character strings "(/* " and "*/)" to enclose the name. However, you may only add the name as a multilingual comment or as a name that cannot be translated. Keep the following in mind:
- Combining real names and names used as multilingual comments is not allowed.
- As a multilingual comment, the name cannot span several lines, and
- Regions with a multilingual comment as a name can also be copied. If there are already translations for this, they are likewise used for the region's copy. If you modify the region's name, it will be modified in the editing language now in use.
To merge the program components into regions, use the following syntax:
REGION <Name> or (/*<Name as a multilingual comment>*/)
<Instructions>
END_REGION
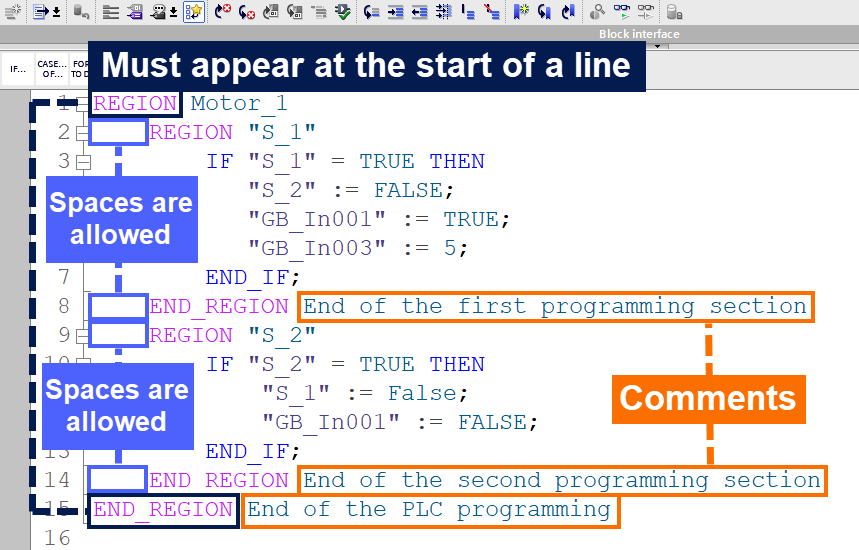
When employing regions, keep the following details in mind:
- The keywords "REGION" and "END_REGION" must appear at the beginning of a line.
- Before the keywords, only spaces are permitted.
- Any characters that follow the keyword "END_REGION" are regarded as comments and, as a result, have no impact on how the program is carried out.
- Throughout a region, all instructions must be completed.
- Regions can be used to surround instructions within CASE statements. However, the constants used for CASE statement comparison must exist outside the regions. There cannot be several branches covered by the regions. The following example demonstrates the proper usage of regions within a CASE statement:
CASE <Expression> OF
<Constant1> : REGION <Instructions1> END_REGION
<Constant2> : REGION <Instructions2> END_REGION
ELSE REGION <Instructions0> END_REGION
END_CASE
The following examples demonstrate the prohibited usage of regions within CASE statements:
CASE <Expression> OF
REGION <Constant1> : <Instructions1> END_REGION
<Constant2> : REGION <Instructions2> END_REGION
ELSE <Instructions0>
END_CASE
-----------------------------------------------------------------------
CASE <Expression> OF
<Constant1> : <Instructions1> REGION
<Constant2> : END_REGION <Instructions2>
ELSE <Instructions0>
END_CASE
In the above examples, constants within a region are treated as jump labels that may be reached with GOTO but are not considered by the CASE statements.
Additionally, you have the choice to nest regions. However, ensure that regions inside other regions are finished correctly.

Adding regions
You can add regions to your program code in the following ways:
- You may manually insert regions using the keyboard.
- Through the "Instructions" task card, you may insert regions. You may either enter blank regions or enclose the current program code in regions.
Manually adding regions with the keyboard
Follow these methods to manually insert a region into your application code using the keyboard:
- Set the cursor where you wish to insert a region.
- Type the word "REGION" here.
- Enter the region's name as a standard name or multilingual comment. It is an optional step.
- Set the cursor to the region's end.
- Type the word "END_REGION" here.
As a result, the related program code is integrated into a region that you may expand and collapse. The region overview includes the new region. If you haven't given your region a name, it will be labeled "Unnamed" in the region overview.

Adding regions using the "Instructions" task card
Follow these steps to add a region to your application code using the "Instructions" task card:
- Set the cursor where you wish to add an empty region or choose the program code you want to enclose in a region.
- Open the task card labeled "Instructions."
- Go to "Program control operations > REGION".
- Drag the REGION to the location in your application code where you wish to introduce a region, or double-click to insert the REGION directive.

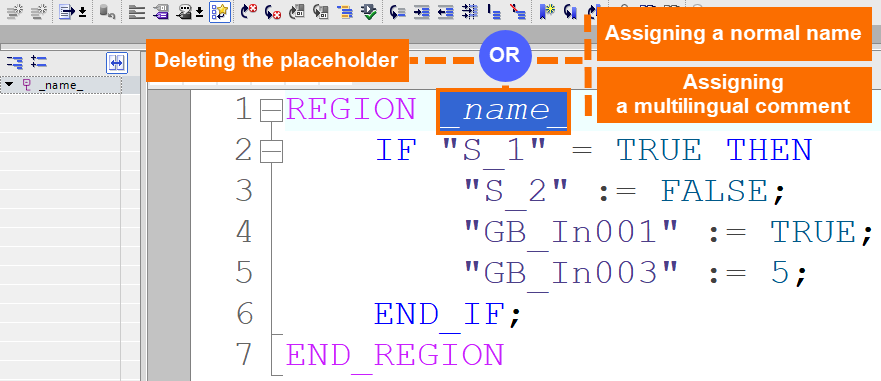
As a result, an empty region or a region enclosing the chosen program code is added. The placeholder "_name_" is used to name the new region, shown in the region overview.
- The desired name can be substituted for the placeholder "_name_," either as a standard or as a multilingual comment. If you do not wish to provide a name, remove the placeholder.
Region Navigation
The region overview can help you browse quickly through the regions. Every region present in your application code is shown in the region overview. Additionally, it performs the following duties:
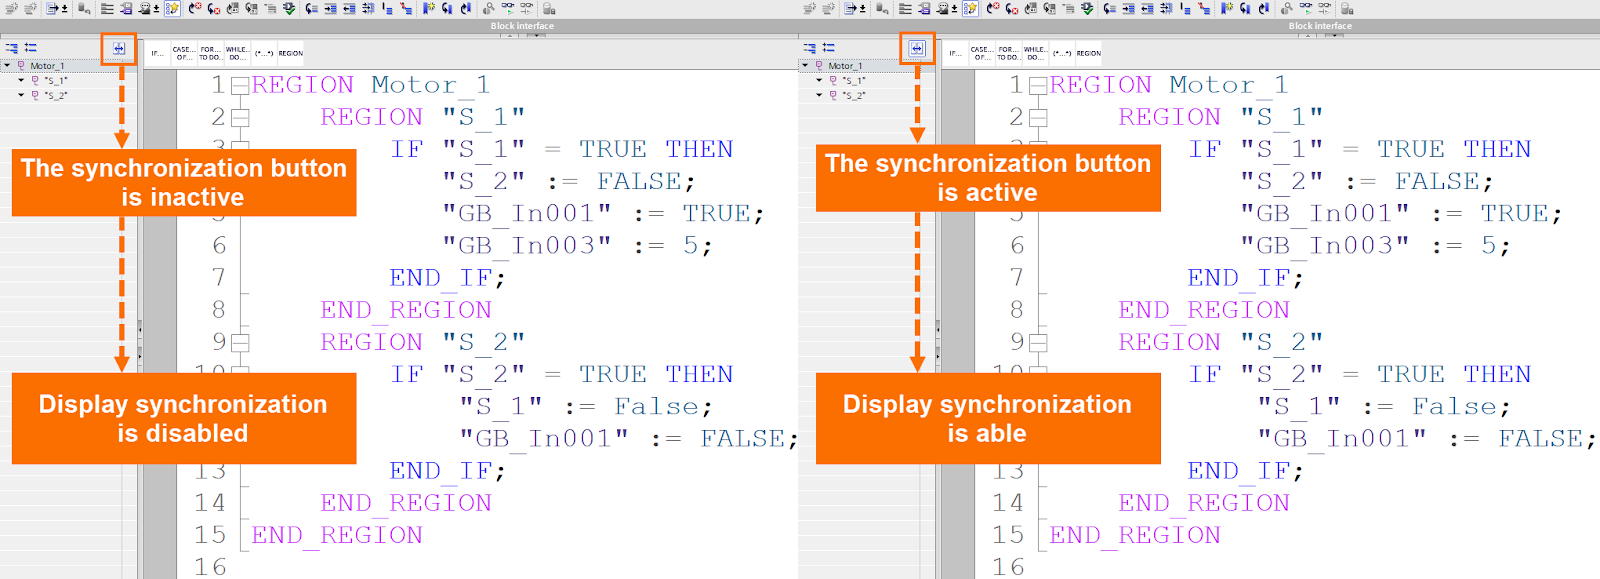
- Synchronizing the presentation of the regions in the programming window and the region overview: The programming window, the region overview, or both may be affected by expanding and collapsing regions, depending on the chosen settings. Follow these steps to specify the synchronization:
- Get the region overview open.
- To enable and disable display synchronization, click "Synchronization on/off" in the region overview toolbar. The synchronization button is marked as active and inactive, respectively.
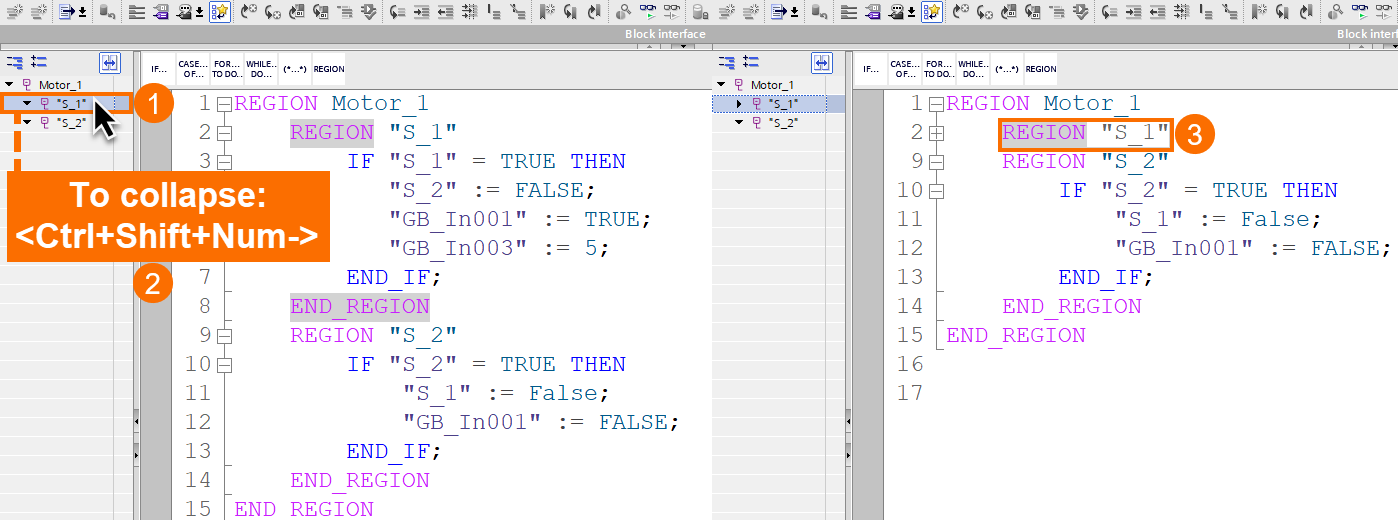
- Individual region expansion and collapse: Individual regions can be expanded and collapsed in the programming window or the region overview. If synchronization is enabled, the region expands or collapses in both windows. To expand or collapse a specific region, perform the following steps:
- Navigate to the region overview.
- Select your desired region and then to expand or collapse, use the keyboard shortcuts <Ctrl+Shift+Num+> and <Ctrl+Shift+Num->, respectively.
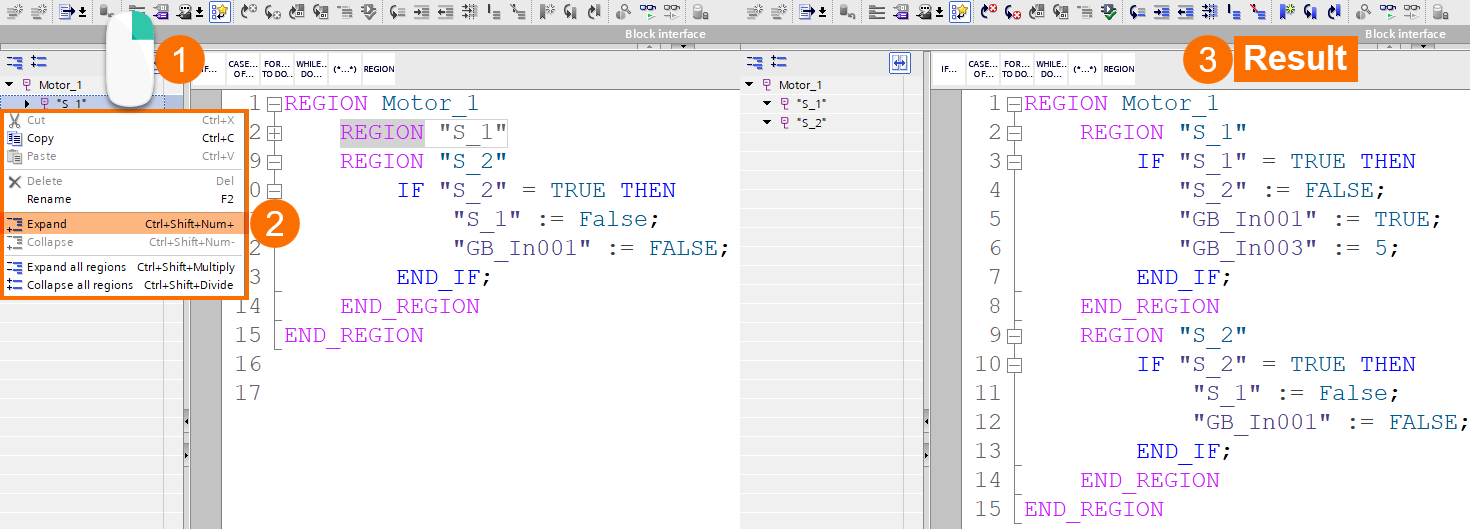
Another option is in the region overview, right-click over your desired region that you want to expand or collapse and choose "Expand" or "Collapse" from the pop-up menu to expand or collapse the targeted region, respectively.
- All regions' expansion and collapse: In the region overview or the programming window, you may expand or collapse all regions at once. To do so, take the following procedures:
- Put the mouse pointer in the programming window.
- To expand or collapse all regions, use the keyboard shortcuts <Ctrl+Shift+Num*> and <Ctrl+Shift+Num/>, respectively.
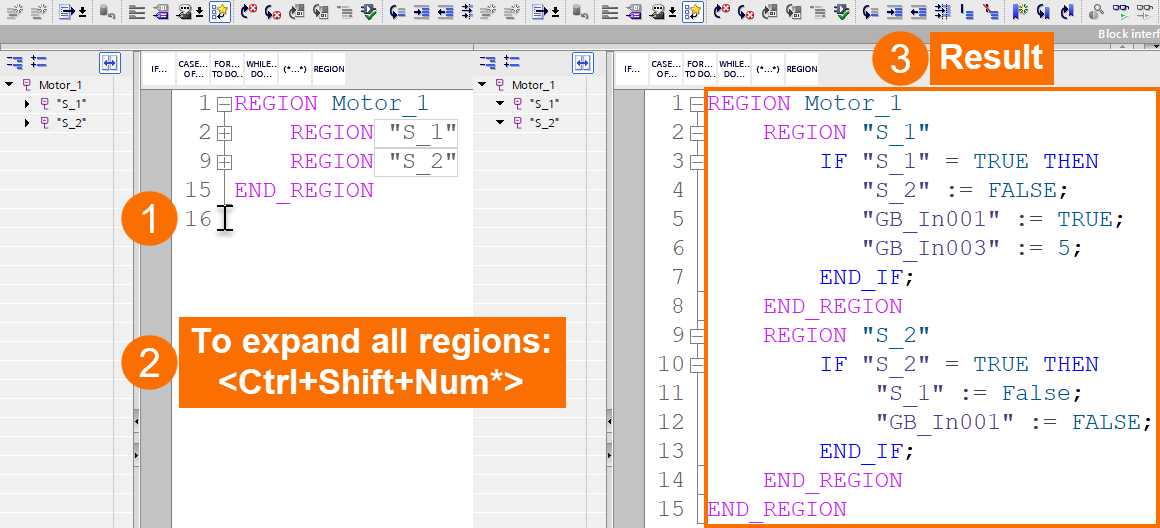
Or right-click over a region in the region overview and choose "Expand all regions" or "Collapse all regions" from the pop-up menu to expand or collapse all regions simultaneously, respectively.

Conclusion
This tutorial discussed organizing your program code in regions. You learned how to use region overview for quick navigation within the regions, and it helps you to find the regions with syntax mistakes to solve the issue.
You learned how to use the "REGION" and "END_REGION" keywords to summarize your program code for a region. You also learned how to name each region and the benefits that come after this action.
You got familiar with the details when employing regions and how to nest regions inside another region. You understood how to add regions to your application code using the keyboard or through the "Instructions" task card.
Finally, you learned how to utilize region navigation to synchronize the presentation of the regions in the programming window and the region overview, and individual regions and all regions’ expansion and collapse.
