Storing PLC Data in a Database and Excel Sheets Using Node-RED

Introduction
In today's data-driven world, the ability to collect, store, and analyze data efficiently is critical, even in industrial settings. Programmable Logic Controllers (PLCs) are the backbone of industrial automation, generating a wealth of data that can provide valuable insights. This tutorial explores a practical solution for capturing and utilizing this data using Node-RED, a versatile and user-friendly platform.
Node-RED simplifies the process of integrating PLC data into databases and spreadsheet applications like Excel and Google Sheets. In this tutorial, we'll walk you through the steps required to seamlessly connect your PLC to Node-RED, transform and store the data in a database, and export it to user-friendly formats for analysis and reporting.
Whether you're an industrial engineer looking to optimize processes or a data enthusiast eager to explore industrial data handling, this tutorial will equip you with the skills to bridge the gap between your PLC and data storage solutions with ease.
Prerequisites
You’ll need to have a few items to follow this tutorial:
- TIA Portal V15 | Note - The process is the same for other versions of TIA Portal.
- Net-To-PLC-Sim | Note: Necessary for simulating a real PLC when a physical PLC is not available.
- Node-RED.
- MySQL | Note - The process is the same for other SQL databases.
MySQL – Download and Setup
Step 1 - Download MySQL
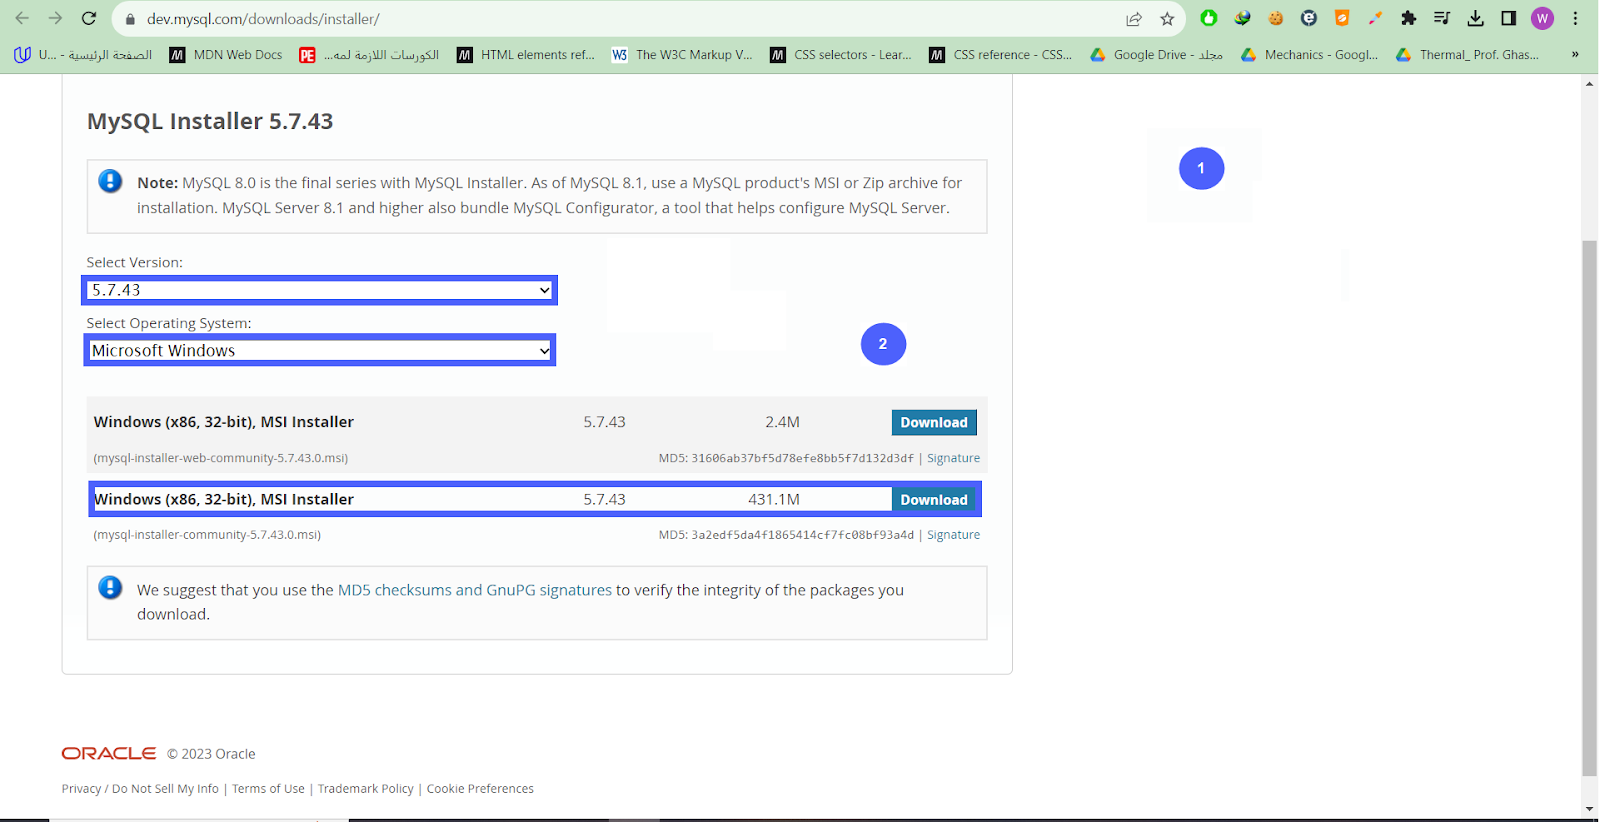
Step 1.1 - Navigate to the following Link - MySQL Download.
Step 1.2 - Select “Version and Microsoft Windows” & Click “Download.”
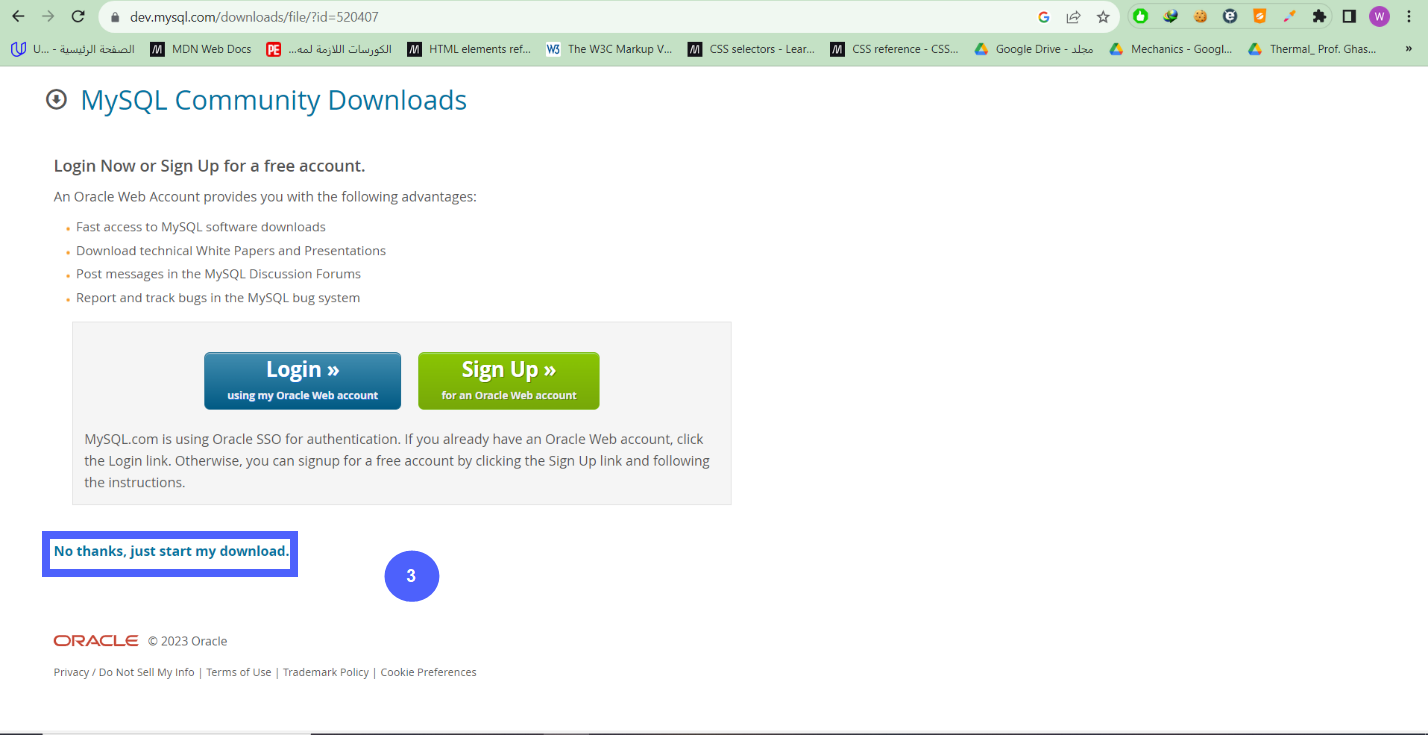
Step 1.3 – Click “No thanks, just start my download.”
Now that we’ve downloaded MySQL, let’s install it.
Step 2 - Install MySQL
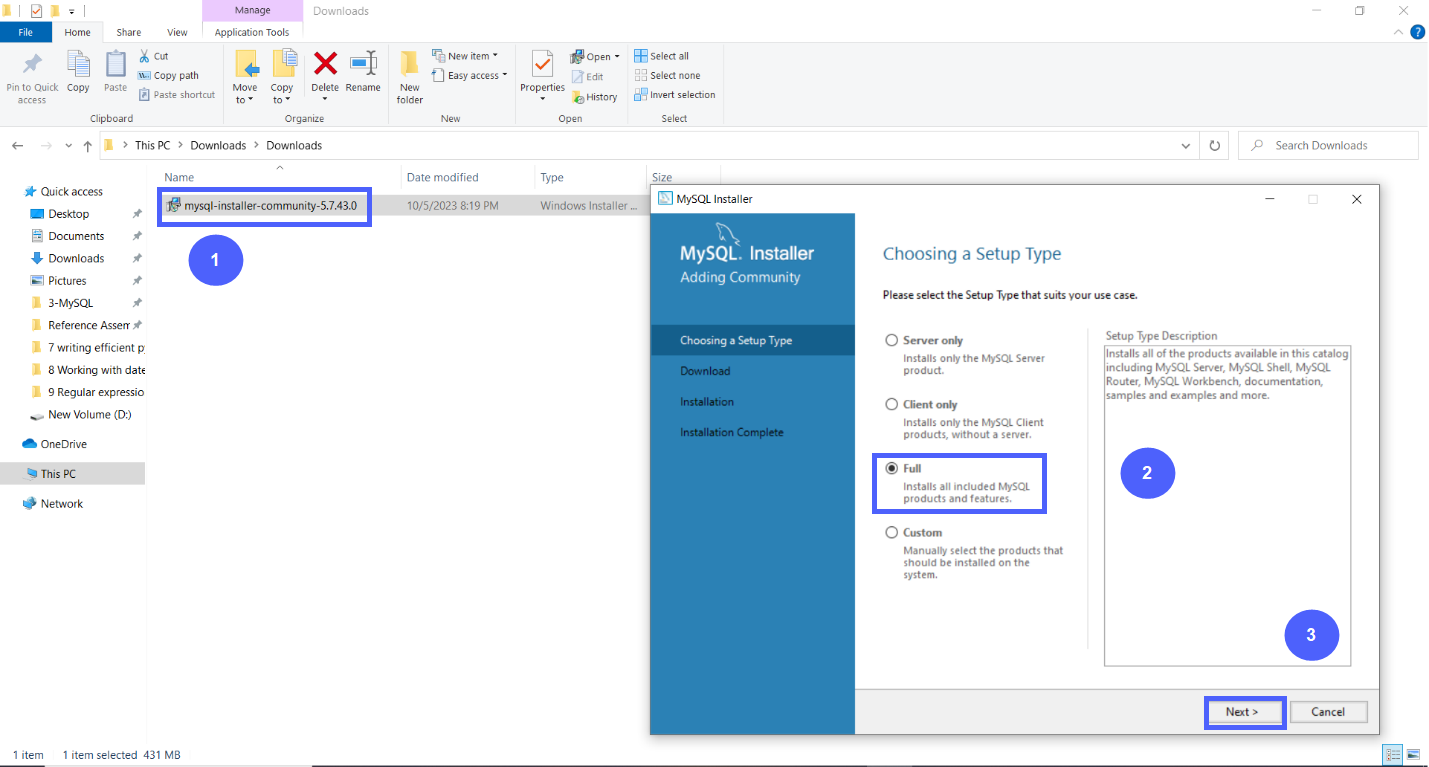
Step 2.1 -Double-click on “MySQL installer.”
Step 2.2 - Select “Full”
Step 2.3 - Click “Next.”
Step 2.4 - Click “Execute.”

Step 2.5 - Click “Next.”
Step 2.6 - Click “Next.”
Step 2.7 - Click “Next.”
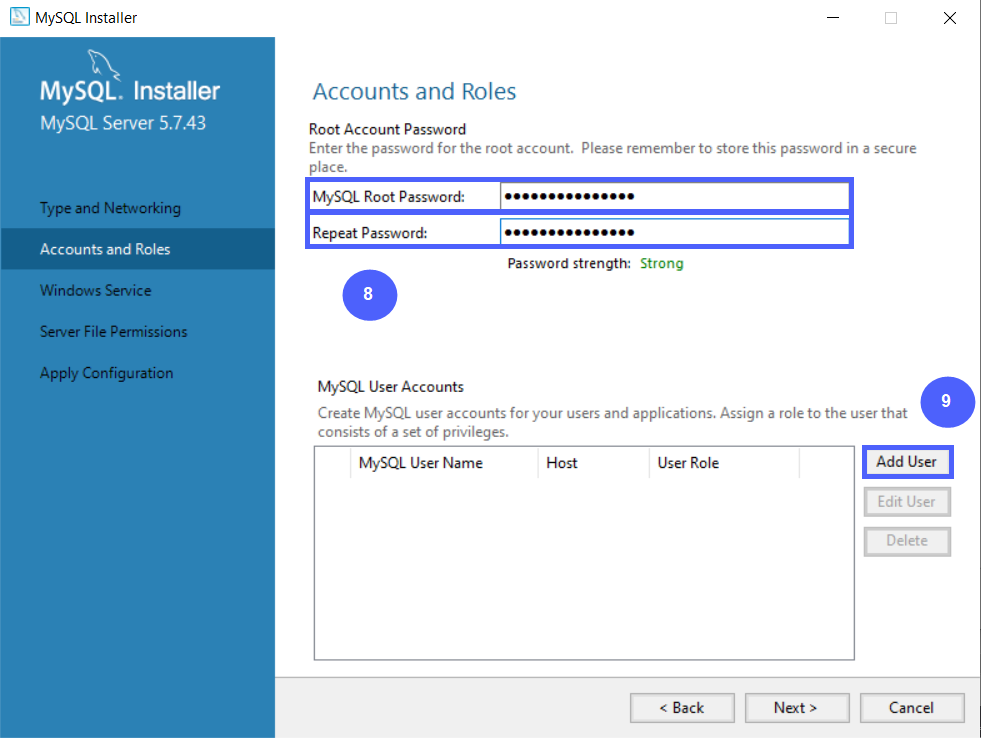
Step 2.8 - Set Password.
Step 2.9 - Click “Add User.”
Step 2.10 - Set User and Password
Step 2.11 - Click “OK.”

Step 2.12 - Click “Next.”

Step 2.13 - Click “Next.”
Step 2.14 - Click “Next.”
Step 2.15 - Click “Execute.”
Step 2.16 - Click “Finish.”
Step 2.17 - Click “Next.”
Step 2.18 - Click “Finish.”
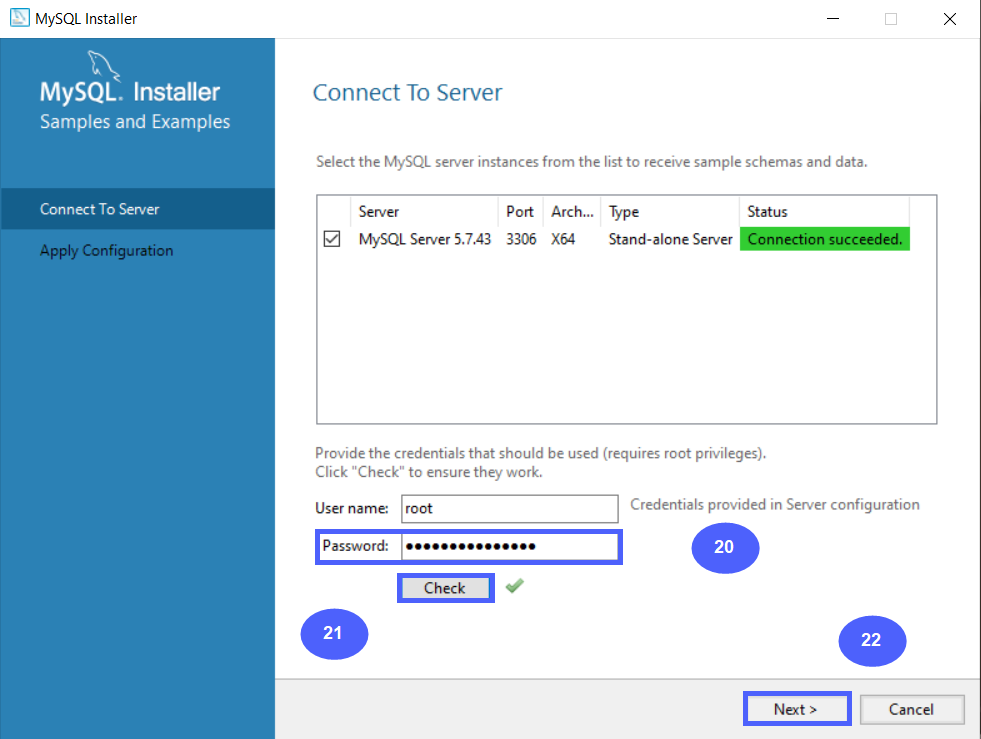
Step 2.19 - Click “Next.”
Step 2.20 - input password
Step 2.21 - Click “Check.”
Step 2.22 - Click “Next.”
Step 2.23 - Click “Execute.”
Step 2.24 - Click “Finish.”
Step 2.25 - Click “Next.”
Step 2.26 - Click “Finish.”
The installation is now completed.
MySQL side – Configurations
Step 1 - How to Connect to MySQL
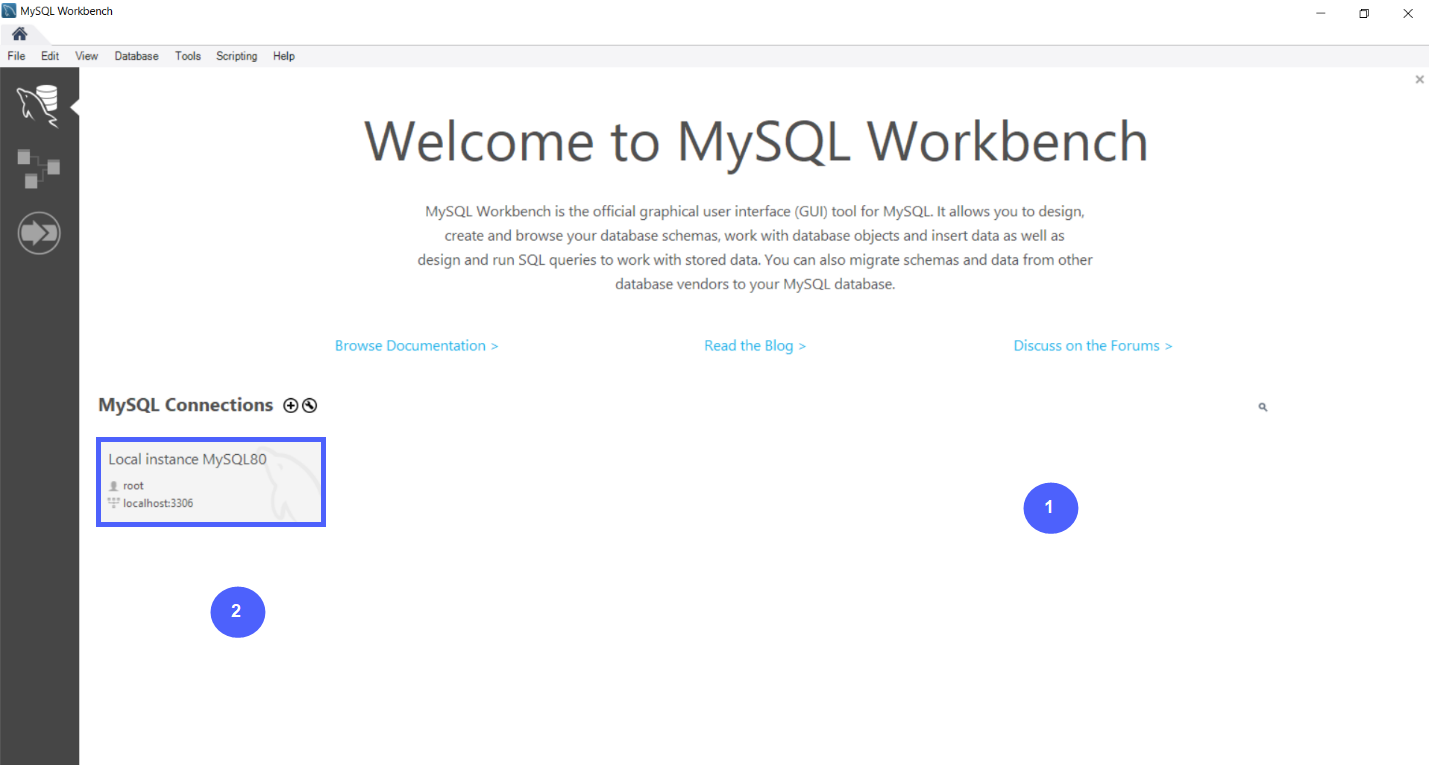
Step 1.1 - Open “MySQL Workbench.”
Step 1.2 - Click “Local instance MySQL80.”
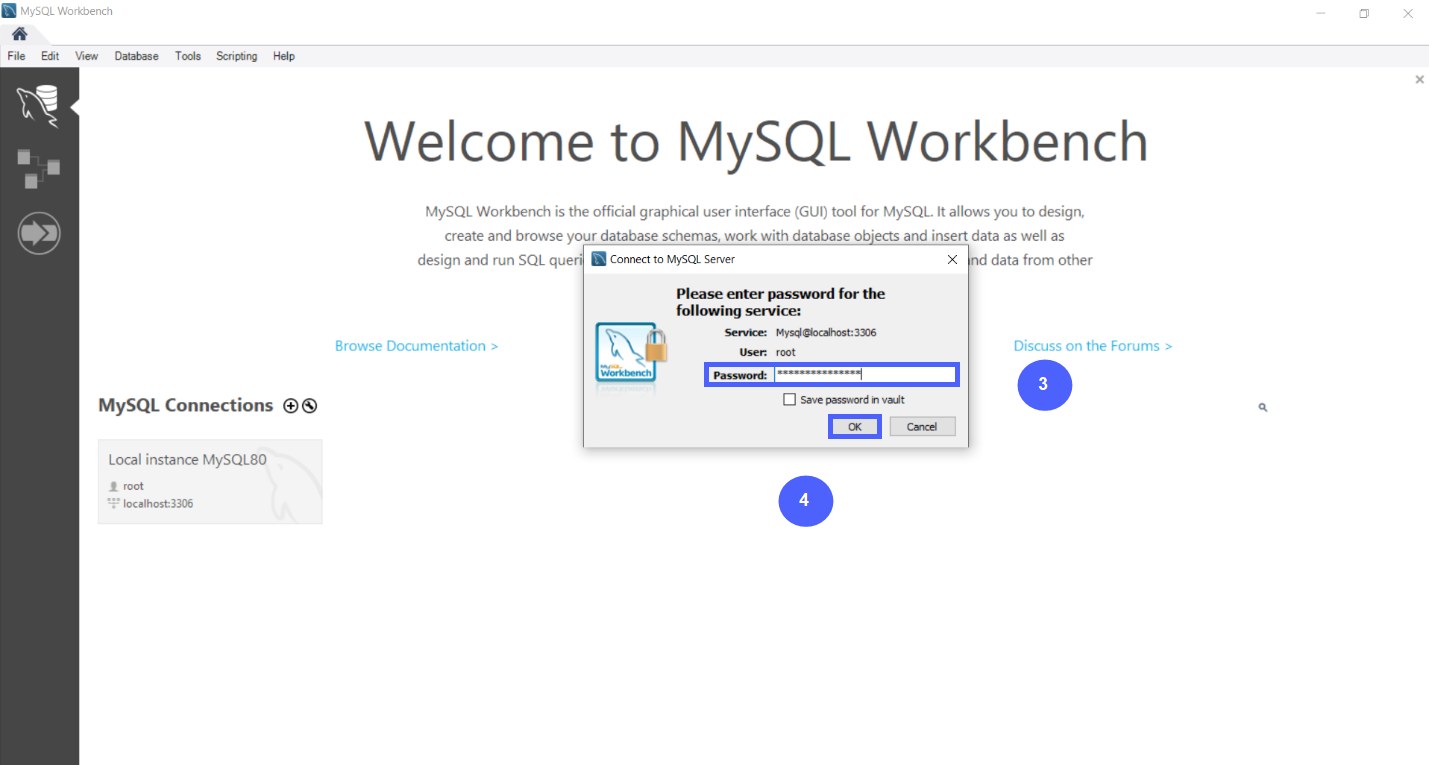
Step 1.3 - Enter your password.
Step 1.4 - Click “OK.”
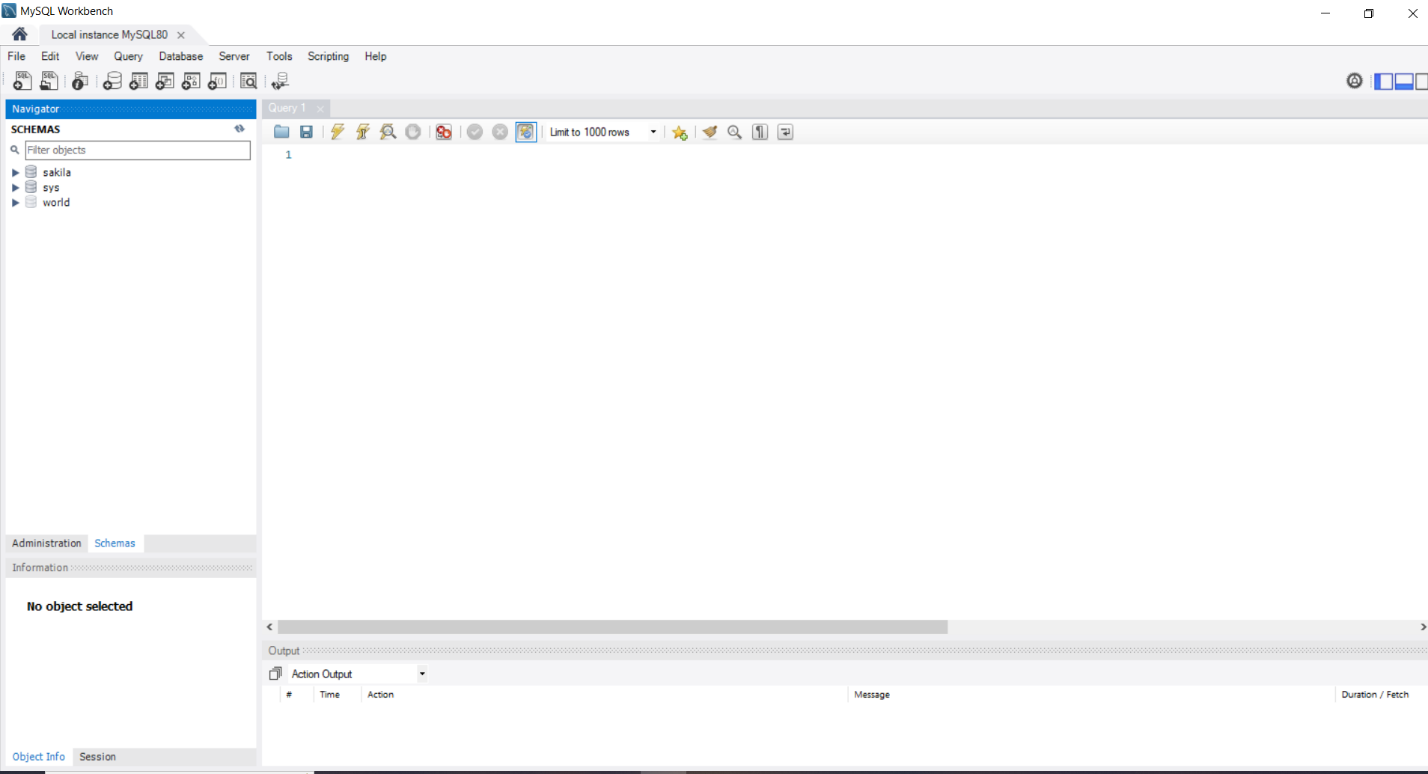
Now, this is the MySQL Server
Step 2 - How to Identify and Add New Users
Step 2.1 - Click on “Server.”
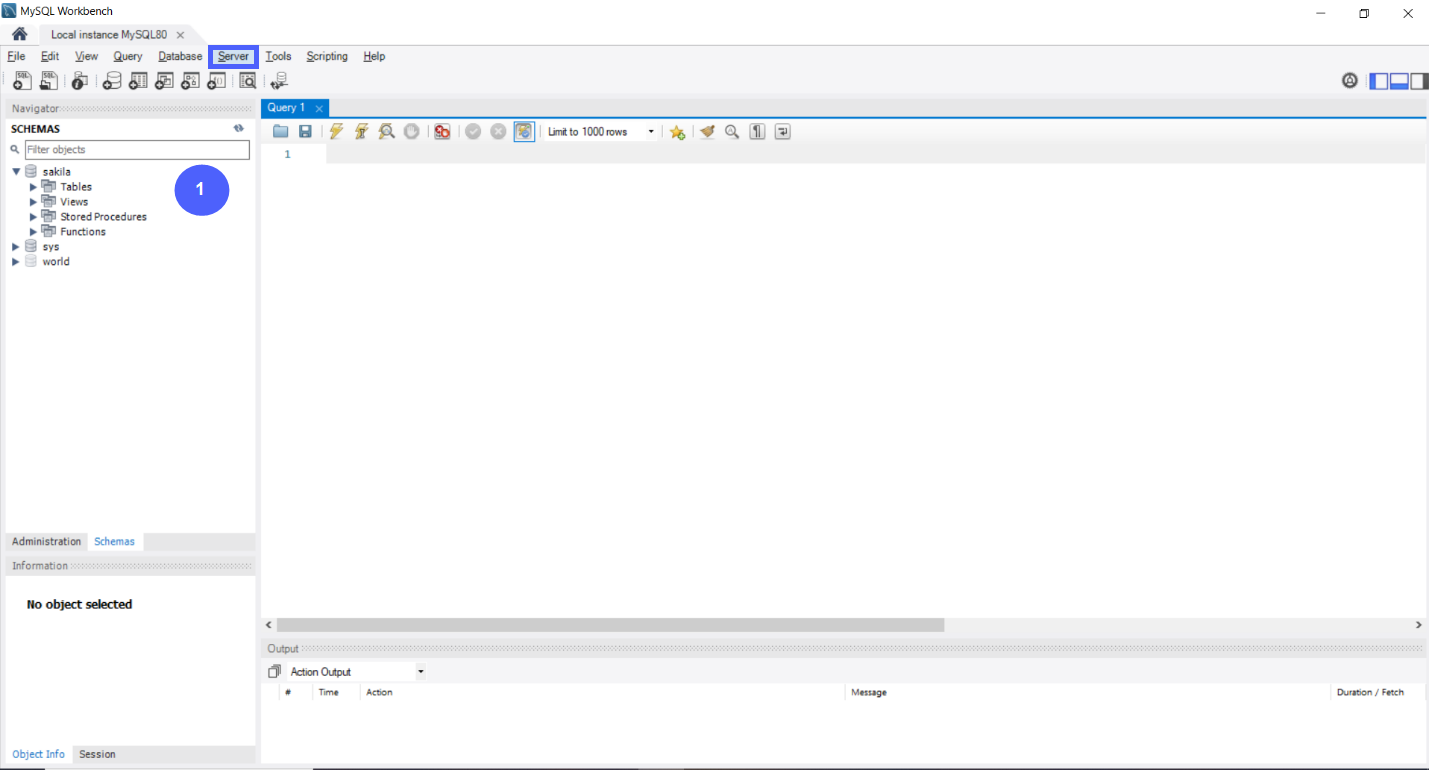
Step 2.2 - Select “Users and Privileges.”

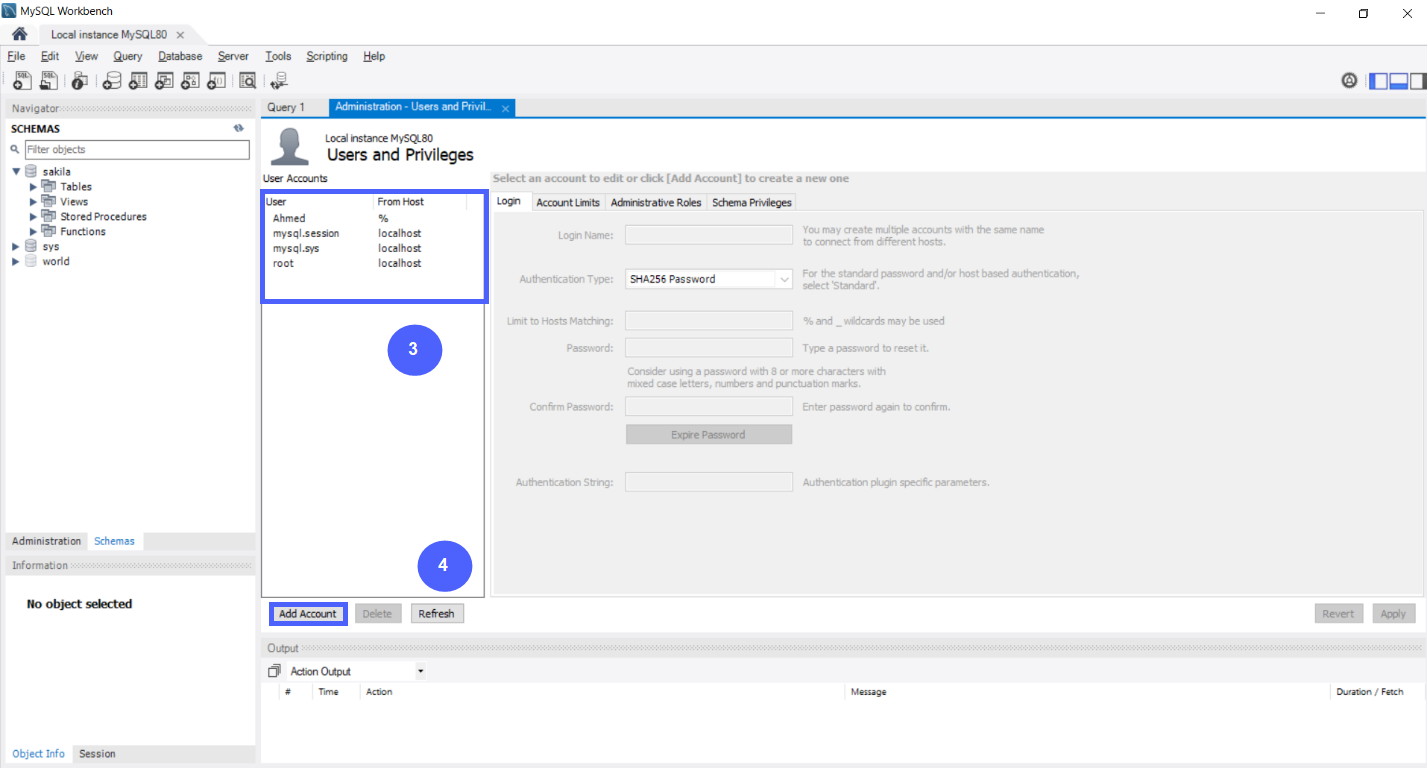
Step 2.3 - These Are All the Users in the MySQL Server.
Step 2.4 – To Add a new user click on “Add account.”
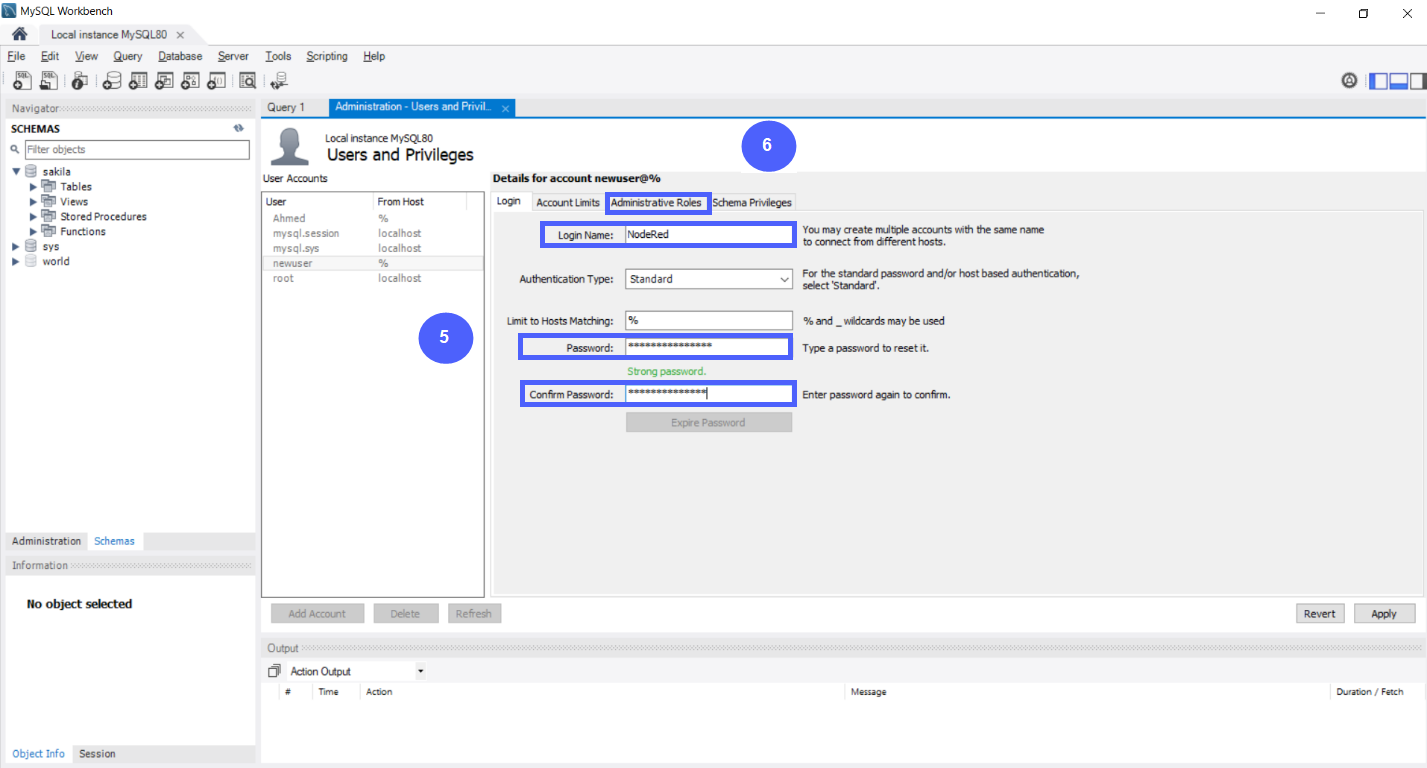
Step 2.5 – Set your Name && Password.
Step 2.6 – Click on “Administrative Roles.” | To Grant Access to the New User.
Step 2.7 - Grant the Desired Access Permissions to the New User.
Step 2.8 - Click “Apply.” | To Add The New User.
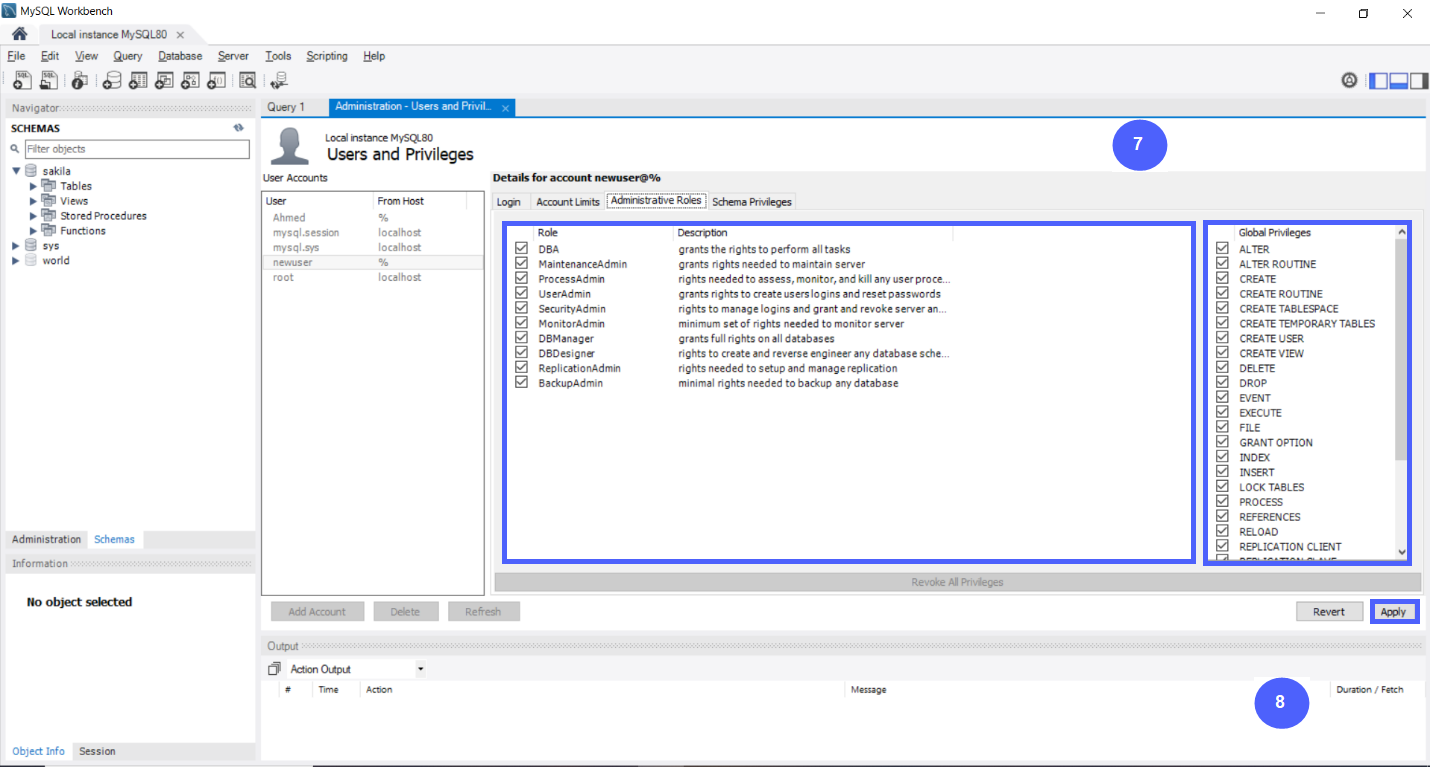
Now, the New User Has Been Successfully Added.

Now, we are granting the “Node-Red” user the same permissions as the “root” user, allowing us to use either of them later to connect with Node-RED.
Tia Portal side – Configurations
Step 1 - New TIA Portal Project
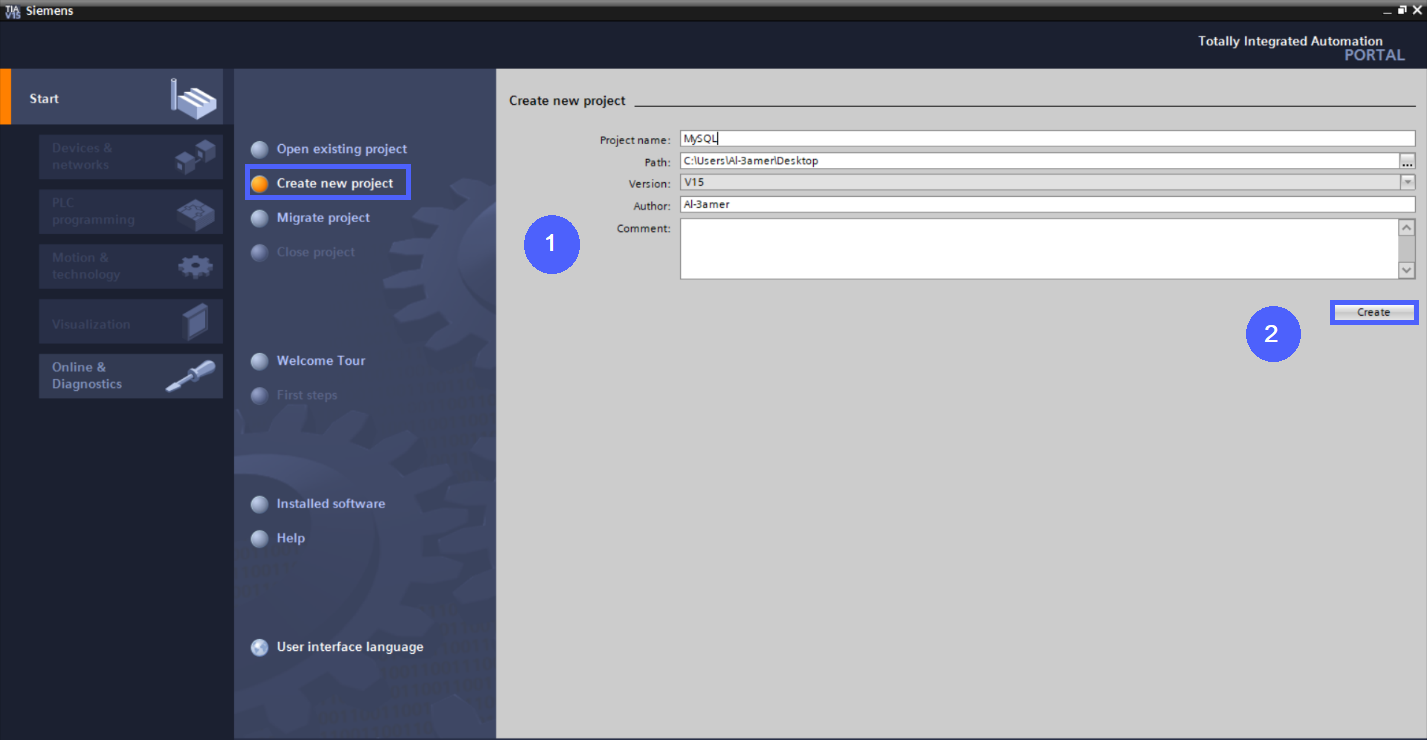
Step 1.1 - Create a new TIA Portal project & give it any name, Click on “Create new project.”
Step 1.2 - Click on “Create.”
Step 2 - New Device
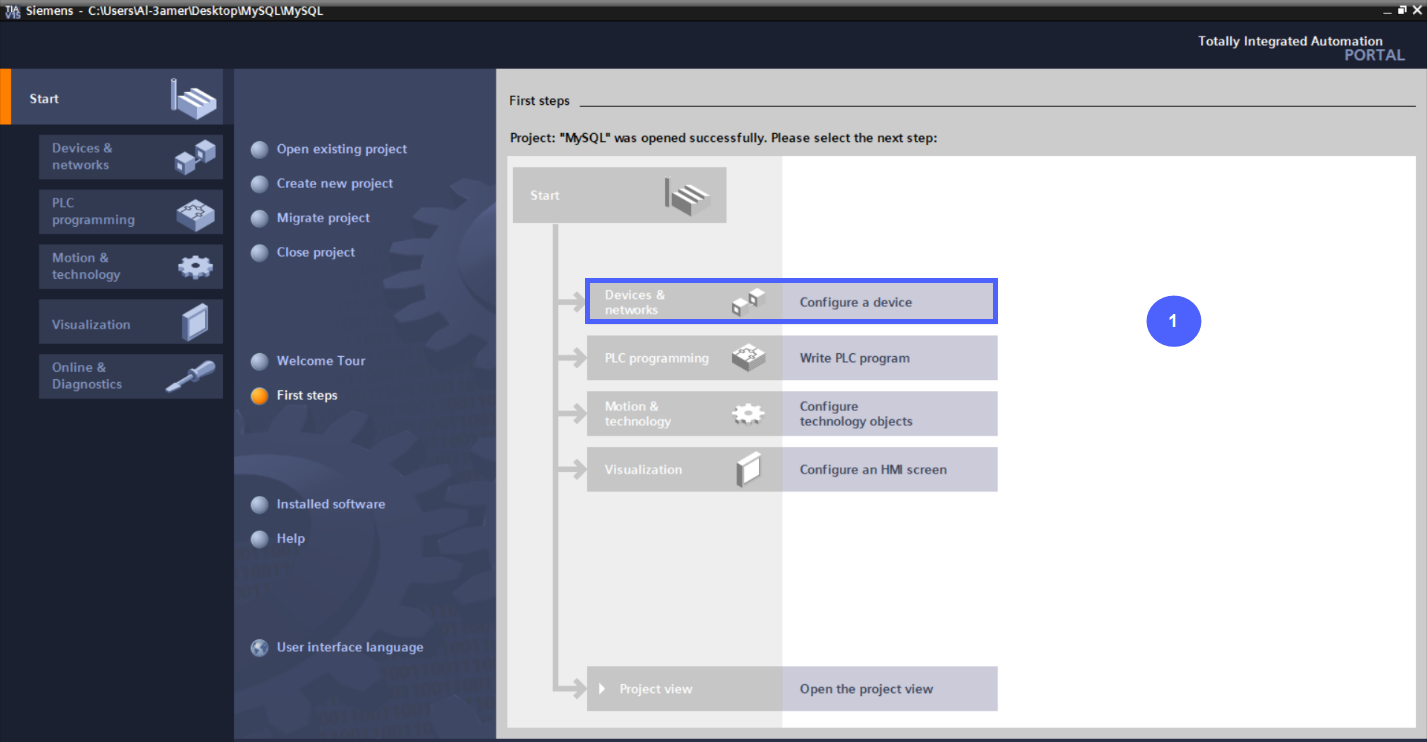
Step 2.1 - Select “Configure a device.”
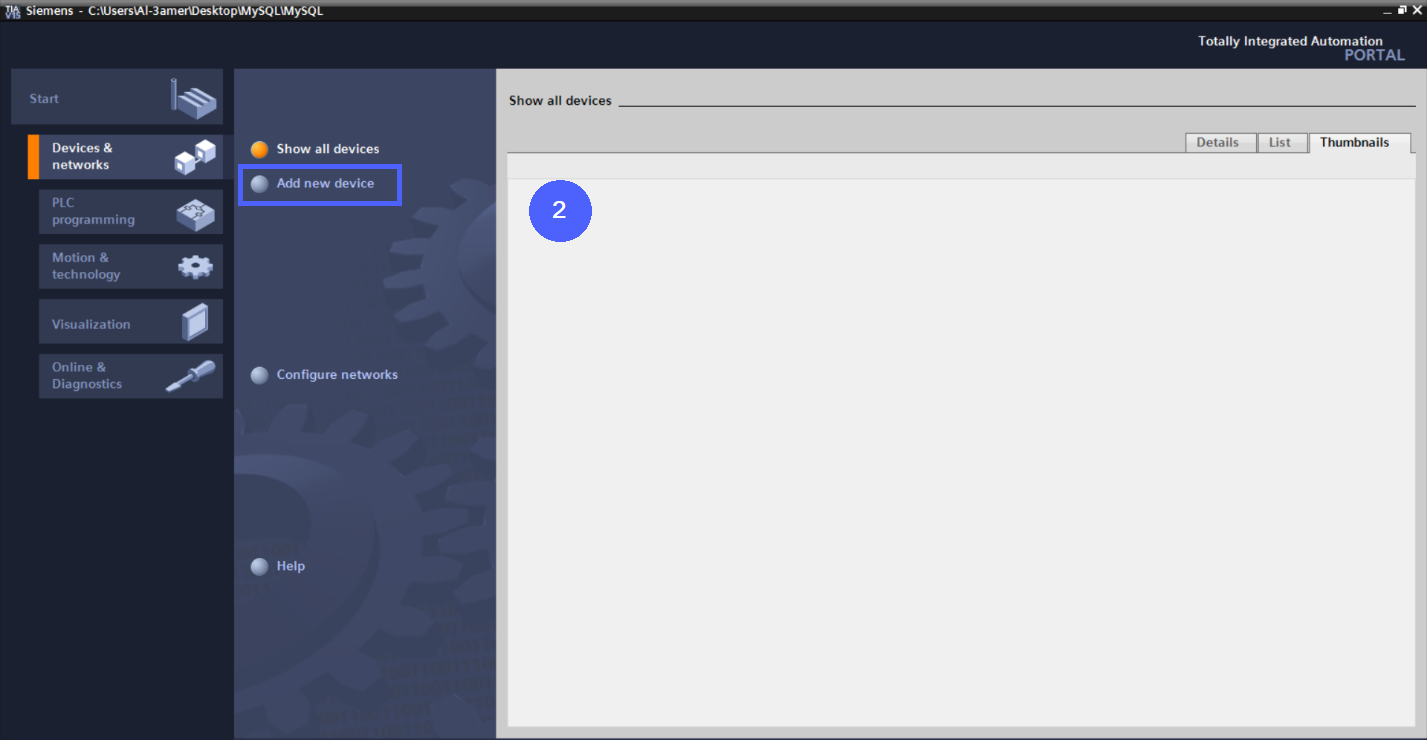
Step 2.2 - Select “Add new device.”
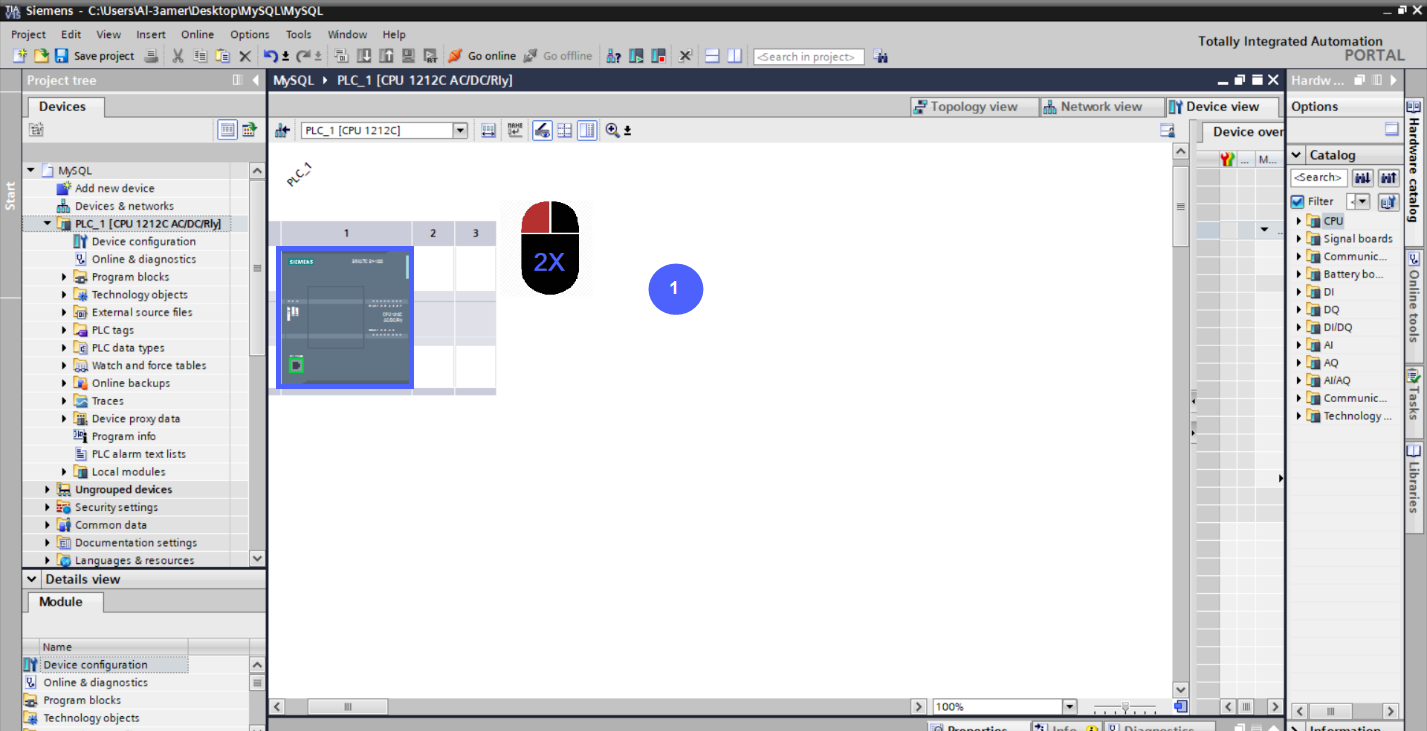
Step 2.3 - Select your PLC.
Step 2.4 - Click “Add.”

In the figure above, we’re looking at an S7-1200 CPU model 1212C AC/DC/Rly with the part number of 6ES7-212-1BE40-0XB0. Please choose the PLC that matches your setup.
Step 3 - PLC Hardware Configuration
Step 3.1 - Double click on PLC hardware.
Step 3.2 - Go to “Connection mechanisms.”
Step 3.3 - Apply “Permit access with PUT/GET.”
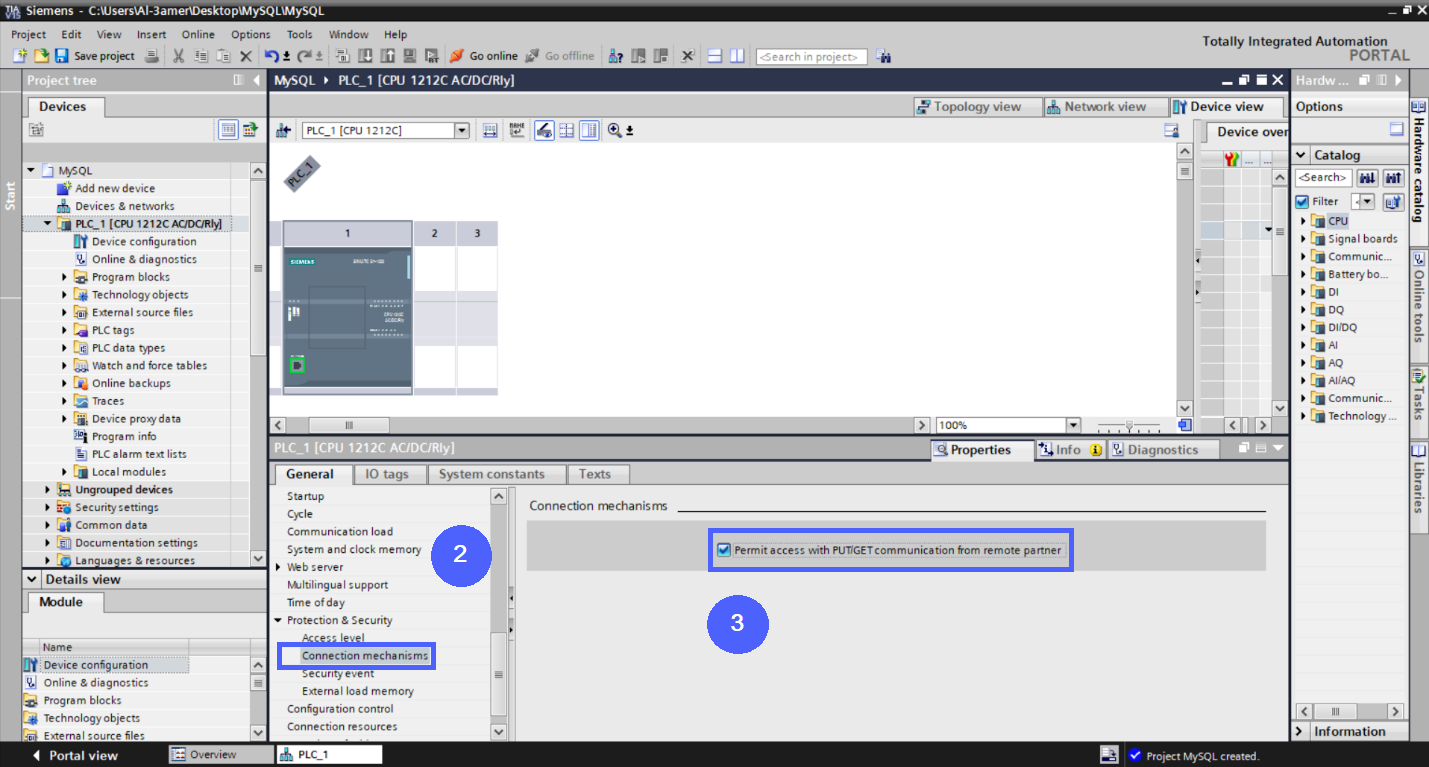
In the figure above, later the PLC will be communicated with Node-RED via Ethernet, so PUT/GET functionality must be activated.
Step 4 - New Data Block
Step 4.1 - Click “Program blocks.” && “Add new block.”
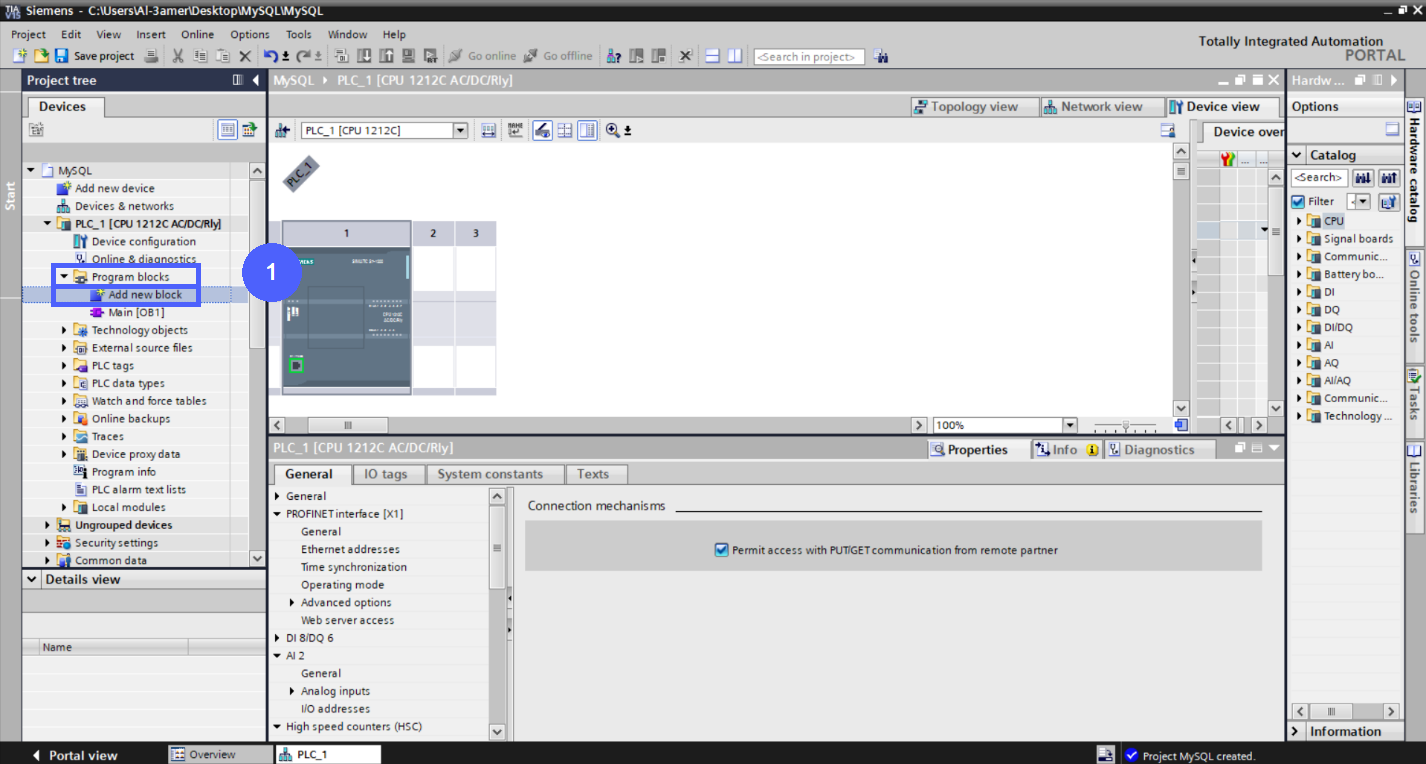
Note: The objective is to create a Data block for making some values that will be subsequently stored in the database.
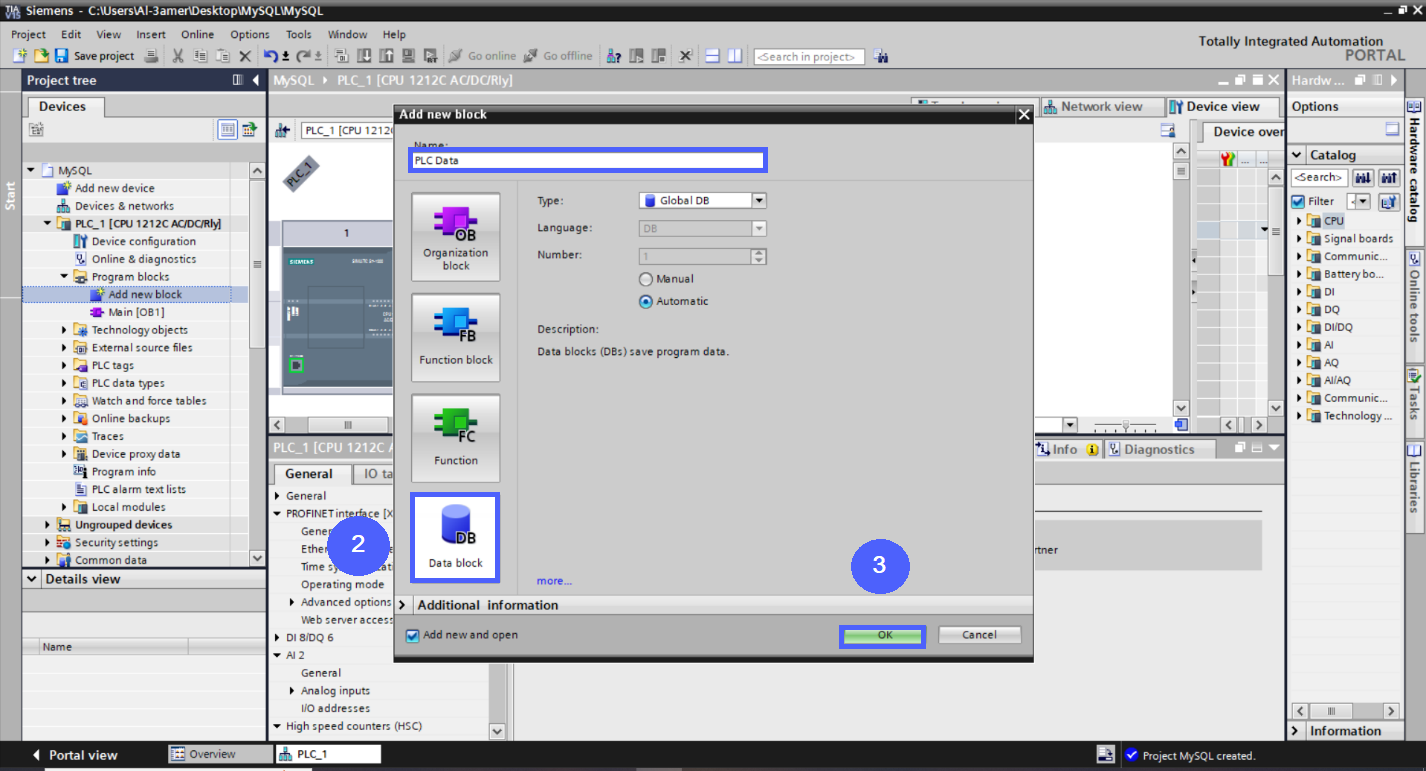
Step 4.2 - Click “Data block.”
Step 4.3 - Click “OK.”
Step 4.4 - Right Click on “PLC Data [DB1].”
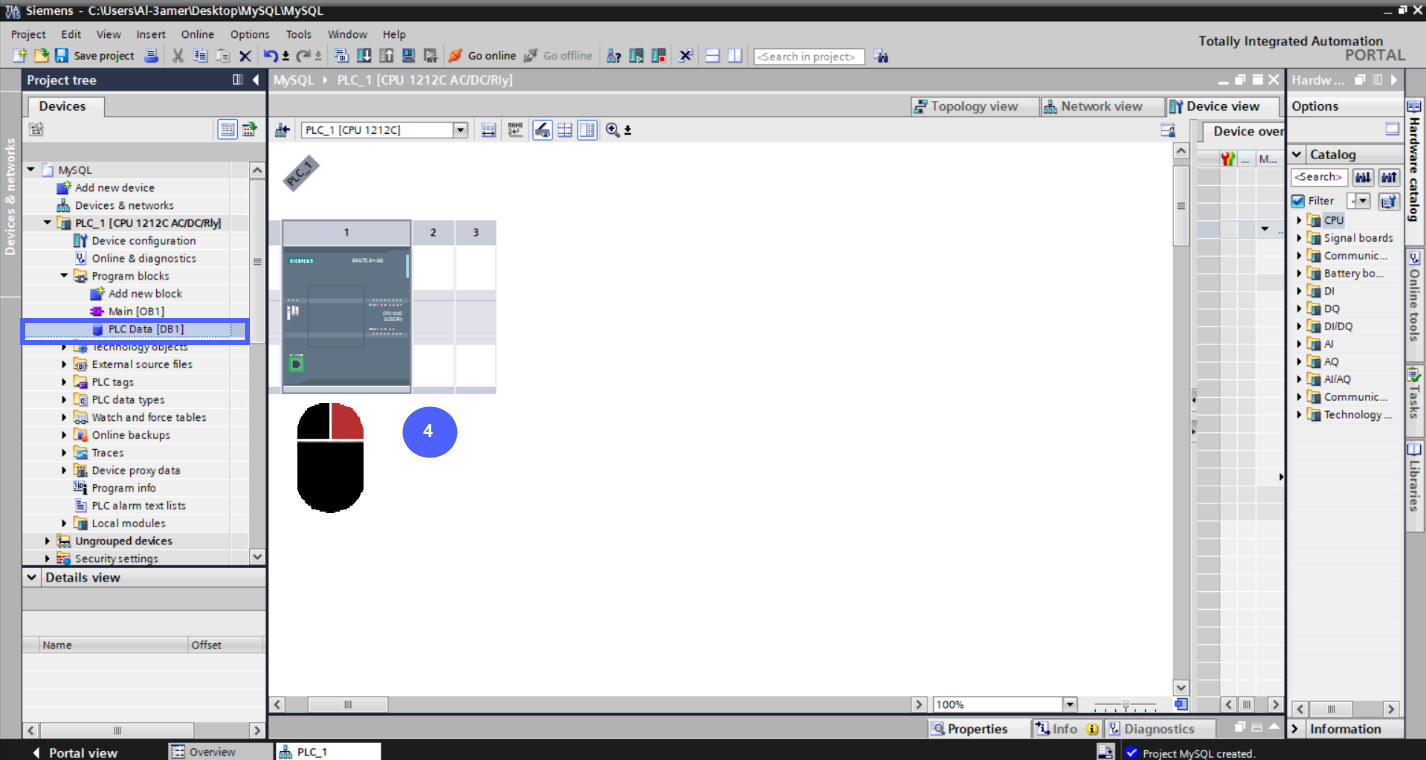
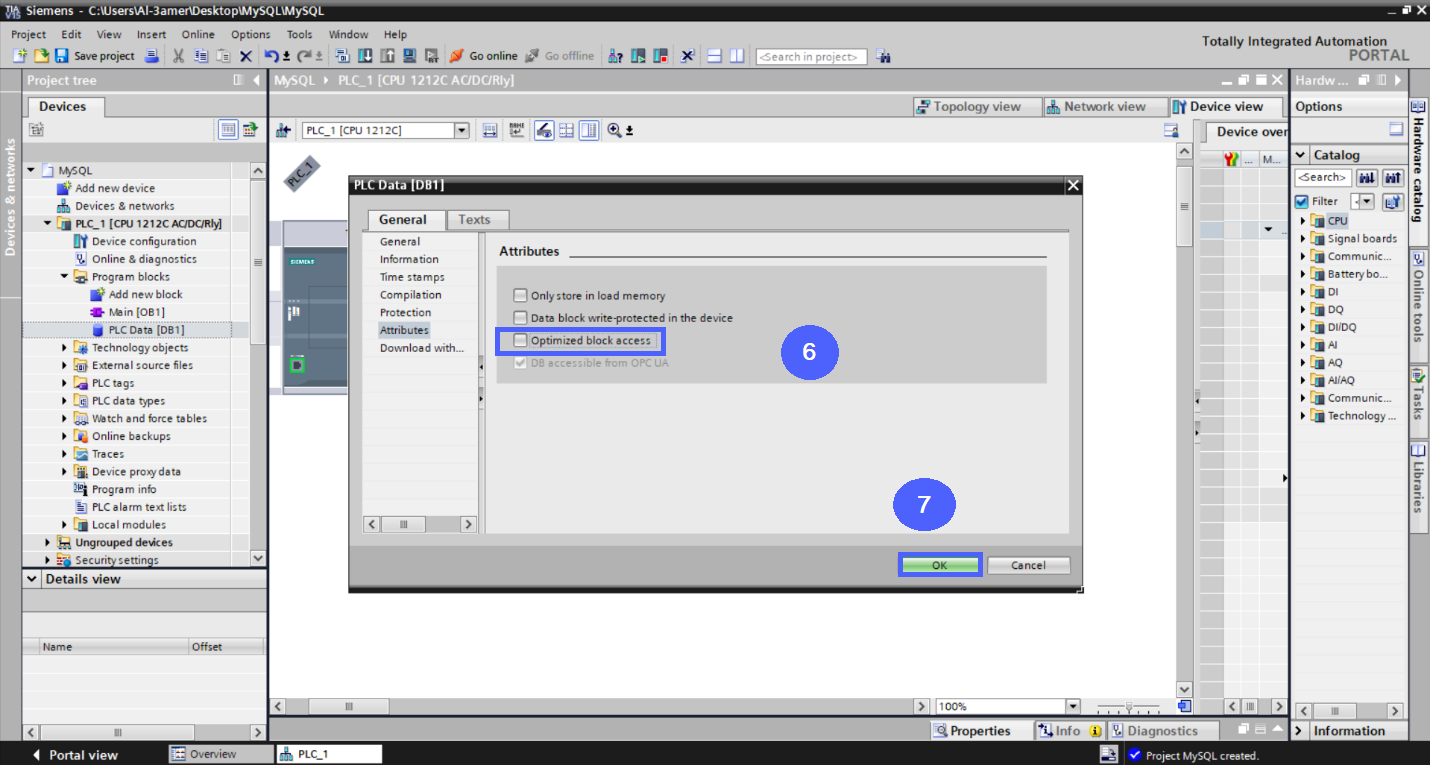
Step 4.5 - Click “Properties.”

Step 4.6 - Disable “Optimized block access.” | To Display Tag Offsets in Data Block
Step 4.7 - Click “Ok.”
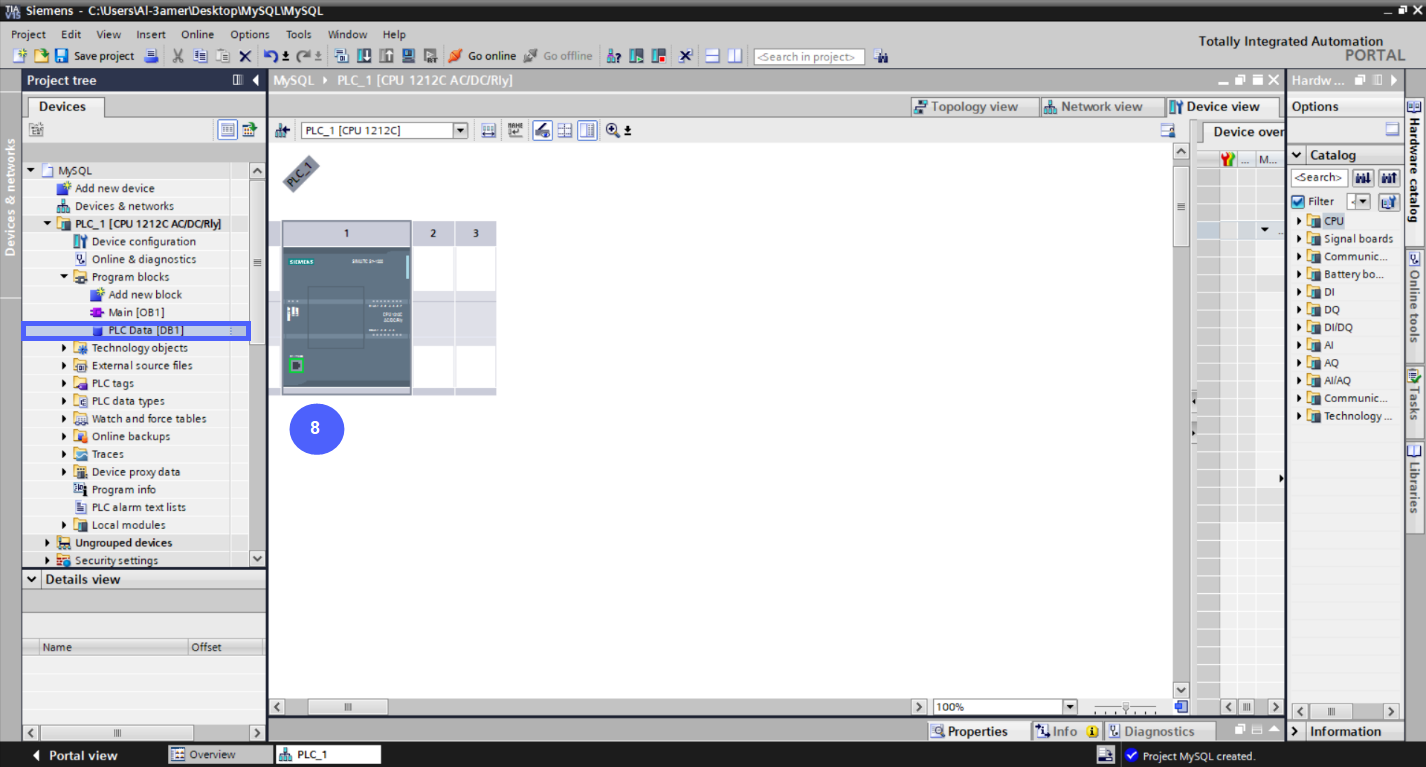
Step 4.8 - Double Click on “PLC Data [DB1].”
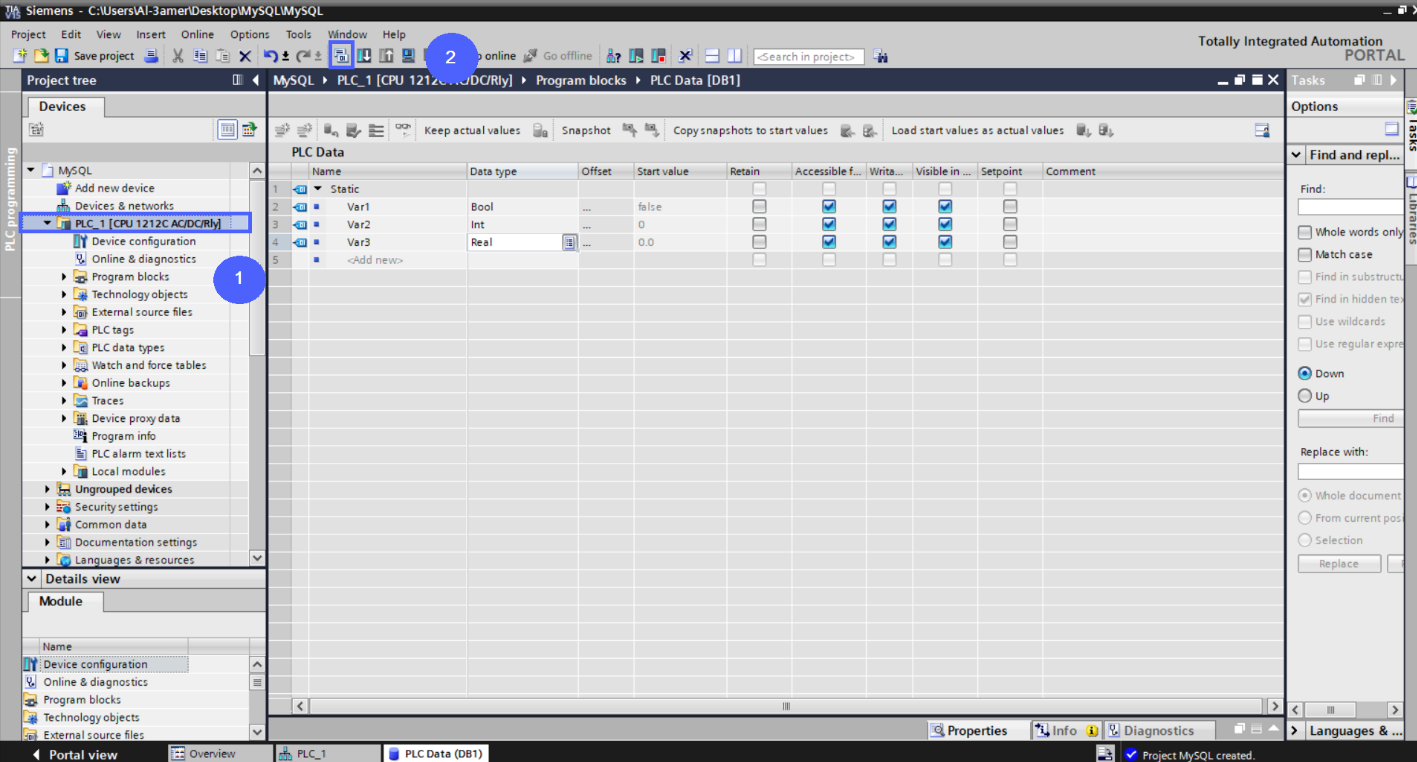
Step 4.9 - Adding Data to the Data Block.

Step 5 - Compiling All Changes
Step 5.1 - Select PLC.
Step 5.2 – Click on “Compile icon.”
Step 6 [Optional] – Run Simulation
Step 6.1 - Select PLC.
Step 6.2 - Click on “Start Simulation icon.”

Step 6.3 - Click “Load.”

Step 6.4 - Select “Start module.”
Step 6.5 - Click “Finish.”

Net-To-PLC-sim side [Optional] – Configurations
Step 1 - How to download and run Net-To-PLC-Sim
Step 1.1 - Go to this Link and download net to plc.
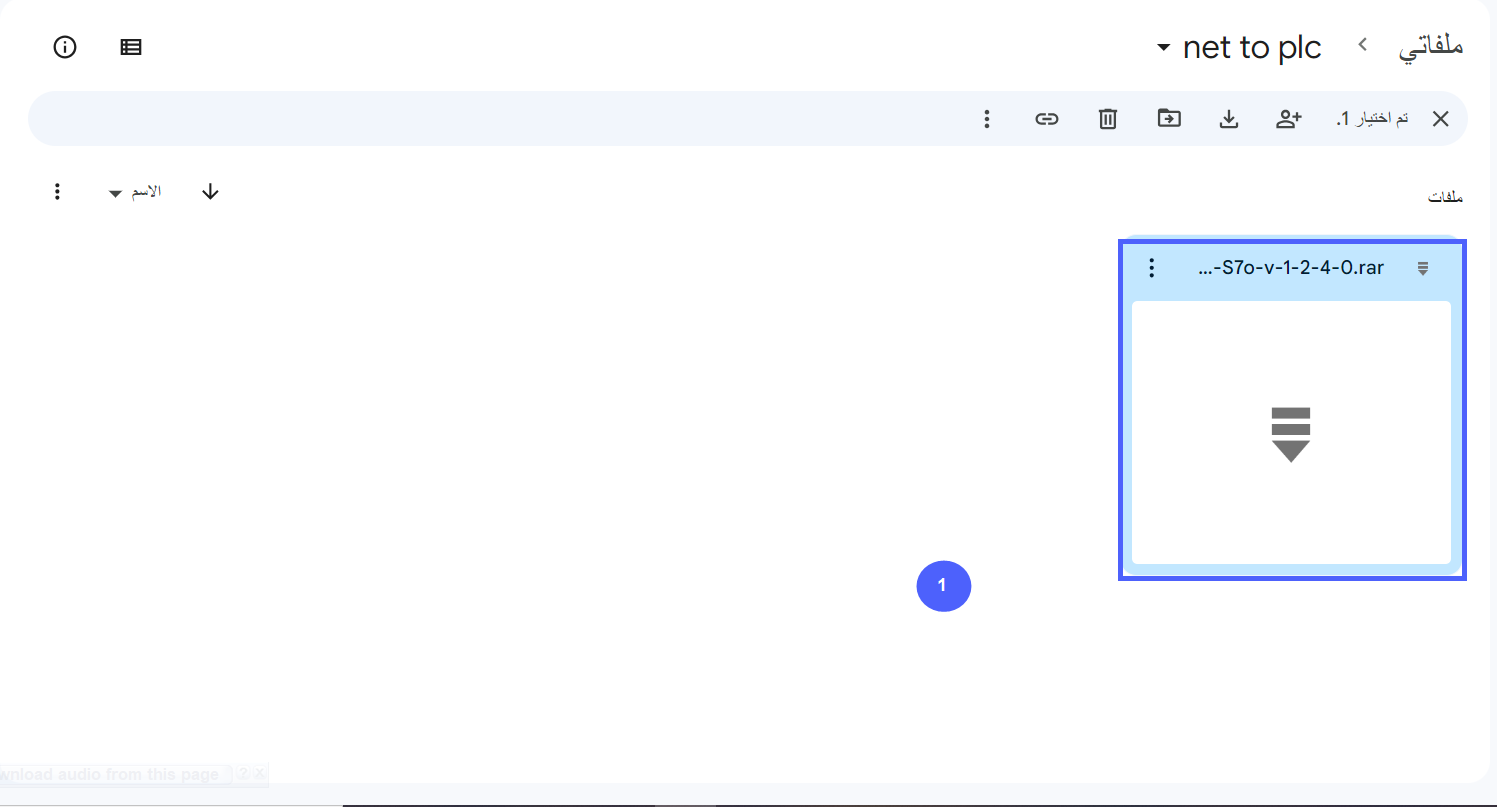
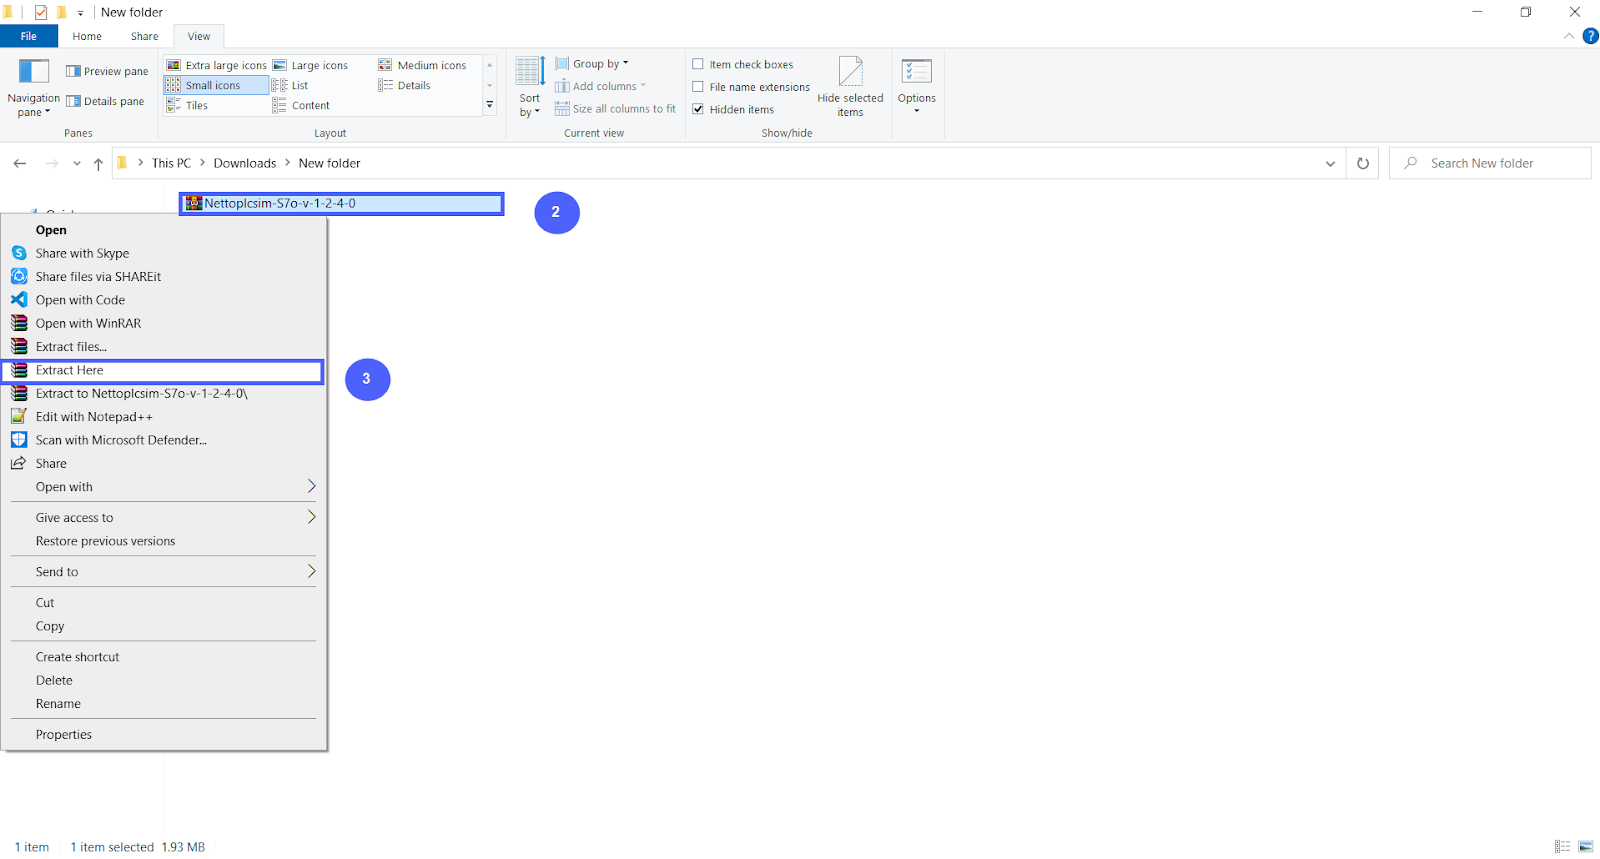
Step 1.2 - Right click on the file.
Step 1.3 - Extract the file.
Step 1.3 - Open file then open “bin file.”
Step 1.4 - Right click on “Net-To-PLC-sim.”
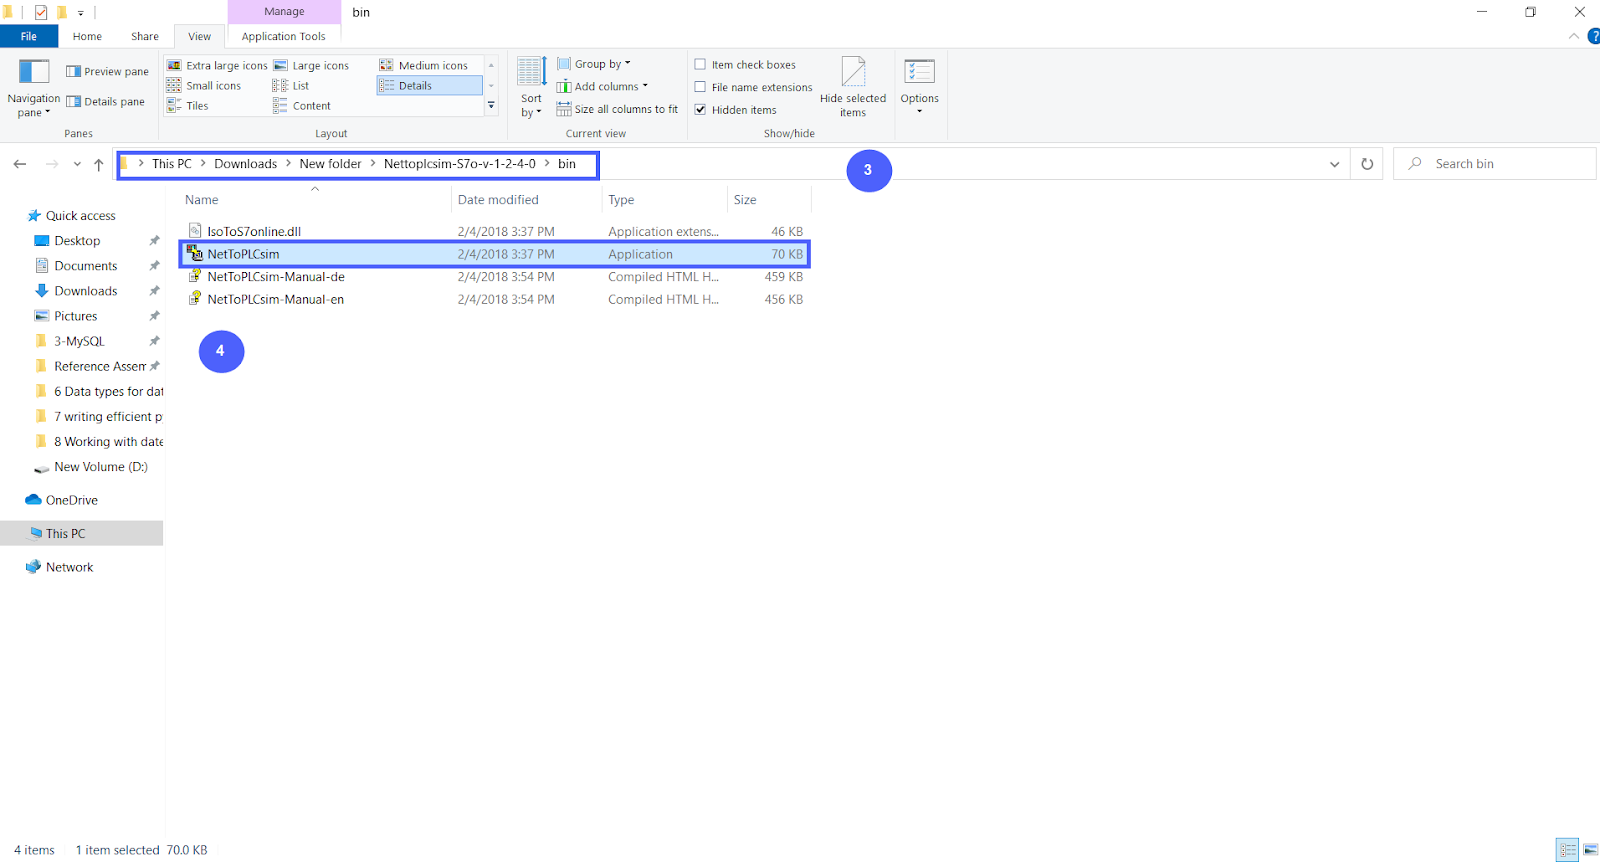
Step 1.5 - Run as administrator.

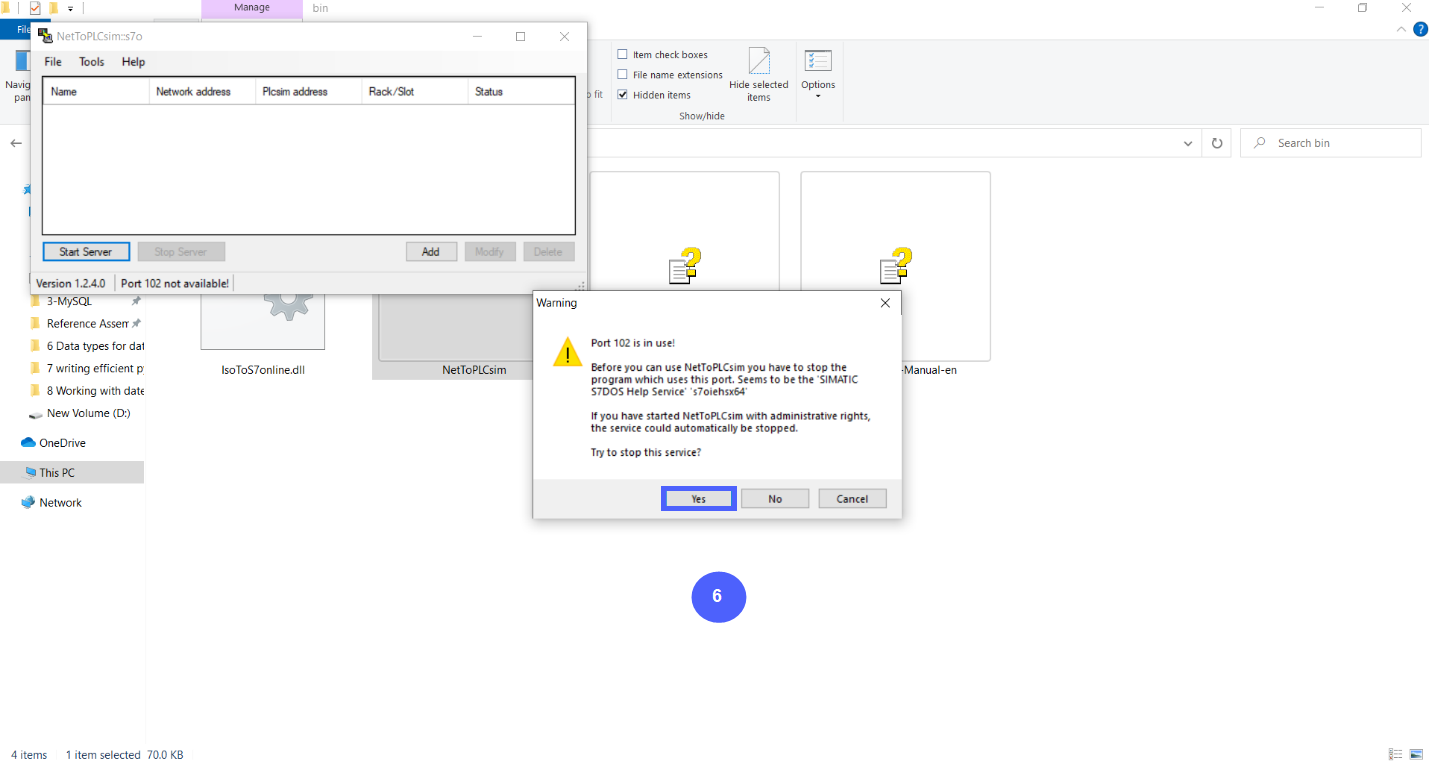
Step 1.6 - Click “Yes.”
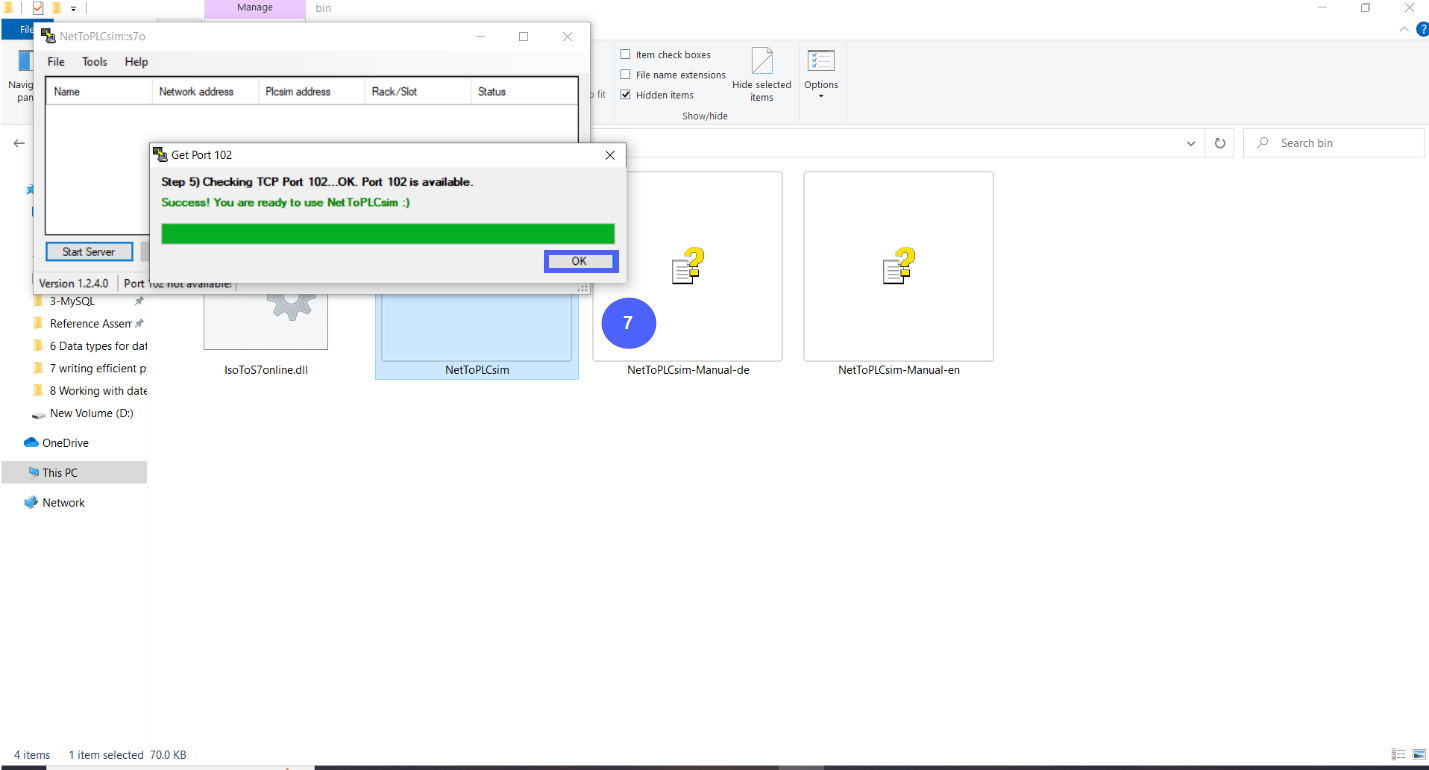
Step 1.7 - Click “OK.”
Step 2 - How to find Your PC's Network IP Address
Step 2.1 - Open search Window && Search for “CMD.”
Step 2.2 - Open “Command Prompt.”
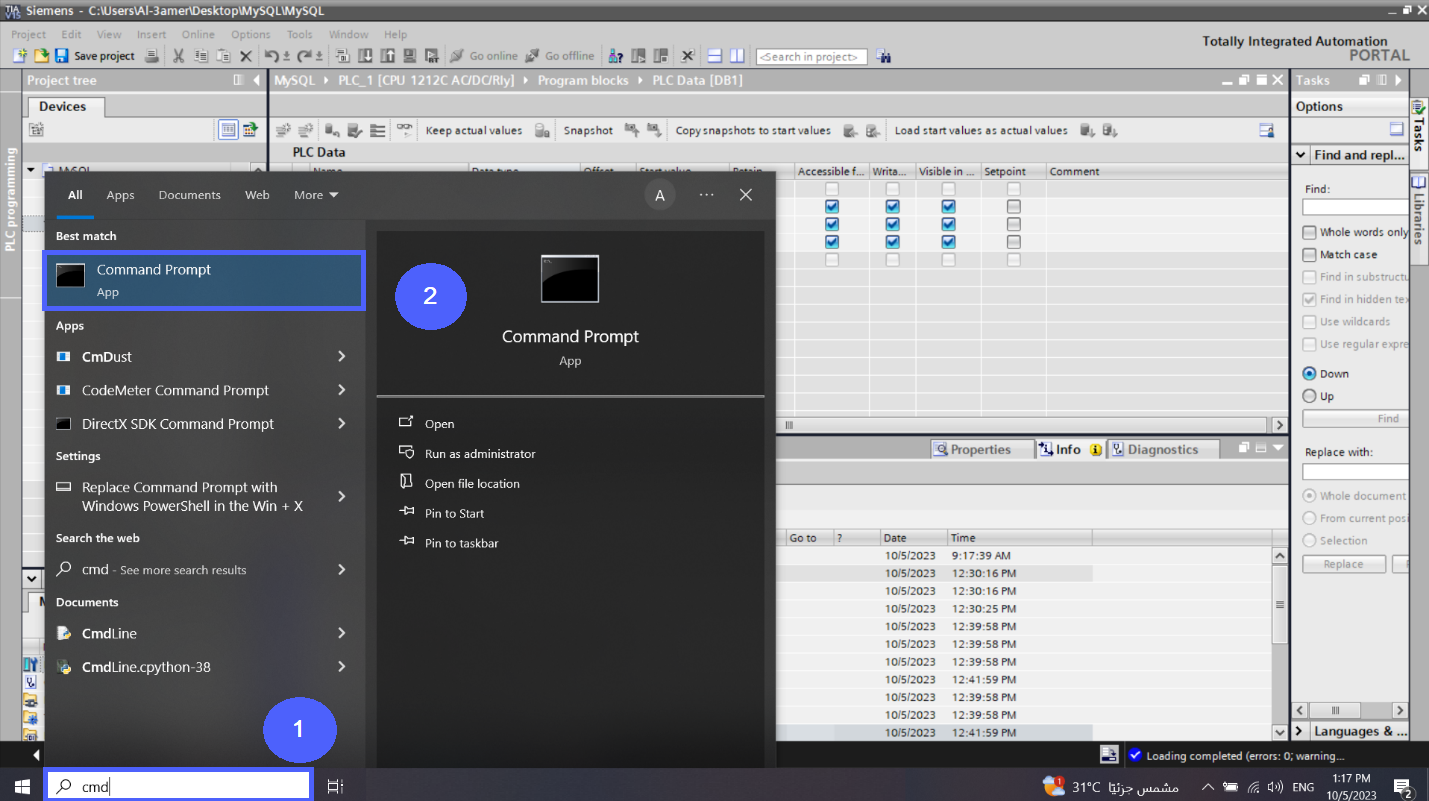
Figure 4.7 – Command Prompt Window
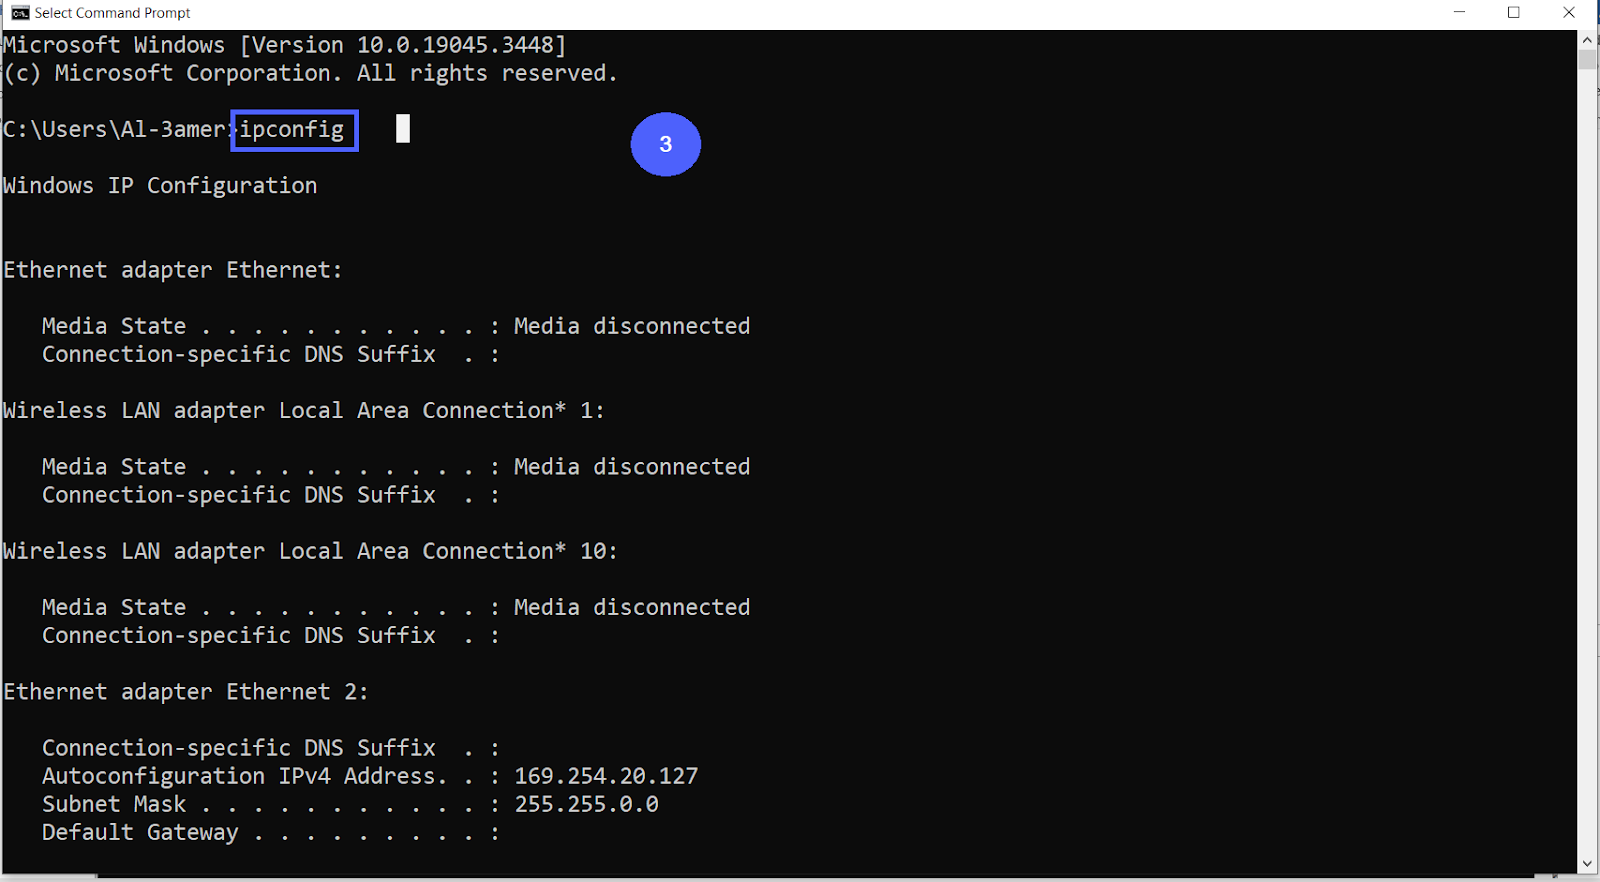
Step 2.3 - Write the “ipconfig” Command && Execute It by Pressing “Enter.”
Step 2.4 - Scroll down to Wireless Lan adapter WI-FI. | Your PC network.
Step 2.5 - Copy IPV4 address | This is the IP of PC Network.
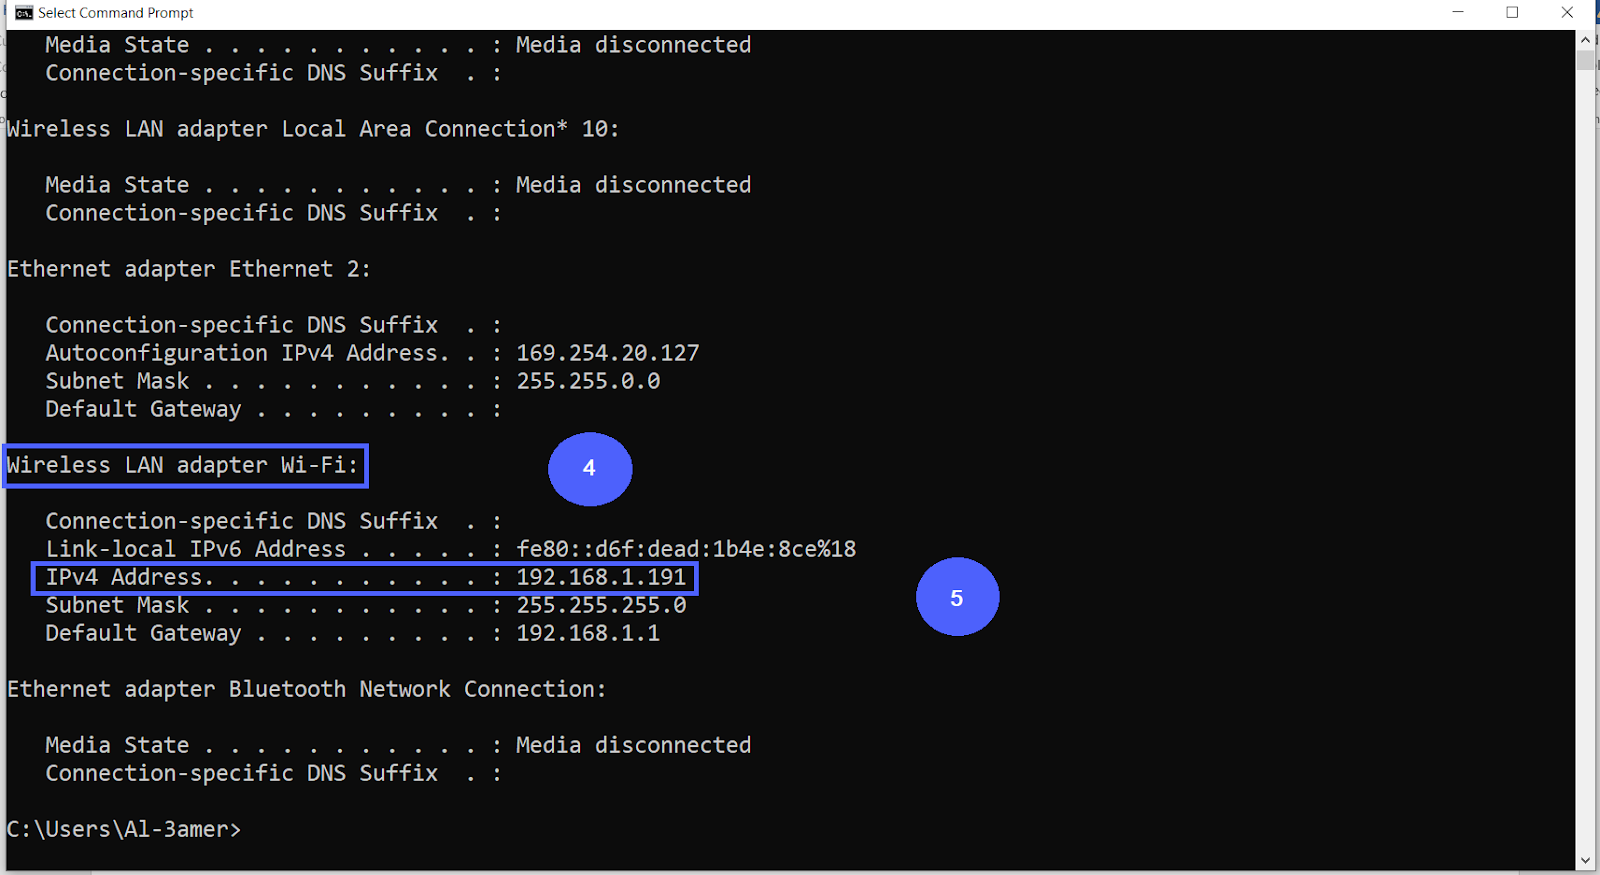
Note, The IP network address is required for use in Net-to-PLC communication.
Step 3 - Configure Net to PLC SIM
Step 3.1 - Return to Net-To-PLC-Sim screen.
Step 3.2 - Click “Add.”
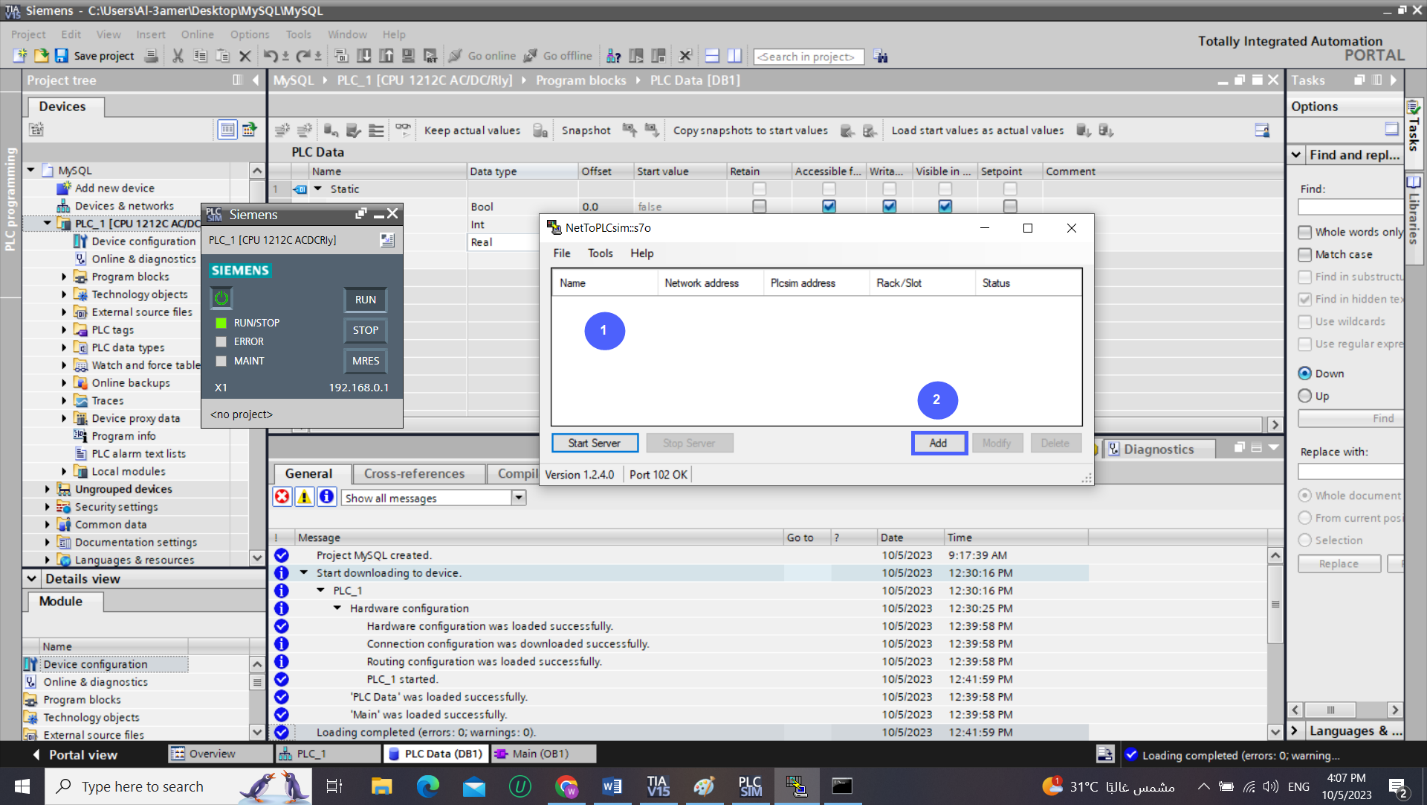
Step 3.3 – Set your PC Network IP && PLC Ethernet IP && Rack and slot Numbers && Click “OK.”

Step 3.4 – Click “Start Server.”
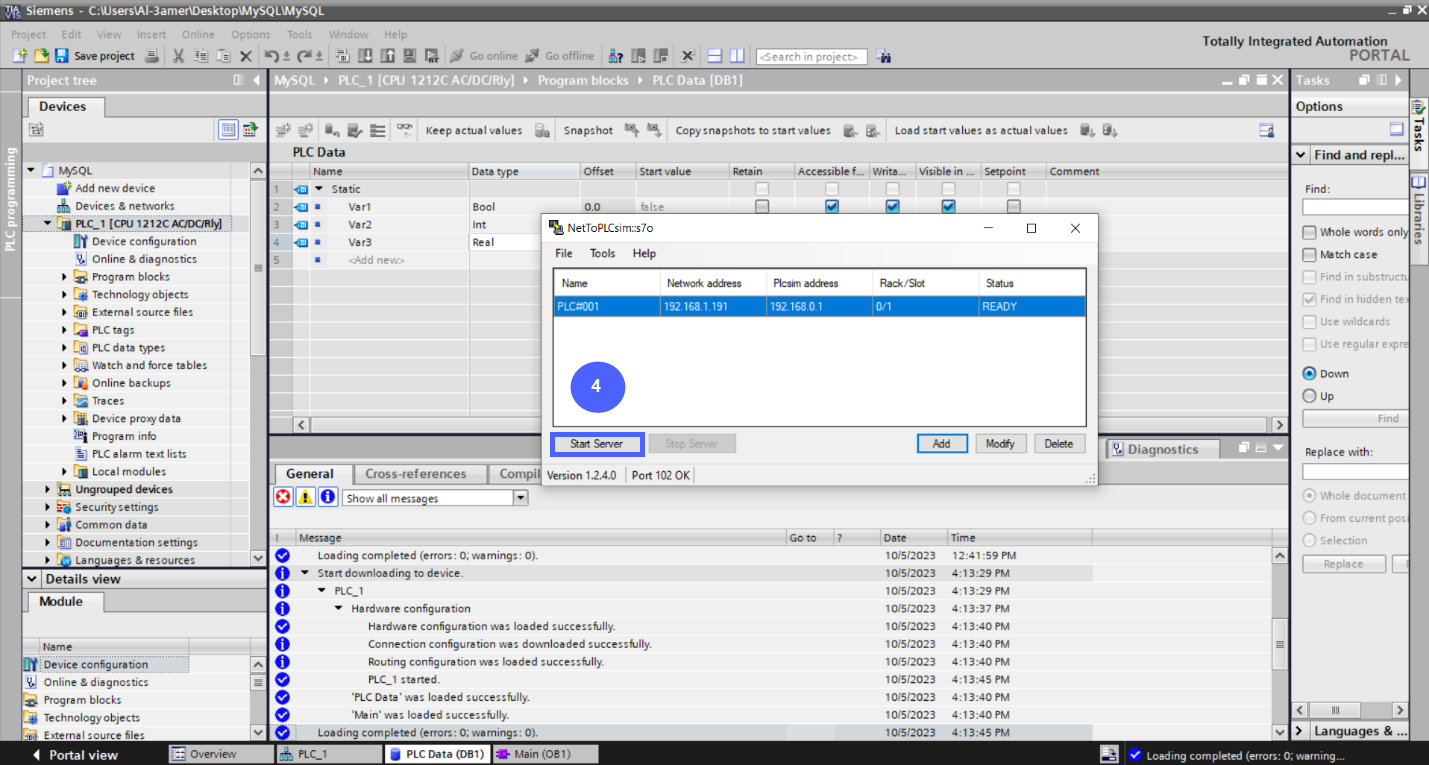
Note: The PLC is currently running on your PC's network IP.
MySQL side – SQL Programming
Now, we're going to create a new database and table to store data. We'll leverage the features of the MySQL software to quickly create the database and table. Additionally, we will explore essential SQL queries that you'll frequently use, such as insert, update, delete, and select queries.
Step 1 - How to create a new database
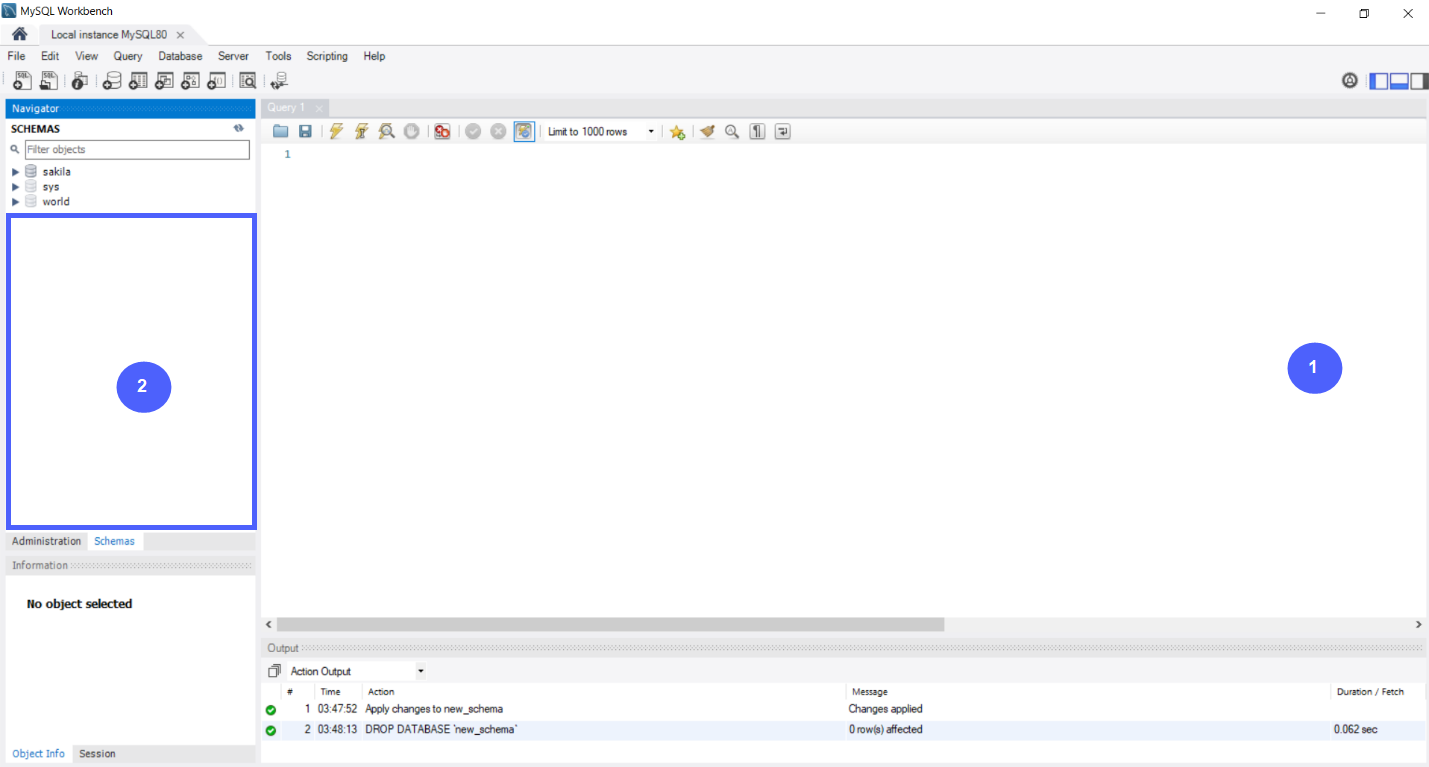
Step 1.1 - Open “MySQL Server.”
Step 1.2 - Right Click on Any Empty Space in the Selected Area.
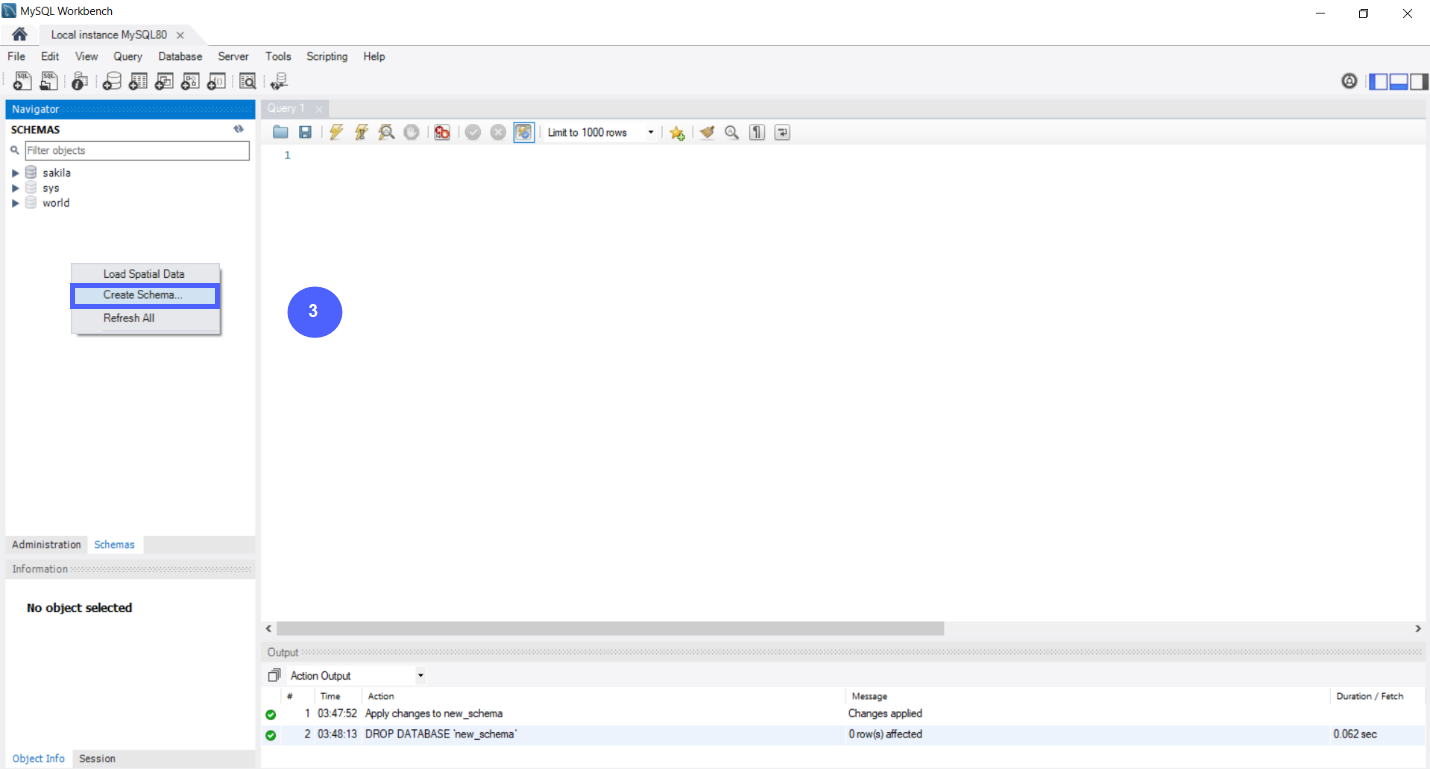
Step 1.3 - Select “Create Schema.”
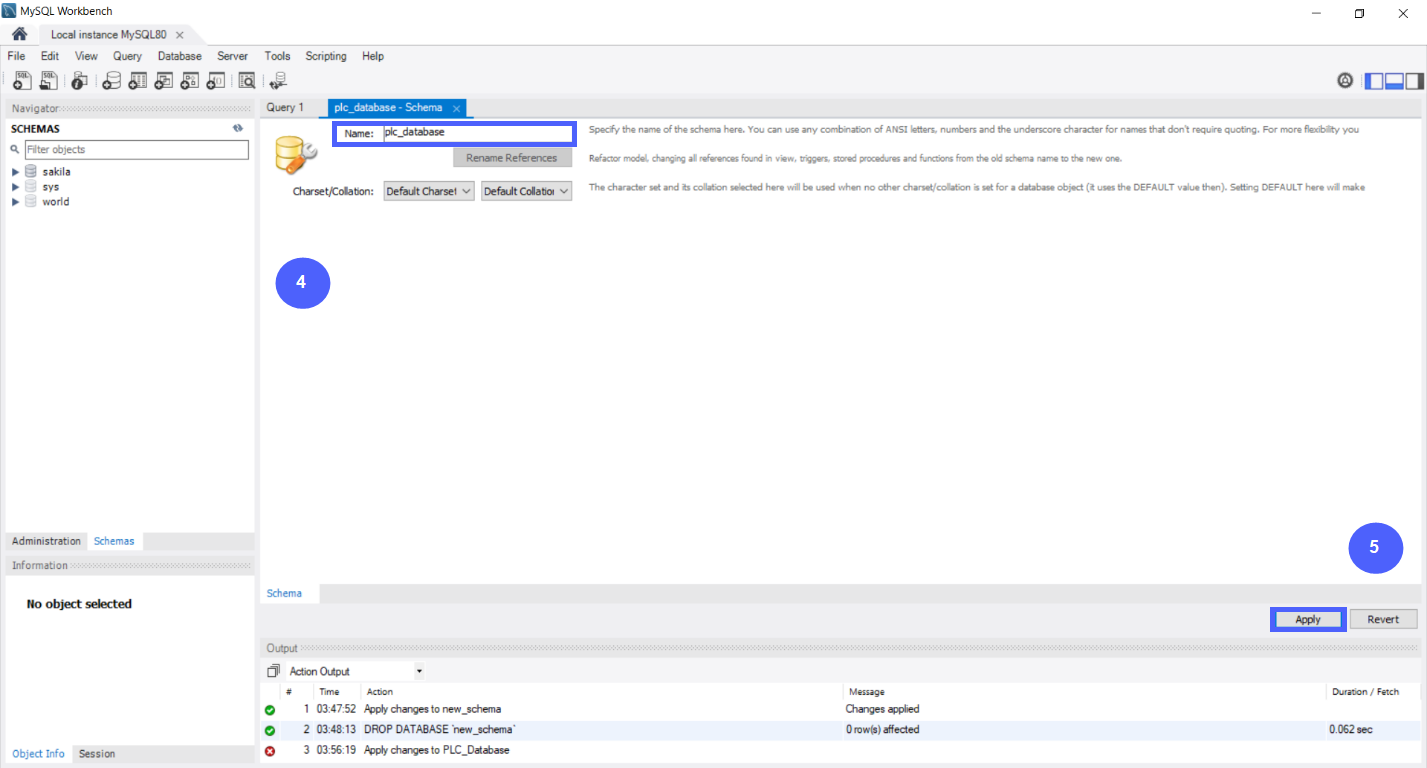
Step 1.4 - Set name of the new Database.
Step 1.5 - Click “Apply.”
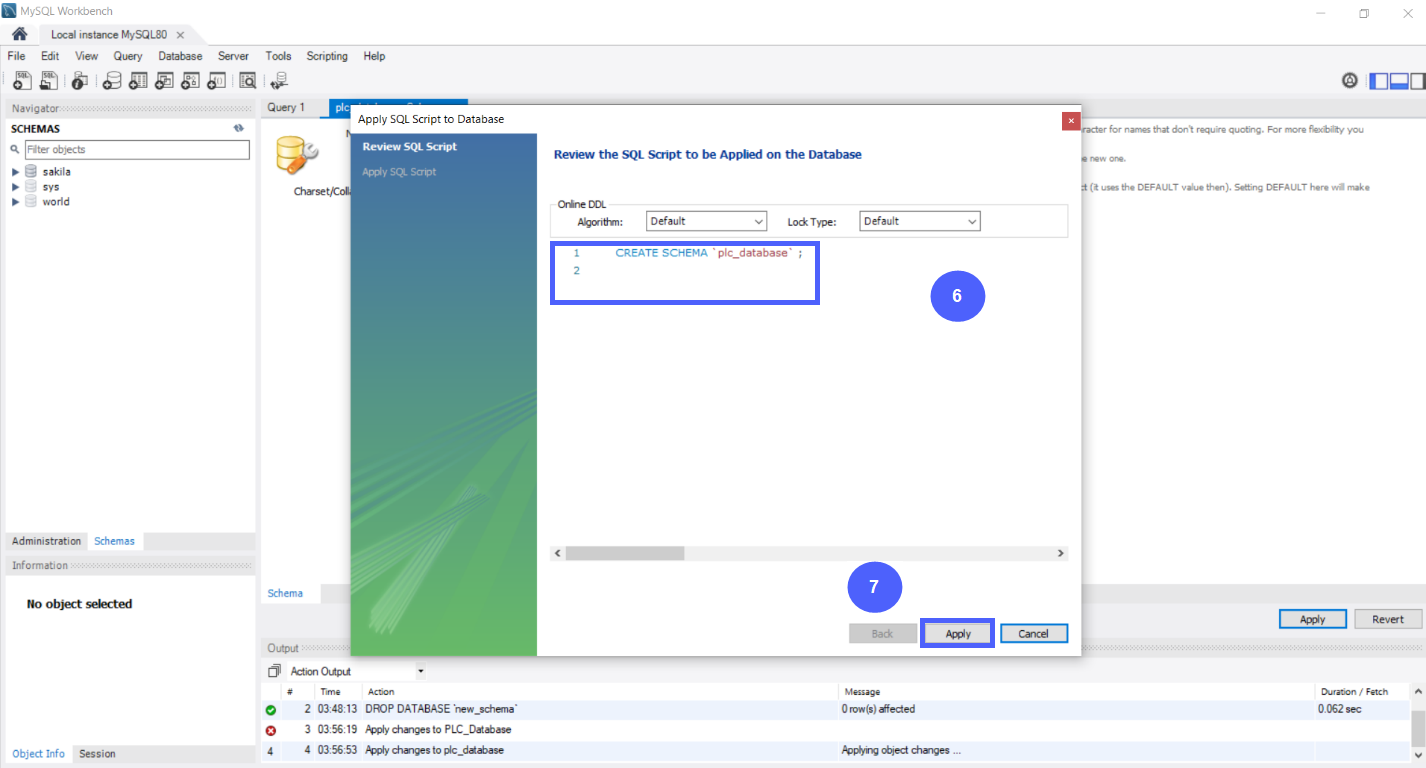
Step 1.6 - This is the SQL Queries to create a new database
Step 1.7 - Click “Apply.”
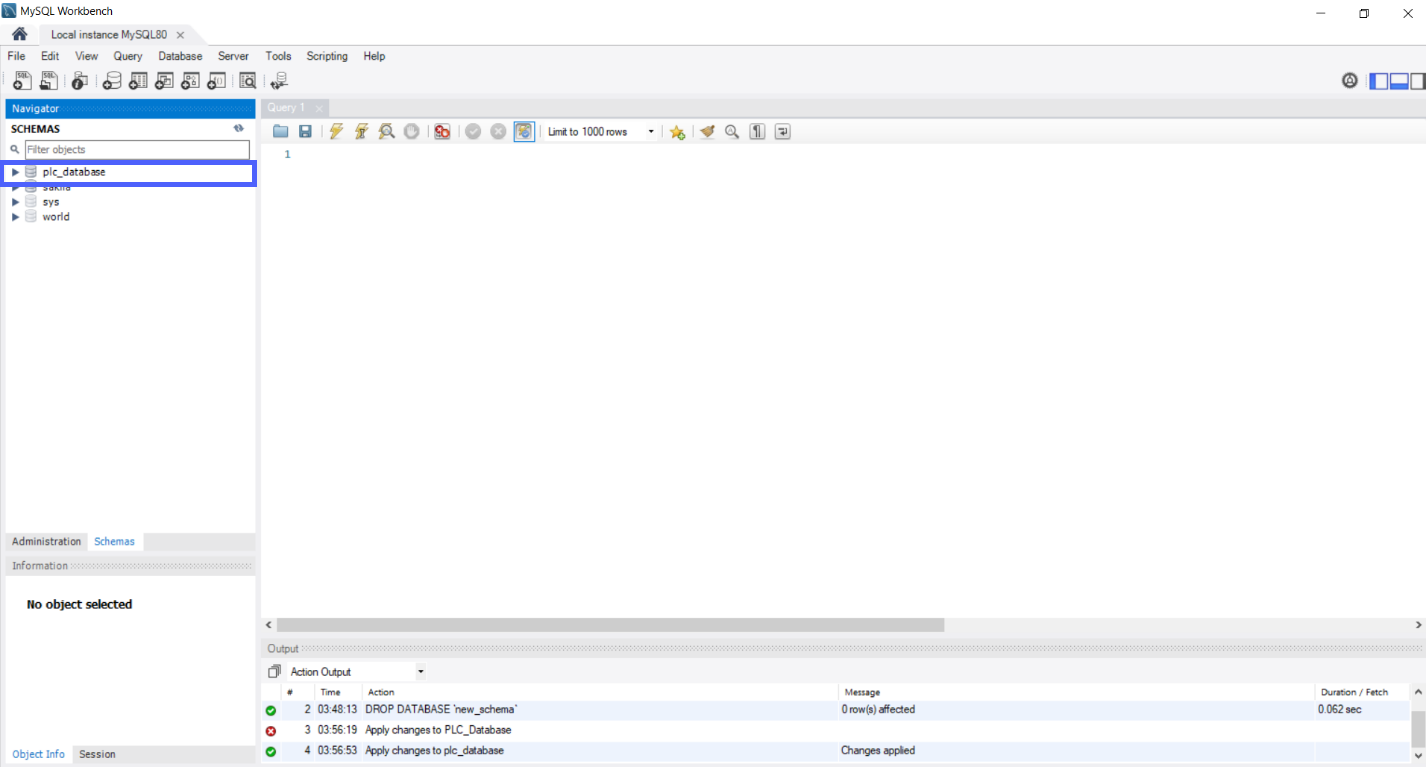
Now, the New Database Has Been Successfully Created.
Step 2 - How to create a new Table
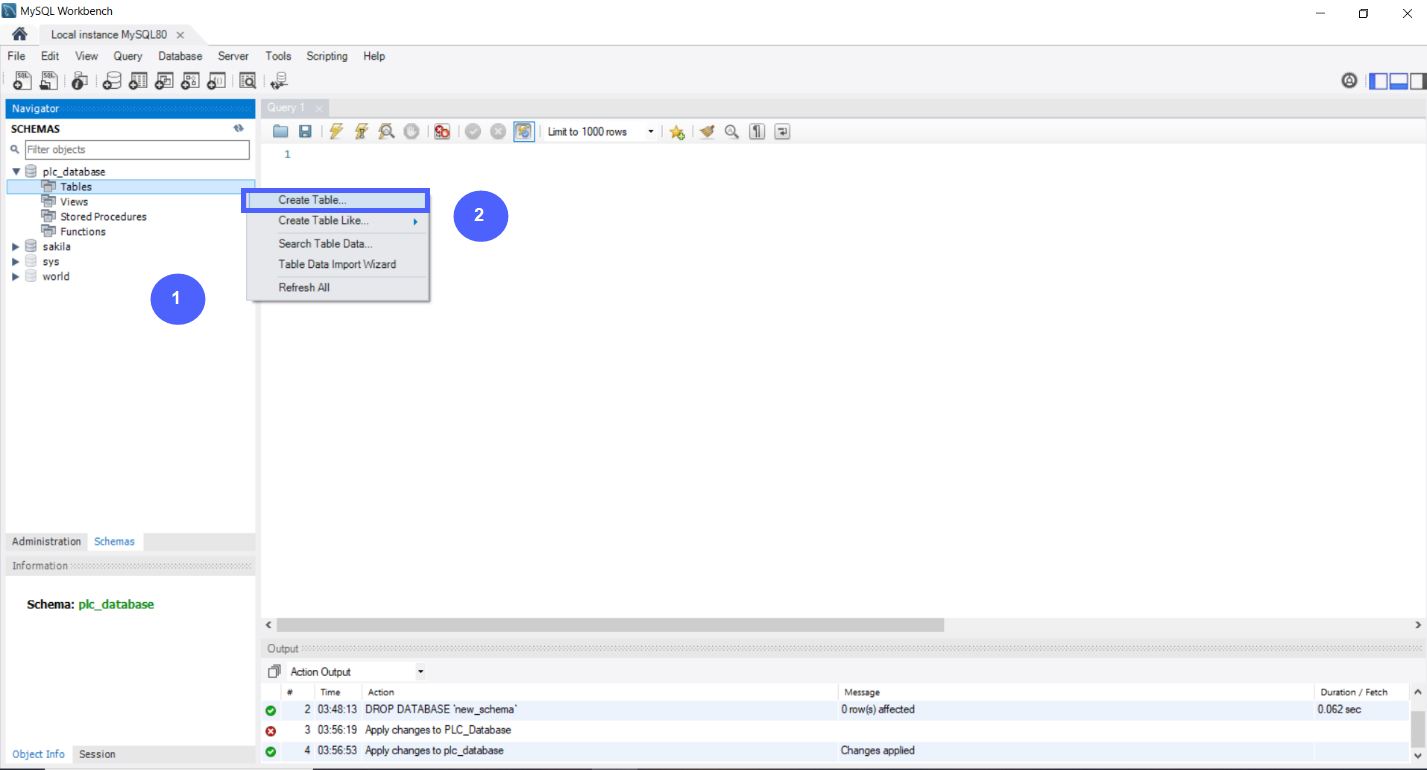
Step 2.1 - Open your database and Right Click on “Tables.”
Step 2.2 - Select “Create Table.”
Step 2.3 - Set name of the new Table.
Step 2.4 - Add your Variable will be stored later. | Note, we will set the Data type of var1 to Bool later.
Step 2.5 - Click “Apply.”
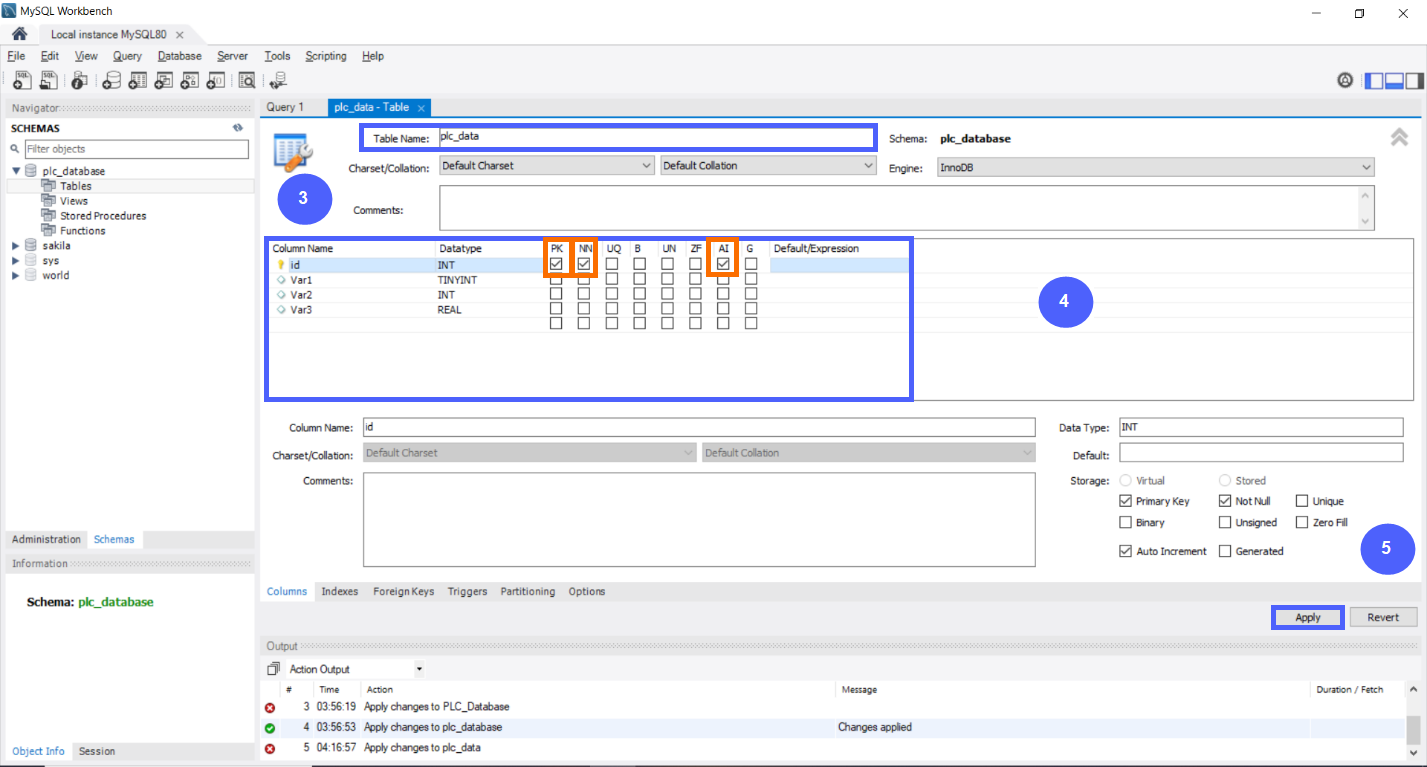
In the highlighted orange area in the figure above:
- 'PK' signifies that the 'id' will be used as a primary key, ensuring the uniqueness of each row.
- 'NN' indicates that this field must not contain empty values.
- 'AI' designates our intention to create an auto-increment ID variable for new rows, guaranteeing a unique ID is generated for each newly added row."
Note: The data type of 'Var1' is Boolean. If you encounter any difficulties setting it in step 2.4, we will address it in the next step."
Step 2.6 - This is the SQL Queries to create a new Table.
Step 2.7 - Click “Apply.”
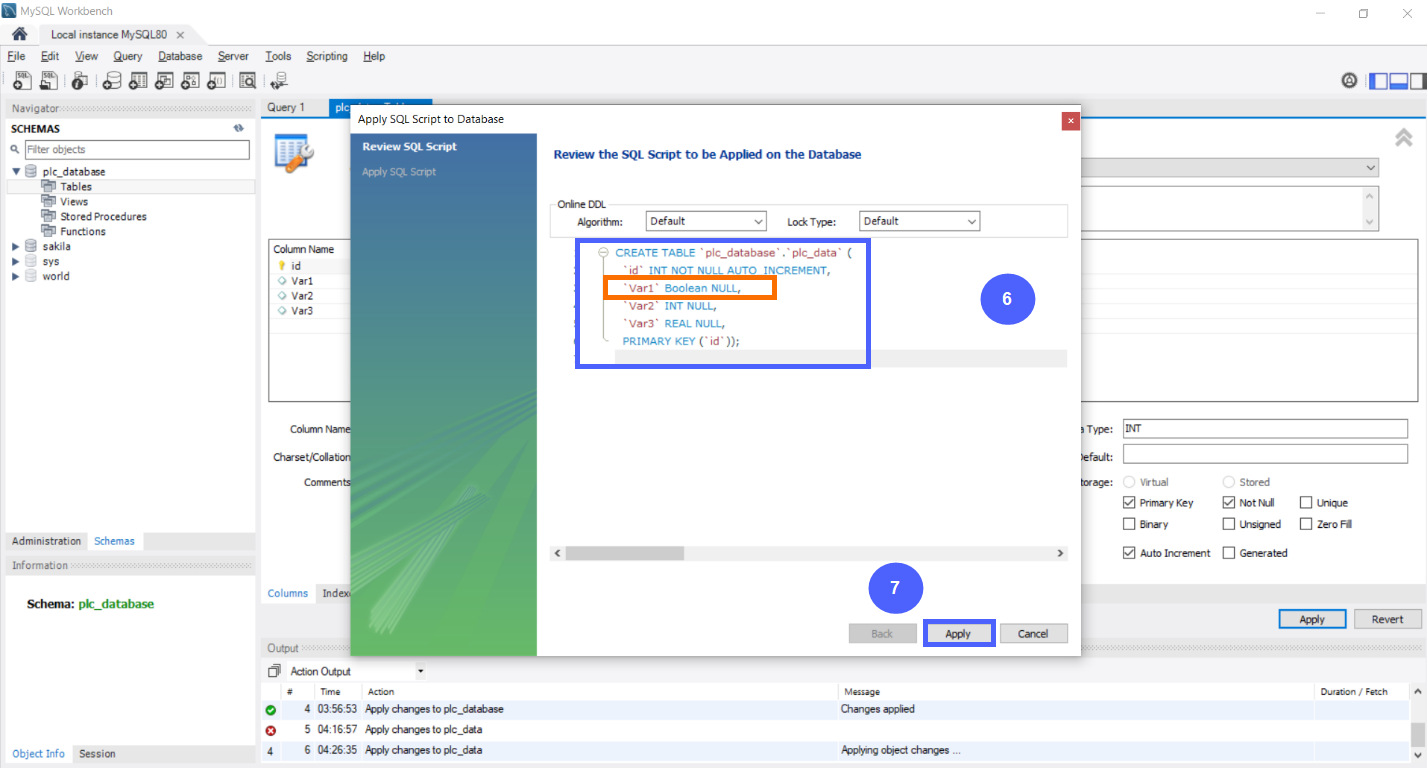
In the highlighted orange area in the figure above we set the data type of Var1 to Boolean.
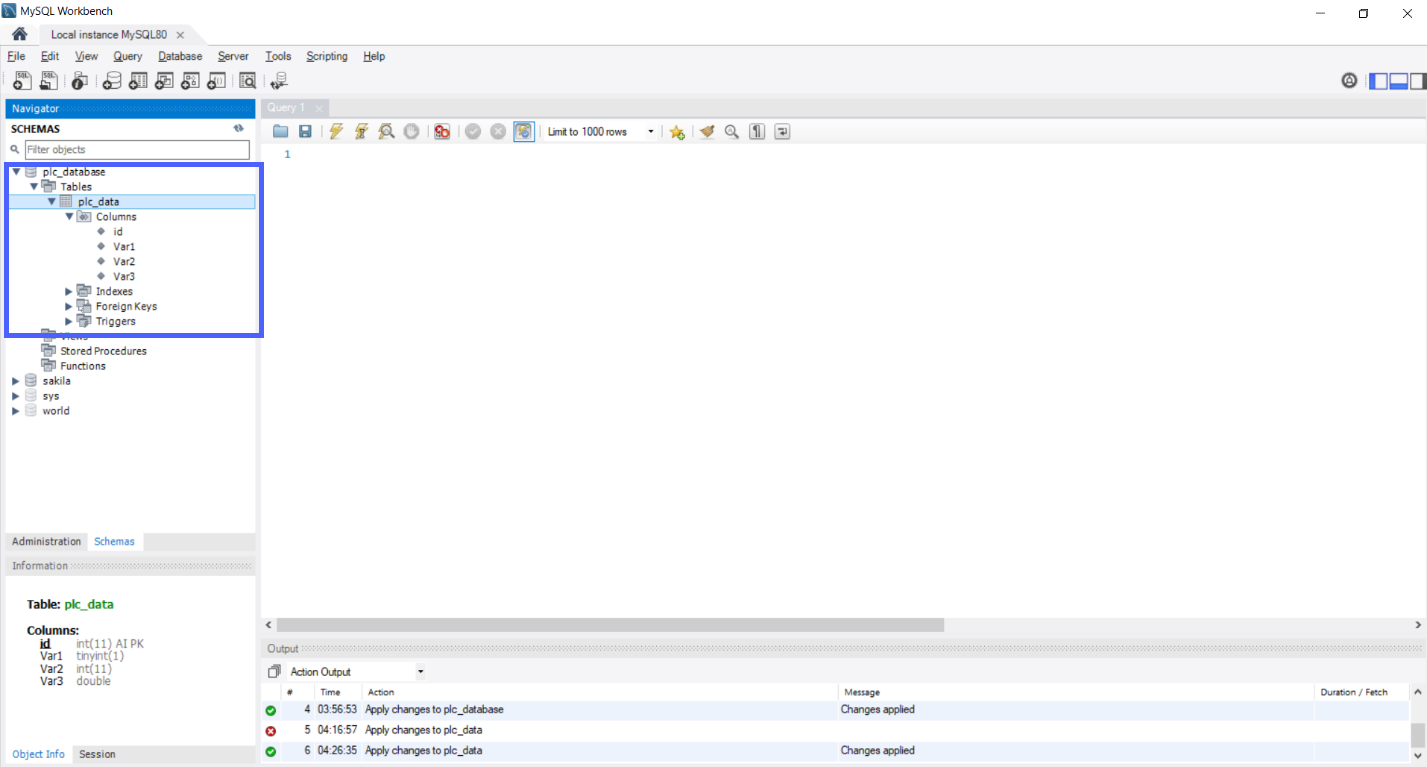
Now, the New Table Has Been Successfully Created.
Step 3 - How to Create insert SQL Queries
The process of inserting SQL queries involves adding new data to the table in the database.
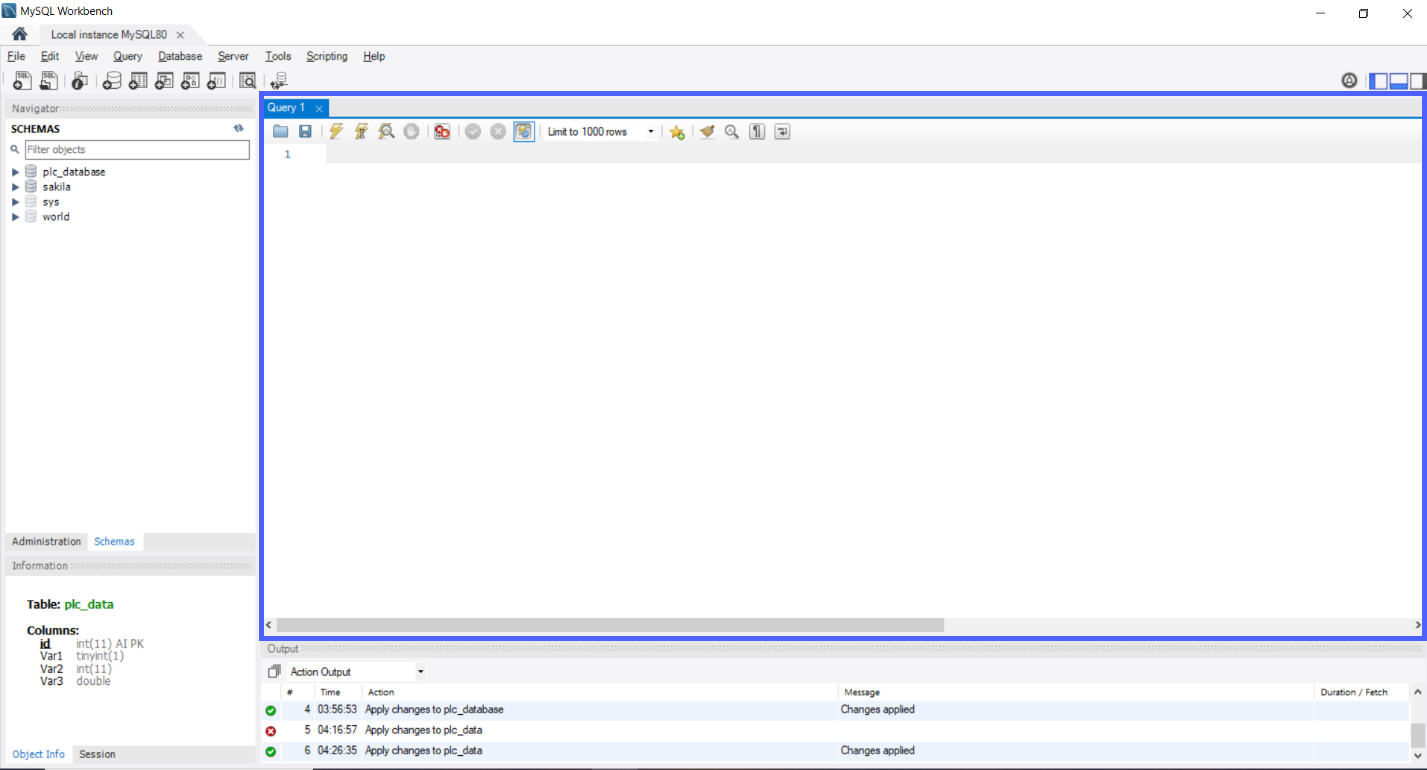
In the figure above, you can see the Query View, where we will create and manage our SQL queries.
Let’s learn how to make insert Queries.
Step 3.1:
We must select the database first by using the format: use database_name.
Step 3.2:
The general query format for inserting data is: INSERT INTO table_name(column_list) VALUES(value_list).
In our case, we will use the table named 'plc_data,' and the column list will include (Var1, Var2, Var3). We will populate the value list with the specific values we want to assign to these columns.
Note: Instead of specifying a column list, you can use '*' to indicate that you want to insert values into all columns. For example, INSERT INTO table_name * VALUES(value_list) would insert values into all columns of the table.
Note: it's important to use a semicolon ' ; ' at the end of each query.
Step 3.3:
Execute the query.
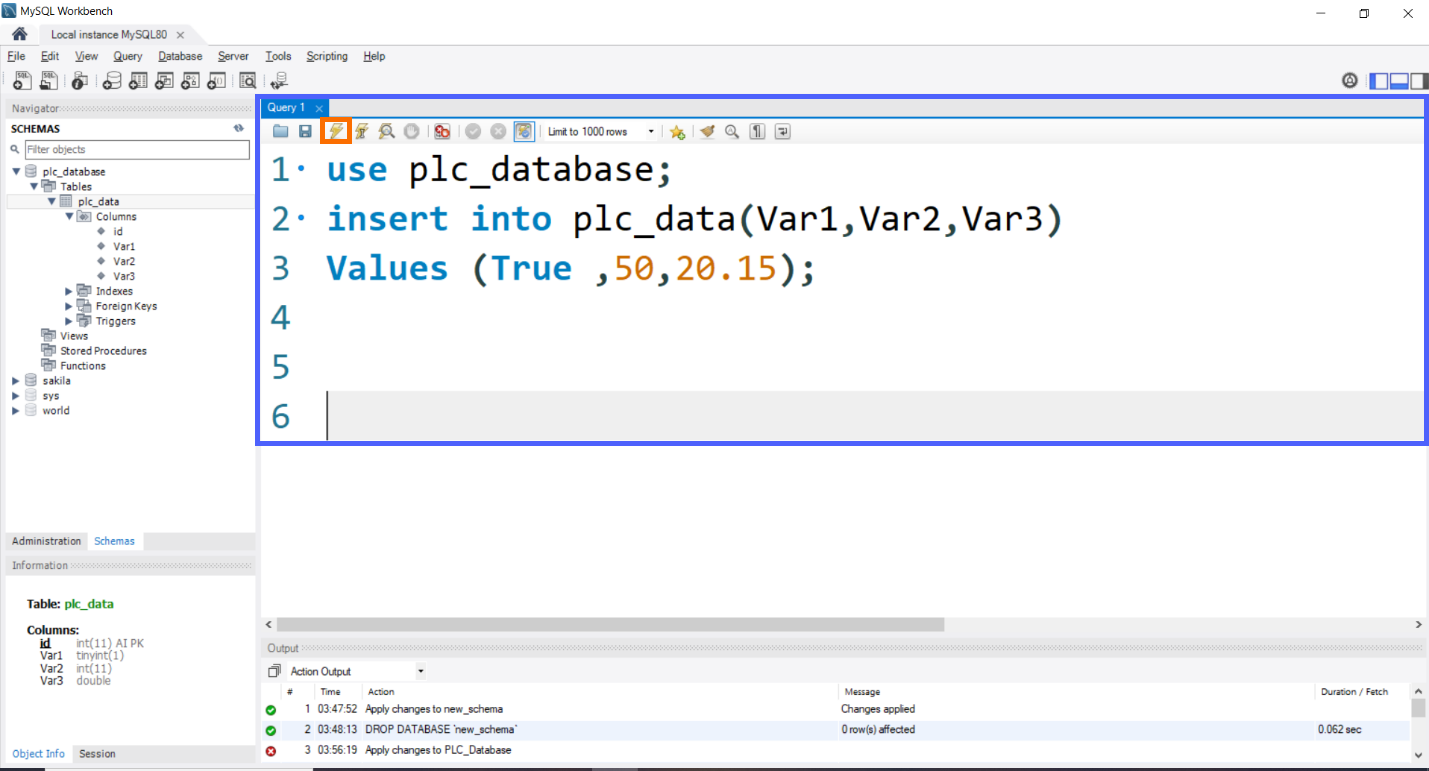
Note: In the figure above, to execute our queries, we need to click on the icon highlighted in the orange area.
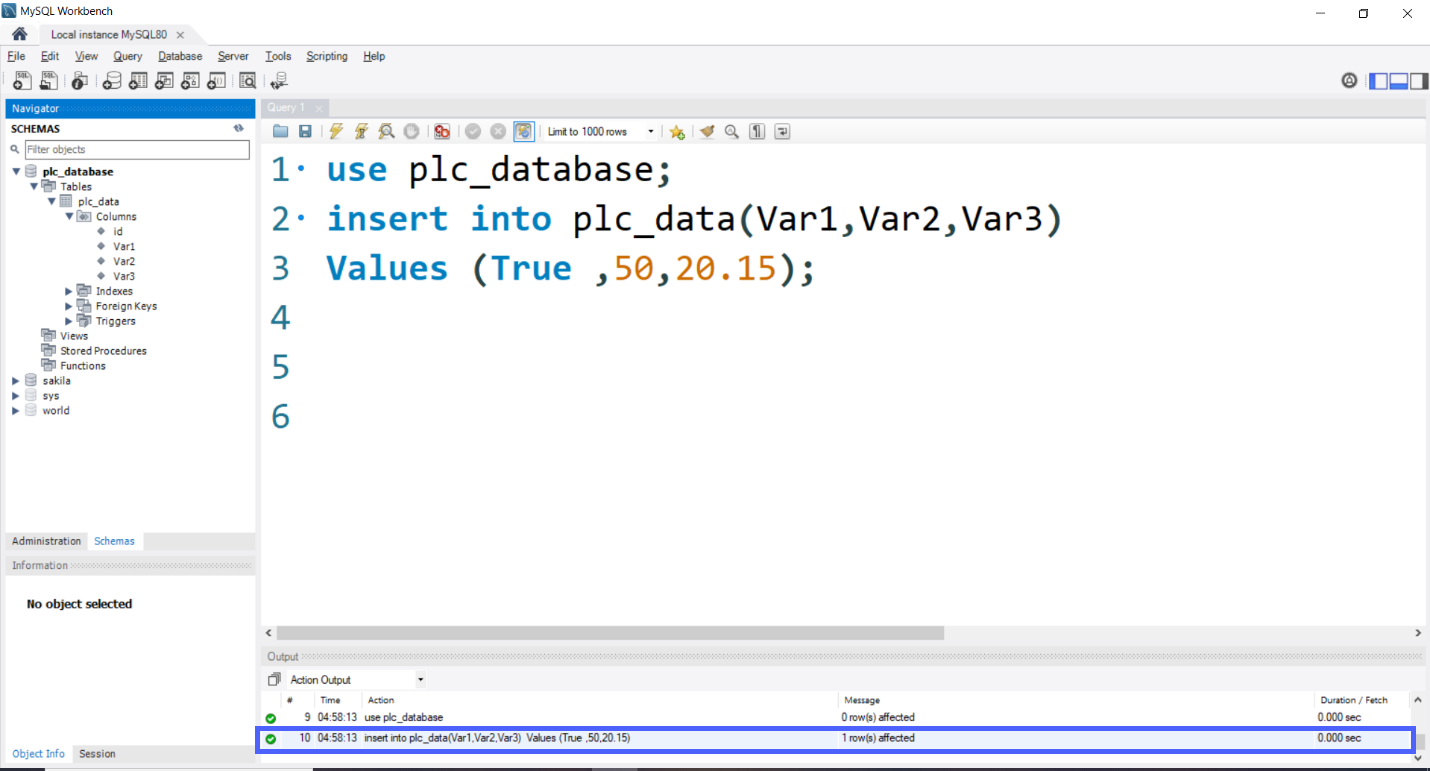
In the figure above, the executed query was successful.
Step 4 - How to Create Select SQL Queries
The purpose of selecting SQL queries is to select and display data in a table.
Let’s learn how to make select Queries.
Step 4.1:
We must select the database first by using the format: use database_name.
Step 4.2:
The general query format for select data is: select column_list from table_name.
Note: Instead of specifying a column list, you can use '*' to indicate that you want to select all columns. For example, select * from table_name would select all columns of the table.
Step 4.3:
Execute the query.
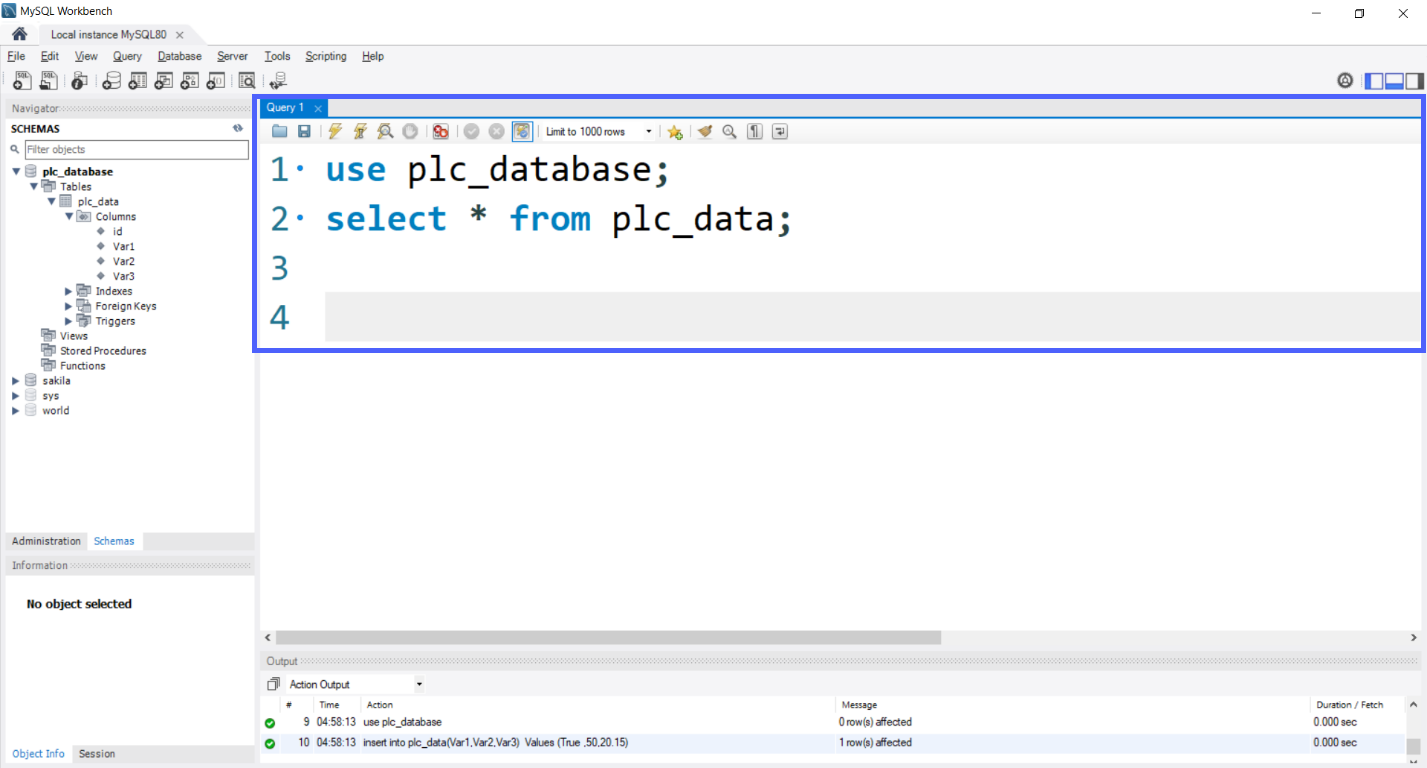
After execution, you will see the selected data displayed in a table format.

Step 5 - How to Create Update SQL Queries
The purpose of using UPDATE SQL queries is to modify or update values in a table.
Let’s learn how to make updating Queries.
Step 5.1:
We must select the database first by using the format: use database_name.
Step 5.2:
The general query format for update data is: UPDATE table_name SET column_name = new_value [WHERE condition]
Step 5.3:
Use select query to see the new result.
Step 5.4:
Execute the query.

After execution, you will observe the updated data displayed in a table format.

Step 6 - How to Create Delete SQL Queries
The purpose of using DELETE SQL queries is to remove or delete specific rows from a table in a database.
Let’s learn how to make Deleting Queries.
Step 6.1:
We must select the database first by using the format: use database_name.
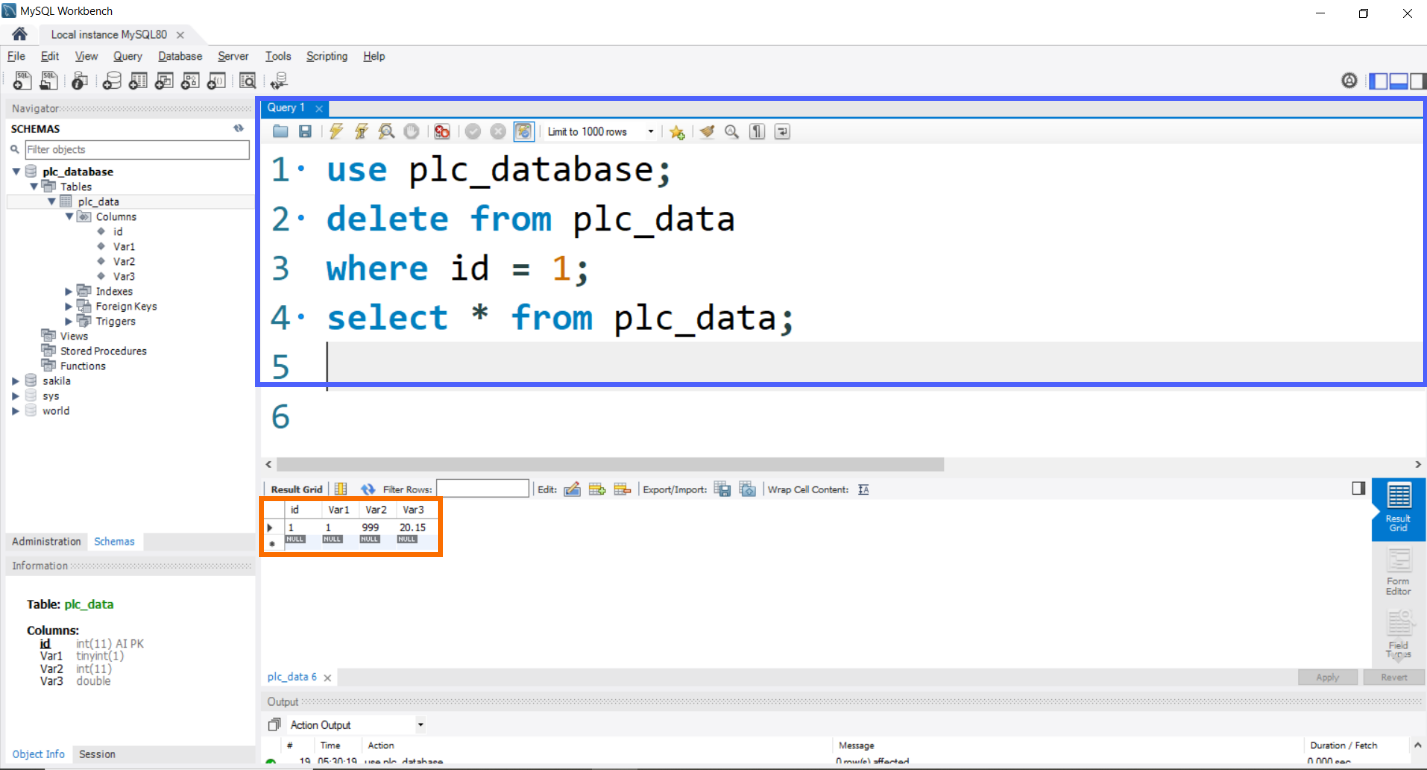
Step 6.2:
The general query format for update data is: Delete From table_name [WHERE condition]
Note: When DELETE queries are used without a WHERE condition, they will delete all rows in the specified table. You can use the format 'DELETE TOP number FROM table_name' to specify the number of rows to delete. For example, 'DELETE TOP 10 FROM table_name' will delete the top 10 rows in the 'table_name' within the database."
Step 6.3:
Use select query to see the new result.
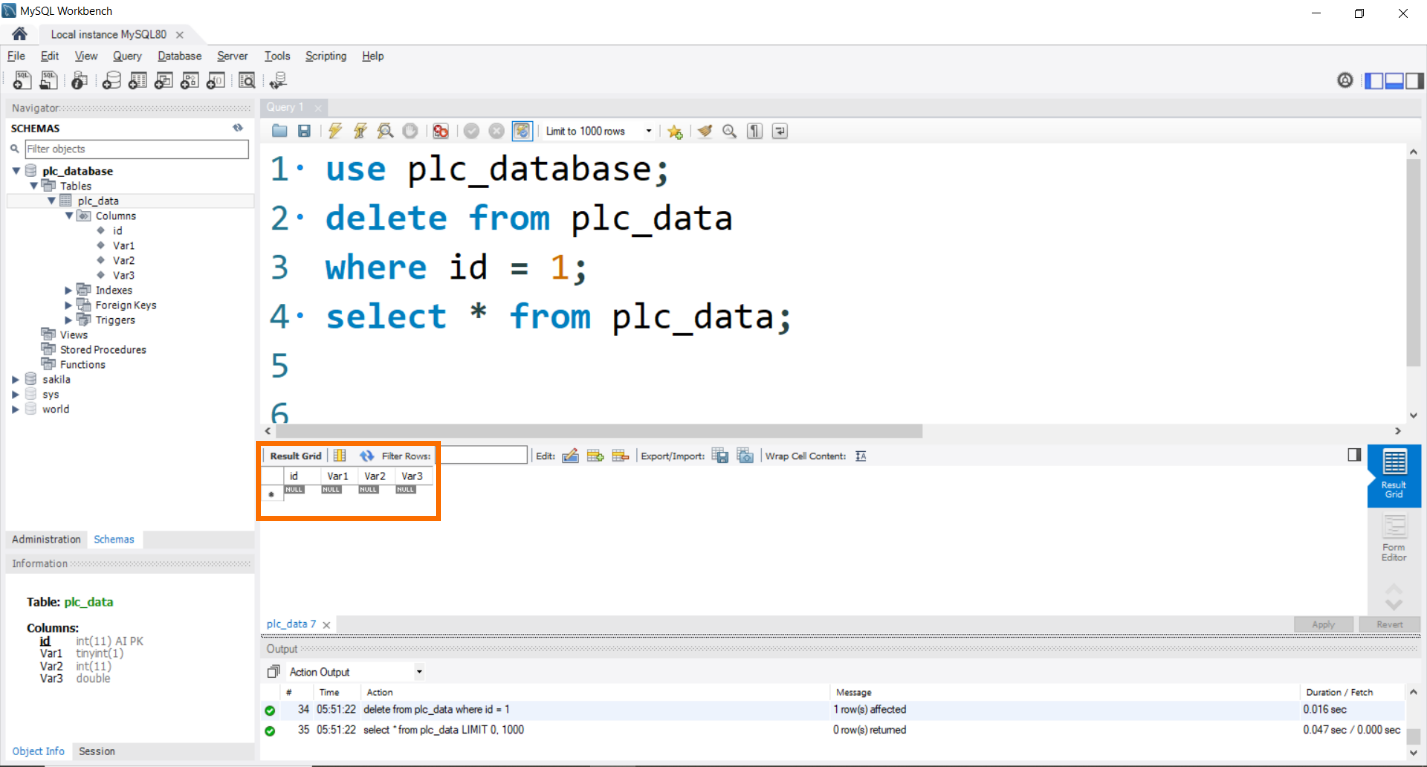
Step 6.4:
Execute the query.
After execution, you will notice that the deleted data is no longer displayed in the table format.
Now, we are prepared to work with the database in Node-RED.
Node-RED Essentials
Explore this tutorial for comprehensive guidance on using Node-RED. It covers essential topics such as reading and writing data from a PLC and creating a dashboard. We will integrate concepts from these tutorials into our current guide.
Node-RED side – Configurations for MySQL
We will need to install a MySQL palette.
Step 1 - How to install MySQL palette
Step 1.1 - Open Node-Red.
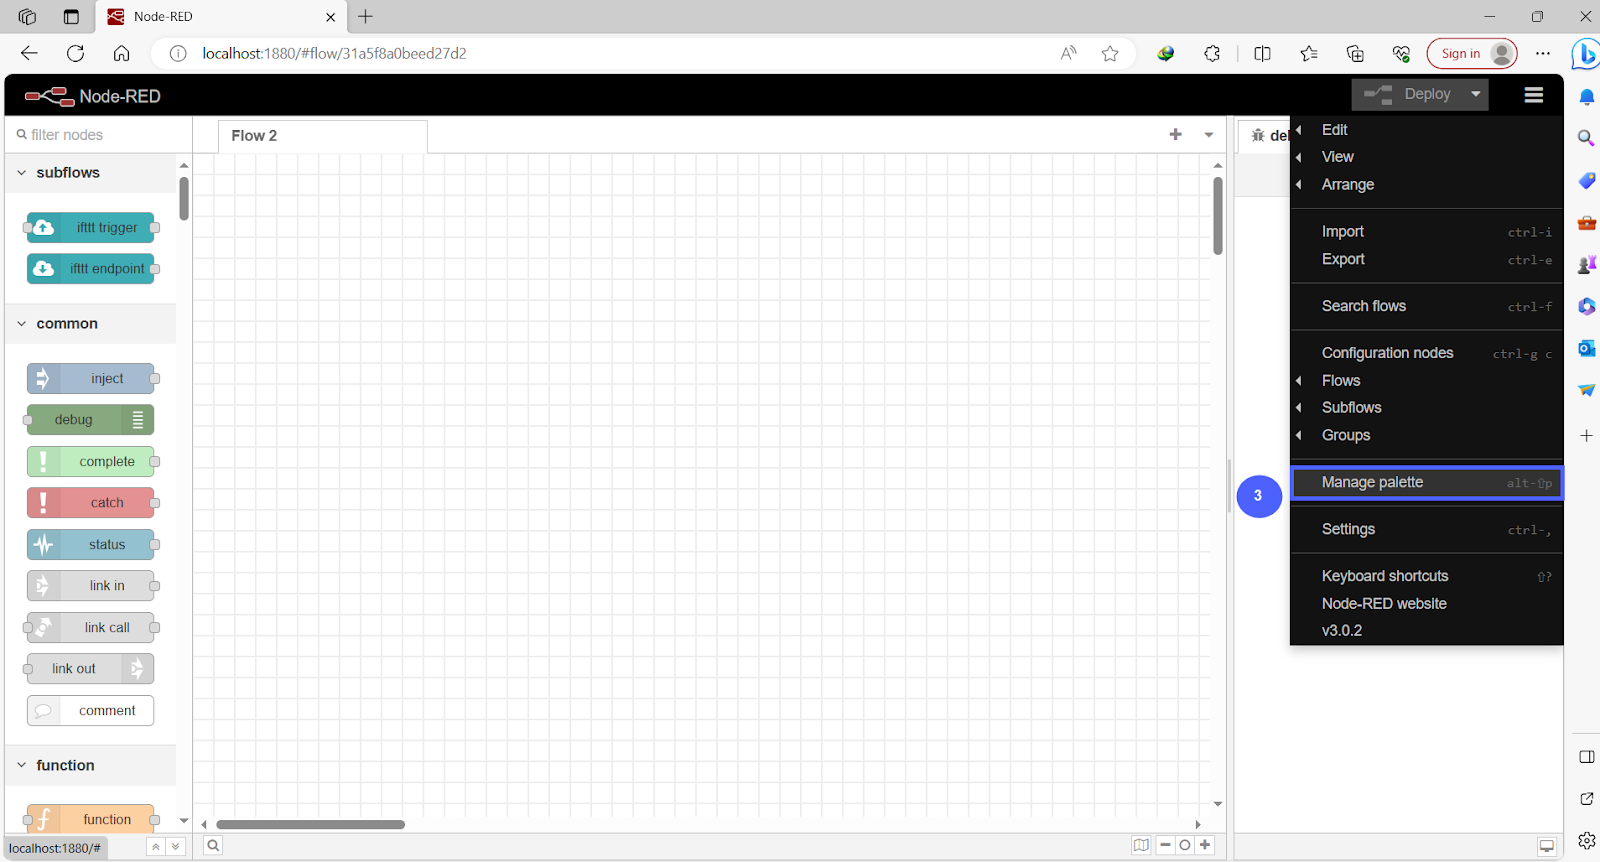
Step 1.2 - Click on setting.

Step 1.3 - Select “Mange Palette.”
Step 1.4 - Click “install” then Search for palette “node-red-node-mysql.” && Click “install.”
Note: already installed.

Step 2 - How to get mysql node
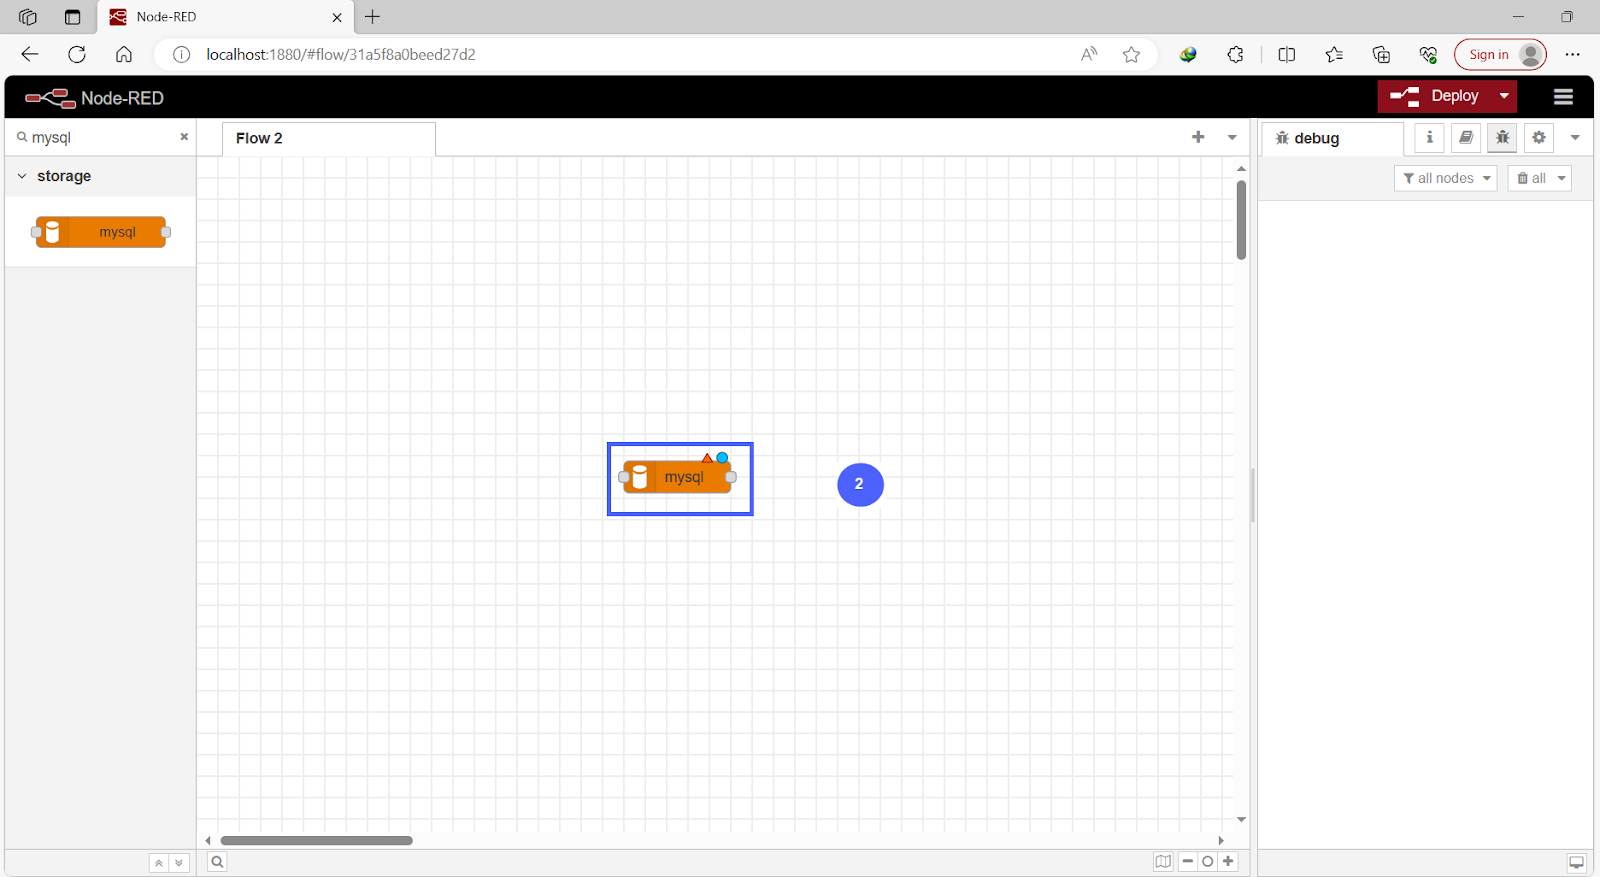
Step 2.1 - Go to the node list and Search for “mysql.”

Step 2.2 - Grab mysql node to the flow.
Step 3 - How to Connect MySQL to the Database
Step 3.1 - Double Click on “mysql node” to open its setting.
Step 3.2 - Click to add a new mysql database.

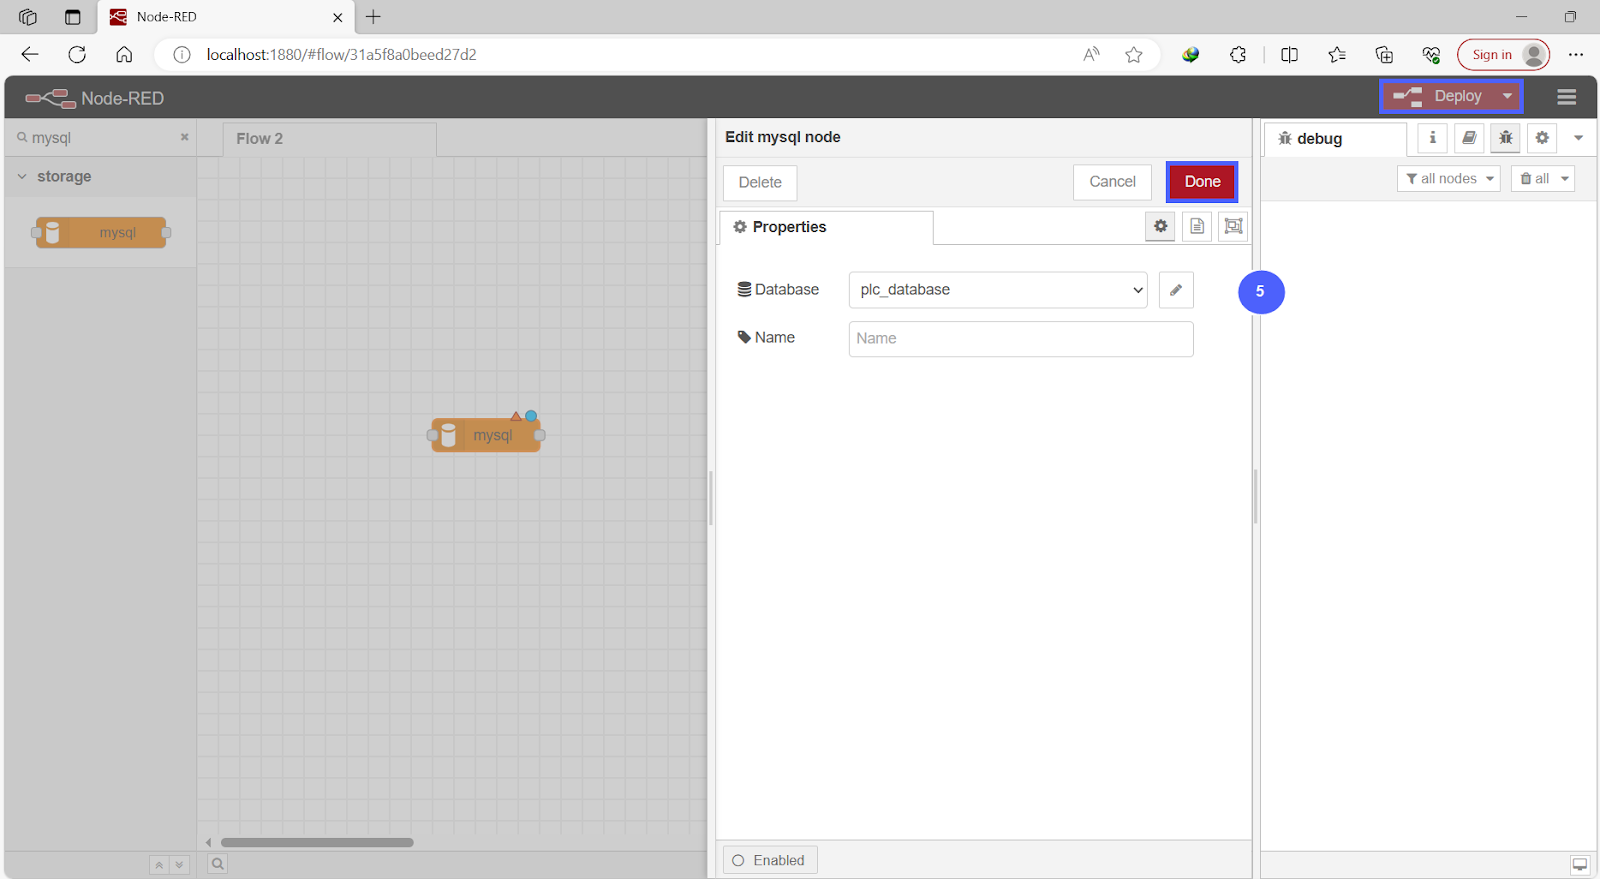
Step 3.3 - Set your user and password in your MySQL server && your database name.
Step 3.4 - Click “Add.”
Note: the port must be the same port of your MySQL server, check it from your MySQL server.

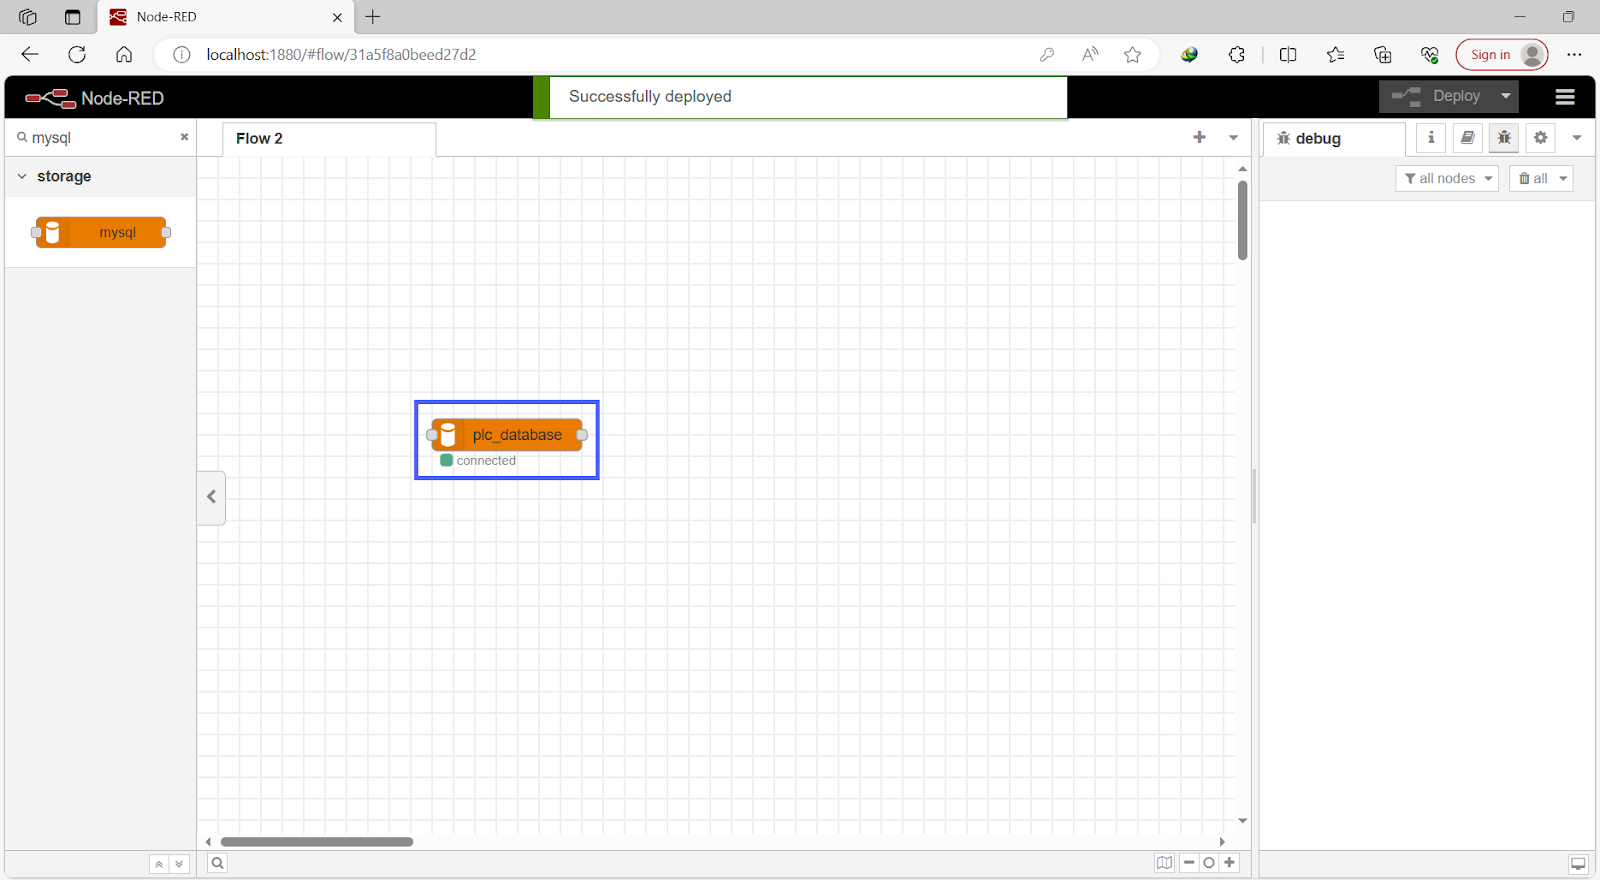
Step 3.5 - Click “Done” Then Click “Deploy.”
Now, the MySQL node is successfully connected to the MySQL database.
Node-RED side – Dashboard
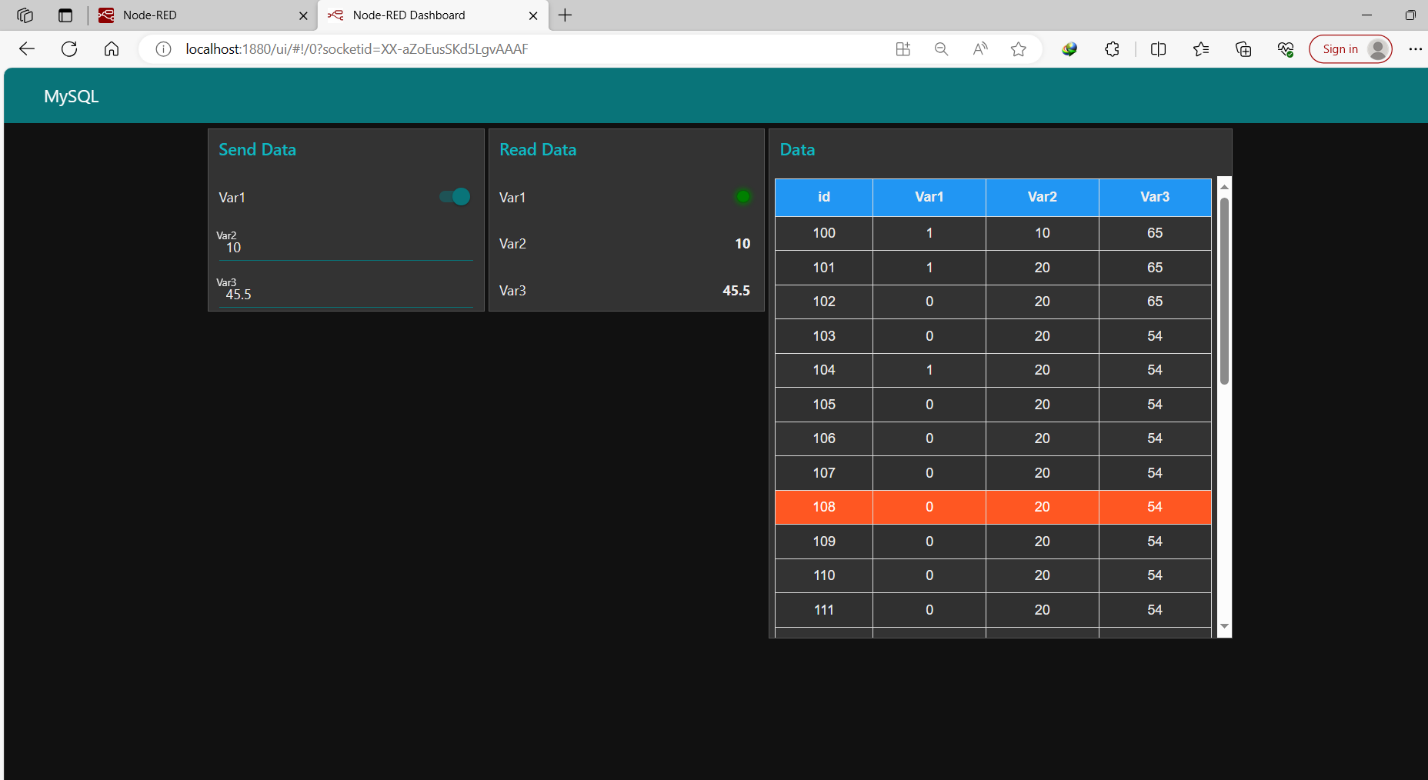
As the tutorial mentioned in the Node-RED Essentials section, we will now swiftly create a dashboard for reading and writing data to the PLC.
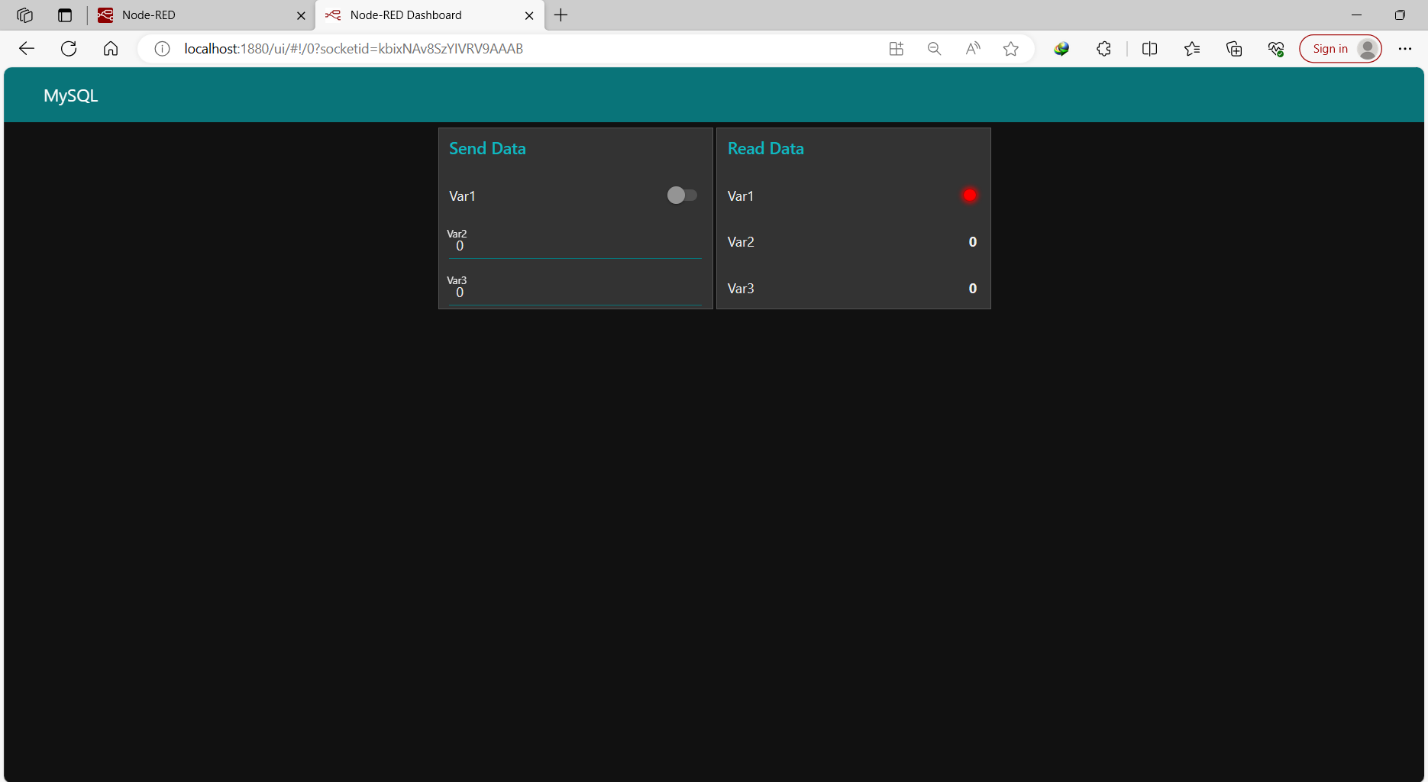
In the figure above, we have created a simple dashboard that allows us to read and write data in the PLC's DB.
Now, let's explore how to send this data to MySQL database.
Node-RED side – Programming for MySQL
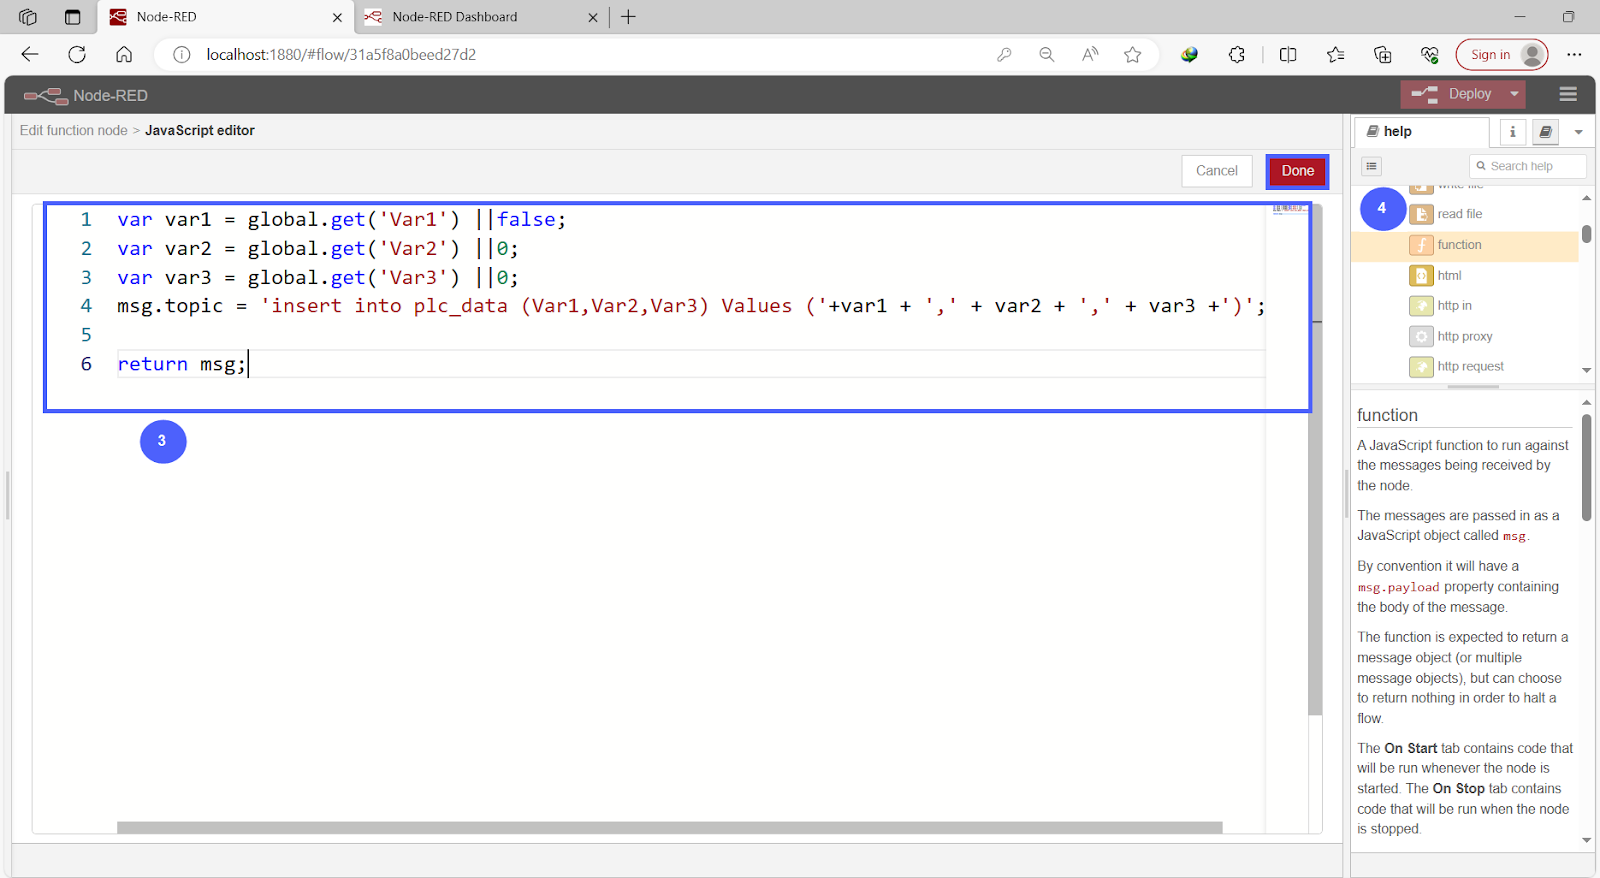
We will be using insert and delete queries, as explained earlier. To prepare for inserting our three variable data, we need to make them global values so that we can use them in any flow. The format to set a variable as global is “global.set('variable', Value),” and to call them, we use “global.get('variable').”
To ensure that these variables have a value, we can use the format “global.get('variable') || 0;”which defaults to zero if the variable has no value. Let's proceed by making the three variables from the PLC's DB global.
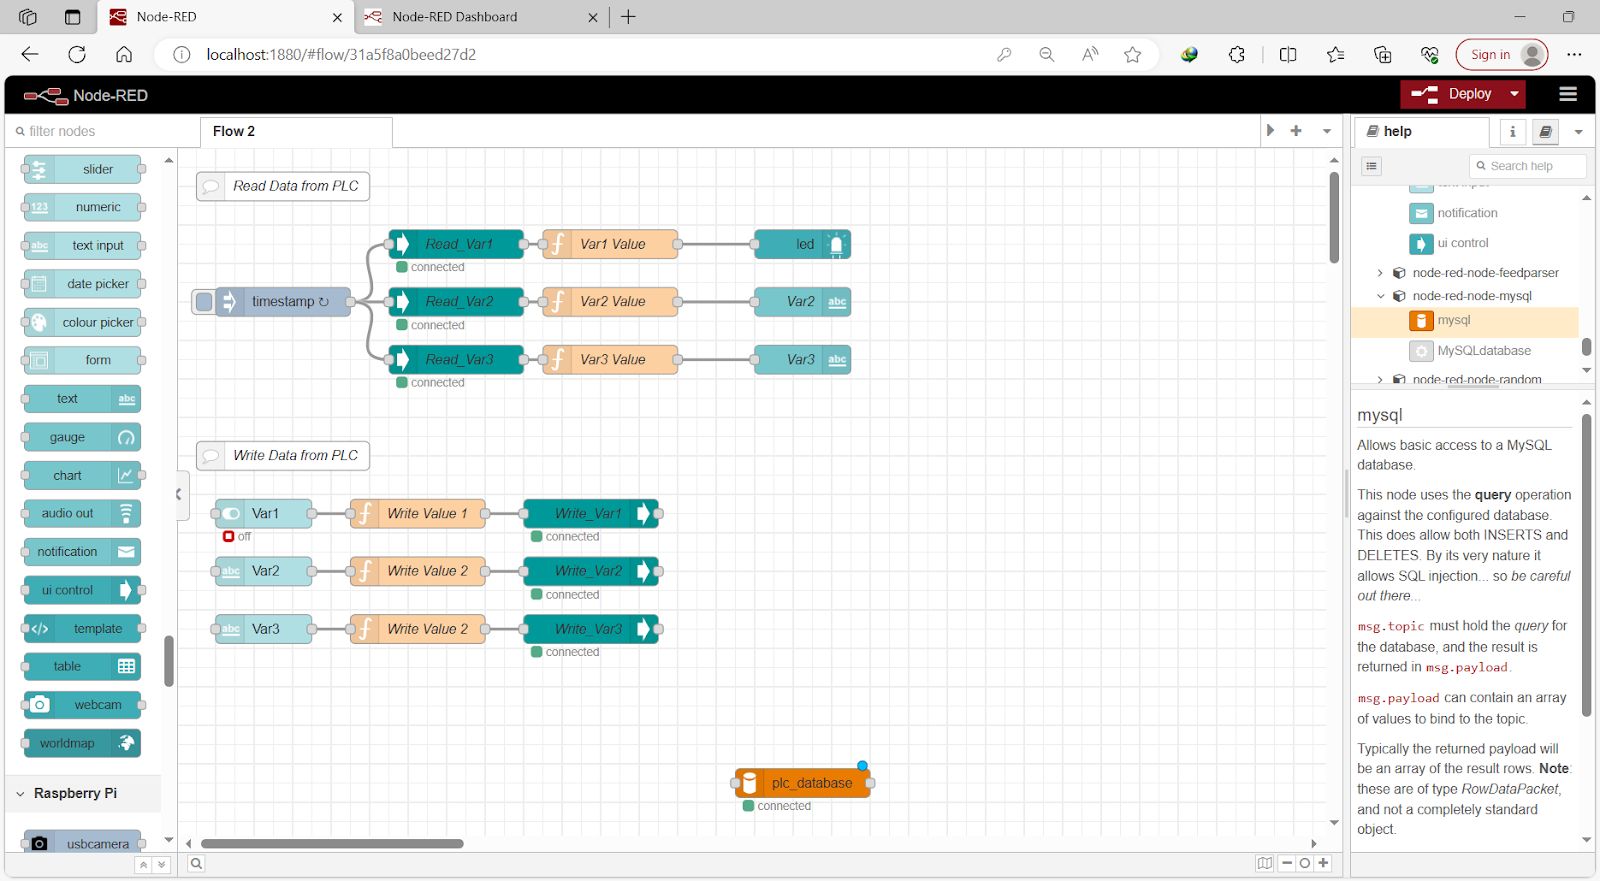
In the figure above we will configure the three function which connecting to Reading S7comm node
Step 1 - How to Make variable global
Step 1.1 - Double click on function node.
Step 1.2 - Making Var1 a Global Variable with a Value Read from the S7comm Node.
Step 1.3 - Click “Done.”
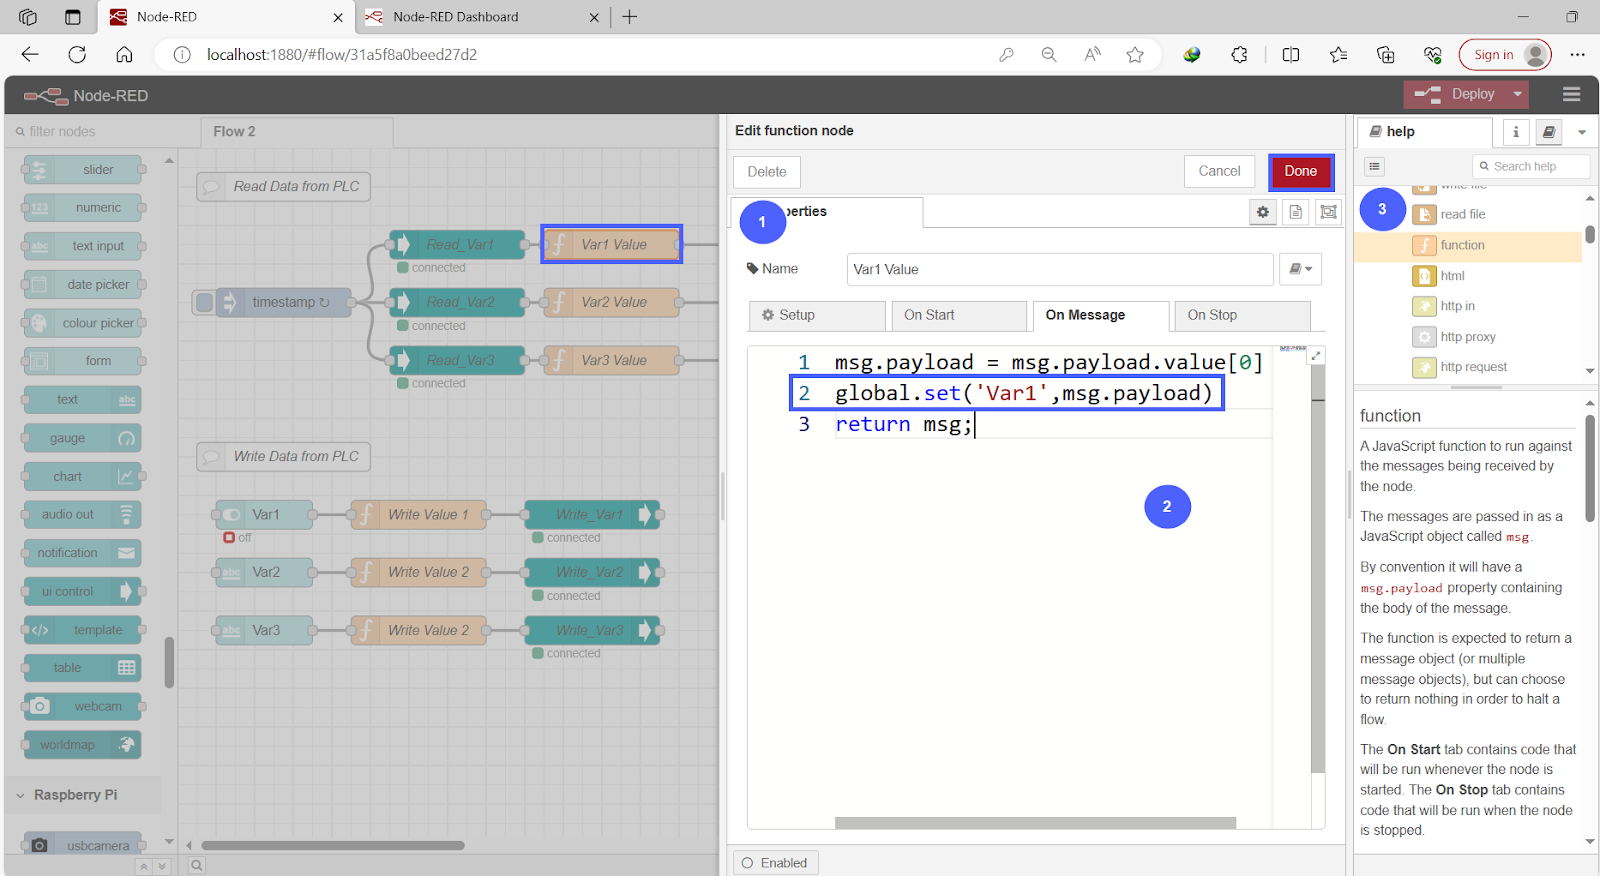
Similarly, for the other two functions: one will set 'Var2' as a global variable using “global.set('Var2', msg.payload),” and the other will set 'Var3' as a global variable using “global.set('Var3', msg.payload).”

Step 2 - How to get global variable
Step 2.1 - Grab a new “function node” into the Flow and Double click on this new function node.
Step 2.2 - Retrieving Your Global Variable. | Note: We retrieve the global variable and store it in a new temporary or local variable.
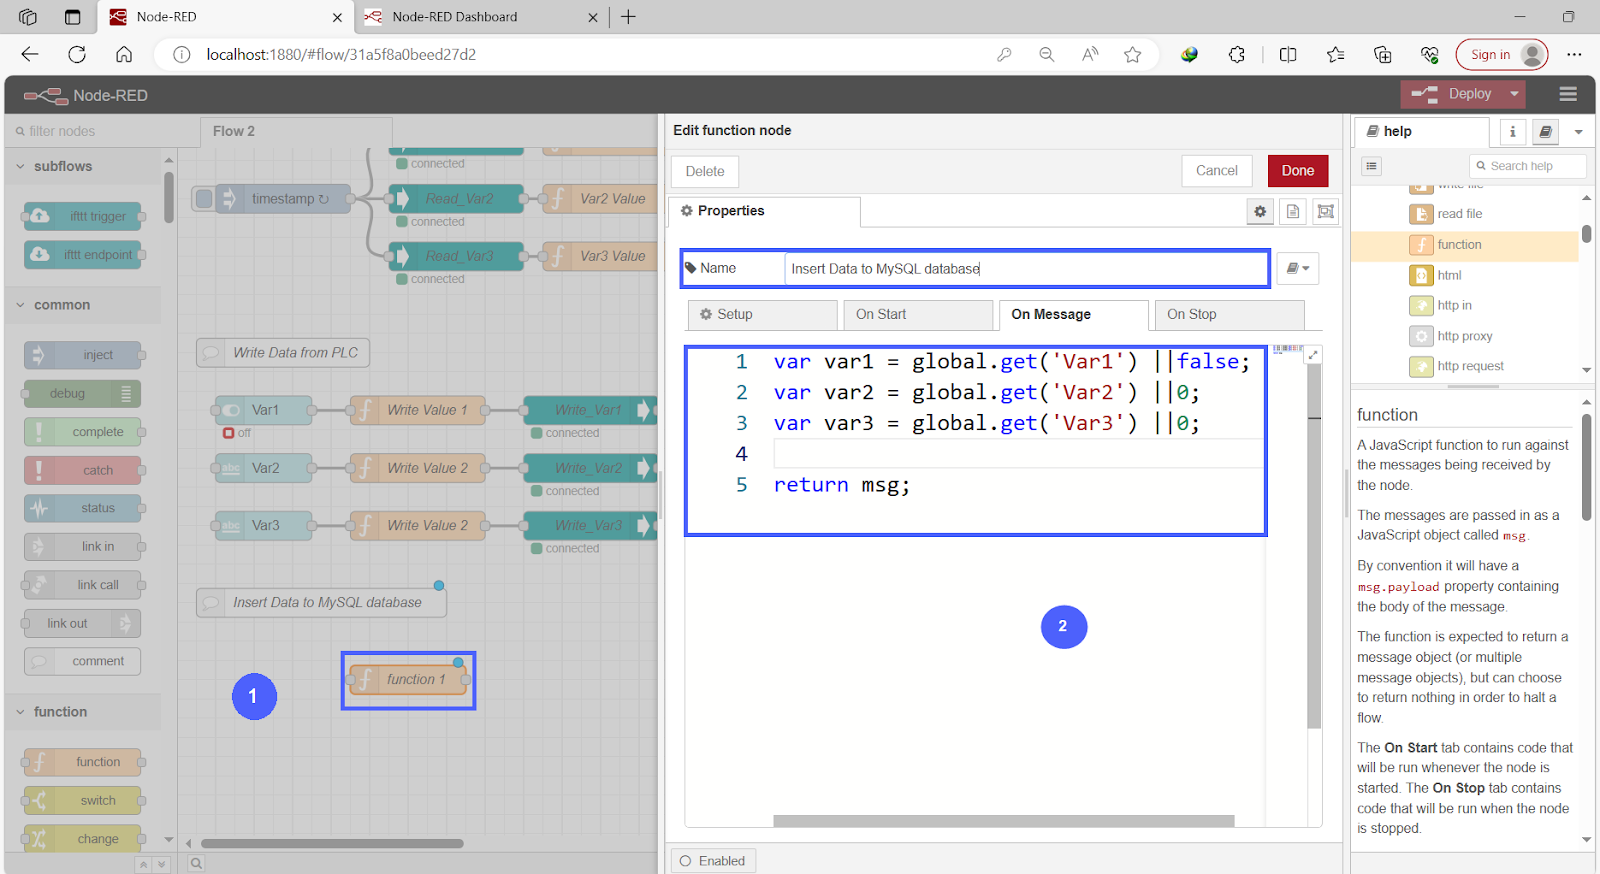
Note: To create a local variable in Node-RED, you can use either the let or var keywords followed by the variable name and its value. You can also define a constant variable using the const keyword in the format “const variable = value.”
Now, let's explore how to insert these values into a MySQL database.
Step 3 - How to insert values to MySQL
We will employ the INSERT queries, as explained earlier.
Step 3.3 - Use insert queries as string in “msg.topic.” |Note, “msg.topic” property, which is a special property used in Node-RED to hold the SQL query, is also used in different cases.
Step 3.4 - Click “Done.”
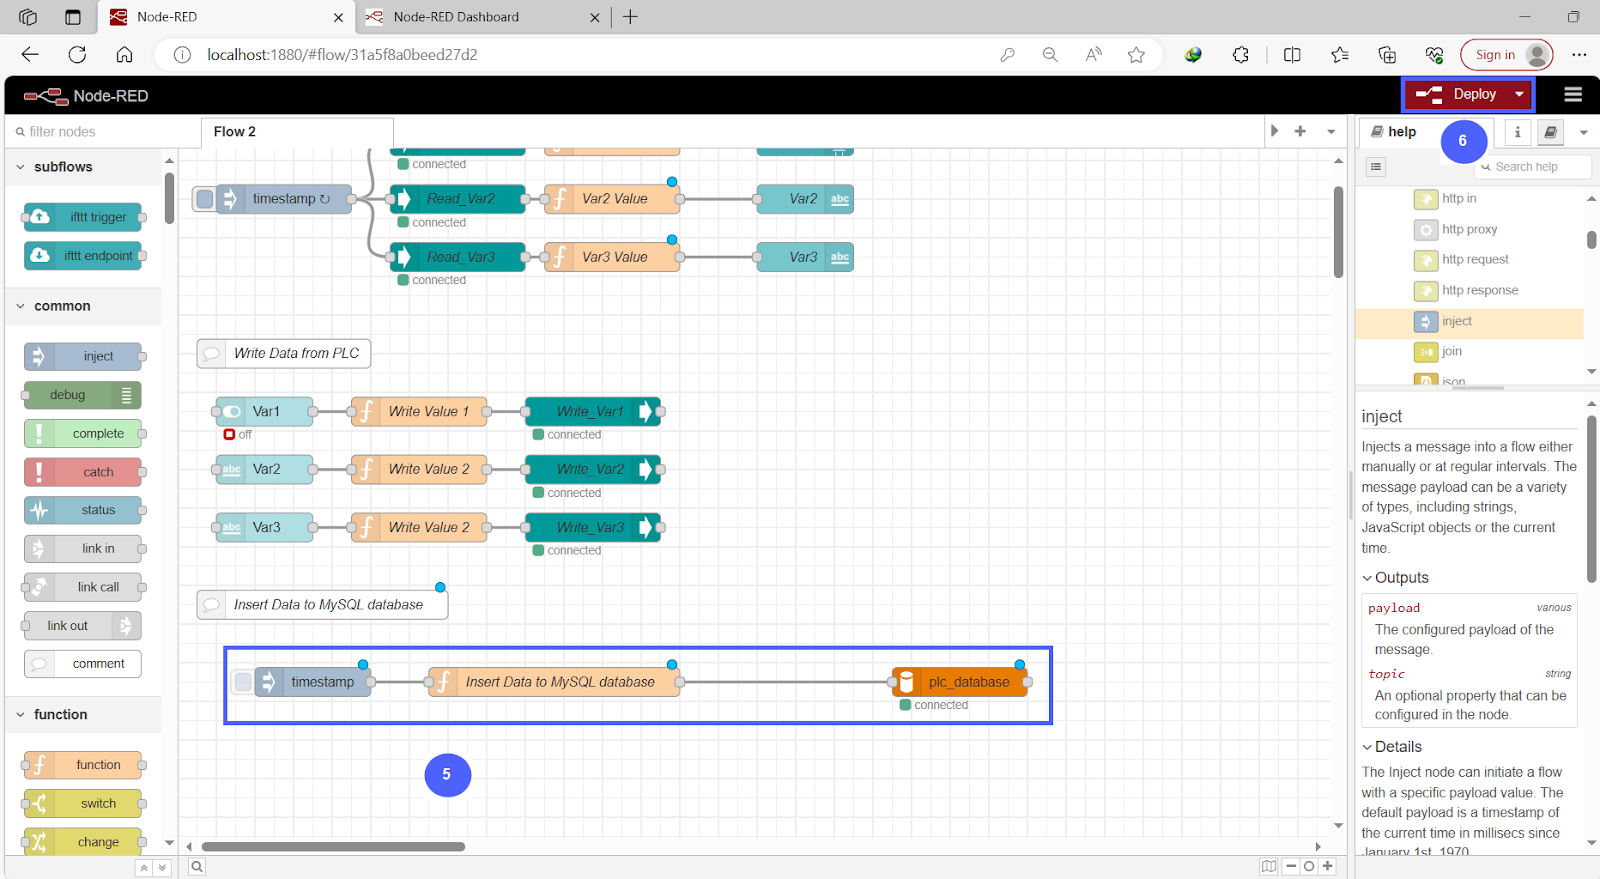
Step 3.5 - Connect the output of the function node to the MySQL node and use an inject node to trigger the function node and insert data into the MySQL database.
Step 3.6 – Click “Deploy.”
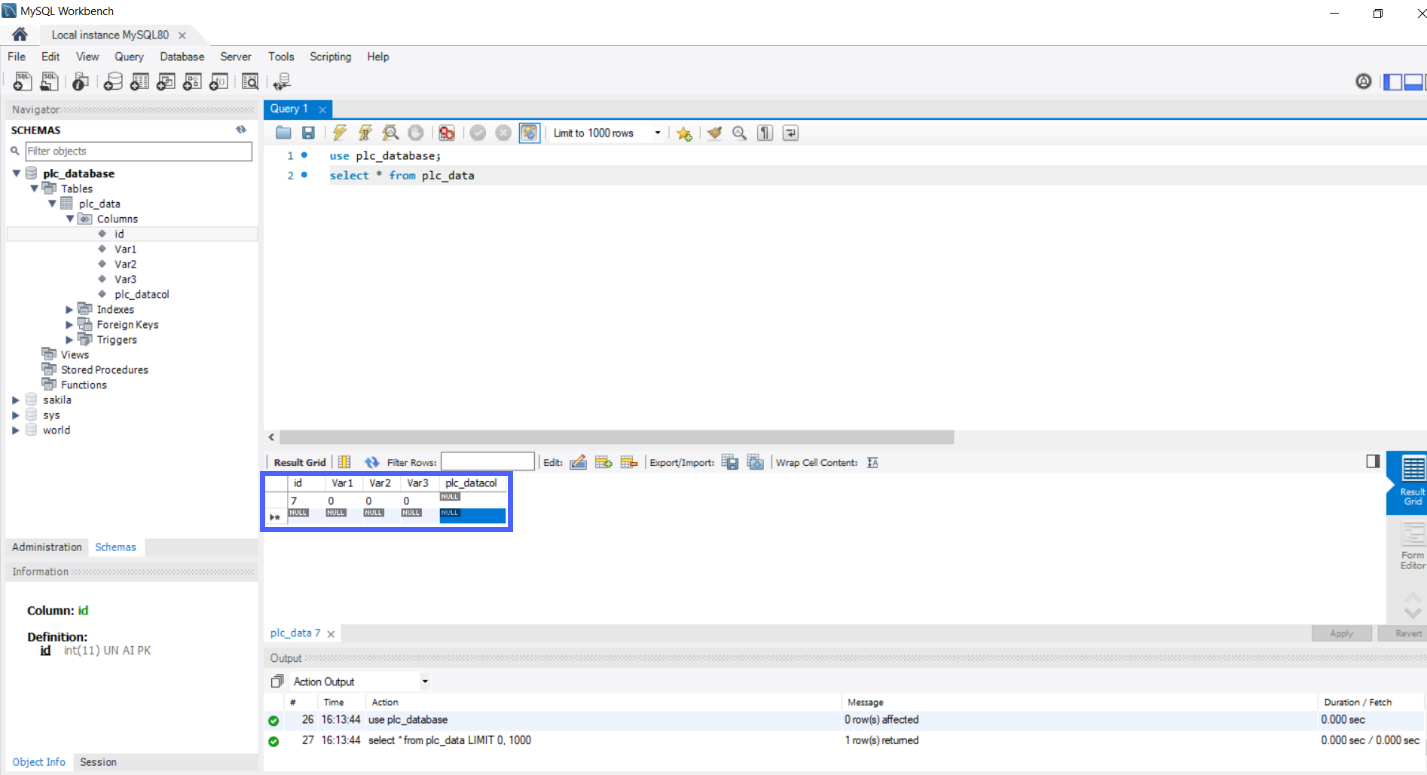
When you trigger the function, it will insert data into the MySQL database, and you can verify this by using a select query. Please note that the 'id' is set to 7, indicating that this data is the 7th entry in the table. The first 6 entries were deleted using delete query. As a side note, you can configure the 'id' to start from 0 each time you use a delete query. However, for the purpose of this tutorial, we won't delve into those details. If you're interested in learning more, we can explore this and how to store data with Real Time in a future tutorial.
Now, let's discuss the continuous insertion of data into the MySQL database. However, there's a challenge here: if we use an inject node to trigger automatic insertion, it might insert the same data every second, and we don't want that. Inserting constant data repeatedly isn't ideal. Instead, we want to insert values only when they change, creating a new row in the database when any value changes. So to tackle this challenge, we will use the signals output from the s7comm node to trigger the function node responsible for inserting data. However, there's another challenge: the s7comm node reads data every 1 second. Let's explore how we can overcome this.
Step 4 - How to insert values to MySQL Automatic
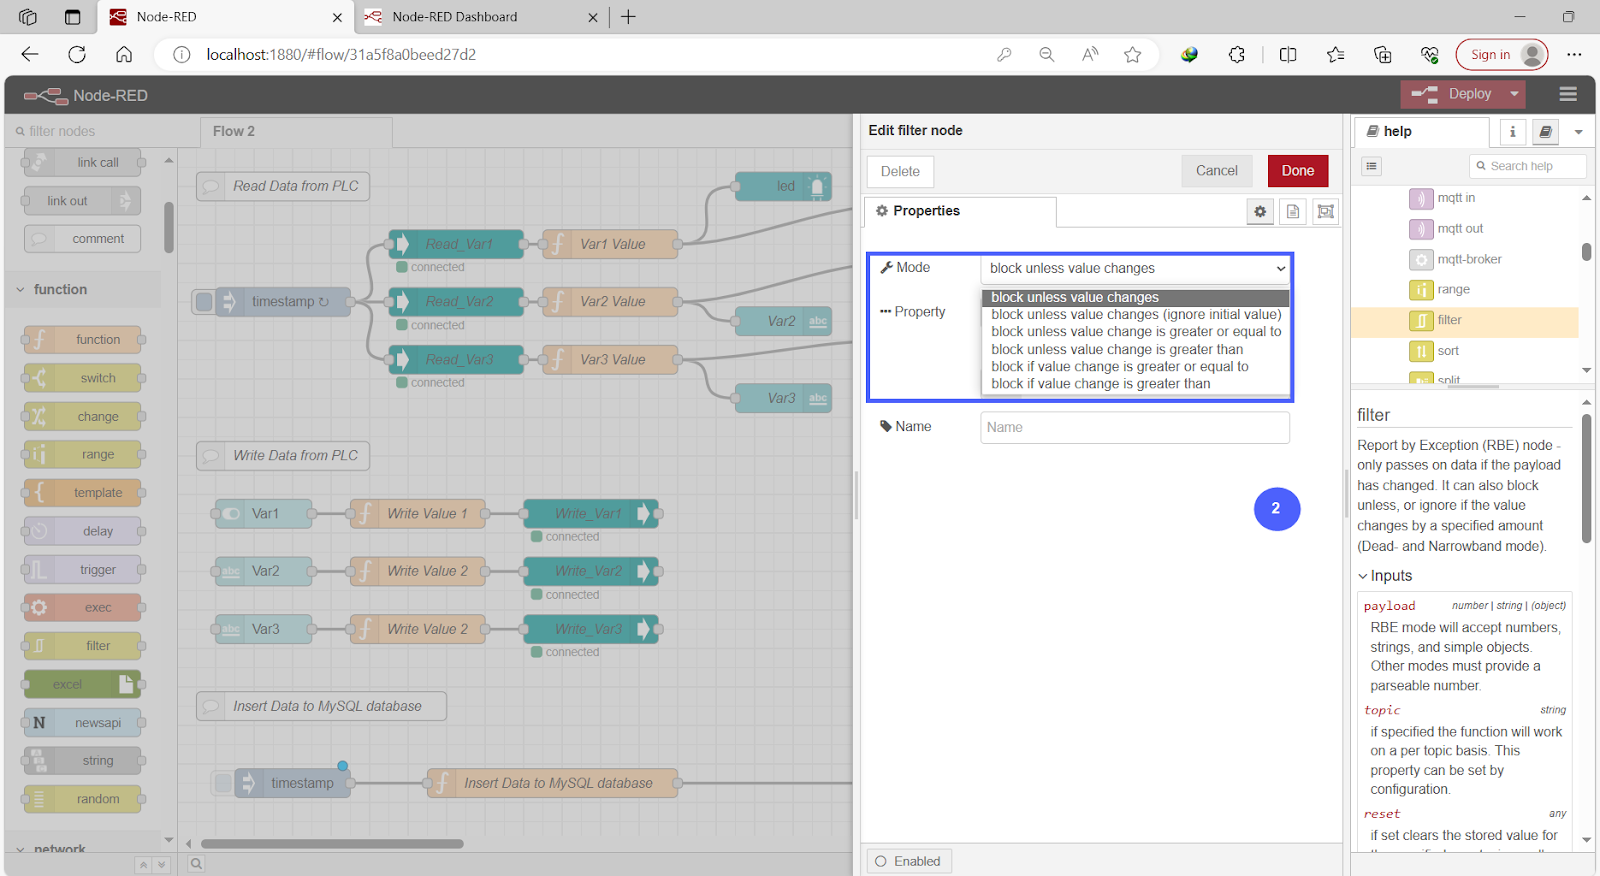
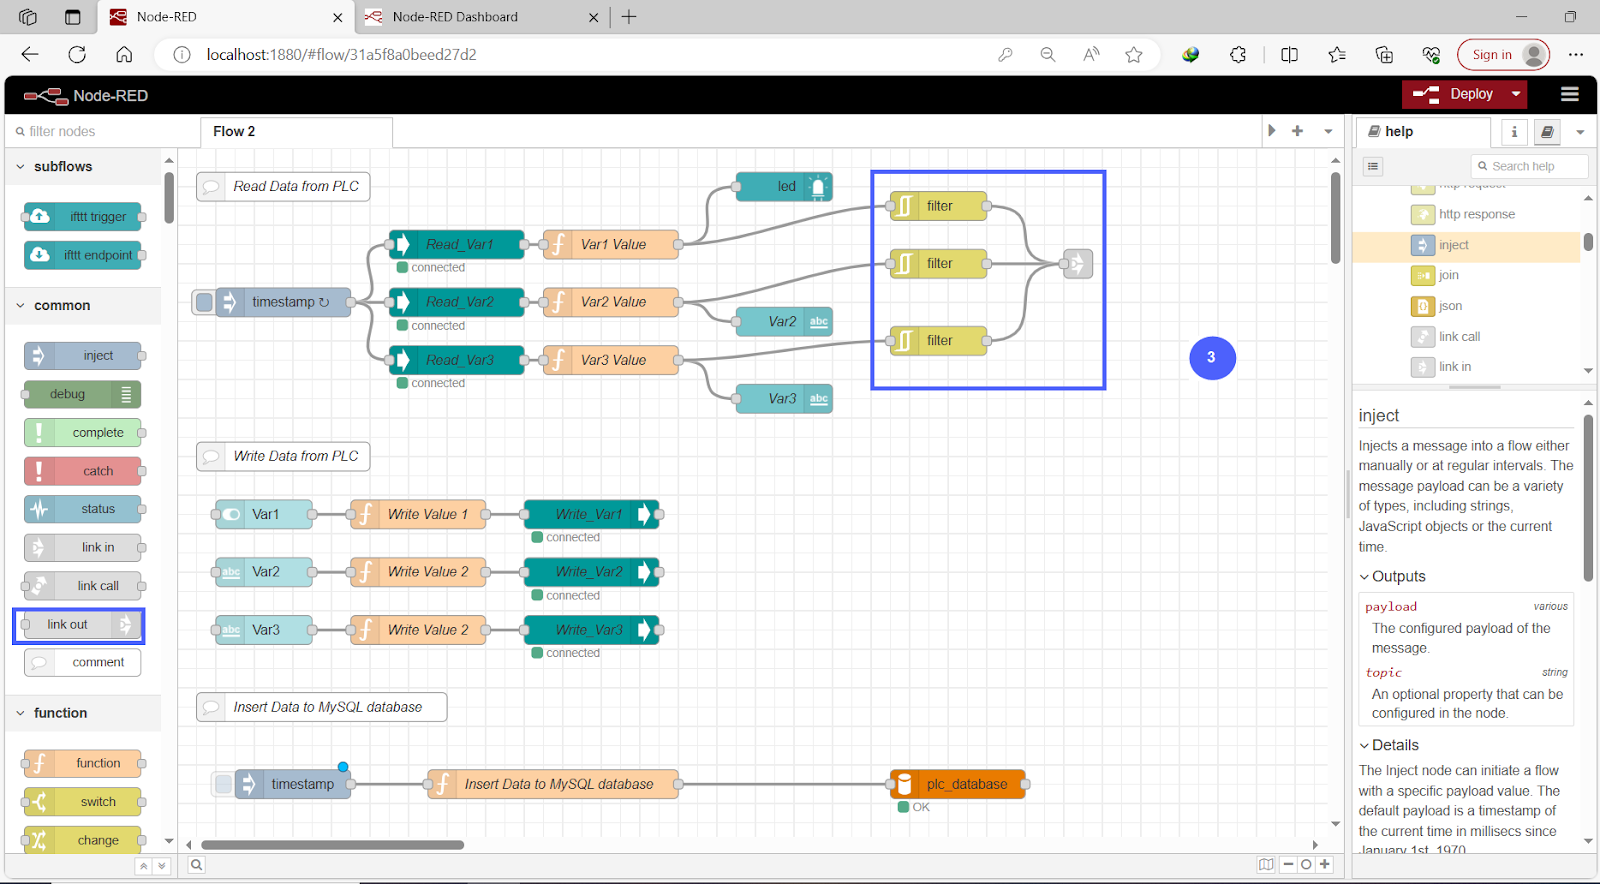
Step 4.1 - Grab three “Filter nodes” into the Flow and connect each one of them to the output of the three Functions nodes of s7comm.

Step 4.2 - Double click on “Filter node” to see its setting && Click “Done” after finish.
Note, we will leave the settings of the filter node unchanged. Its default functionality is to block output signals unless the value changes. This ensures that it will only provide an output signal when there is a change in value. While there are different modes available, we won't be using them for now.
Step 4.3 - Grab a “link out node” into the Flow and connect with the output of the three “filter nodes.”
Step 4.4 – Delete inject node && Grab “link in node” into the Flow and connect to the “Function node of inserting Data”.
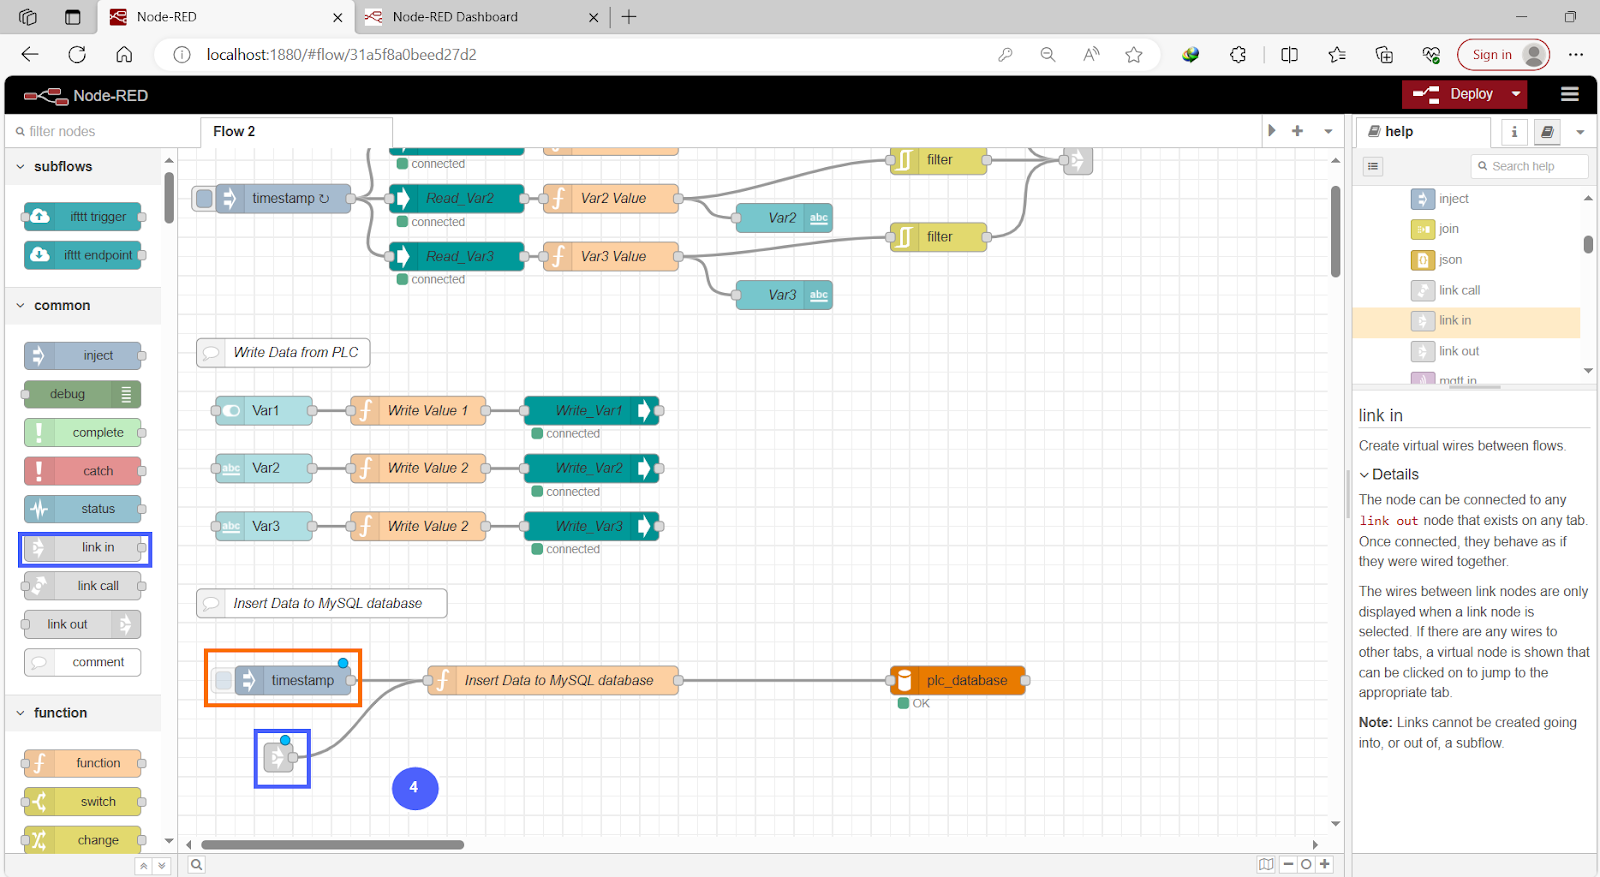
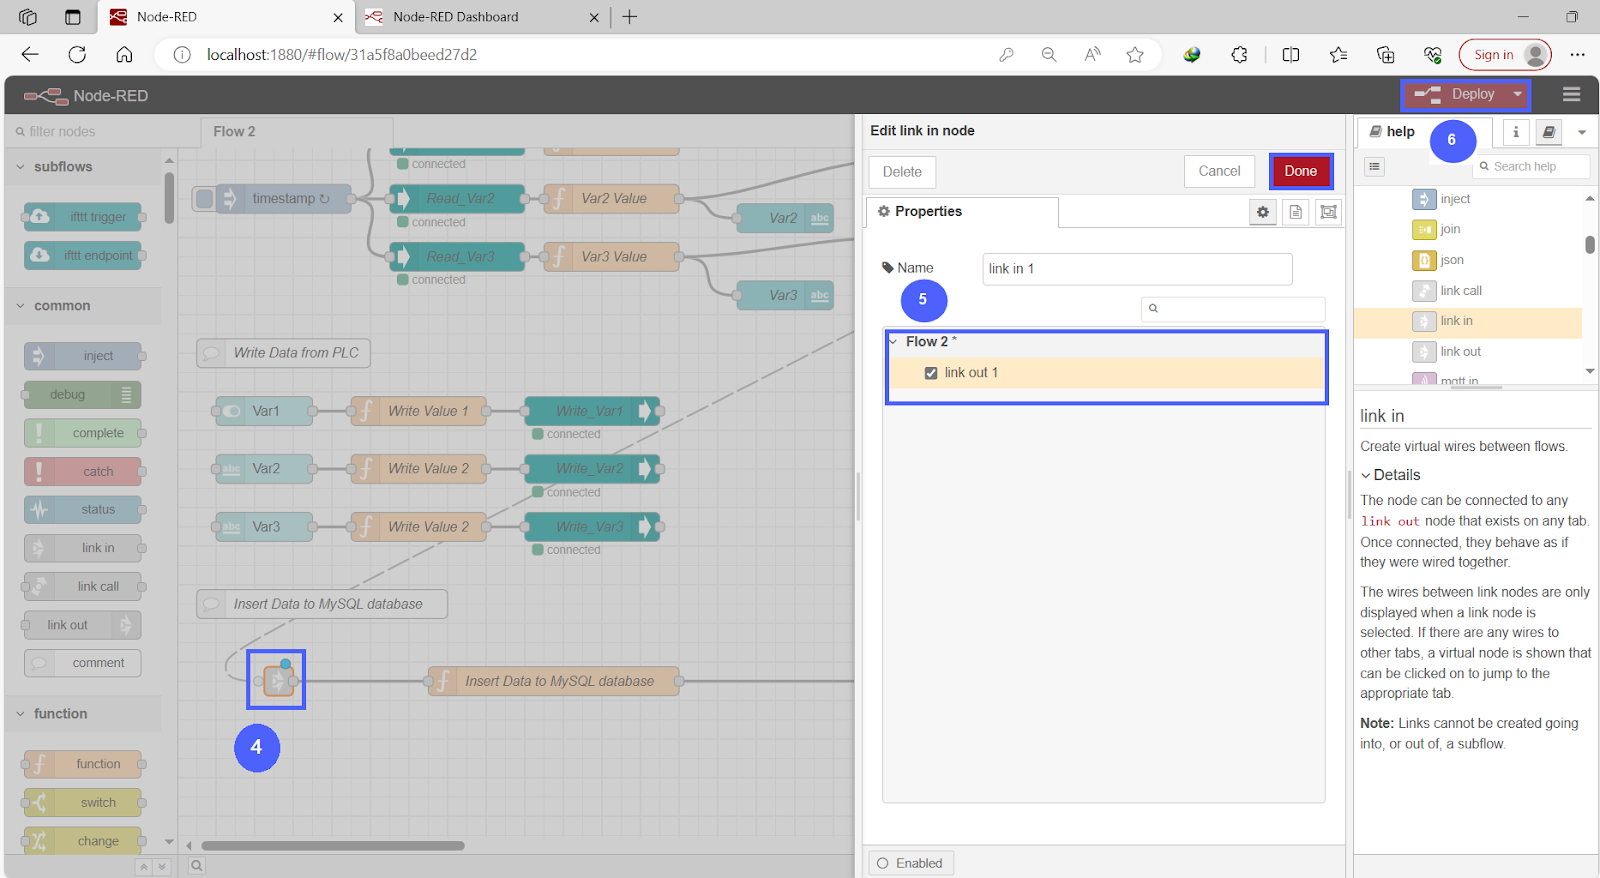
Step 4.5 - Double click on “link in node” to see its setting.
Step 4.5 – Select the link out node Then “Done.” |Note, while it's possible to connect the output of the three filter nodes directly to the function, for better visualization, we are using the 'link out' and 'link in' nodes.
Step 4.6 - click “Deploy.”
Now that we have everything set up, let's learn how to display the data from our database on the dashboard.
Step 5 - How to Display a Table of MySQL Data on the Dashboard
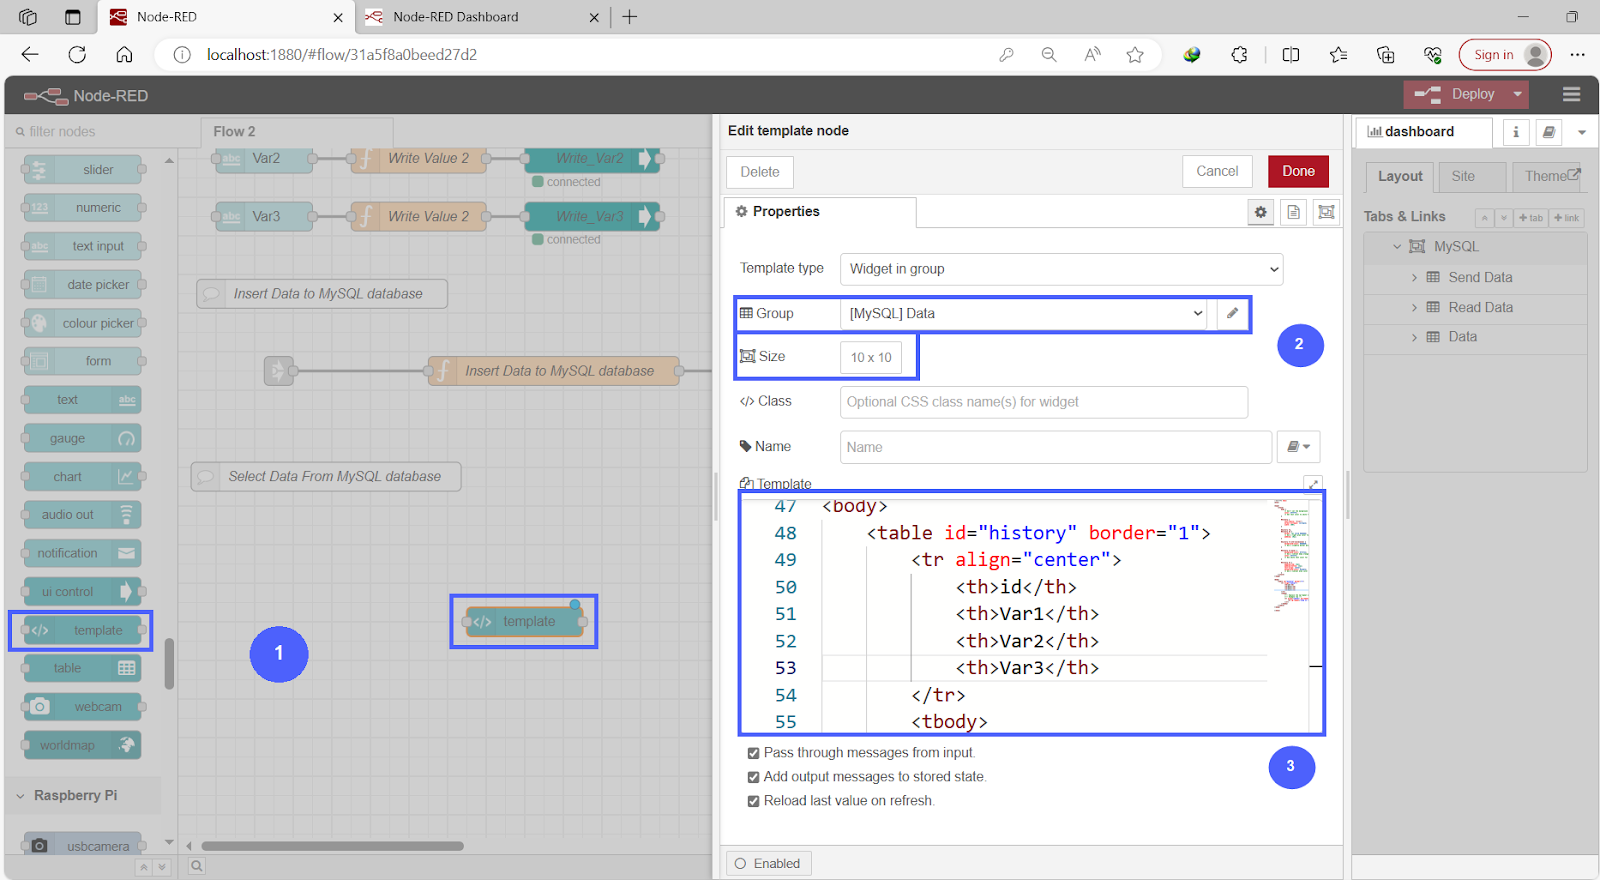
Step 5.1 - Grab a “Template node” into the Flow && Double Click on it.
Step 5.2 - Add to new Group && Edit size.
Step 5.3 - Write an HTML code for the table then Click “Done.”
Note, you don't need to know how to handle HTML code; it will simply define the structure of the table that will contain data from MySQL. You can utilize CHAT GPT to assist you in generating some HTML code for this purpose.
Step 5.4 - Choose the 'MySQL node' and the 'Function node,' and then establish a connection between them. Connect the output of the first MySQL node to the input of the function node responsible for the SELECT query. This will allow you to display data on the dashboard after inserting it.

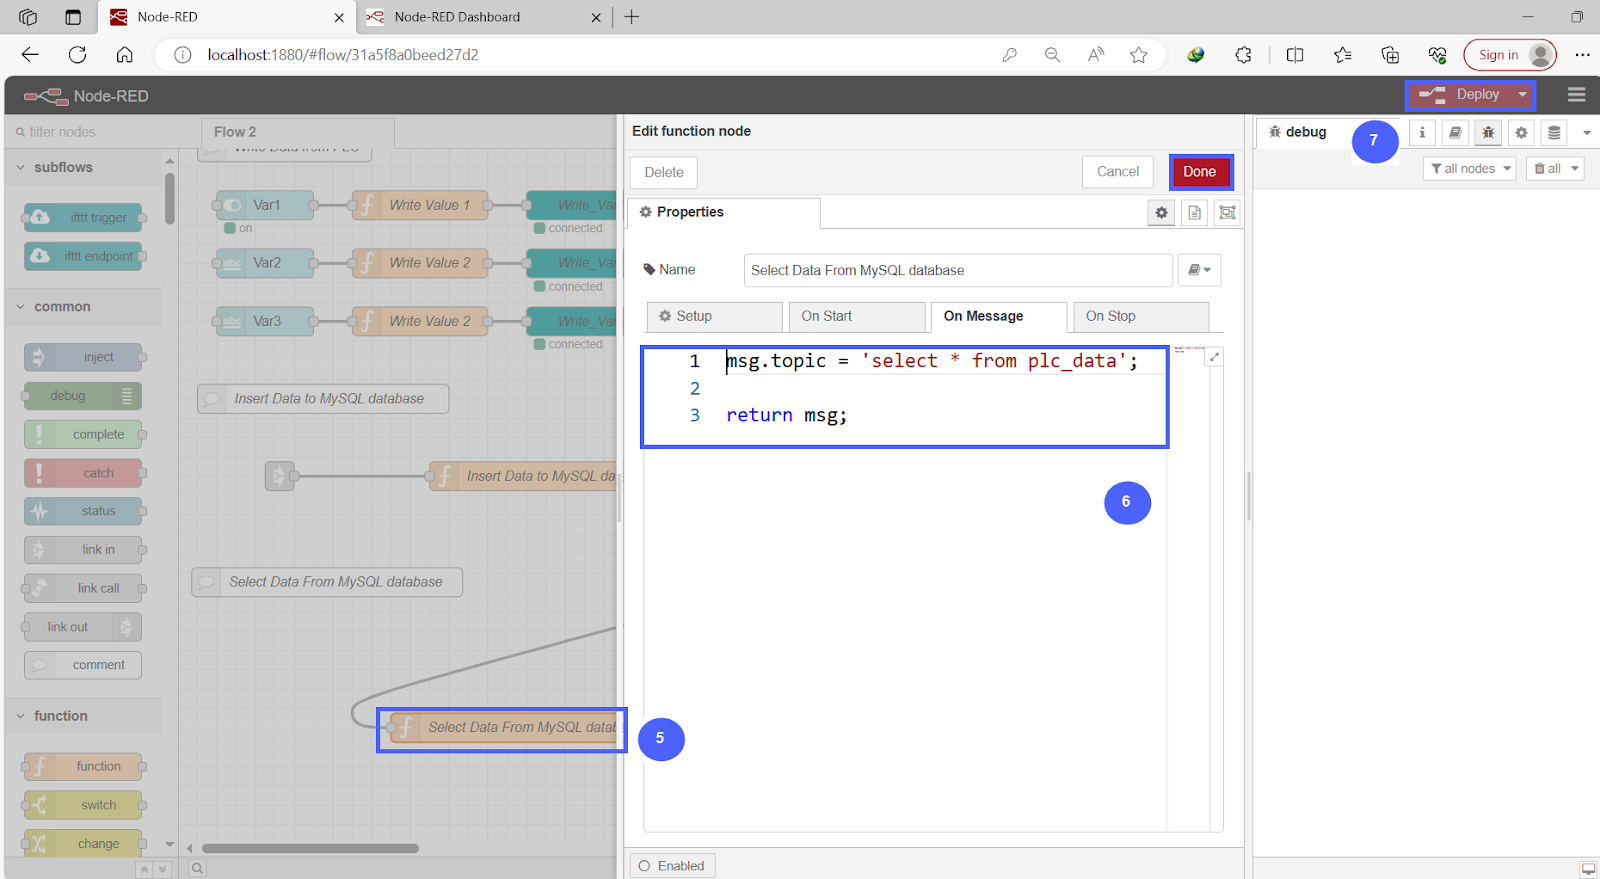
Step 5.5 - Double Click “Function node of select data.”
Step 5.6 - Add Select query
Step 5.7 - Click “Done” then Click “Deploy.”
This is the dashboard in the next figure, and you may notice that there is a lot of data being inserted into the MySQL database as we work in Node-RED. The repeating values occur because every time we 'Deploy' our flow, it starts from the beginning and sends three signals to the inserting function node, resulting in three rows being added to the MySQL database. While it is possible to address this issue by adding some lines of code to the function node responsible for inserting data, we won't be doing that in this tutorial. Advanced topics like this can be discussed in future tutorials where we can delve into their details.
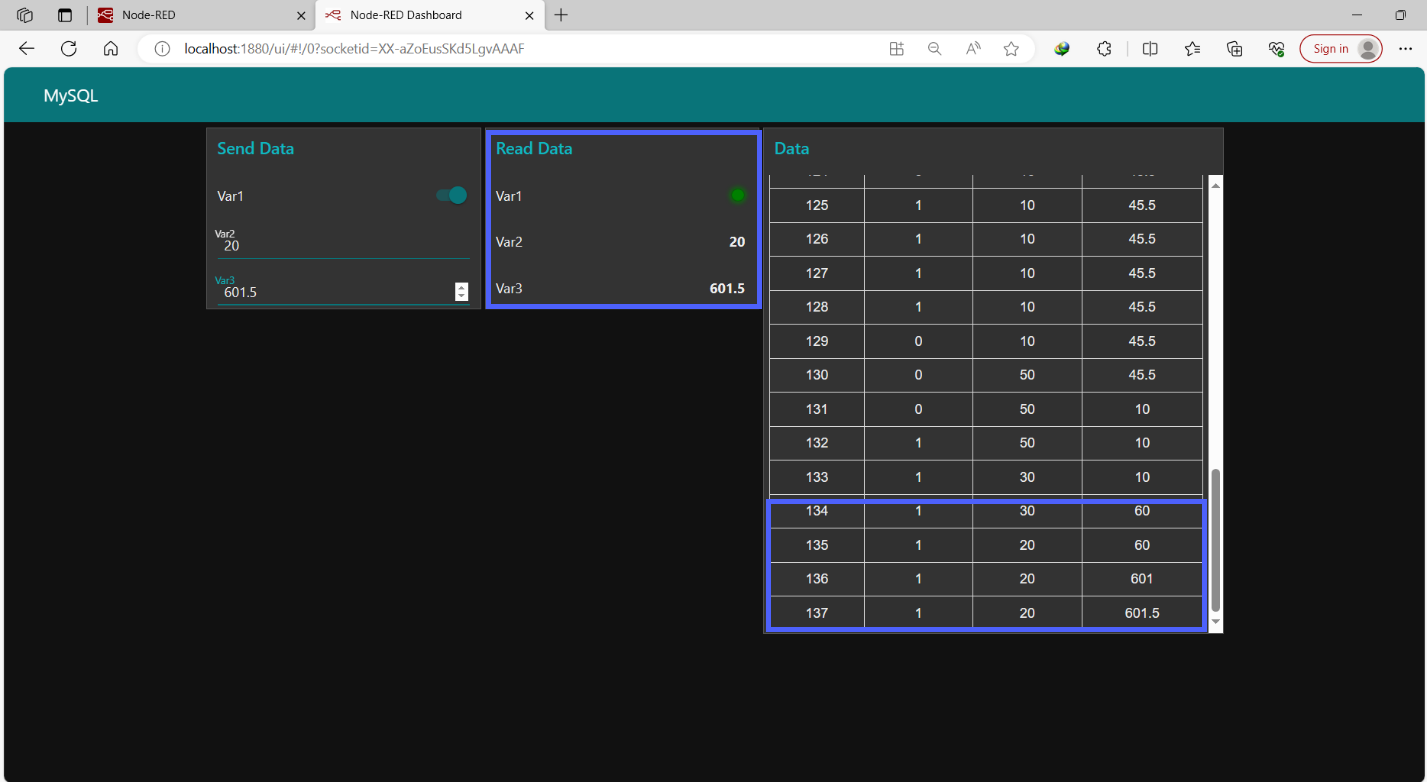
Let’s Create a Delete query to delete all this data.
Step 6 - How to Create Delete query
Add a “button node” to trigger a function node containing a delete query to interact with the MySQL database then connect the output of the function node to the input of MySQL node.
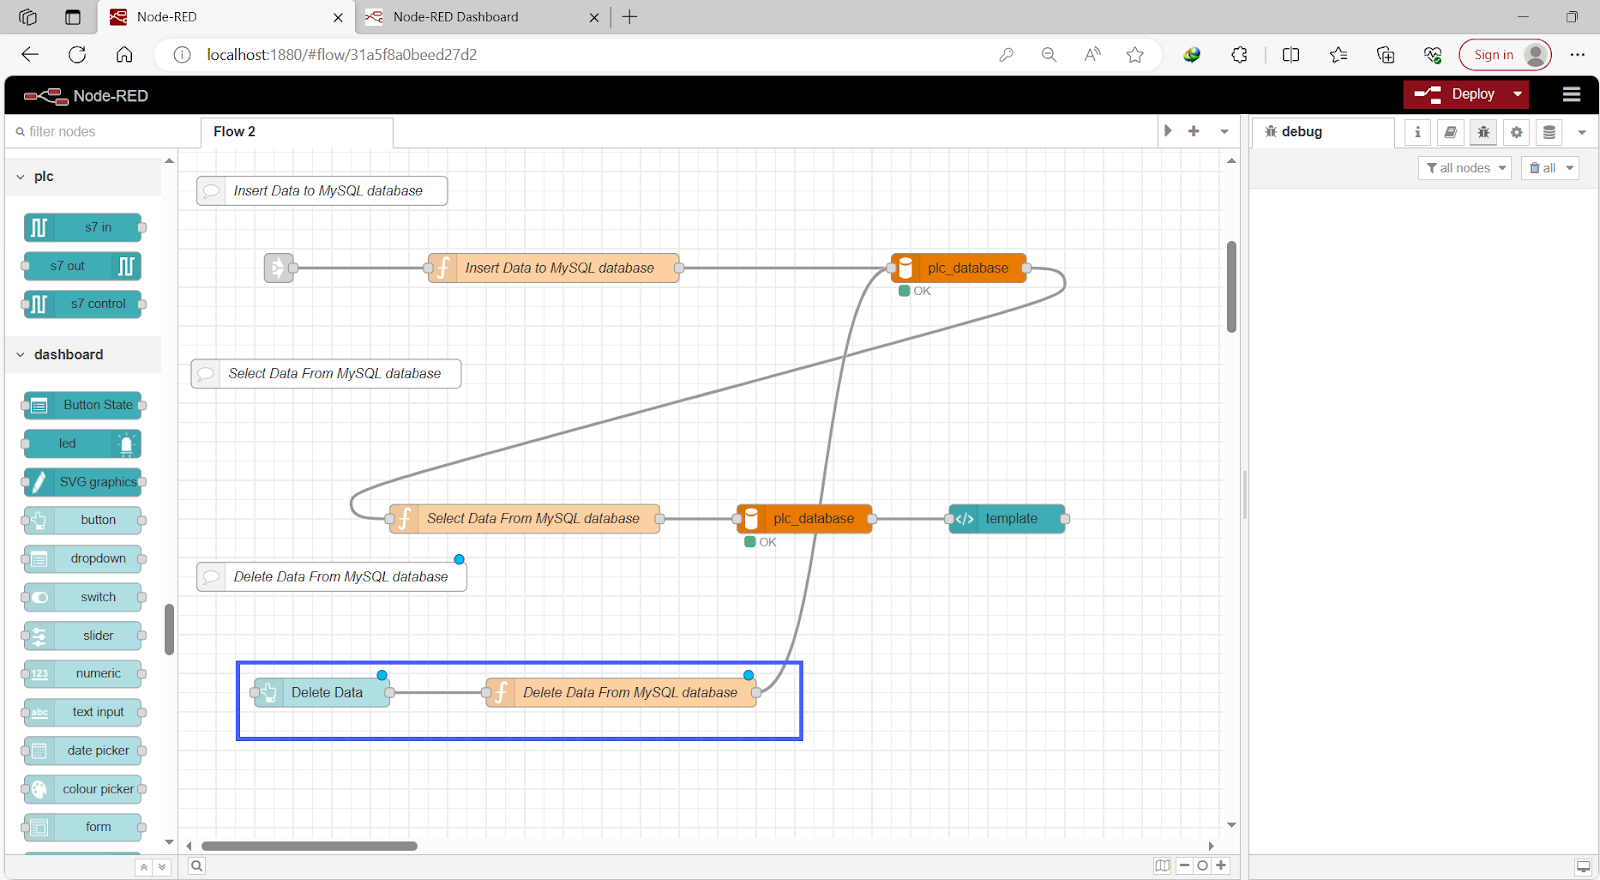
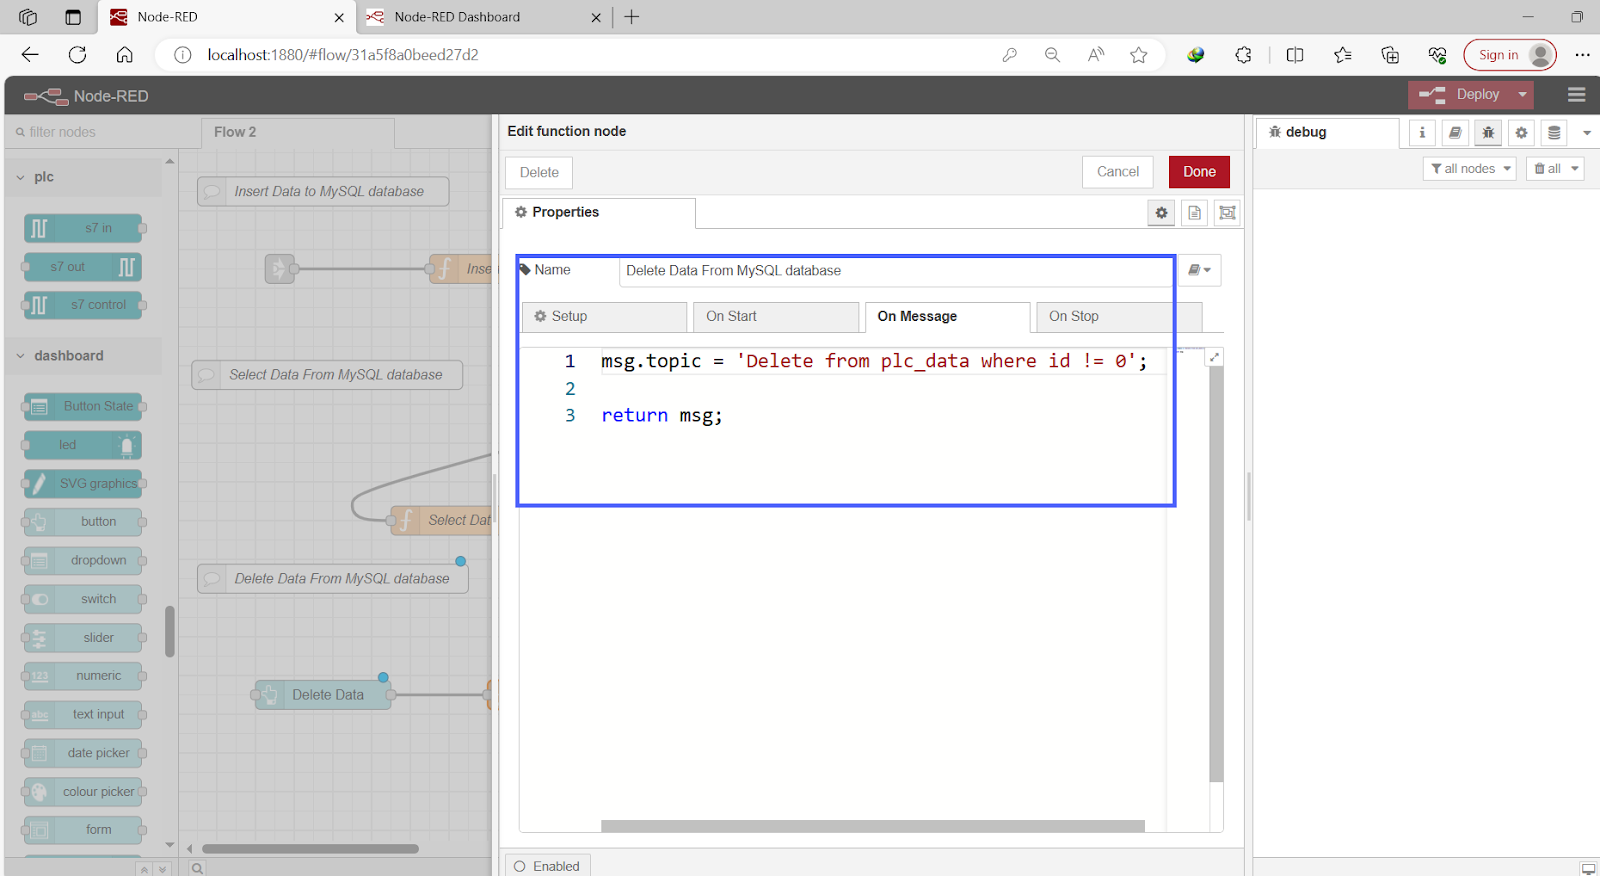
In the figure above, you can see the code inside the Delete function node. However, as shown in Figure 8.18, the visualization is not optimal. To improve the visualization, let's use “link out” and “link in” nodes.
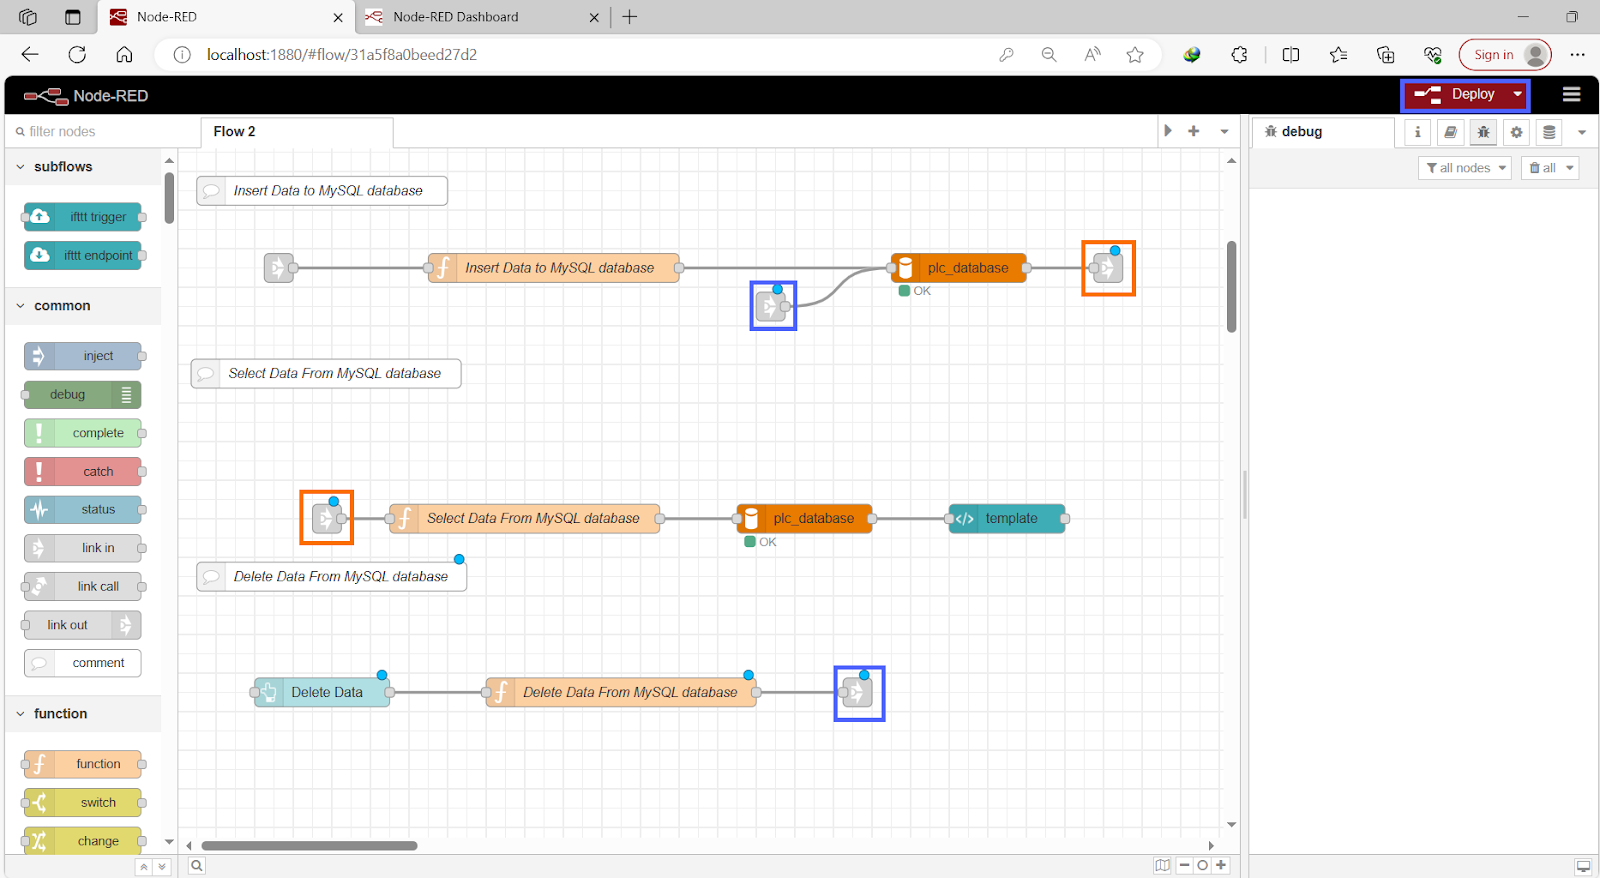
Now it looks better. Let's click “Deploy” to apply these changes.
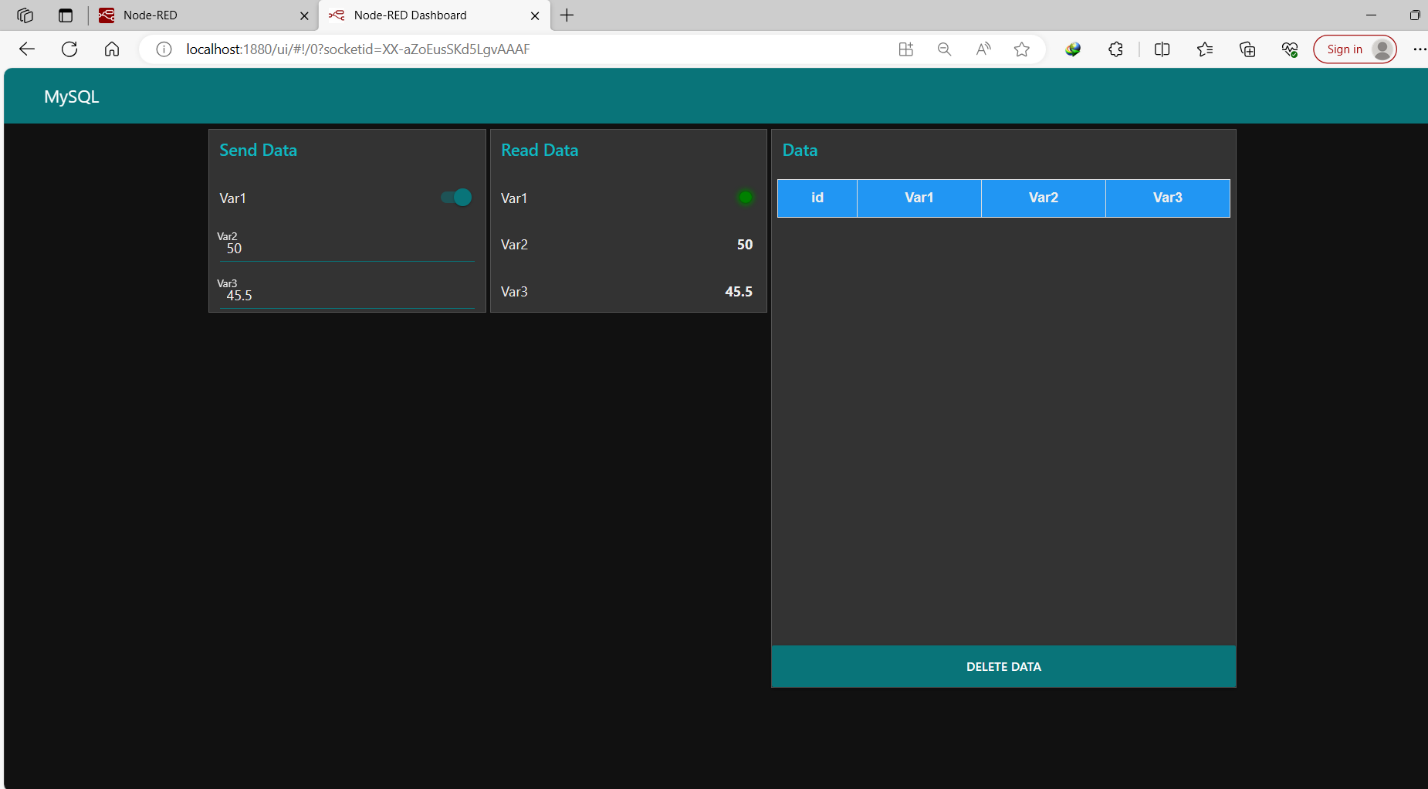
As you can see, after clicking “Delete Data,” all the data has been successfully deleted.
Now, let's explore how to create an Excel sheet to store this data.
Node-RED side – Configurations for Excel
We will need to install an Excel palette.
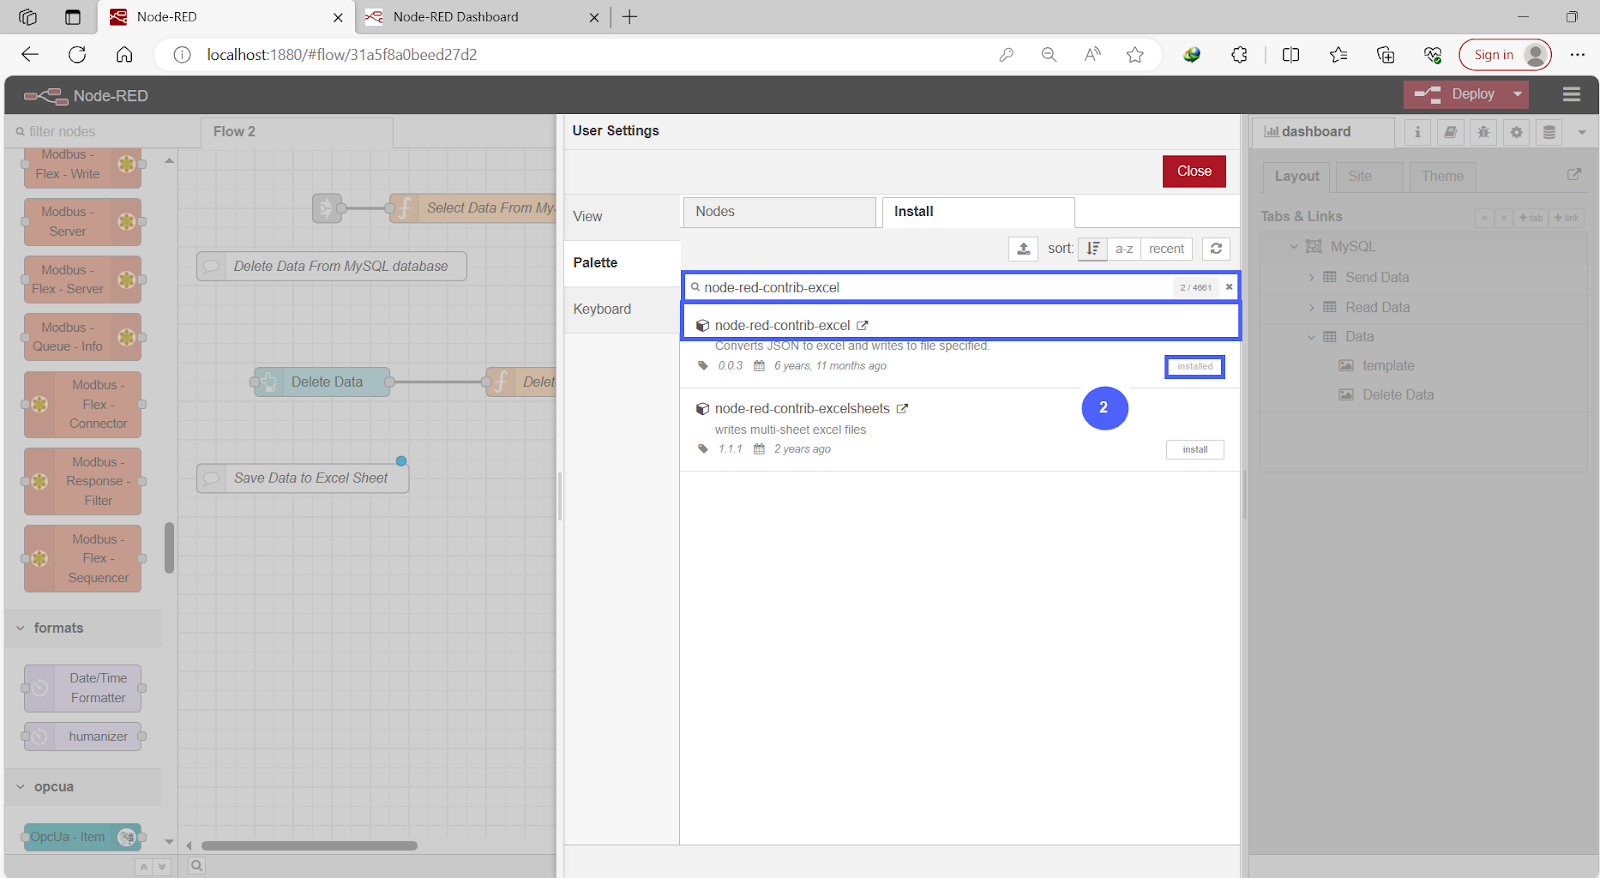
Step 1 - How to install Excel palette
Step 1.1 – Go to manage palette.
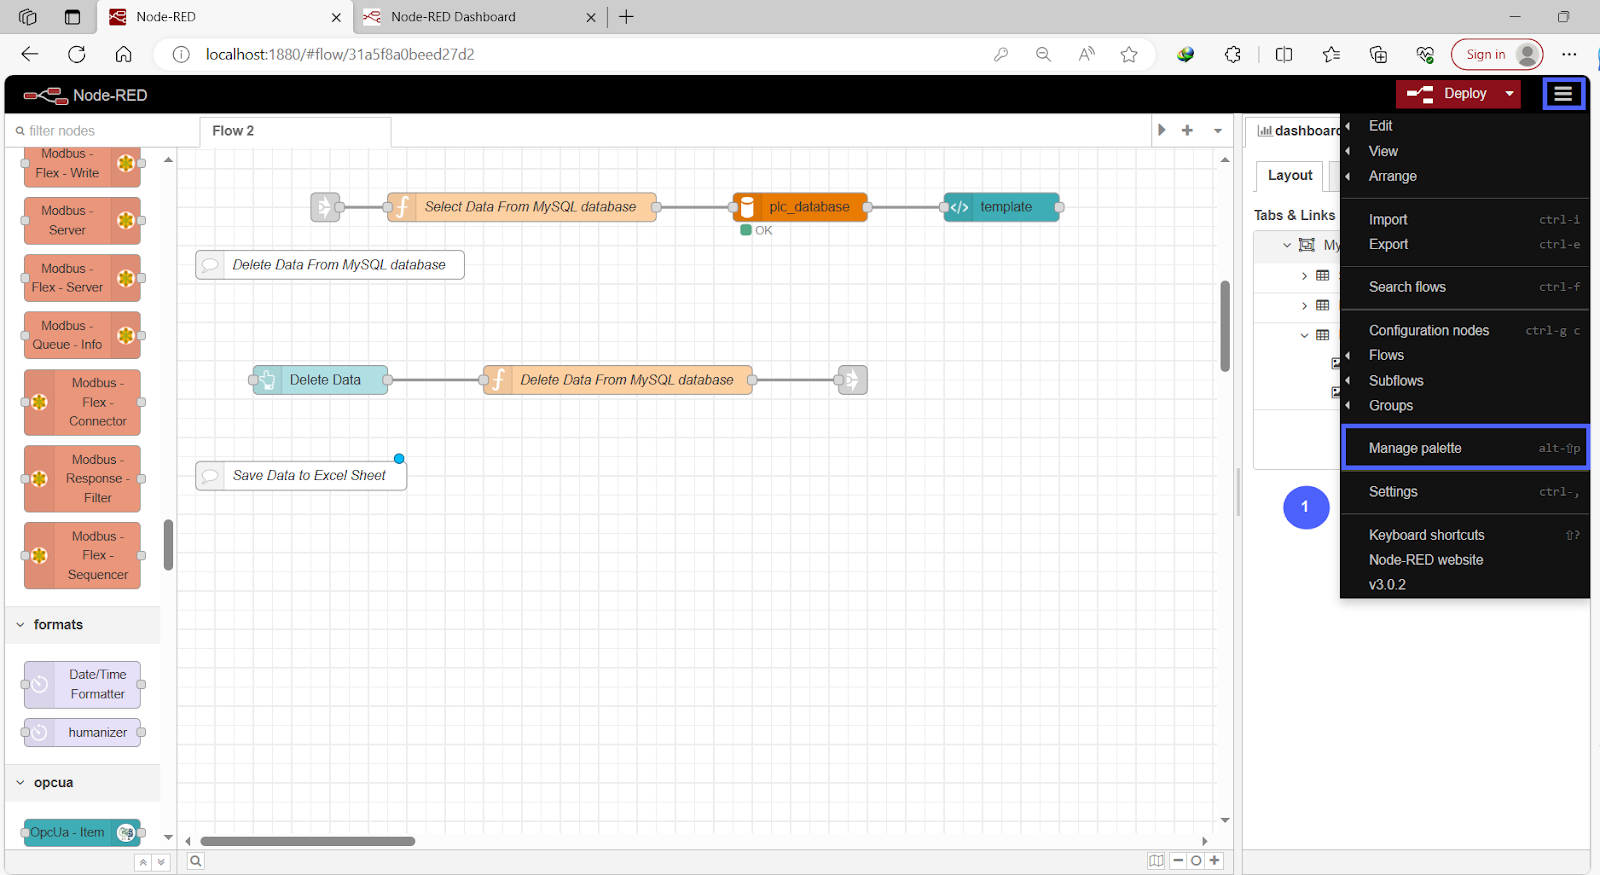
Step 1.2 - Click “install” then Search for palette “node-red-contrib-excel” && Click “install.”
Note: already installed.
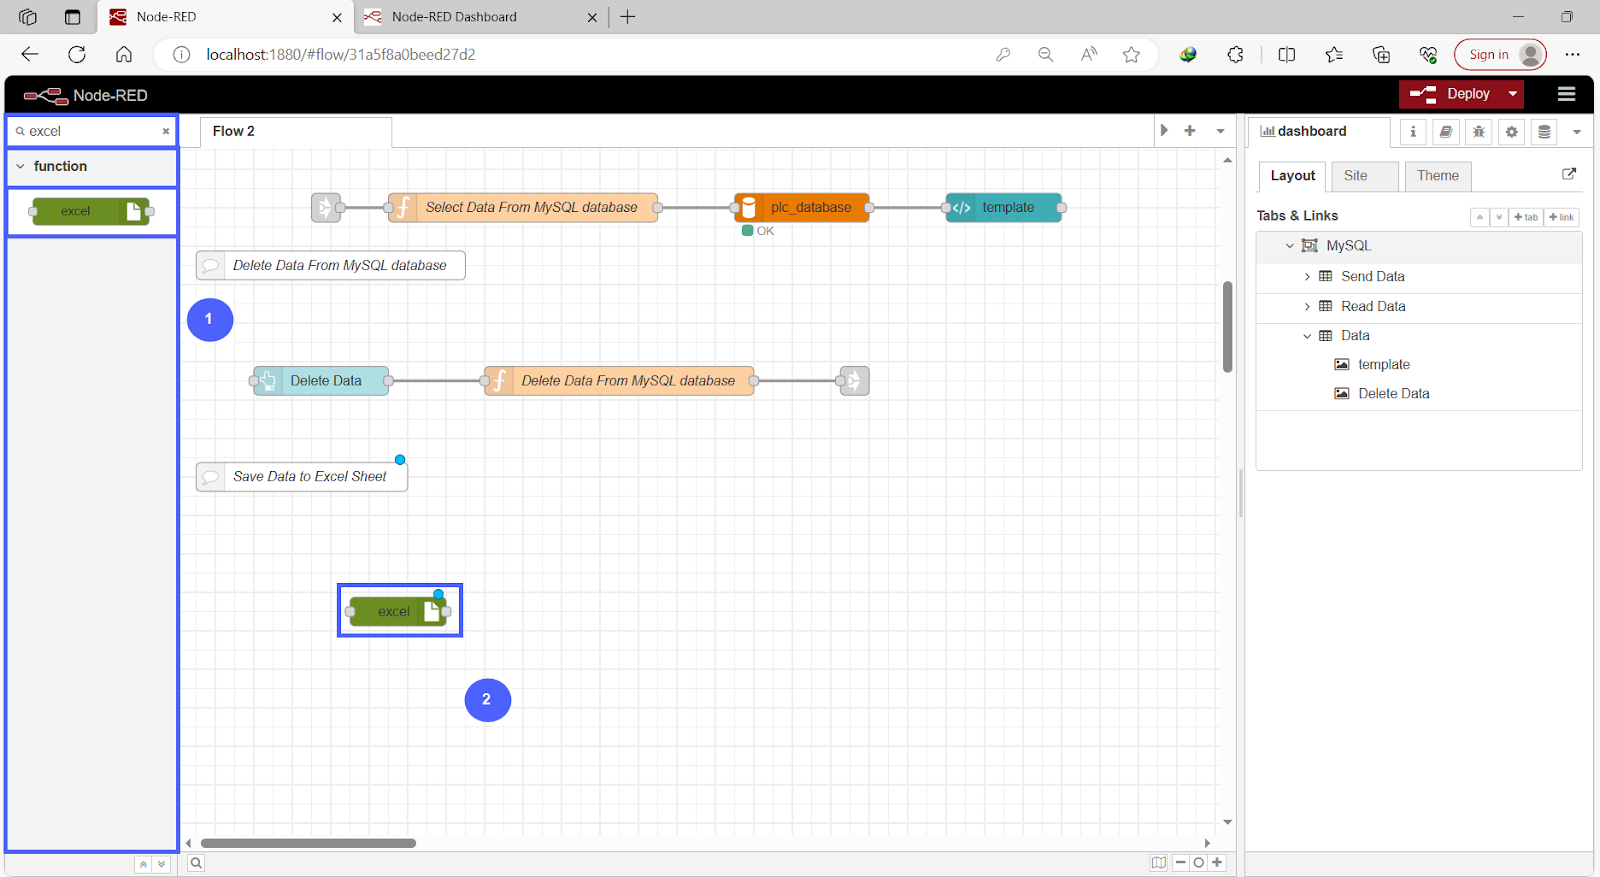
Step 2 - How to get Excel node
Step 2.1 - Go to the node list and Search for “Excel.”
Step 2.2 - Grab Excel node to the flow.
Node-RED side – Programming for Excel
To save Data in Excel sheet we will Make Data Global to use and send to excel node.
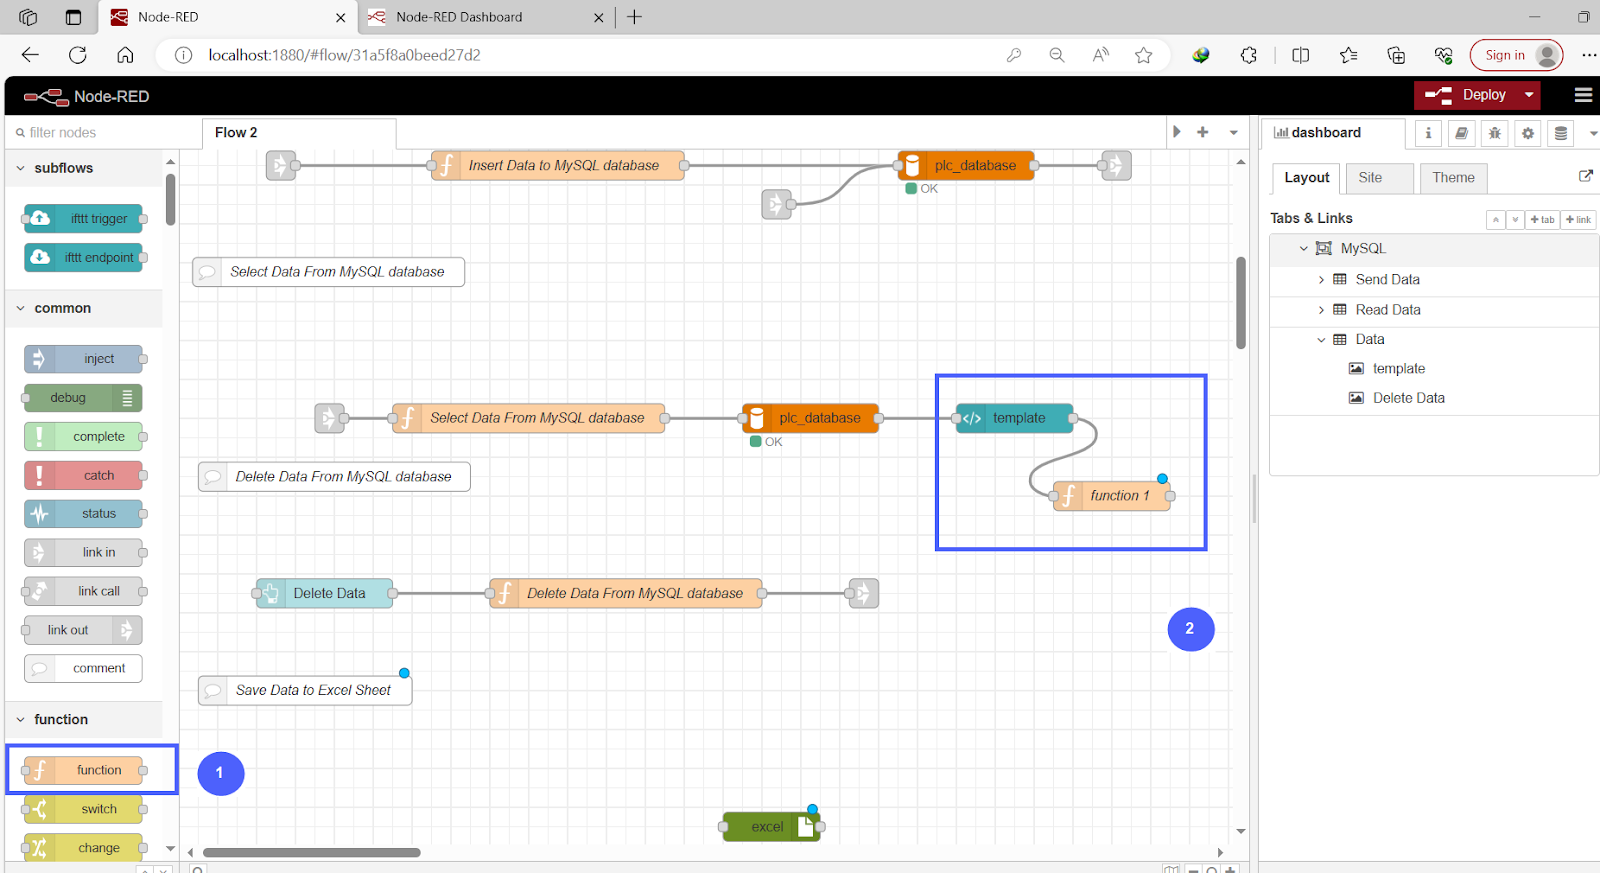
Step 1 - How to make Data global
Step 1.1 - Add new function node.
Step 1.2 - Connect function nodes to the output of Template nodes that contain the Data.
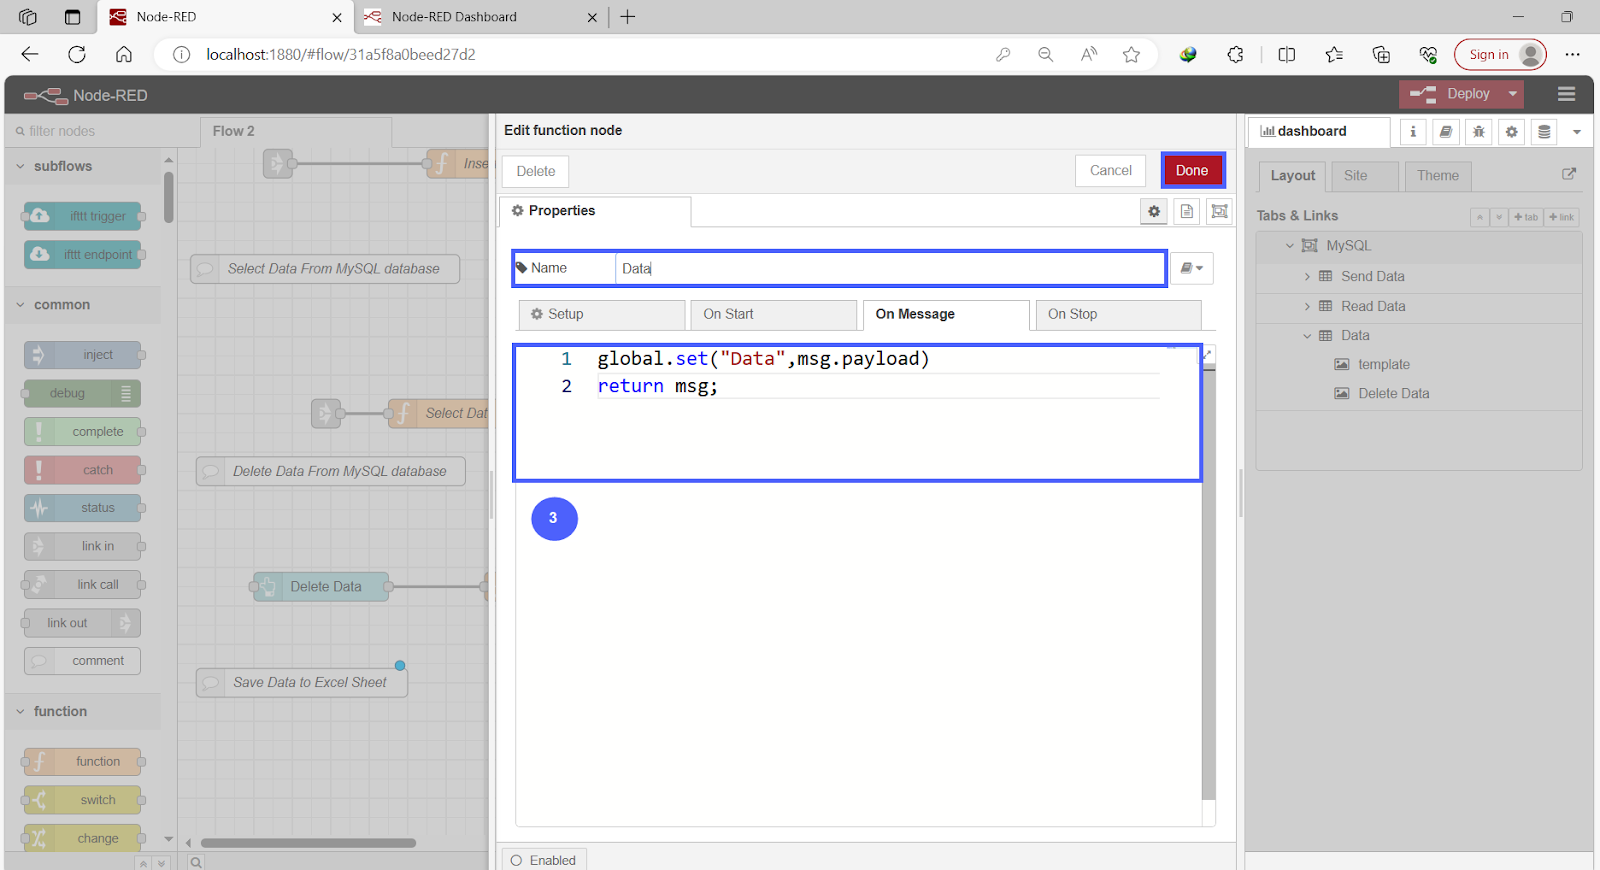
Step 1.3 - Double-click on the Function node to modify its settings && Click “Done.”
Step 2 - How to send Data to excel node
Step 2.1 - Grab a new “function node” into the Flow and Double click on this new function node.
Step 2.2 - Retrieving Your Global Variable and set to msg.payload then Click “Done.”

Step 2.3 – Create a button node to trigger function and connect to excel node.
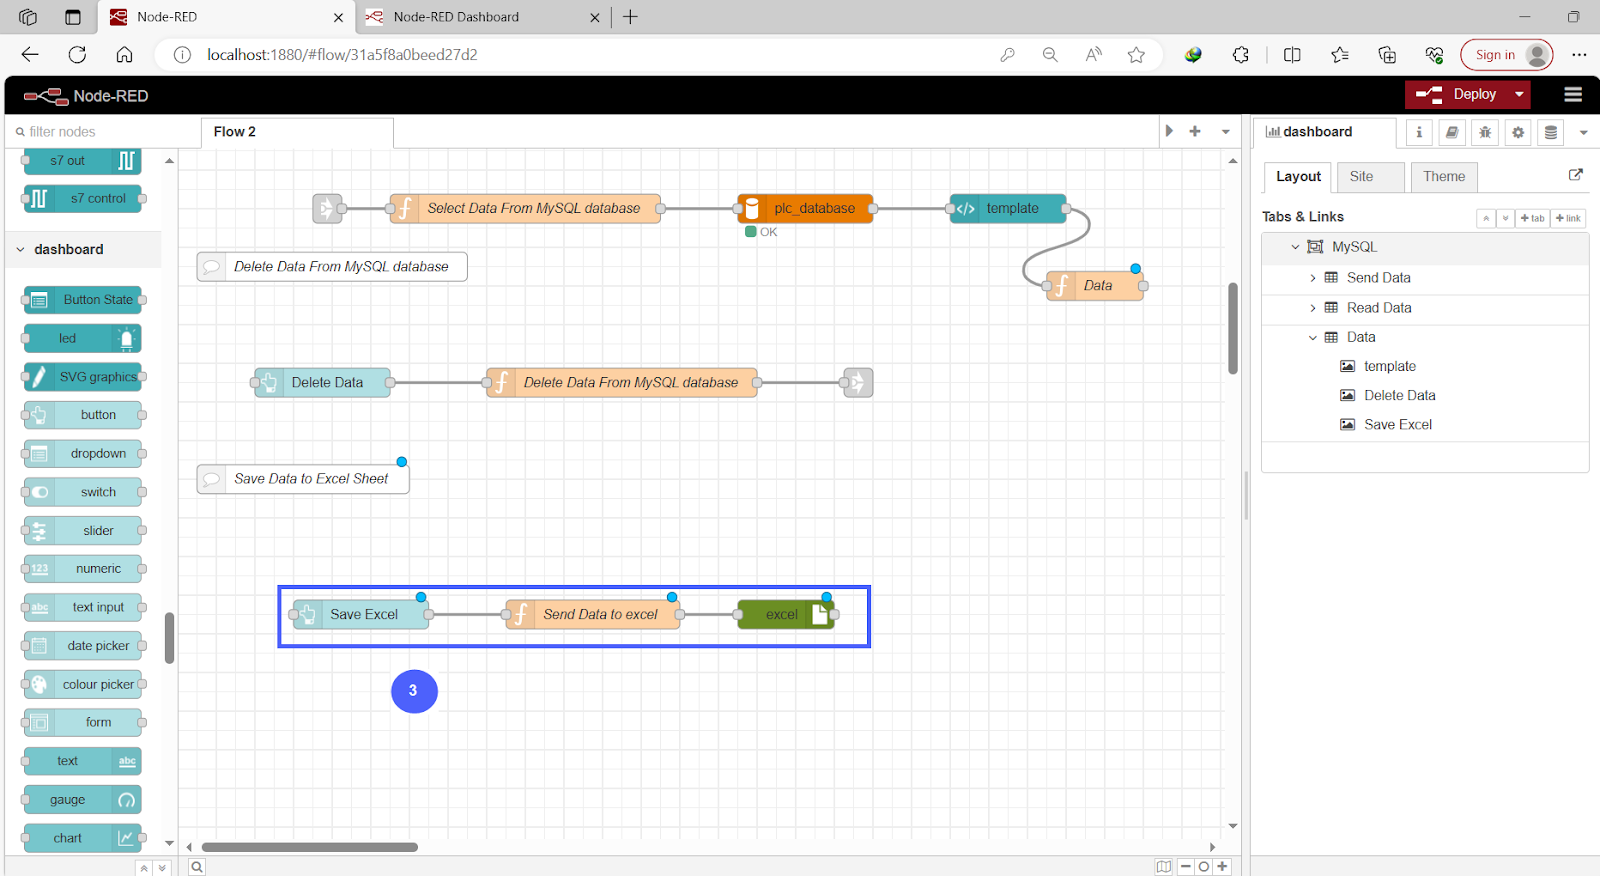
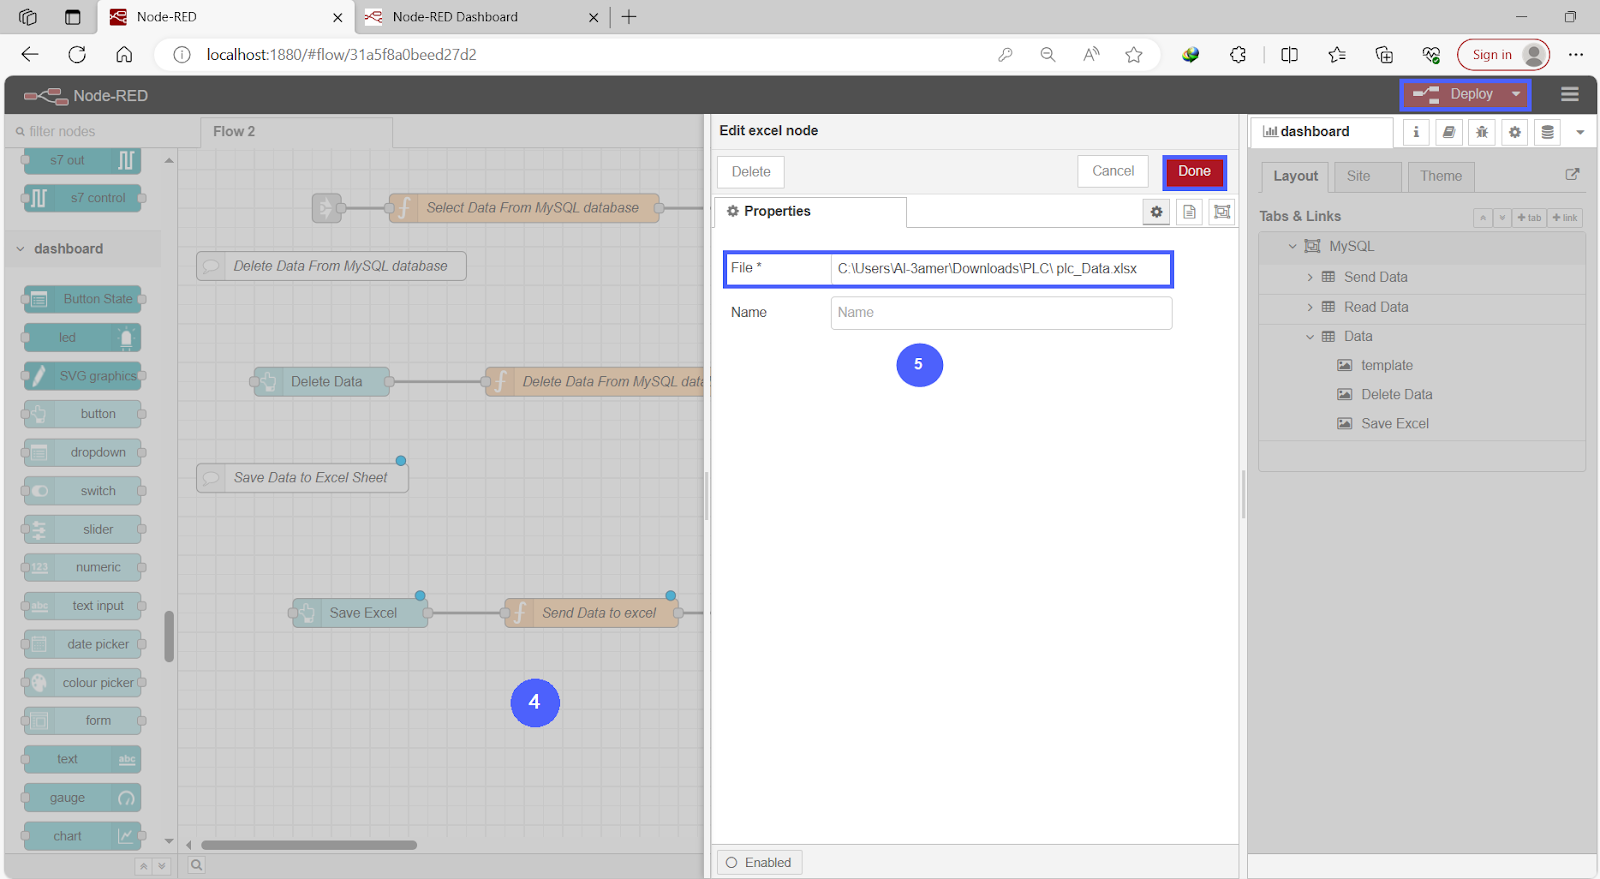
Step 2.4 - Double-click on the excel node to modify its settings.
Step 2.5 - In the 'File' section, specify the path where the Excel sheet will be saved and set its name. then “Done” and “Deploy.”
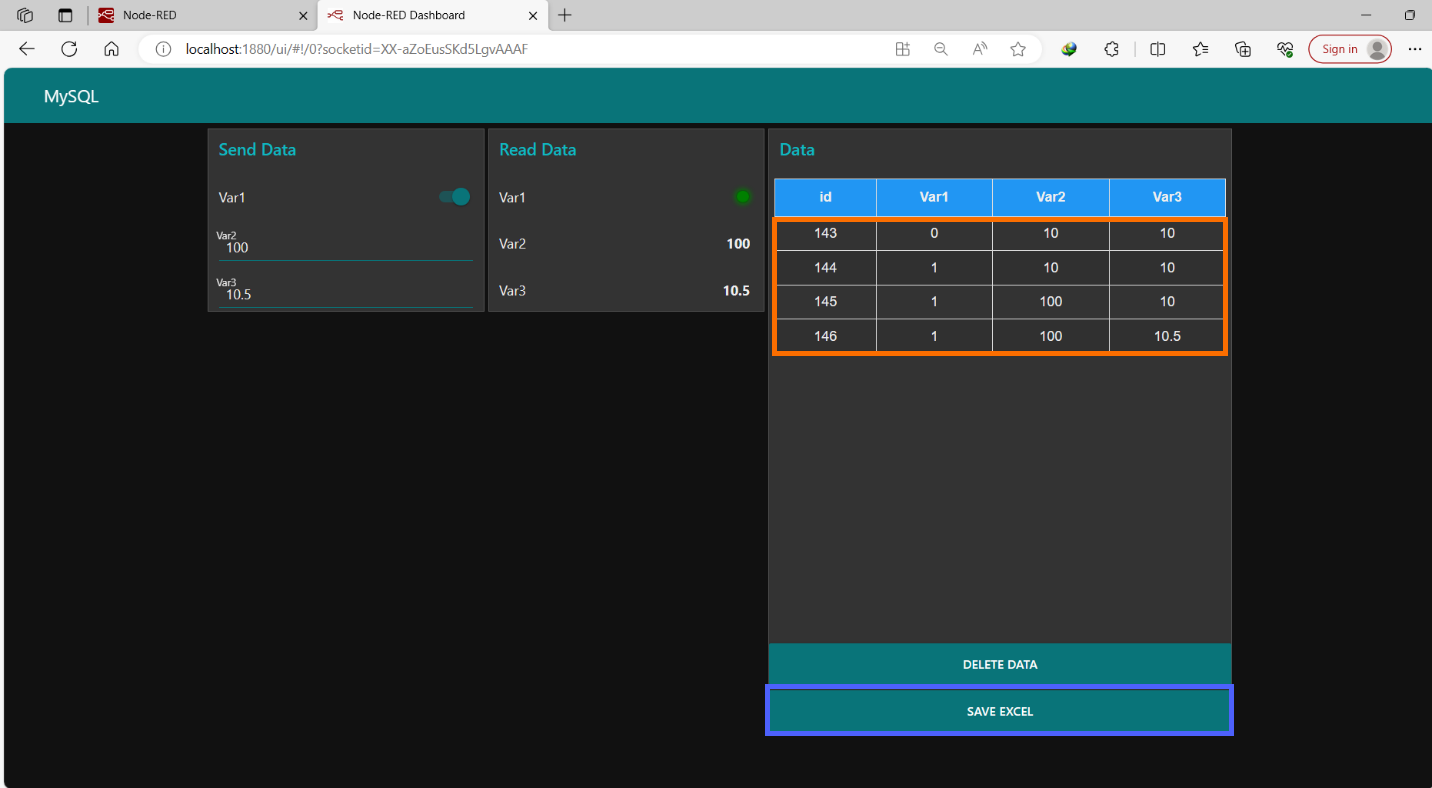
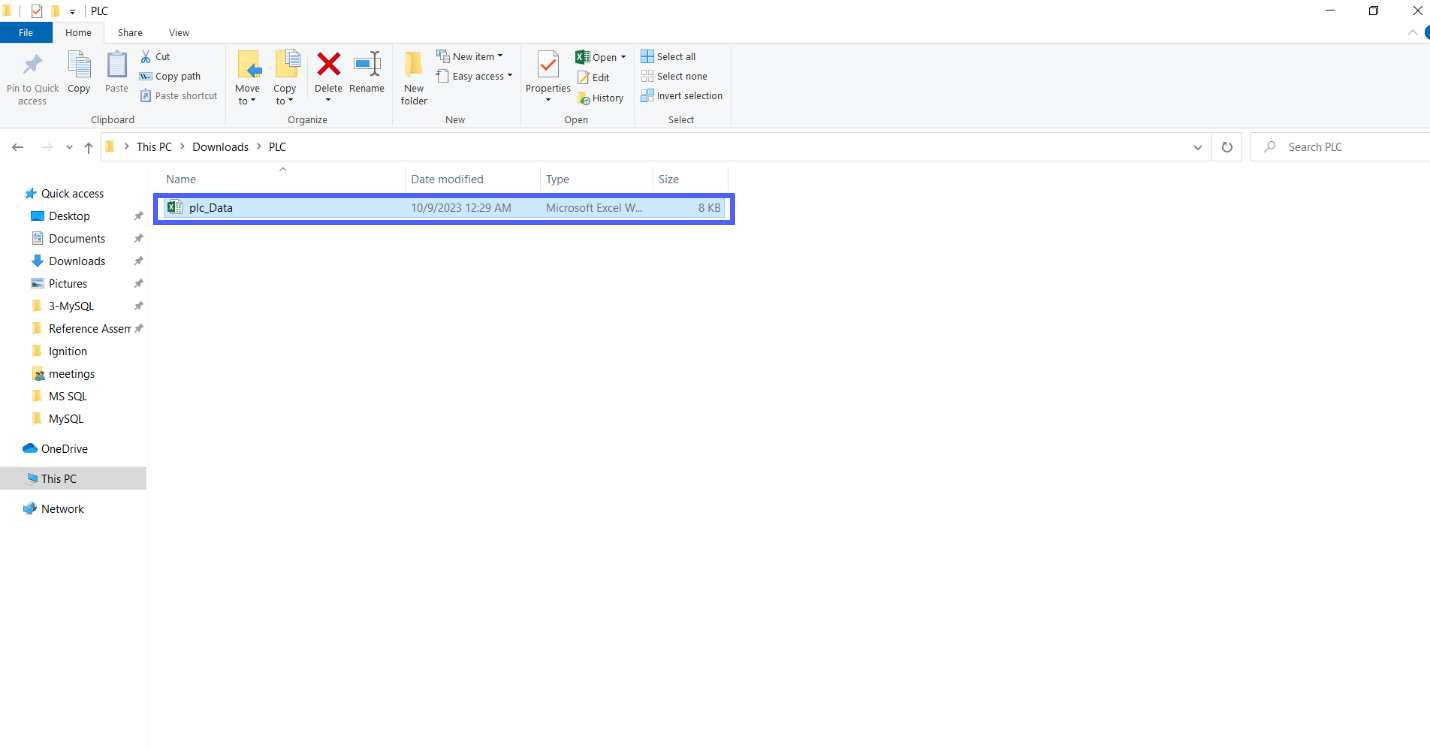

We have successfully configured the Excel sheet. However, it's worth noting that every time we save data to the Excel sheet, it overwrites the same file in the specified path. If you want to create multiple Excel sheets each time you save data in real-time, we can explore this topic in a future tutorial.
System Overview and Project Files
All the necessary files and a video demonstration of the running system are available here.
Conclusion
In this comprehensive tutorial, we explored the powerful capabilities of Node-RED for integrating Programmable Logic Controllers (PLCs) with various data storage solutions, such as MySQL databases and Excel sheets. We learned how to set up MySQL, connect it to Node-RED, and perform essential SQL operations like creating databases, tables, inserting, selecting, updating, and deleting data. Additionally, we created a functional user interface using Node-RED's dashboard feature to visualize and interact with PLC data.
We also dove into the realm of Excel integration, enabling the export of data from PLCs to Excel sheets effortlessly. By making data global and configuring Node-RED to save data to Excel files, we created a streamlined process for data storage and analysis. Throughout the tutorial, we encountered various challenges and learned how to overcome them, such as handling repeated data insertion and optimizing data visualization for better user experience. We demonstrated the step-by-step process, providing clear instructions and visuals to guide readers through each stage of the setup.
