Add On Instructions Programming | AOI RSLogix / Studio 5000 PLC Programming Tutorial Example Logic

Introduction
Add-On Instructions play a critical role in PLC programming. They give a programmer the ability to define custom instructions in order to maximize code reusability and simplify development. An Add-On Instruction or AOI is basically a function which is defined by the programmer and works in the same manner as the one provided by Rockwell.
Building AOIs is not complicated but does require a good understanding of PLC programming. Based on my experience, it’s also important to have been exposed to structured code in order to properly implement AOIs.
Many third-party vendors and OEMs release custom AOIs for their equipment. An example which comes to mind is that Cognex In-Sight 7200 Camera AOI. This instruction allows the user to easily interface with the camera supplied by Cognex. This practice is common & provides integrators with a simple way to interface with a certain device without having to work with registers directly.
When to use Add-On Instructions [AOIs]
Just like with User-Defined Data Types (UDTs), there’s a reason for using an AOI implementation. Based on what we’ve seen in the field, there could be several good circumstances in which an AOI would be justified:
- You’re an OEM or Systems Integrator working with a new product and want to create an instruction which would interface said hardware. The AOI would provide an API (Application Program Interface) for the users looking to work with your system.
- You’re a PLC Programmer who’s using the same exact rungs of code repeatedly. The goal of the AOI here would be to simplify your code into fewer rungs and to make it easier to program.
The biggest mistake I see programmers make is converting all their code into an AOI, nesting multiple AOIs and utilizing AOIs for basic logic. As you gain experience as a PLC programmer, you’ll recognize cases which could benefit from an AOI and others which won’t.
Building an Add-On Instruction in RSLogix / Studio 5000
Getting started with AOIs is fairly straightforward. However, you do need to work in an Offline program in order to create or modify them. This is one of the major drawbacks of AOIs. However, if planned accordingly, this isn’t a problem, but rather a deterrent for anyone to modify your code on a live PLC.
To create a New AOI, right click on the “Add-On Instructions” Folder in the Controller Organizer and select “New Add-On Instruction”. If this option isn’t available, make sure that you are offline; as mentioned above, you won’t be able to perform this action online.

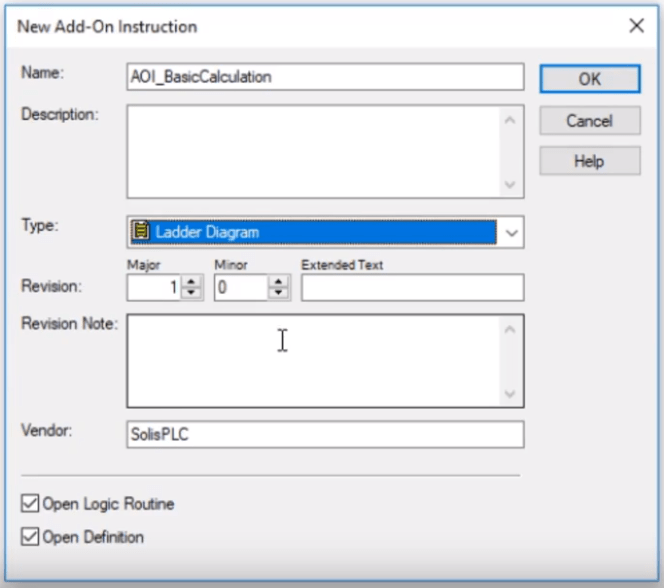
A menu will be presented to you. Through this menu, you can specify general options of your AOI; all of them can be changed at a later time. The most important options are the type of logic you will be using & the name. Everything else is secondary. By personal preference, I always use an “AOI_” prefix for all my Add-On Instructions. The optional selections allow you to keep track of the revision of your code as well as the vendor which has released it. This is particularly important if you’re planning on using the AOI across multiple systems or revise it for other hardware or future firmware upgrades.
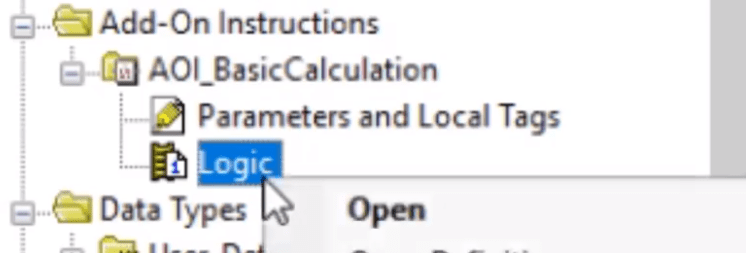
Once you’ve completed the steps above, the AOI will appear within the directory. The AOI will contain a set of Local Tags as well as a single routine which will host the implementation of your logic. You may not create additional routines, so the one you see will be called by the AOI when it’s called in the logic automatically.
AOI Parameters | Inputs & Outputs Definitions
An Add-On Instruction in RSLogix / Studio 5000 PLC Programming is very similar to an instruction we can use from the Rockwell library. It will take a set of inputs, process them in a defined fashion and release a set of outputs to your program. In fact, we will be implementing a multi-parameter Multiplication through the use of MUL Instructions. Using a familiar implementation will illustrate the power of AOIs very well.
Our first step is to understand and define the parameters.
In our example, the inputs will be four distinct operands: “Operand_1”, “Operand_2”, “Operand_3” and “Operand_4”. They are REAL values which we will be multiplying and adding within the AOI. As you define them, make sure to specify their “Usage” type to “Input” and make sure that they are “Req” or Required.

In the image above, you’ll also notice the two outputs which are “Multiplication” and “Addition”. They will be used to store the values calculated by the AOI. The only difference in their definition if the fact that they are set to “Output” in the “Usage” column of the AOI parameters.
AOI PLC Programming Ladder Logic Implementation | Local Tag Definition
The parameters we’ve defined in the previous step are going to be “Global” inputs and outputs. In other words, as you define the AOI, you will be able to use them outside of the AOI.
The logic for the instruction will reside within the routine which came in the definition step. This logic will be executed in sequential order once the AOI is called from the main program on the PLC. The logic is programmed just like in any other routine of the PLC.
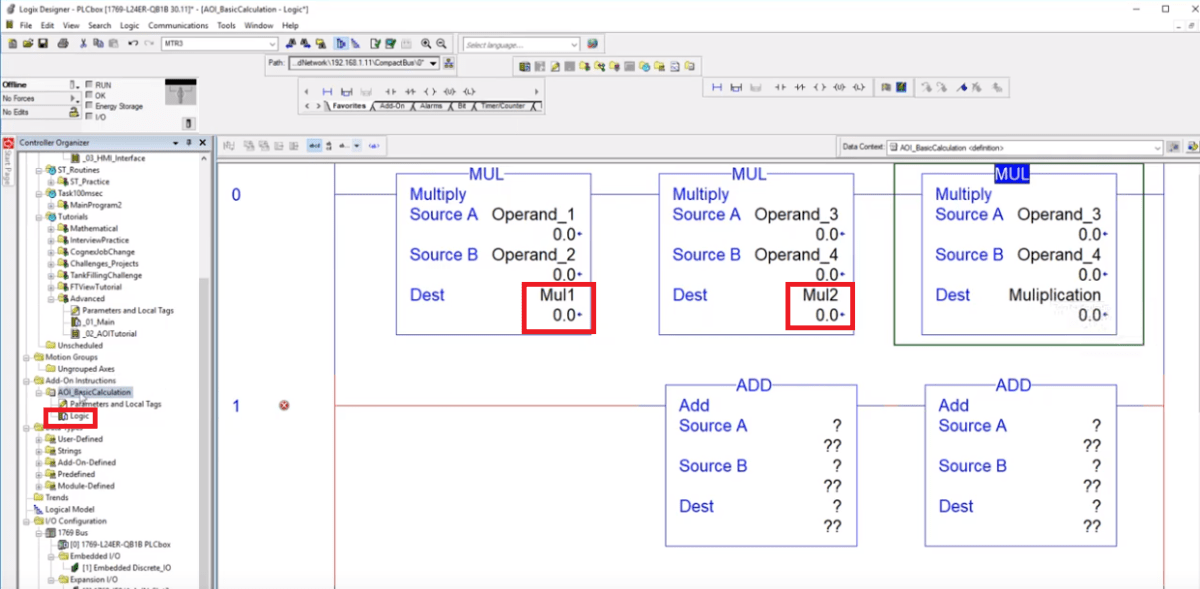
In the image above, you will notice multiple tags which we haven’t defined in the parameters table. These are local tags specified within the AOI; they can only be used and referenced from the logic in the instruction. In this specific example, these tags are “Mul1” and “Mul2”.
Deploying & Understanding an AOI in the Main Logic Programs
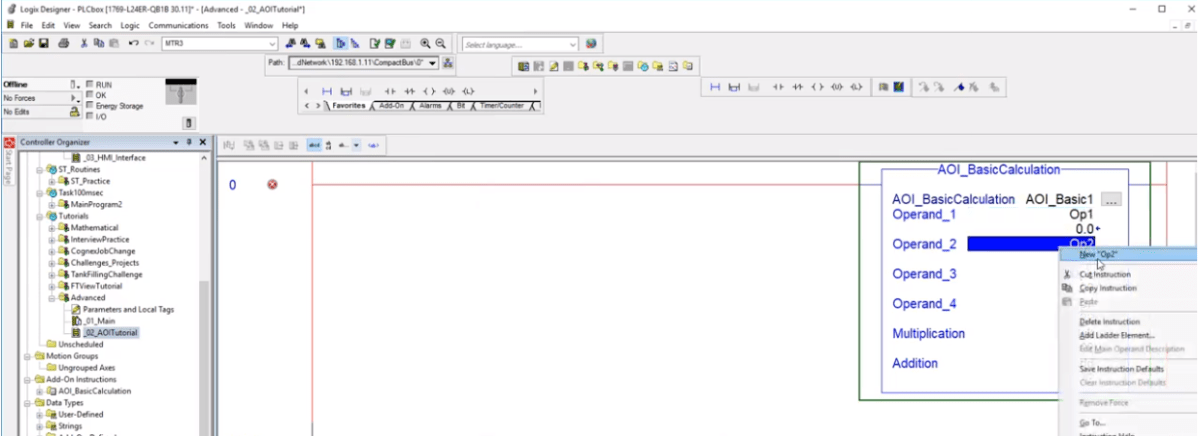
Once the Add-On Instruction has been finalized, it can be used within the main program of the PLC. Just like any other instruction, the AOI can be placed as a ladder logic block or otherwise. Once that’s completed, the inputs and outputs need to be inserted accordingly. The software will give you an error unless all the required input and output tags are properly defined.
Lastly, an AOI required a “CONTROL” tag of the type specified by the name of the AOI. In other words, unlike an ADD Instruction, an AOI will have a tag associated with its implementation.
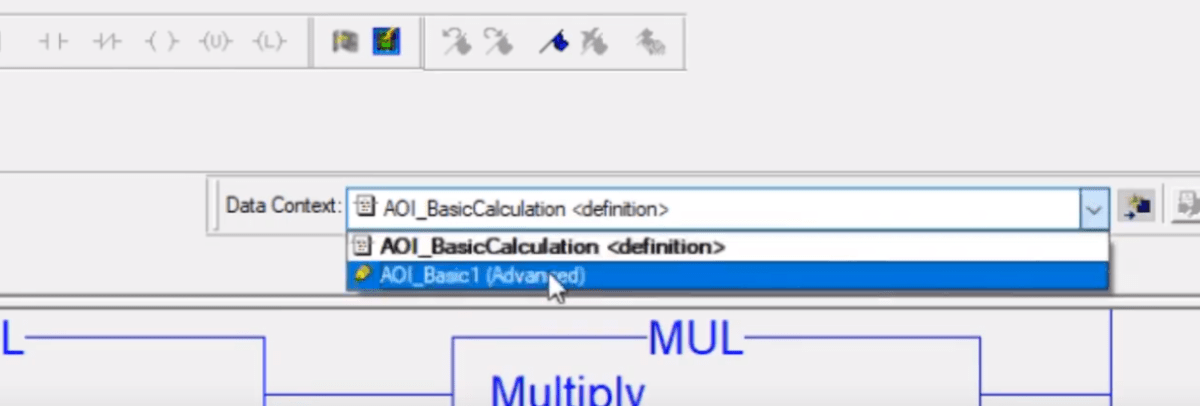
Once the AOI has been programmed into the routine, it will execute the logic within its implementation. One of the biggest challenges when it comes to working with AOIs is the troubleshooting aspect. Unlike other code, it’s not obvious what’s happening within the routine. In order to see the logic which is being executed, you will need to enter the AOI routine and select the tag which you’ve configured when the instruction was created. All the AOI instances will be listed within this menu. Keep in mind that you will only see actual tag values when the appropriate instance is selected.
Conclusion
Add-On Instructions are a powerful tool which allows you to create highly reusable and modular code. They can be utilized to create a custom instruction which will be reapplied numerous times or will be used as an API endpoint for a specific piece of hardware.
Although an AOI is extremely versatile and can be used in many instances, it’s important to understand that they can make it difficult for others to understand and troubleshoot your code. You should only create an AOI implementation for the use cases mentioned above and do your best not to overexaggerate by nesting multiple levels, converting all your code into AOIs, etc. If you don’t believe that’s possible; I’ve seen it done. In fact, I’ve been assigned projects of removing poorly implemented AOIs by other Systems Integrators.
