Cognex In-Sight Vision System - Job Change EtherNet IP CompactLogix Rockwell PLC RSLogix Studio 5000

Introduction
Before we get into the technical details of Cognex In-Sight Job changes, it’s important to understand why we need them in the first place. The reason for this need is what’s called a manufacturing changeover. A changeover is an act of changing the production of a certain manufacturing line from one product to another. The changeover will typically consist of mechanical & electrical components which will dictate certain parameters of the final product.
The most common parameters affected by a changeover mentioned above are product size, color, weight & dimensions. As those very, certain components of the equipment will need to be changed either by operators or control systems. Since our goal is to automate the process as much as possible, we want to make sure that our vision systems are able to detect, work with and process the proper product automatically. The process of changing the product on a Cognex In-Sight system requires a job change.
A job change is a process of going from one job to another where a unique job is created for each product type.
Establishing Communication between Cognex In-Sight & CompactLogix Programmable Logic Controller
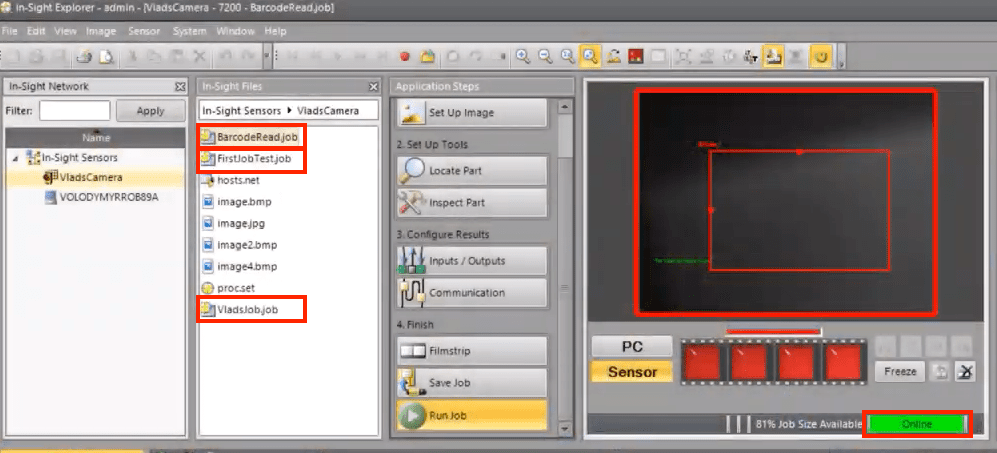
We need to make sure that we can communicate with all the equipment we’re working with. Starting with the Cognex camera, we should be able to go online and verify that we have multiple jobs within the “In-Sight Files” section. This section can be made visible by selecting View > In-Sight Files. Once there, we need to write down the names of the files we will be dealing with during the job change. These names need to be entered exactly as they appear within the Camera.
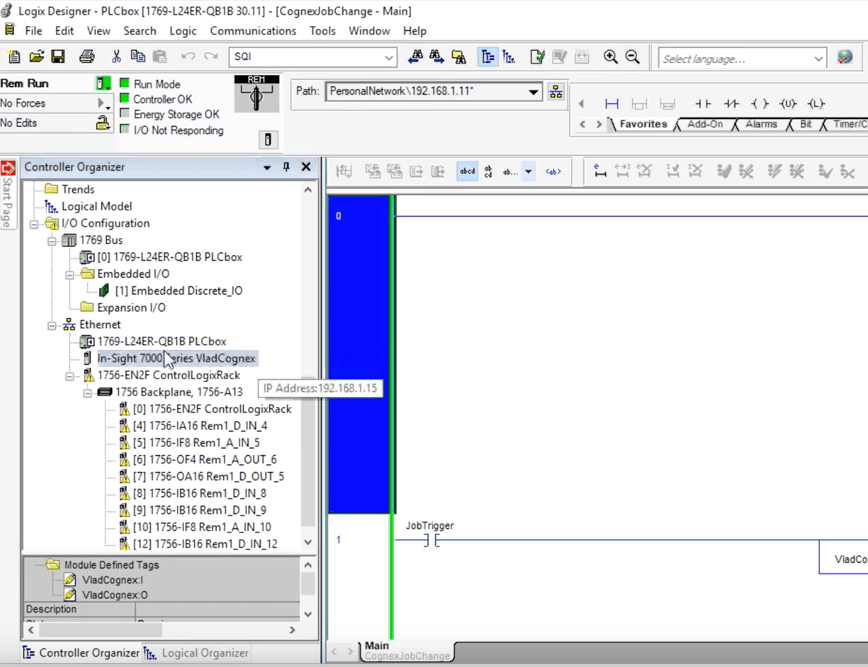
On the Programmable Logic Controller (PLC), we need to make sure that the Camera is added to the IO tree. From the screenshot below, you’ll notice that the camera appears under the IP address of 192.168.1.15 and is communicating with the processor without any issues (no yellow triangle is present). Lastly, for those who are wondering, the PLC used in this tutorial is a 1769-L24ER-QB1B processor and the software used to program the ladder logic is Studio 5000 v30. This should work for other versions, but the AOI or EDS files for the camera may differ. Make sure to refer to the manual if you have an older version of the software or hardware.
The Logic Which Executes the Job Change
The rung below is responsible for changing the job on the Cognex Camera. It’s a simple yet intricate rung which needs to be explained in detail. You’ll find this explanation right below.
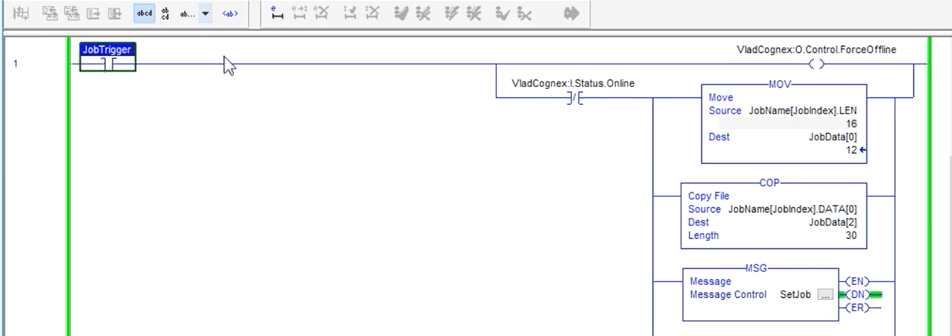
At the start of the rung, we have a condition which allows the rest of it to execute. This condition is based upon a boolean labeled as “JobTrigger”. “JobTrigger” is responsible for starting the procedure. In our case, it’s nothing but a manually toggled bit, but it could be tied to an HMI button, an automatic changeover, etc.
As “JobTrigger” becomes set, we energize (OTE) a bit called VladCognex:O.Control.ForceOffline. This bit is part of the Cognex AOI & allows the user to set the camera to “Offline Mode” while it’s energized. This is a requirement outlined in the Cognex documentation for a job change.
By using an Examine if Open (XIO) Instruction, we’re able to detect the moment our camera actually goes offline. Since the previous bit is only an instruction for the camera to go offline, this may not happen instantaneously. Therefore, we need to monitor the camera status in order to be absolutely sure that it is in fact offline.
Once we are sure that the camera is in “Offline Mode”, we can send our packet. This packet will contain two things: the length of the job name & the job name. The first two bytes are set to the length by moving the “job name”.LEN tag into the first byte. The remaining 30 bytes are written into by copying the name we’ve stored in a separate register.
Lastly, the MSG Instruction is responsible for properly routing the packet from the PLC into the Cognex Camera.
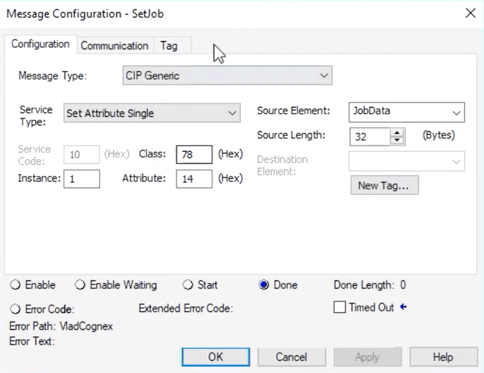
The Structure of the MSG Instruction
I’ve made an extensive video explaining the steps required to use an MSG Instruction to pass data between ControlLogix & MicroLogix processors. The application here is close to what we covered in the said video but does need to be changed to reflect the Cognex In-Sight system parameters. Here’s a screenshot of what was used for sending the data in my case.
Conclusion
By utilizing the method outlined in this tutorial, it’s possible to perform a job change on a Cognex In-Sight vision system. This job change allows one to account for multiple variations of a product on a single production line thus providing the functionality for what’s called a manufacturing changeover.
The logic outlined can be further extended by expanding the array of jobs used during the changeover. You may also want to implement a scheme which makes sure that the job changed has been successfully completed as there are bits & tags which send the status of the camera back to the processor. By reading these tags you can determine if the job change took place and take appropriate action if it didn’t. For example, you may issue a “re-try” after a certain cool-down period.
