How to Use the GSV and SSV Instructions in Studio 5000 and RSLogix 5000
Introduction
This tutorial will provide an in-depth look at the GSV (Get System Value) instruction in Rockwell Studio 5000 (formerly known as RSLogix 5000). The SSV (Set System Value) will also be discussed. GSV and SSV basics will be reviewed (the concept of GSV and SSV Objects, the need for scan time consideration). Several programming examples will be shown (looking for the presence of forces, determining module fault status, and getting date and time).
Prerequisite information
The GSV and SSV are very powerful instructions. The SSV instruction, if used incorrectly, may even lead to a PLC fault (this is discussed later on). Probably the most important thing to realize about these instructions is that there is plenty of help available right in Studio 5000 Instruction Help. Simply insert a GSV or SSV instruction into your logic, right click on it, and select Instruction Help (instead of right clicking, you can also select the instruction, then press the F1 key). The Rockwell Knowledgebase also has numerous tech notes about these instructions. It is also important to note that these instructions take up considerable scan time. Place them in a Periodic task rather than a Continuous task. Rockwell’s tech note ID # QA4409 recommends a Periodic task with a time base of 1,000 ms (1 second) or greater. Let’s go ahead and look at how to actually use these instructions in the code. Examine how these instructions look when inserted into your ladder logic:
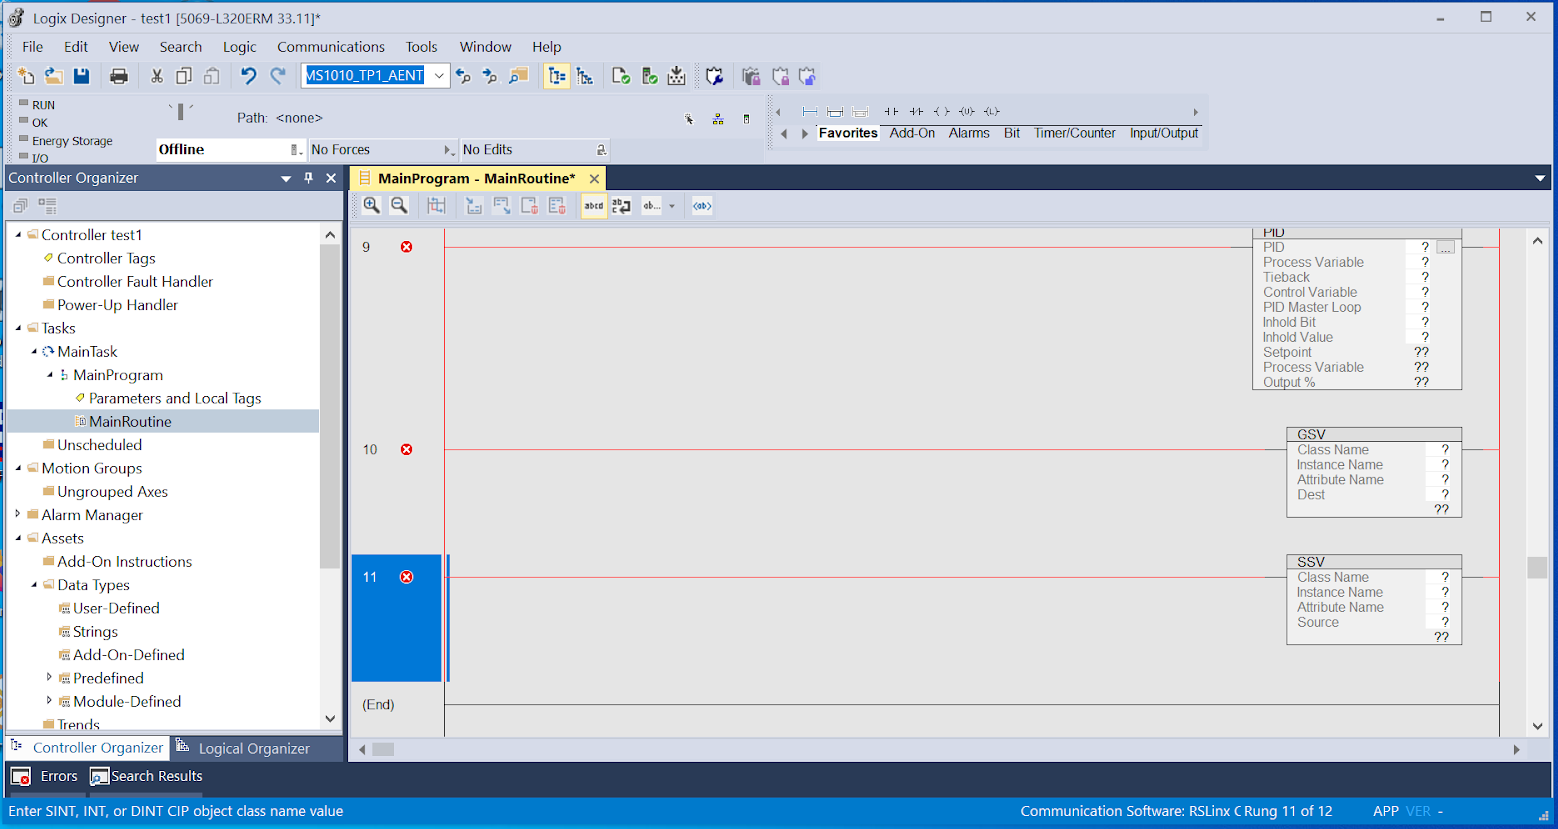
You can see that these look similar, except for the GSV has an operand called “Dest” while the SSV has an operand called “Source”. This makes sense, because the GSV is used to retrieve system information only, while the SSV actually changes system information.
Objects
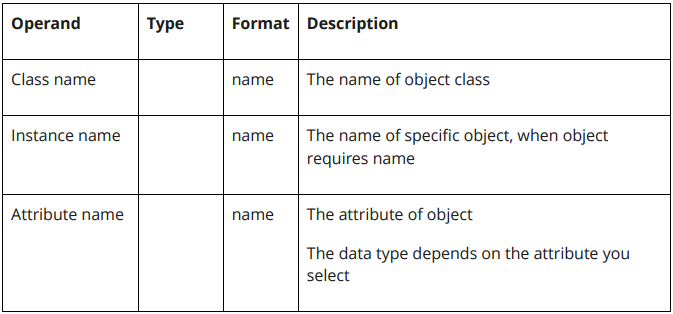
So, you know that when you use a GSV, you need to enter in the Class Name, the Instance Name, the Attribute, and the Destination. You may be wondering what these operands actually mean. The image below is from the Instruction Help for the GSV instruction:Image_2Notice that these operands all have to do with the Object. Here is the complete list of what Objects are available:
- AddOnInstructionDefinition
- Axis
- Controller
- ControllerDevice
- CoordinateSystem
- CST
- DF1
- FaultLog
- HardwareStatus
- Message
- Module
- MotionGroup
- Program
- Redundancy
- Routine
- Safety
- SerialPort
- Task
- TimeSynchronize
- WallClockTime
Although there are numerous Objects available, most of them are not commonly used in practice. In this tutorial, we will only discuss WallClockTime and Module.
GSV example: are forces present in the PLC?
In the following example, we will look at how to use a GSV instruction to determine if a PLC has forces present. This can be useful if, for example, you want to add a warning message on the HMI indicating that forces are present in the PLC. Very little programming is required. See the image below:
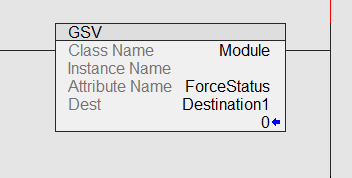
- Select Module as the Class Name operand.
- Leave the Instance Name operand blank.
- Select ForceStatus as the Attribute Name operand.
- You must create a tag of data type INT and select it as the Dest operand (in this example, I named my INT tag “Destination1”).
The Destination1 tag will take on the following values: 0 = no forces, 1 = forces are installed but not active, 3 = forces are active. You could then add logic to, for example, trigger an alarm if Destination1 NEQ 0.
GSV example: is a module faulted?
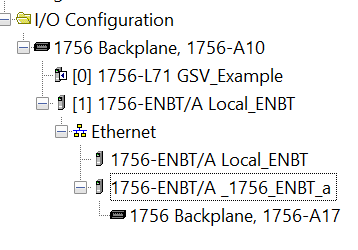
In this GSV example, we will check if a module is faulted. This can be used to trigger an alarm on the HMI so that operators, maintenance and other personnel can be alerted. This is especially useful if you have multiple remote modules communicating with one PLC. You can program multiple GSV instructions to check the status of all your remote modules. Then, simply by looking at one routine in the PLC program, or by checking the alarms on the HMI, you can view, in one place, whether your modules are all fault-free (as opposed to having to physically access multiple electrical control cabinets and checking the status LEDs of all your remote modules). Reference the two images below to set up your GSV:
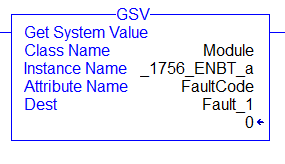
- Select Module as the Class Name operand.
- Look in your IO Configuration Tree and find the name of the module that you wish to check the fault status of. Enter this as the Instance Name operand. In my example, I want to check the fault status of my 1756-ENBT module named “_1756-ENBT_a”.
- Select FaultCode as the Attribute Name operand.
- Create an INT tag that will serve as your Dest operand (in my example, it is named “Fault_1”).
The Fault_1 tag will store the fault code, if any. A fault code of 0 means that there is no fault. A nonzero value means that there is a major or minor fault. To look up what a particular fault code means, you can use the Instruction Help, as follows: select the GSV, right click, Instruction Help > GSV/SSV Objects > Module > Module Faults
GSV example: getting the date and time of an event
In this example, we will investigate how to use a GSV to determine the date and time that an event occurred. For example, let’s say that you wish to know the exact time of day that an operator starts a certain pump. You could use a GSV to log the exact time that the PLC tag Pump_On was energized. Take a look at the image below:Image_6

Program the GSV as follows:
- Select WallClockTime as the Class Name operand.
- Leave the Instance Name operand blank.
- Select LocalDateTime as the Attribute Name operand.
- Create a DINT[7] tag that will serve as your Dest operand (in my example, it is named “Date_Time_1”).
- The first element of the DINT[7] array (in this case, Date_Time_1[0]) will read the year. The following elements will read the month, day, hour, minute, second, and millisecond.
Note that, in older versions of RSLogix, the DateTime attribute was used instead of the LocalDateTime. Newer versions must use LocalDateTime. See Rockwell Knowledgebase tech note ID: QA924 for more information. Also note that, if you don’t have this set up already, you may have to go to Controller Properties > Date/Time and make sure that the correct time zone is selected.
SSV discussion
As mentioned before, the SSV instruction should be used with caution. In writing this tutorial, I referred to the Rockwell Knowledgebase to find any potentially helpful examples and tips concerning the SSV. The only information I found was regarding how to use the SSV with WallClockTime to set the time in the PLC. This is of limited practical use to most programmers, however, let’s consider the following example. In some religions, the New Year does not start on January 1. If you wish, you could use a SSV to set the Month and Day in the PLC according to a religious calendar (as opposed to the secular calendar that the PLC normally follows). The Rockwell Knowledgebase also contains the following tips:
- Make sure SSVs are never executed more frequently than 15 seconds apart (for more information, see Rockwell Knowledgebase tech note ID: BF21770).
- If setting the date (using an SSV with WallClockTime), note that the Month must range from 1-12, the Day from 1-31, and the Hour from 0-23. If, for example, you try to set the Day to 0, this will cause the PLC to fault (for more information, see Rockwell Knowledgebase tech note ID: QA60660).
Conclusion
In this tutorial, you learned what the GSV and SSV instructions are, and why they should be used cautiously, especially the SSV. We reviewed the importance of understanding Objects as related to GSV and SSV programming. Several GSV programming examples were shown and SSV programming tips were discussed. Want to learn more? If you have access to the Rockwell Knowledgebase, look up the tech notes mentioned in this tutorial. You can also search the Rockwell Sample Code Library for “WallClockTime” to find some more programming examples. Also, don’t forget that simply by using the Instruction Help built into Studio 5000, you will have access to a wealth of helpful information about the GSV and any other instructions that you might have questions on.


