How to Install and Configure RSLogix 5000 Emulate

Introduction to RSLogix 5000 Emulate
With the pandemic changing the nature of the way teams collaborate to develop new products, work from home is becoming increasingly common. That freedom and flexibility come with their own challenges when there is PLC hardware required for developing and testing new programs. In most cases using an emulator can be a very good alternative to spending a fortune on replicating the hardware test setup at home.
This tutorial covers the various software applications needed to set up an emulator and how to configure them. Some of those applications include RSLogix 5000 Emulate, RSLinx, RSLogix 5000.
- RSLogix 5000 software is used for creating a project, writing a program, and testing it.
- RSLinx software is used for setting up topics to facilitate communication between RSLogix 5000 Emulator and RSLogix 5000. RSLinx software can also be used for connecting RSLogix 5000 Emulator and a SCADA client such as FactoryTalk.
- RSLogix 5000 Emulator software acts as a PLC CPU, it does not have any input/output modules. In most cases, this is sufficient to test the code and make sure the SCADA clients are able to receive/send data from/to PLC.
For anyone without access to PLC hardware during development, or to save the hassle of wiring the PLC this is an excellent alternative. This is also a great opportunity for students with no industry experience to familiarize themselves with various tools used in the PLC world.
Prerequisites
The following software applications need to be download and installed :
- Windows operating system – A Windows 7 virtual machine is used in this tutorial. All these steps have been verified in Windows 10.
- RSLinx – From the Rockwell website downloads page, download RSLinx Classic version 3.6. For Windows 10 use RSLinx classic version 4.21 or any other recommended version in the Rockwell products compatibility page.
- RSLogix 5000 – Download and install RSLogix 5000 version 20.04 or any other compatible version from the Rockwell compatibility page.
- RSLogix 5000 Emulate – Download and install RSLogix 5000 Emulate version 20.04 or any other recommended version from the Rockwell downloads page.
Note that:
- Most of the Rockwell software applications require a serial number to download. Contact Rockwell customer support for more information on how to download software applications from the Rockwell website. Usually there is a grace period of 7 days for some software applications from Rockwell.
- It is always a good idea to install software applications as an Administrator. This will improve the chances of software installing correctly and possibly avoid any repairs or re-installation.
- Rebooting the computer or the virtual machine after installing each software application is also a good idea.
Step 1 - Creating a project in RSLogix 5000 Emulate
Once all the necessary software applications are installed, open RSLogix5000 software from the Start menu.
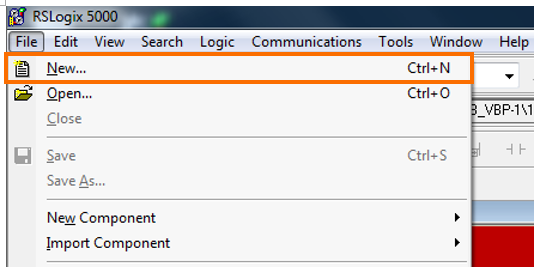
Once the RSLogix 5000 program starts, click “File” from the menu at the top of the window and select “New”.
From the drop-down list, select “Emulate 5570 Studio 5000 Logix Emulate Controller”. Note that this dialog box shows the name of the project, controller version number, and the location where the project will be saved.

Name – RSLogix 5000 software uses the IEC-1131 name standard for filenames. Some of the rules include:
- Minimum of six characters (Logix Designer application supports a minimum of 1 character)
- Starting with an underscore “_” or an alpha character (A-Z) followed by one or more characters consisting of an underscore “_”, alpha character (A-Z), or a number (0-9)
- Spaces can not be used
Version – Version 20 is being used for this example.
Location – In this case, the project name is “EmulatorTestProject”. The default location is what is shown here: ”C:\\RSLogix 5000\Projects”. Click “OK”.
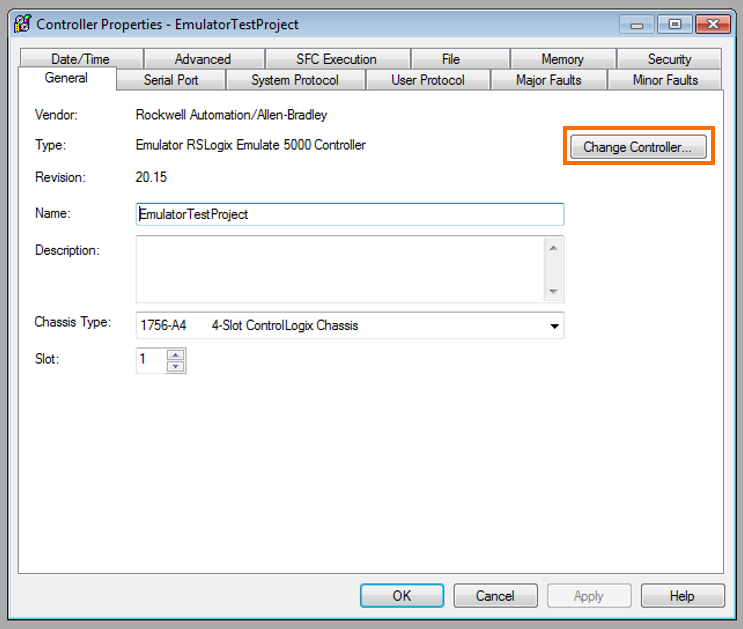
[Optional] If there is an existing RSLogix 5000 project that has a physical controller configured, you can switch to an emulator by following these steps :
- Right-click on the controller name in the “Controller Organizer” and once the “Controller Properties” dialog box opens select “Change Controller”.
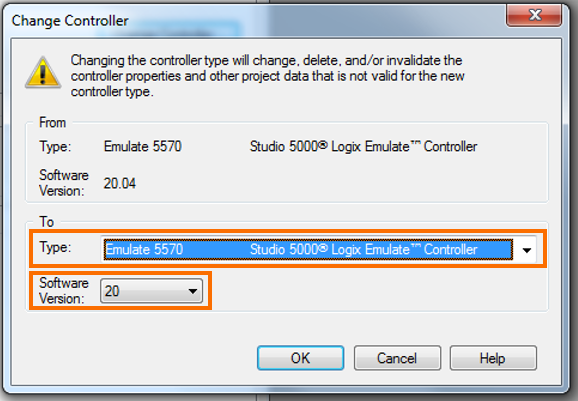
- Once the “Change Controller” dialog box opens, scroll down to the bottom of the list to select “Emulate 5570-Studio 5000 Logix Emulate Controller” or similar as applicable.
- Finally, select a software version from the drop-down list, and click “OK”.
Note that the Rockwell compatibility webpage also shows the compatibility between various software applications, versions and windows operating systems. It is a handy tool and highly recommended before proceeding with downloading and installation of Rockwell applications.
Step 2 - Creating a communication driver in RSLinx
Next, we’re going to create a communication driver in RSLinx in order to connect to the emulator from RSLogix 5000.
Launch “RSLinx Classic”, select “Communications” from the menu and then click on “Configure Drivers”. That will bring up a “Configure Drivers” dialog box.

From the drop-down menu select “Virtual Backplane (SoftLogix58xx, USB)”. Click Add New, then click OK to confirm the name.
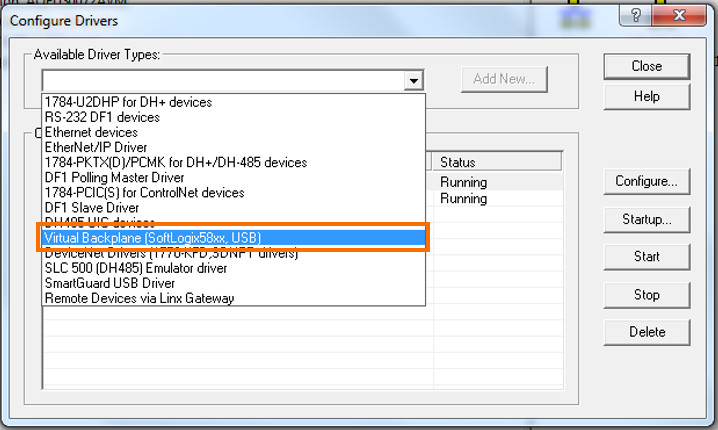
Once the “Virtual Backplane(SoftLogix58xx,USB)” is selected click “Add New” and click “Ok”. After this the selected driver should appear in the list as below with the status showing as “Running”.

In the next section, we’ll learn how to configure the RSLogix 5000 Emulator.
Step 3 - Adding a controller module in Emulator
Launch “RSLogix Emulate 5000”.
The emulator with RSLinx in slot 0 is shown below.
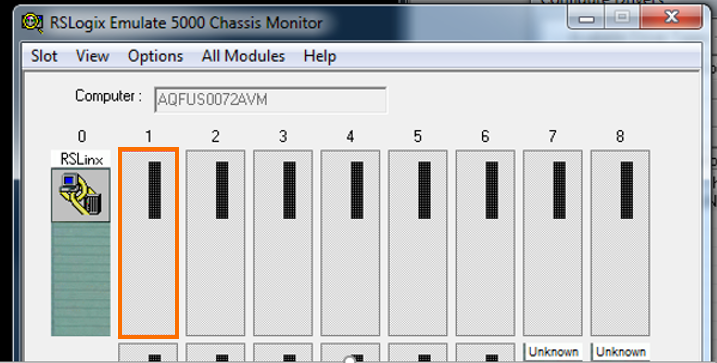
A controller module needs to be added in slot 1 of the RSLogix 5000 Emulator, this is the software equivalent of a PLC CPU hardware. This controller module should be added in slot 1 because the RSLogix 5000 project has an emulator module in slot 1.
To add a controller module, right-click on slot 1, and select “Create”. In the “Select Module” pop-up, select the “Emulator RSLogix Emulate 5000 Controller” option and click OK. Note that the pop-up also shows the slot number. The slot can still be changed here.

After clicking OK in the previous step, a dialog box with more options will appear. Select version 20 for this project. Memory size is set to 3072 KB by default. Most times this is sufficient but sometimes when a project is large it takes more memory. If needed go up to 20,000 or 30,000 KB as allowed. Click Next and Finish.

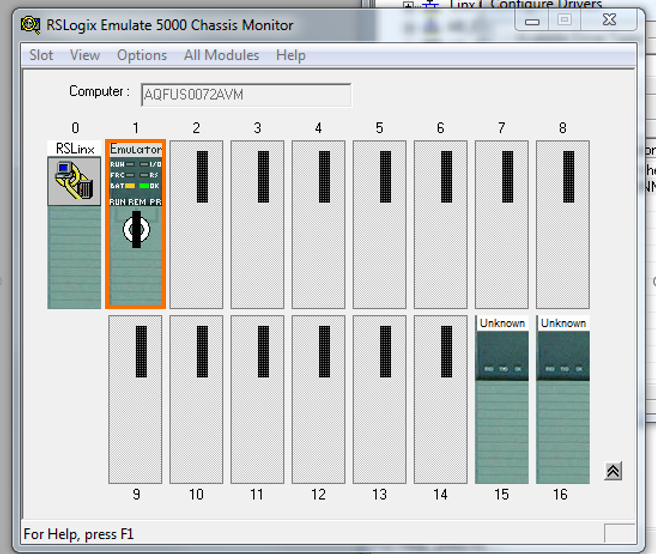
At this point, the emulator should show the controller module in slot 1.
Step 4 - Downloading and going online
So far, we have covered how to :
- Create an RSLogix 5000 project
- Add an emulator to the project
- Replace an existing controller with the emulator in the project,
- Create a new virtual driver in RSLinx
- Add a controller module in Emulator
- Configure with the memory needed for the project.
We’re now going to connect to the emulator from RSLogix 5000 software and download the program.
Open the RSLogix 5000 project that was created in the earlier steps - “EmulatorTestProject”.
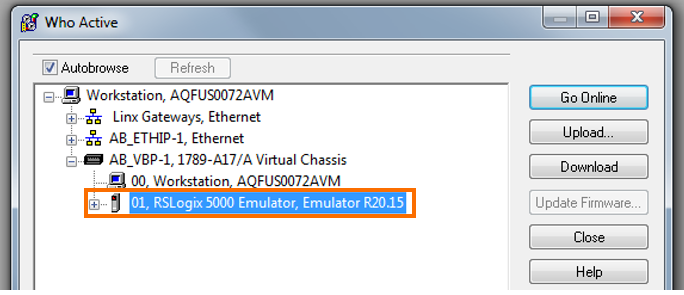
Select “Communications” From the file menu, and then select “Who Active” from the list. A dialog box will appear with the name “Who Active”.
In this dialog box select the newly created driver - “AB_VBP-1”. Expand this item by clicking on the “+” symbol to the left, and then select the RSLogix 5000 Emulator that is highlighted. Notice that the highlighted item also shows the slot number of the controller in the emulator. Finally, select ”Go Online”.
After successfully completing this step a “Connected to go online” dialog box appears with an option to download the project to the emulator. Select “Download” on the dialog box and wait for the project to download. If a warning dialog box appears asking to confirm the download, confirm by selecting “Download” again to proceed.
Bring up the RSLogix 5000 Emulate and right-click on slot 1. From the options select “Run”. This can alternatively be done from the RSLogix 5000 project by changing the controller mode in the top left corner of the project to “Run” mode. Confirm the selection to proceed.
Conclusion
In this tutorial, you learned how to create a project in RSLogix 5000, set up communication drivers in RSLinx, create a software controller module in RSLogix 5000 Emulator, and finally how to connect to the emulator to download the program to be tested.
As a follow-up to this, you can create a project with some ladder logic and output coils. Use the steps above to set up the emulator to test the program logic by observing how the status of the output coils changes by changing the statuses of any of the variables.
Once comfortable with that, a more advanced exercise would be to create a SCADA client such as Factory-Talk to place objects such as buttons, pilot lights, and other input/output elements to simulate using the emulator.
