Introduction to Snap7 & Integration Using Python and Siemens TIA Portal

Introduction to Step7
Industrial Ethernet and other TCP communication protocols have become a standard in the industry. Their adoption offers great flexibility when choosing equipment and dramatically facilitates communication between several different devices. It has never been easier to communicate with PLCs or other industrial devices.
If you want to develop a solution to communicate with a Siemens PLC, Snap7 is the ideal tool. It is an open-source package (or library) developed for several languages , such as VB, C++, Java, Python...etc, which allows us to communicate inherently via the S7 protocol (GET/PUT access).
In this tutorial, you will learn how to use Snap7 to communicate with an S7 PLC. For this example, we will use Python codes to communicate with a virtual PLC (PLCSim Advanced). Note that the package's operation of the package is the same regardless of the language used. The only difference will be a syntax specific to each language. You can consult the official documentation to see the different syntaxes. The logic, however, will remain the same.
Prerequisites
To follow this tutorial, you will need the following:
- An installation of TIA Portal, PLCSim Advanced, and Python. We will use TIA Portal v17 and PLCSim Advanced v4, but you can use any other versions. No additional hardware or software is required.
Installing Snap7
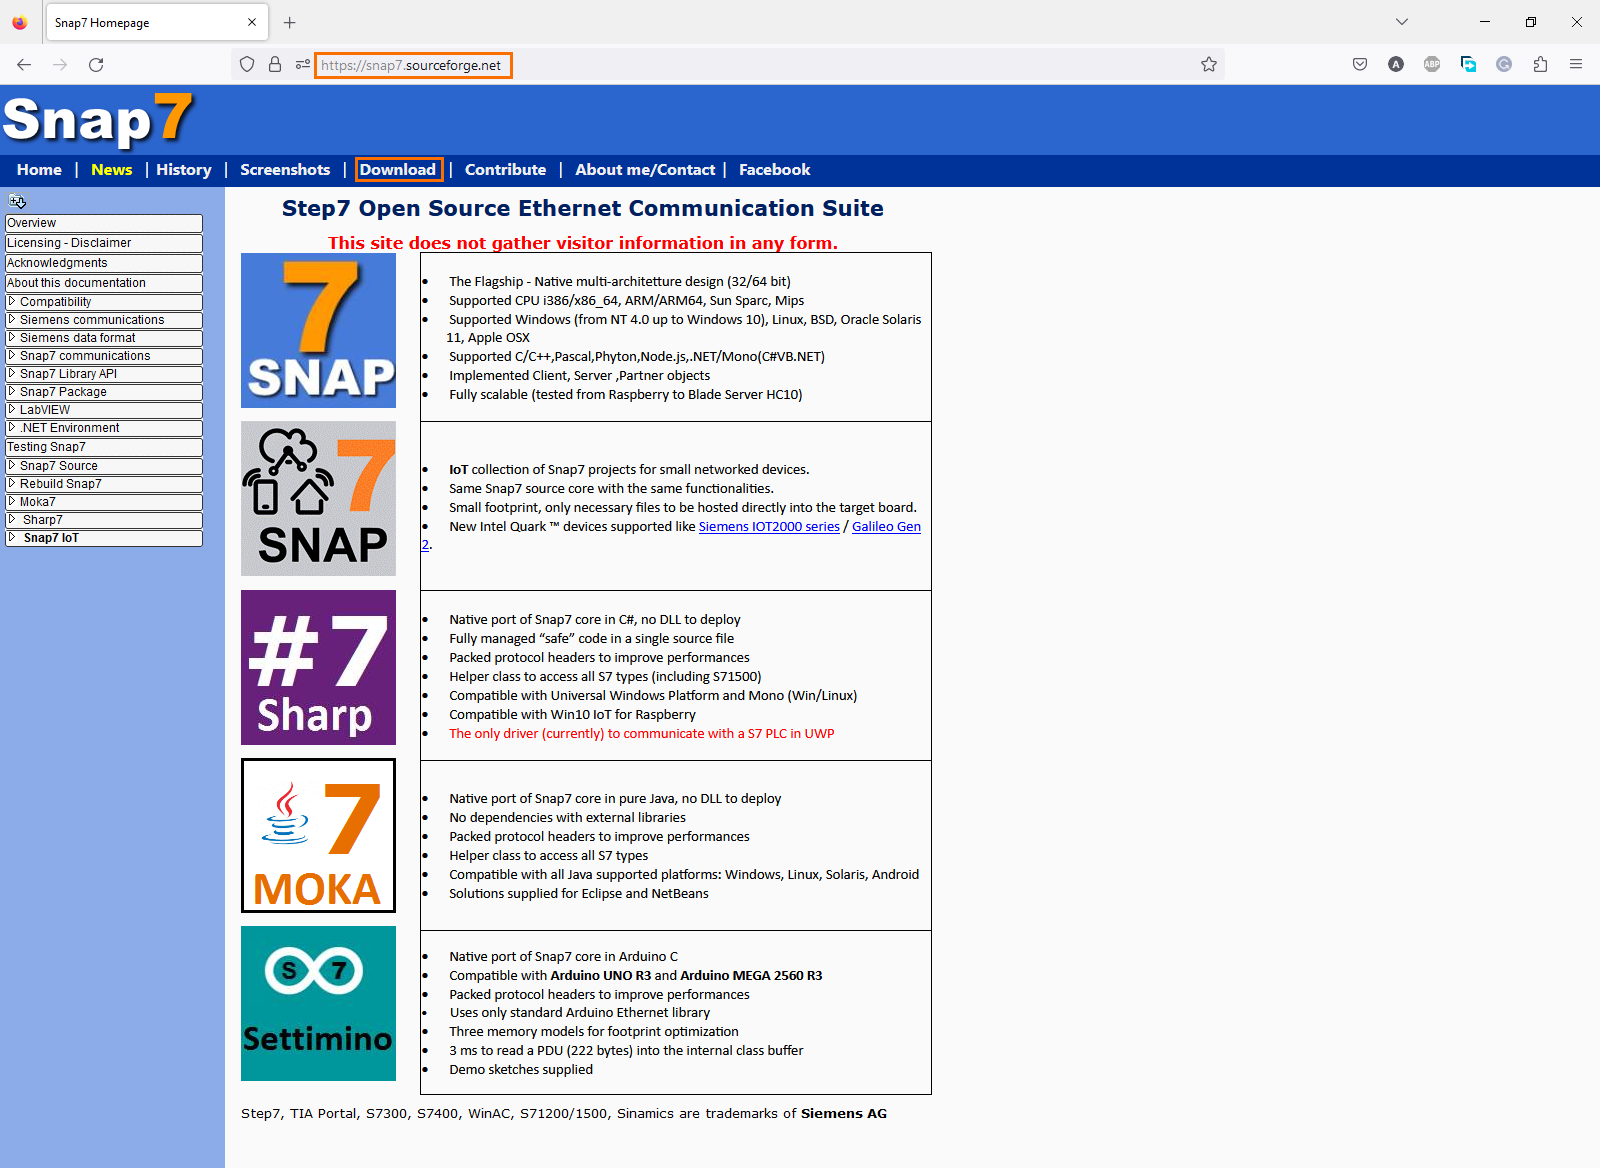
Let’s start by installing Snap7 on your Windows system. Open the Snap7 official website on your web browser. Then, click on the “Download” link.
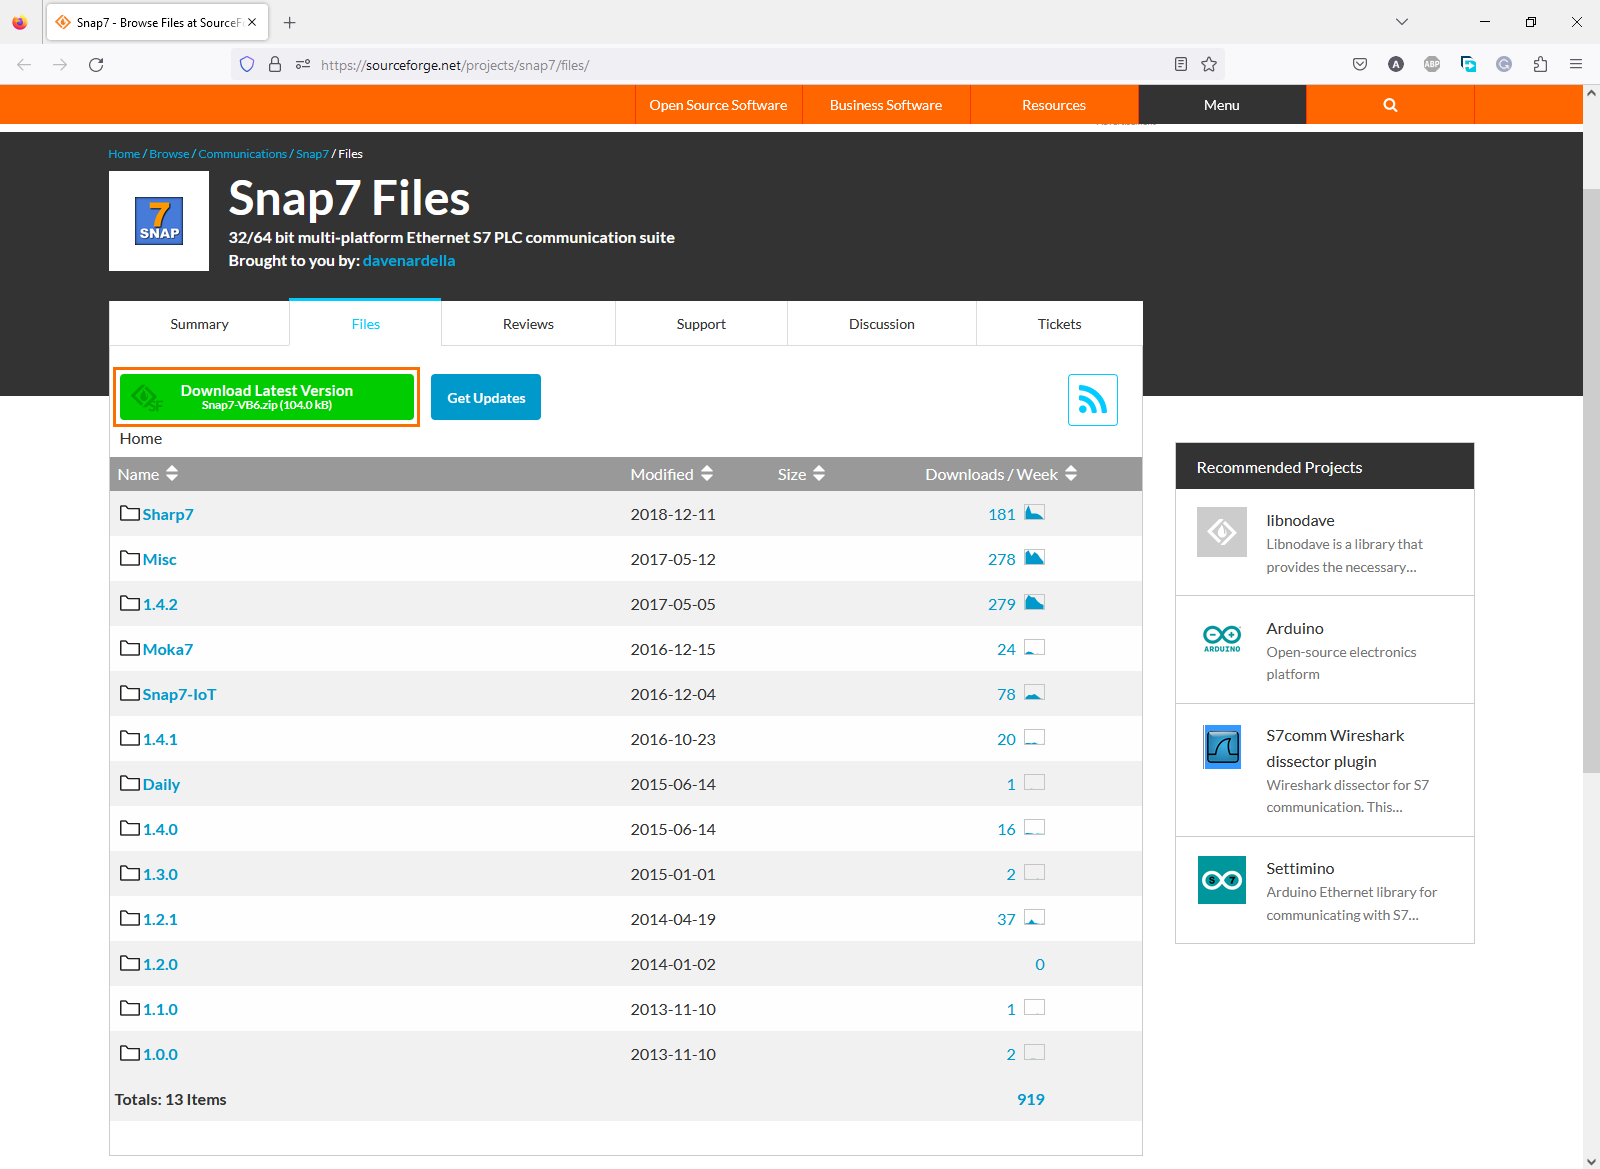
You will be redirected to the Snap7 Sourceforge page. Click on the “Download latest version” link.
Once you have downloaded the zipped file, extract the “Snap7-VB6” folder to a location of your choice.
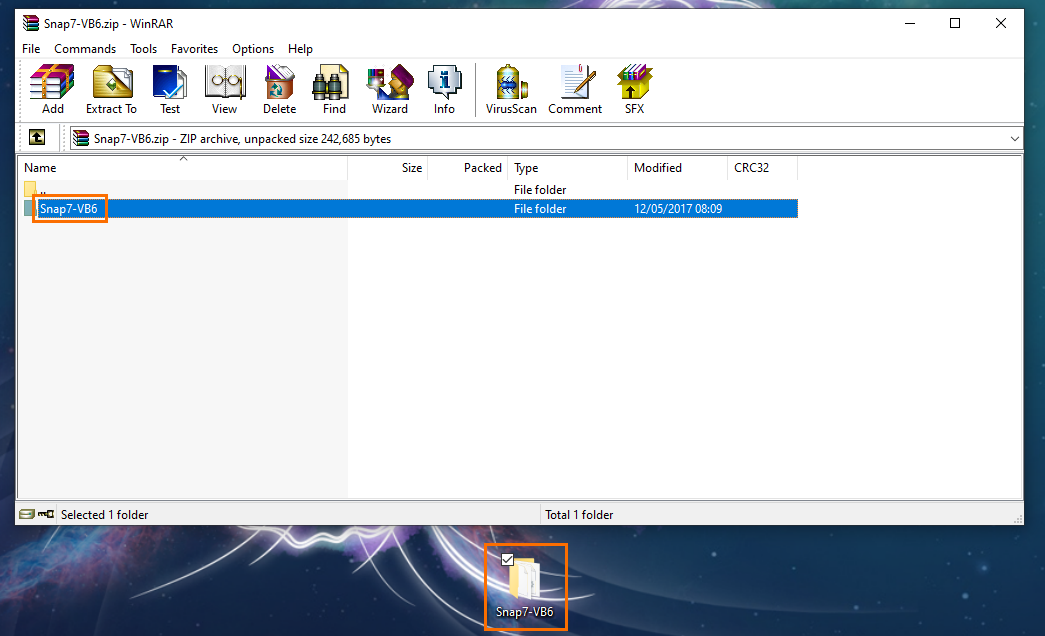
Inside the folder, copy the “snap7.dll” file.
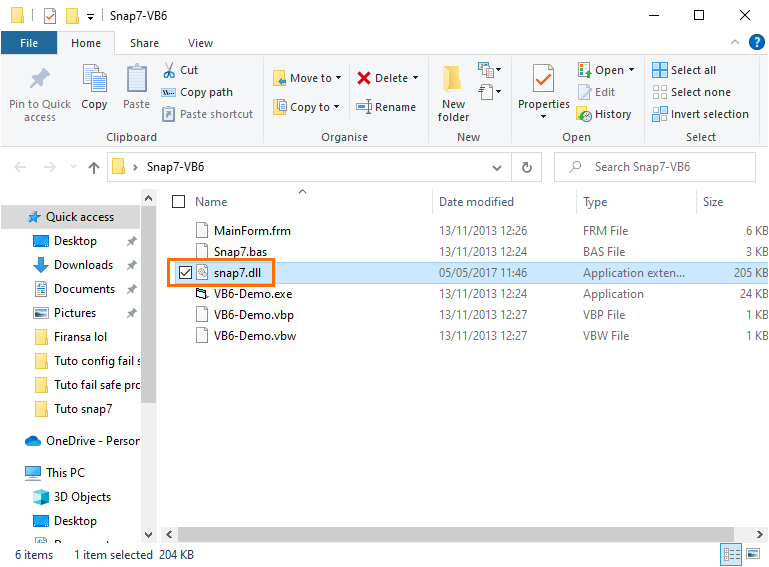
Then, paste it to your “System32” folder.
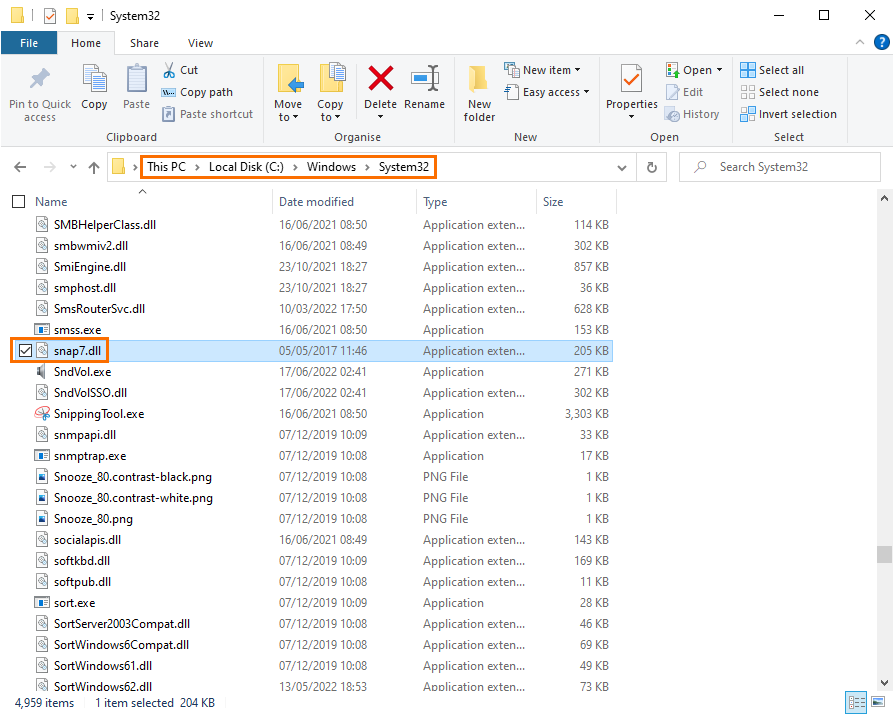
And that’s it, you have installed Snap7 in your system.
Basics of Snap7 with Python
The Snap7 package includes various objects and methods to handle and communicate data. The exchanged data are in the form of a series of bytes. You can read bytes from any memory area of the PLC and extract the desired value, or you can set the values inside the byte array and write it into the PLC. In your usual applications, you will come across three types of instructions:
Configuration instructions
This includes instructions that handle the PLC and communication configuration. the most notable ones are:
Class snap7.client.Client(lib_location: Optional[str] = None)
- Creates an S7 client object that will serve as the interface for the PLC communication.
- You can use the .connect(IP_address, Rack_num, Slot_num) to connect to an S7 PLC (knowing its IP address, rack number, and slot number from its HW configuration).
get_cpu_info()
- Returns a structure containing various info about the PLC such as its name, model, serial number…etc.
get_cpu_state()
- Returns the state of the PLC (if it’s in RUN or STOP mode).
plc_hot_start()
- Switches the PLC to RUN mode.
plc_stop()
- Switches the PLC to STOP mode.
Memory access instructions
Here you can find the instructions for reading and writing data into any memory area.
eb_read(start: int, size: int)
- Reads bytes from the Input Process Image area by defining the starting byte and the number of bytes to read.
eb_write(start: int, size: int, data: bytearray)
- Writes a certain number of bytes into the Input Process Image area by defining the starting byte, number of bytes, and the byte array to send.
ab_read(start: int, size: int)
- Reads bytes from the Output Process Image area by defining the starting byte and the number of bytes to read.
ab_write(start: int, size: int, data: bytearray)
- Writes a certain number of bytes into the Output Process Image area by defining the starting byte, number of bytes, and the byte array to send.
mb_read(start: int, size: int)
- Reads bytes from the Memory area by defining the starting byte and the number of bytes to read.
mb_write(start: int, size: int, data: bytearray)
- Writes a certain number of bytes into the Memory area by defining the starting byte, number of bytes, and the byte array to send.
db_read(start: int, size: int)
- Reads bytes from a Data Block by defining the DB number, the starting byte, and the number of bytes to read.
db_write(start: int, size: int, data: bytearray)
- Writes a certain number of bytes into a Data Block by defining the DB number, the starting byte, the number of bytes, and the byte array to send.
Utility instructions
These instructions are used to extract values from the byte arrays or to set values into them.
snap7.util.get_bool(bytearray_: bytearray, byte_index: int, bool_index: int)
- This method extracts a boolean from a byte array by defining the starting byte and the bit index.
snap7.util.set_bool(bytearray_: bytearray, byte_index: int, bool_index: int, value: bool)
- This method sets the value of a boolean into a byte array by defining the starting byte and the bit index.
snap7.util.get_int(bytearray_: bytearray, byte_index: int)
- This method extracts an integer from a byte array by defining the starting byte.
snap7.util.set_int(bytearray_: bytearray, byte_index: int, _int: int)
- This method sets the value of an integer into a byte array by defining the starting byte.
You can replace “int” in the “get_” and “set_” methods with any other data type such as “real”, “string”, “uint”, “dint”, “char”, “lreal”....etc. For example:
snap7.util.get_real(bytearray_: bytearray, byte_index: int)
snap7.util.set_real(bytearray_: bytearray, byte_index: int, _int: int)
Create a Snap7 client using Python
In this section, we will use two simple codes for reading and writing data into a PLC’s Data Block. The first code will show how to read and extract values from the DB. The second one will show how you can write data into the DB. The communication will be done with a simulated PLC using PLCSim Advanced.
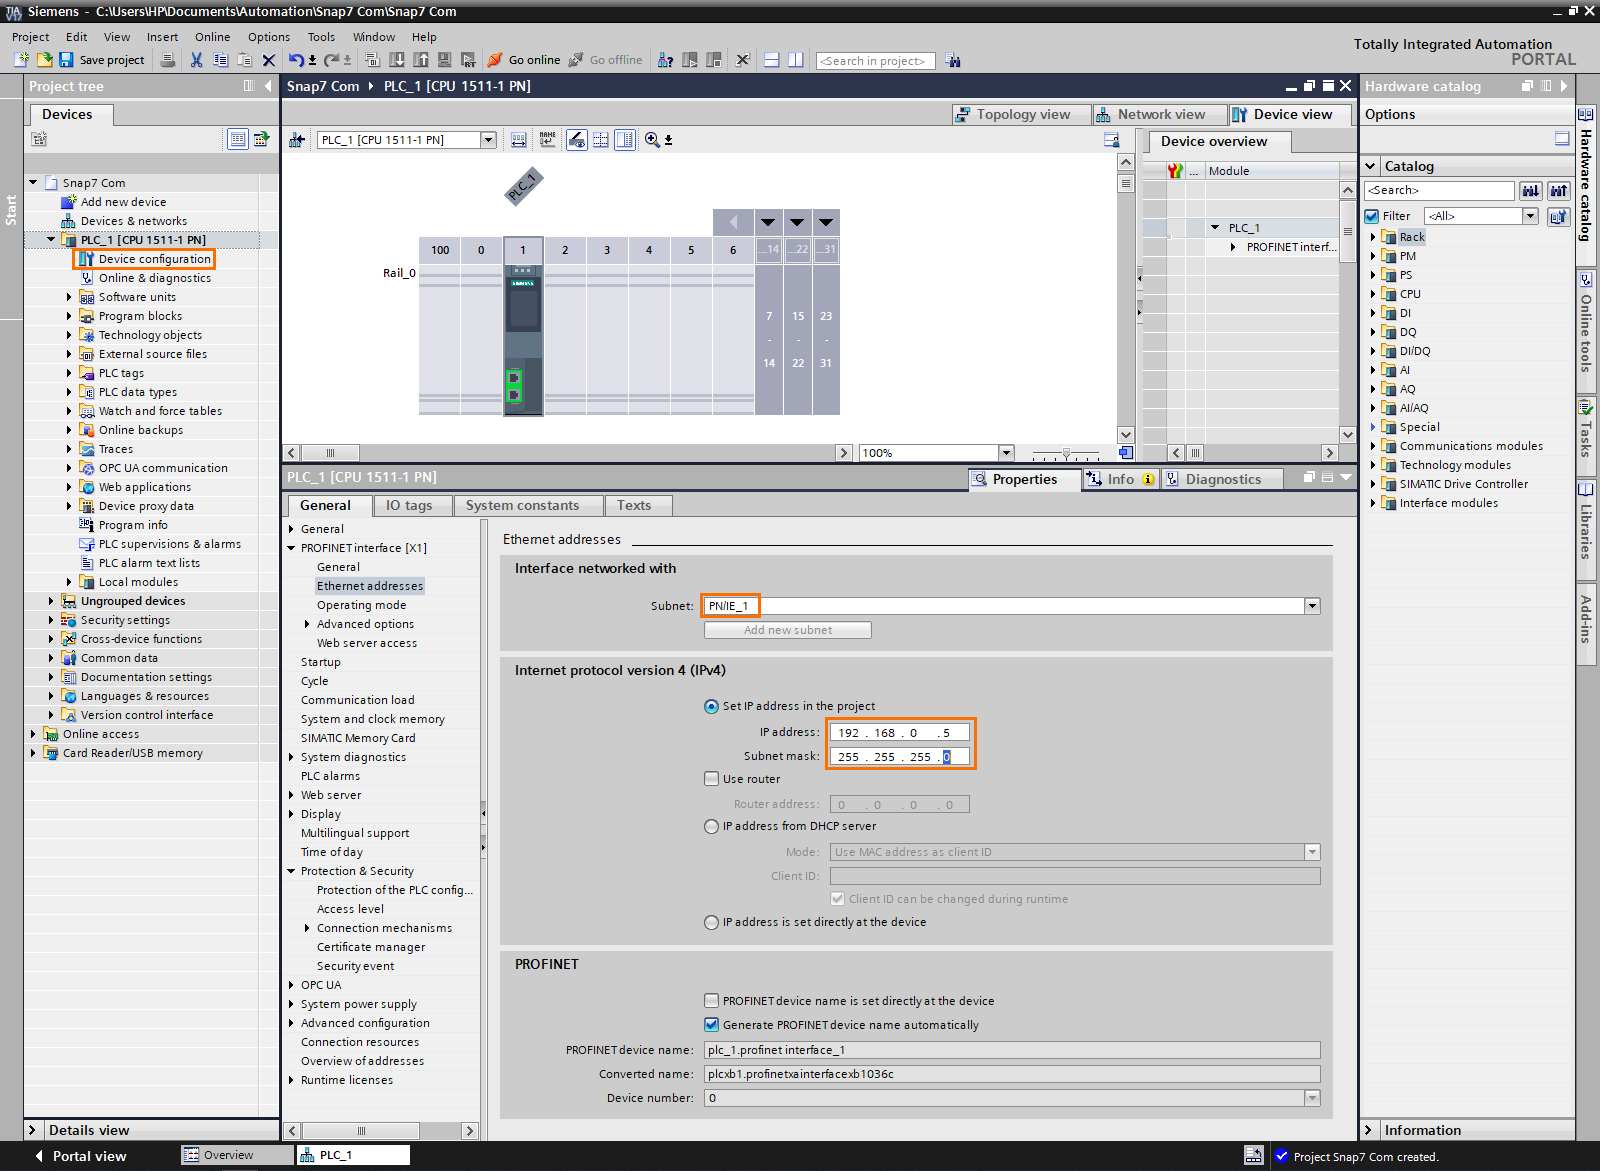
Let’s start by configuring the PLC side. Open TIA Portal and create a new project with the CPU of your choice. I’m using a “1511-1 PN CPU” for this example. Then, open the “Device Configuration”. Create a new subnet and set the IP address to “192.168.0.5/255.255.255.0”.
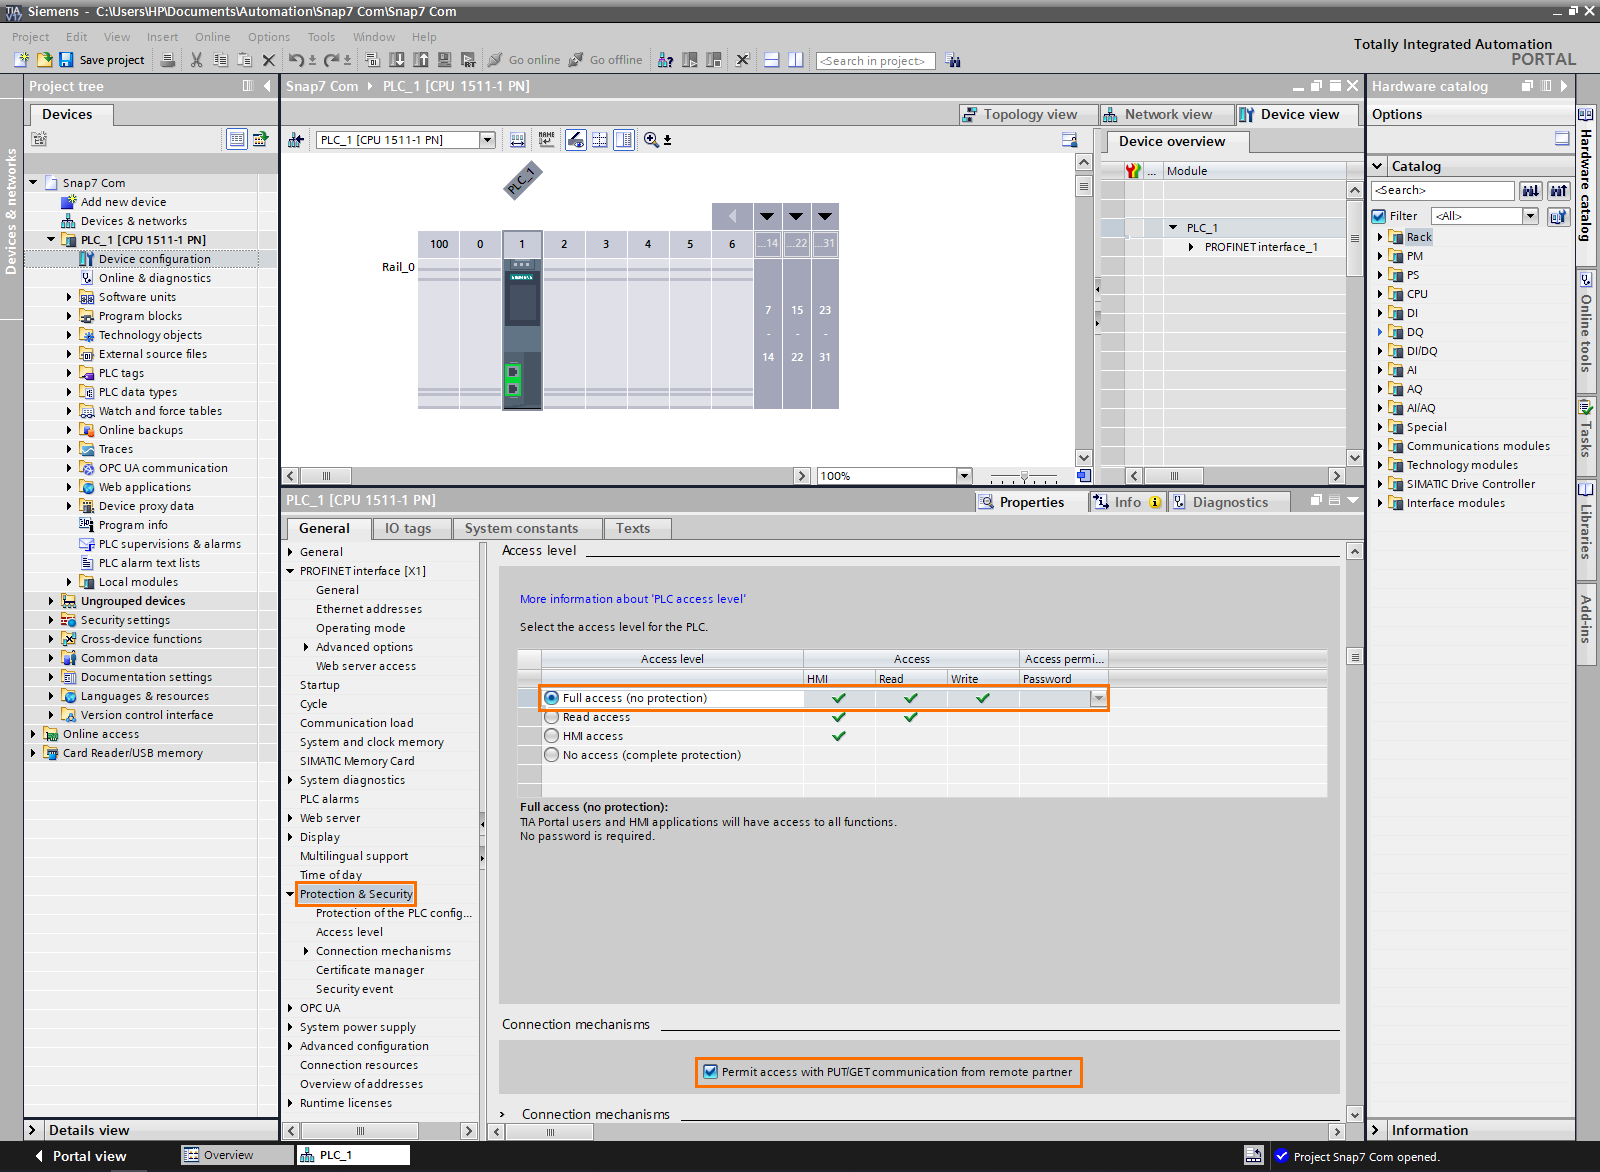
After that, open the “Protection & Security” section, set the access level to “Full access”, and check the “Permit access with PUT/GET communication” checkbox.
These are mandatory. To date, the latest version of Snap7 does not support password access for 1200 and 1500 CPUs. Also, Snap7 uses this S7 communication protocol. Activating the PUT/GET communication allows the S7 protocol.
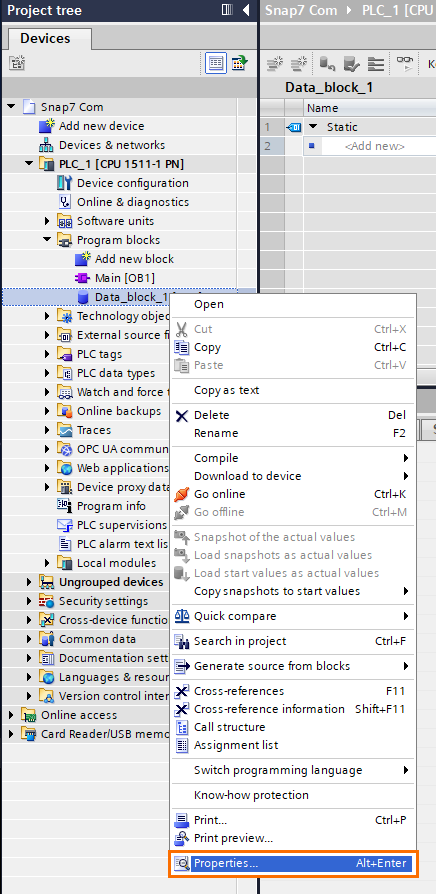
Next, we need to create a Data Block. Click on “Add new block” in the Project tree and create a global DB.

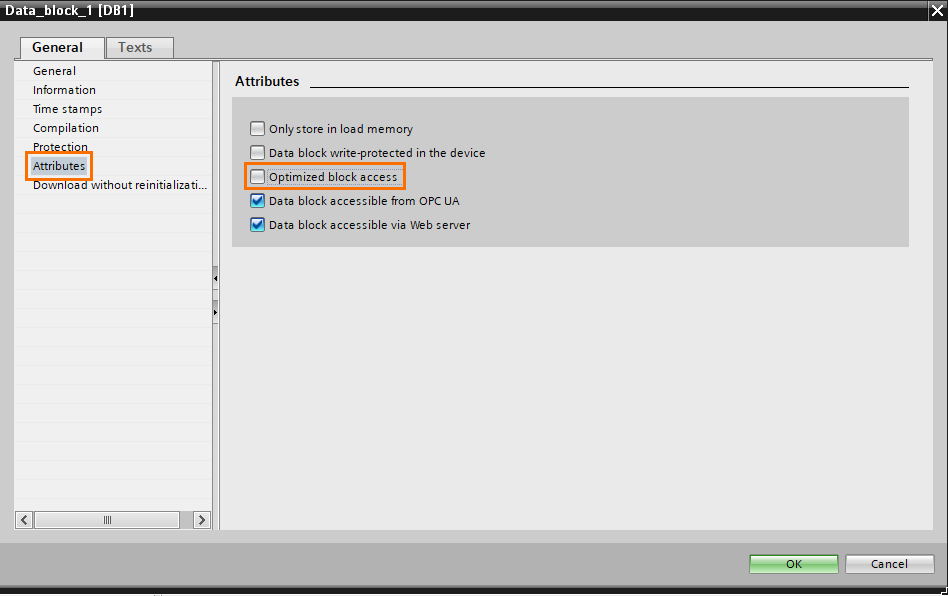
Once the DB is created, right-click on it and open its properties.
In the properties, open the “Attributes” section and uncheck the “Optimized block access” checkbox. This is also mandatory. Snap7 can only access non-optimized blocks (which means that each element has an offset index).
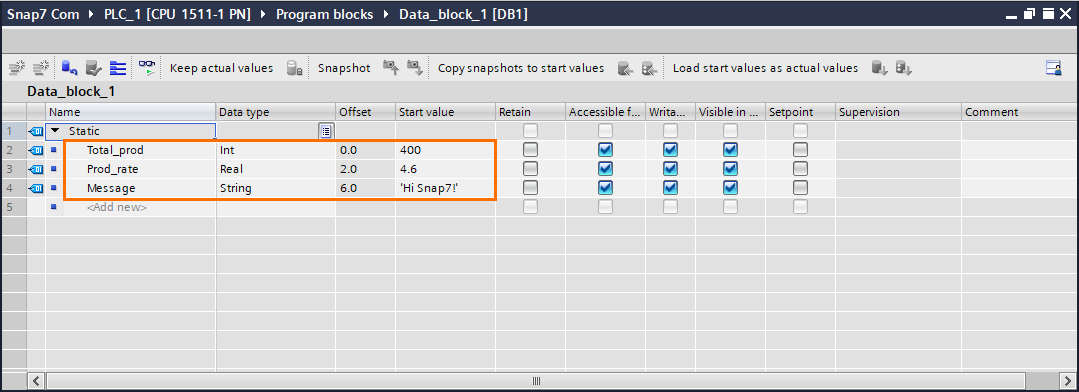
Now, open the DB and create 3 new variables as shown in the next figure. Please note that the offset is generated after compiling the project.
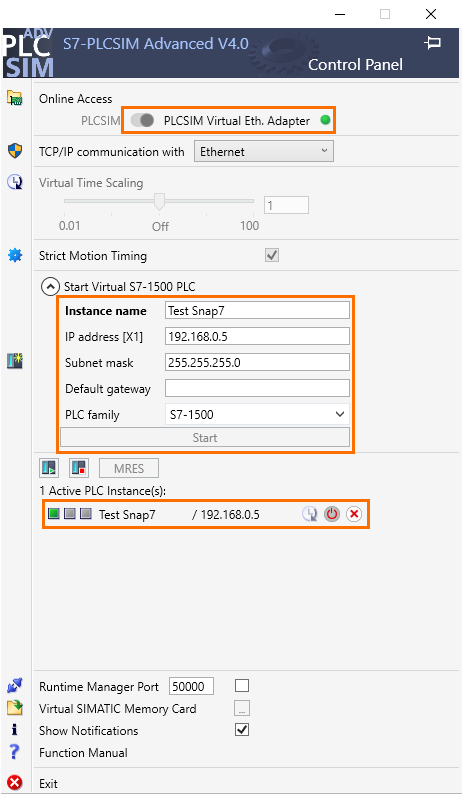
If you’re using PLCSim Advanced, create the virtual PLC as shown in the next figure. (Don’t forget to activate the PLCSIM virtual adapter).
Once your PLC is ready, download the TIA Portal configuration.
We are done with the PLC side. Let’s code some Python. Open your text editor or IDE (I’m using visual studio in this example) and copy the following code. (you can find it in the appendix section below).
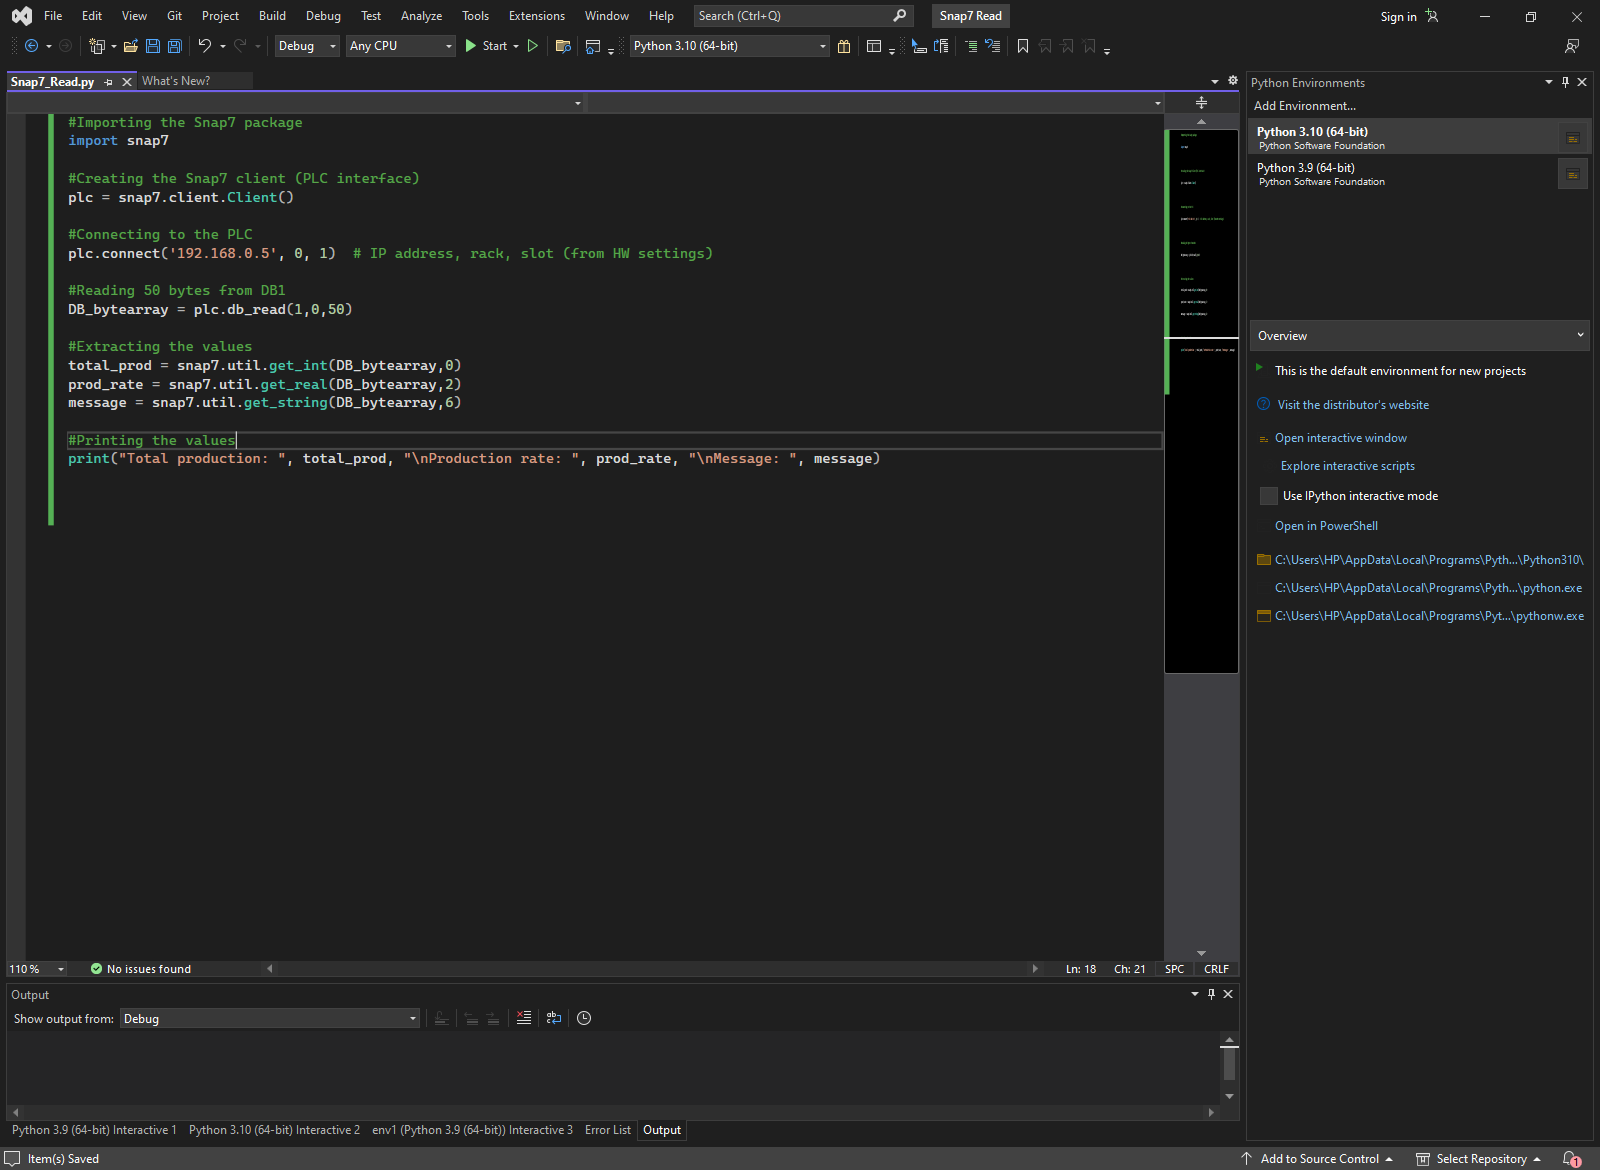
We start by importing the snap7 package. Then we need to create a snap7 client object. Next, we connect to the PLC using its IP address, rack number, and slot number (from the HW configuration). After that, we use the “db_read” method to read 50 bytes from the DB1 (We chose 50 to cover the entire block). Once the DB is read, we extract the 3 elements using utility methods. Then, we display the 3 values.
Upon executing the code, you should obtain the following result.
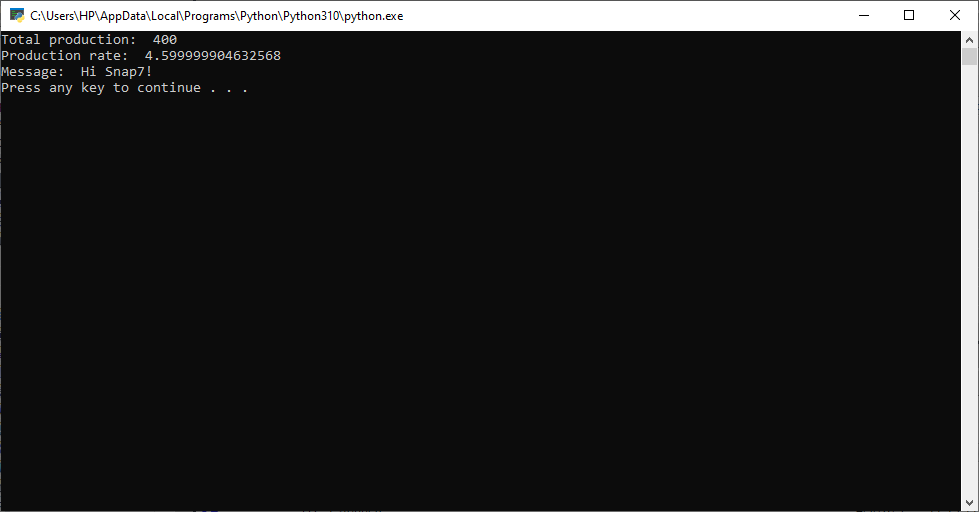
Remark: The difference between the read value (4.5999…) and the actual value (4.6) is normal. It is inherent to the floating point calculations. You can use rounding functions to correct it.
Now to the second code. Copy the following code.
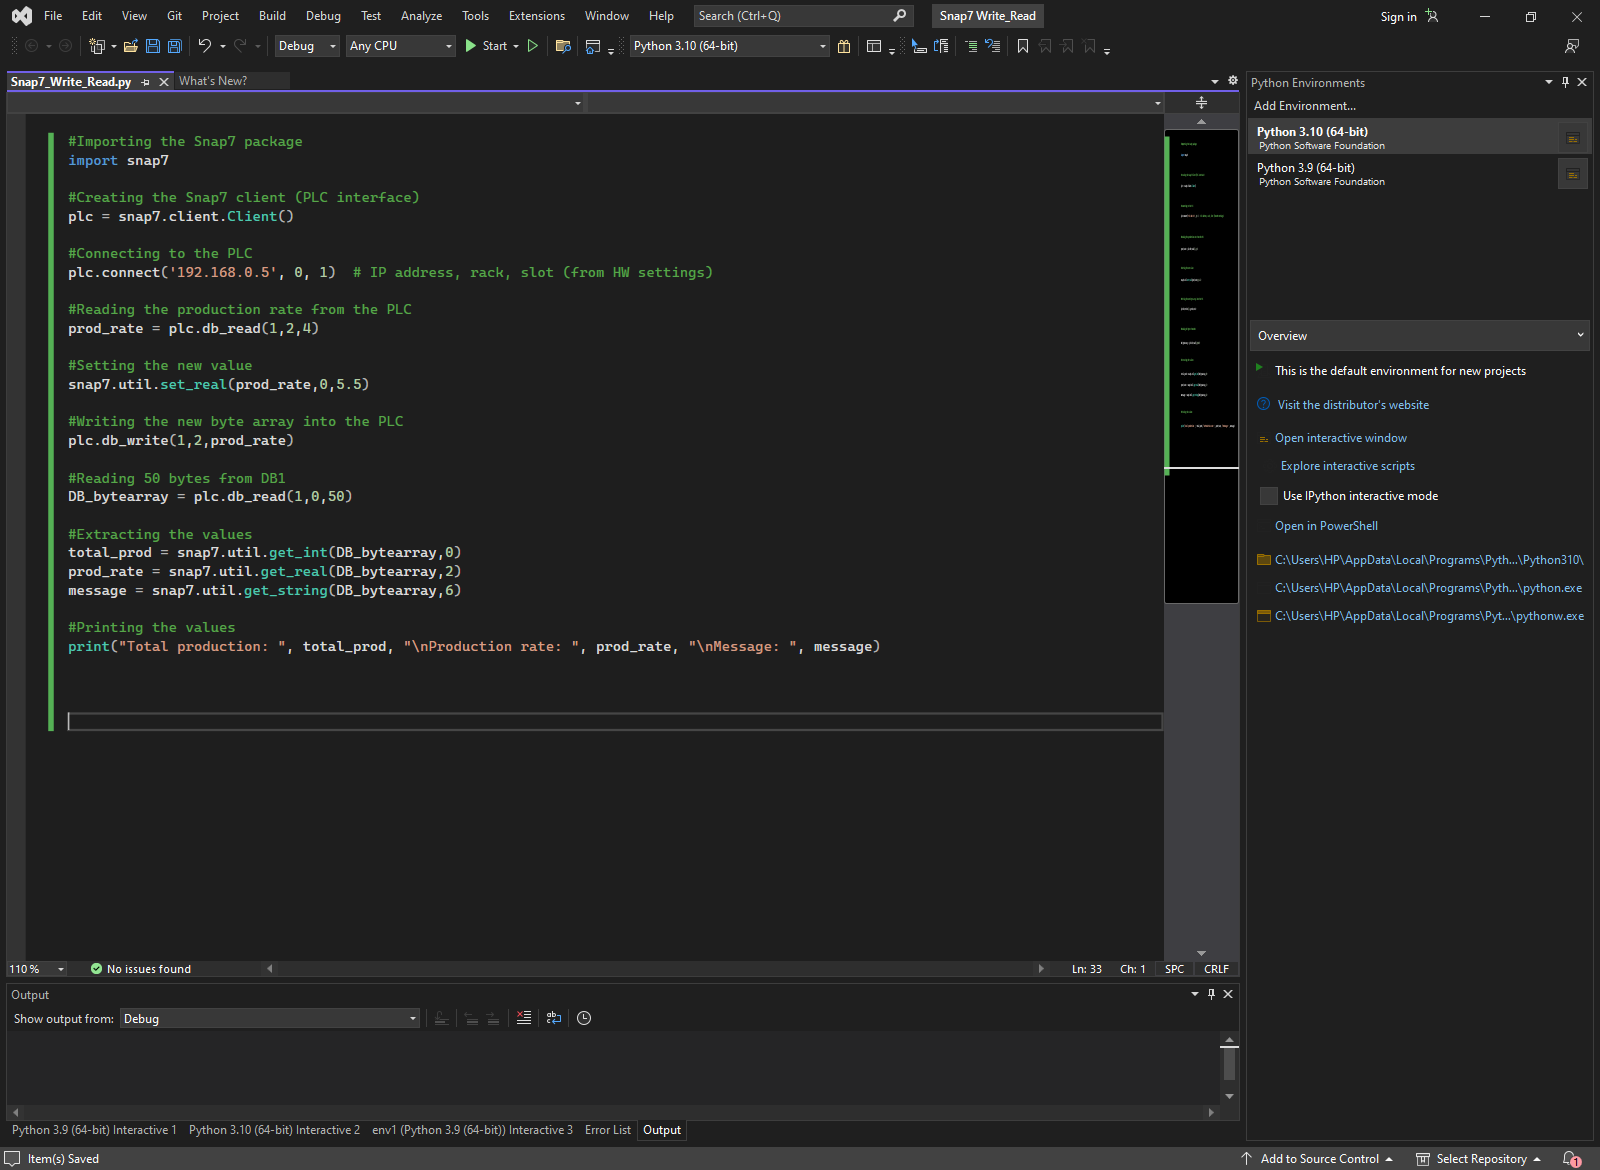
This code works almost like the first one except, after connecting to the PLC, we read the value we want to modify (from DB1, offset 2, and 4 bytes because we’re reading a real). Next, we set the value of the real before writing it back into the PLC. Then, we proceed to read the 3 values like done in the first code.
Upon executing the code, you should obtain the following result.
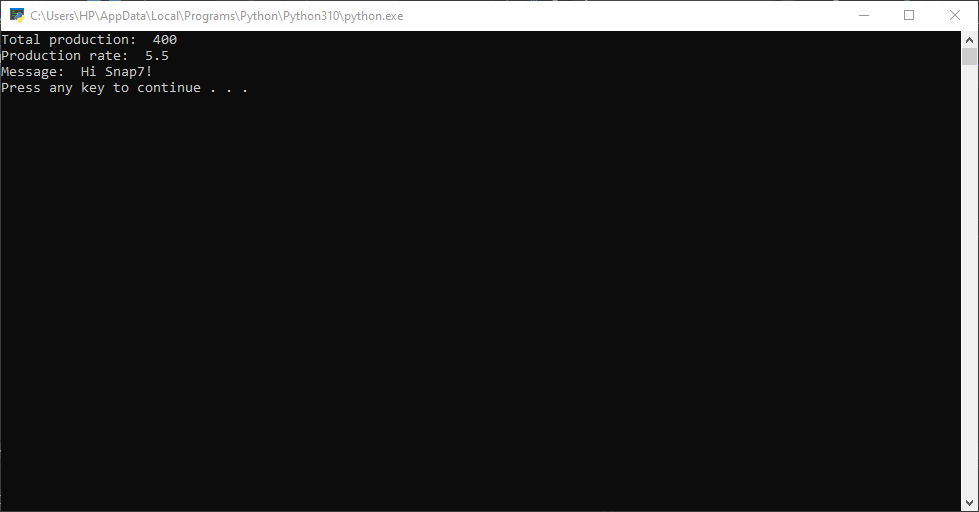
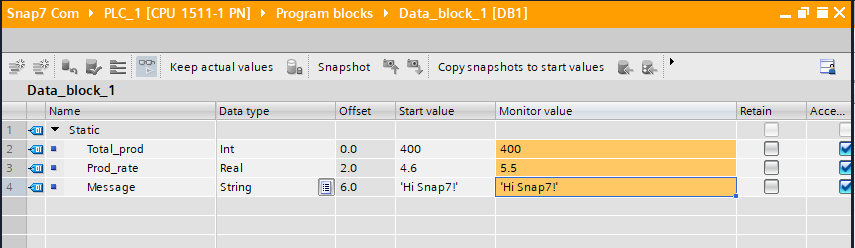
Then you can check the current values of the DB to make sure the value has been modified successfully.
Appendix
Reading code
Importing the Snap7 package
import snap7
Creating the Snap7 client (PLC interface)
plc = snap7.client.Client()
Connecting to the PLC
plc.connect('192.168.0.5', 0, 1) # IP address, rack, slot (from HW settings)
Reading 50 bytes from DB1
DB_bytearray = plc.db_read(1,0,50)
Extracting the values
total_prod = snap7.util.get_int(DB_bytearray,0)
prod_rate = snap7.util.get_real(DB_bytearray,2)
message = snap7.util.get_string(DB_bytearray,6)
Printing the values
print("Total production: ", total_prod, "\nProduction rate: ", prod_rate, "\nMessage: ", message)
Reading/writing code
Importing the Snap7 package
import snap7
Creating the Snap7 client (PLC interface)
plc = snap7.client.Client()
Connecting to the PLC
plc.connect('192.168.0.5', 0, 1) # IP address, rack, slot (from HW settings)
Reading the production rate from the PLC
prod_rate = plc.db_read(1,2,4)
Setting the new value
snap7.util.set_real(prod_rate,0,5.5)
Writing the new byte array into the PLC
plc.db_write(1,2,prod_rate)
Reading 50 bytes from DB1
DB_bytearray = plc.db_read(1,0,50)
Extracting the values
total_prod = snap7.util.get_int(DB_bytearray,0)
prod_rate = snap7.util.get_real(DB_bytearray,2)
message = snap7.util.get_string(DB_bytearray,6)
Printing the values
print("Total production: ", total_prod, "\nProduction rate: ", prod_rate, "\nMessage: ", message)
Conclusion
In this tutorial, You learned how to use the Snap7 package with the Python language. We went through how to install Snap7, then we saw the basics of the package, then we applied it to an actual example using a virtual PLC.
Python is one the easiest language to use in this kind of application. in addition to being beginner-friendly, it allows you to quickly develop a simple communication application in a few lines of code. In addition, it greatly facilitates the processing of the acquired data.
However, keep in mind that Snap7 is not without flaws. For example, the fact that the latest version does not yet support secure access for S7 1500 and 1200 PLCs is very disturbing because it makes us vulnerable to an attack via GET/PUT access. When using this package, it is necessary to take cyber security precautions accordingly.
