Publishing MQTT Data Using Opto 22 groov EPIC PAC

Introduction to MQTT
MQTT is a communication protocol that has taken off in the IIoT community. It’s a light-weight, efficient protocol that works through a publisher / broker / subscriber model. It creates an easy way for field devices to communicate and retrieve data from a single location. In this article, we’ll go over MQTT and dive into an example of how you can publish data using a groov EPIC PAC and retrieve the data using a MQTT client.
How MQTT Works
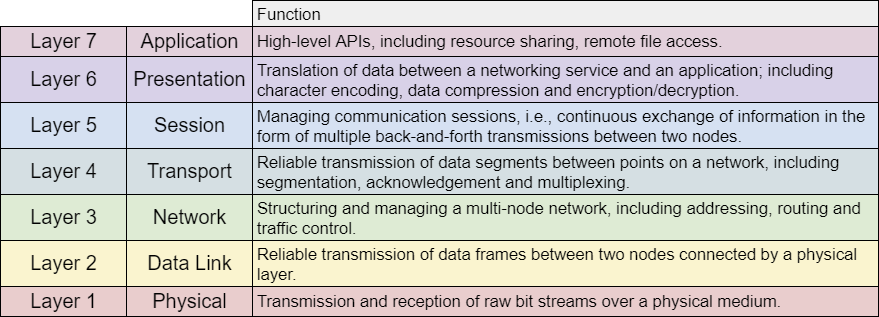
The Open Systems Interconnection (OSI) model is used to describe the way machines and applications communicate between themselves. The model was developed with the idea that a provider can utilize different protocols or software components at every layer without having to re-architect the entire structure. The MQTT protocol will come into play at Layer 7 of the model; on top of TCP/IP (Layer 4). The reason that this is important is that this keeps a lot of infrastructure in place, while re-defining how the packets are being sent between devices.
MQTT Protocol Device Topology
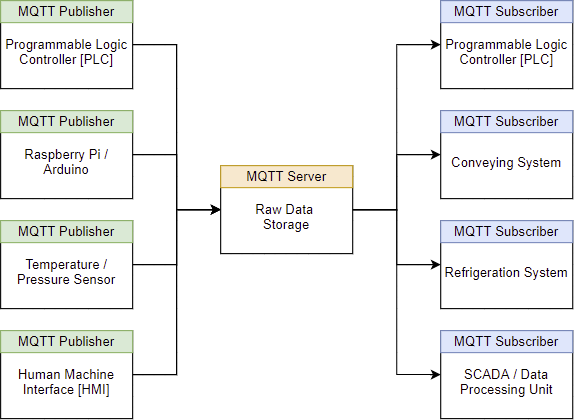
As mentioned in the introduction, MQTT will have three large buckets for each node:
- MQTT Publisher | A publisher will aggregate the data and send it to the server. A publier can be a single sensor or a Programmable Logic Controller (PLC) that collects thousands of nodes and sends the data to one server.
- MQTT Server | The server will collect the data from publishers and make it available (upon request) to all subscriber nodes. The server does not typically process the data; it stores it in raw form.
- MQTT Subscriber | A subscriber will create a link to the server and listen for any data changes at a specific location. The subscriber may collect all or partial data depending on what function it takes on. A subscriber can be a screen (tablet, phone, etc.), a processing unit (PC, Cloud, etc.) or a PLC that will act upon the information it receives.
We thus have the following topology in the world of MQTT:
Advantages of MQTT
It can be immediately apparent that this type of a model has multiple advantages over the traditional polling model. MQTT is often sold to have the following advantages:
1. On-Change Data Transmission
The protocol will send data when a change is detected. In other words, digital values need to toggle while the analog ones need to change beyond a set threshold / deadband. This reduces the amount of traffic on the network and provides only meaningful updates to all the subscribers.
2. Lightweight
The MQTT protocol was designed with efficiency in mind. While HTTP (same OSI layer) has close to 8000 bytes in the header, MQTT has 2. The smaller header once again contributes to faster and more efficient transmission of data over the network.
3. Security
MQTT supports TLS / SSL encryptions and thus secures IoT data sent over the protocol.
4. TCP/IP and non-TCP/IP Network Compatibility
In most instances, MQTT will utilize TCP/IP. However, it’s possible to use the protocol over other popular IoT networks such as Zigbee and UDP. MQTT provides a special standard called MQTT-SN for these types of applications.
5. Reliable Message Delivery
IoT devices are designed with unstable network connections in mind. Therefore, Quality Of Service (QoS) plays an important role within the MQTT protocol. The QoS flags will guarantee message delivery and update based on network conditions. Should the network deteriorate, MQTT will enable a higher level of QoS which will ensure repeated attempts at delivering system messages.
MQTT Example Using Opto 22 groov EPIC PAC
In a previous tutorial, we’ve explored the Opto 22 groov EPIC PAC and how to program the various I/O of the controller: Opto 22 groov EPIC Learning Center groovView IO Status Programming
Now, we will enable the on-board MQTT broker, configure the settings and pass the data to a public broker supplied by HiveMQ. Follow the step-by-step guide if you want to get the most out of the configuration and try this on your own.
Step 1 Configuring the MQTT Producer
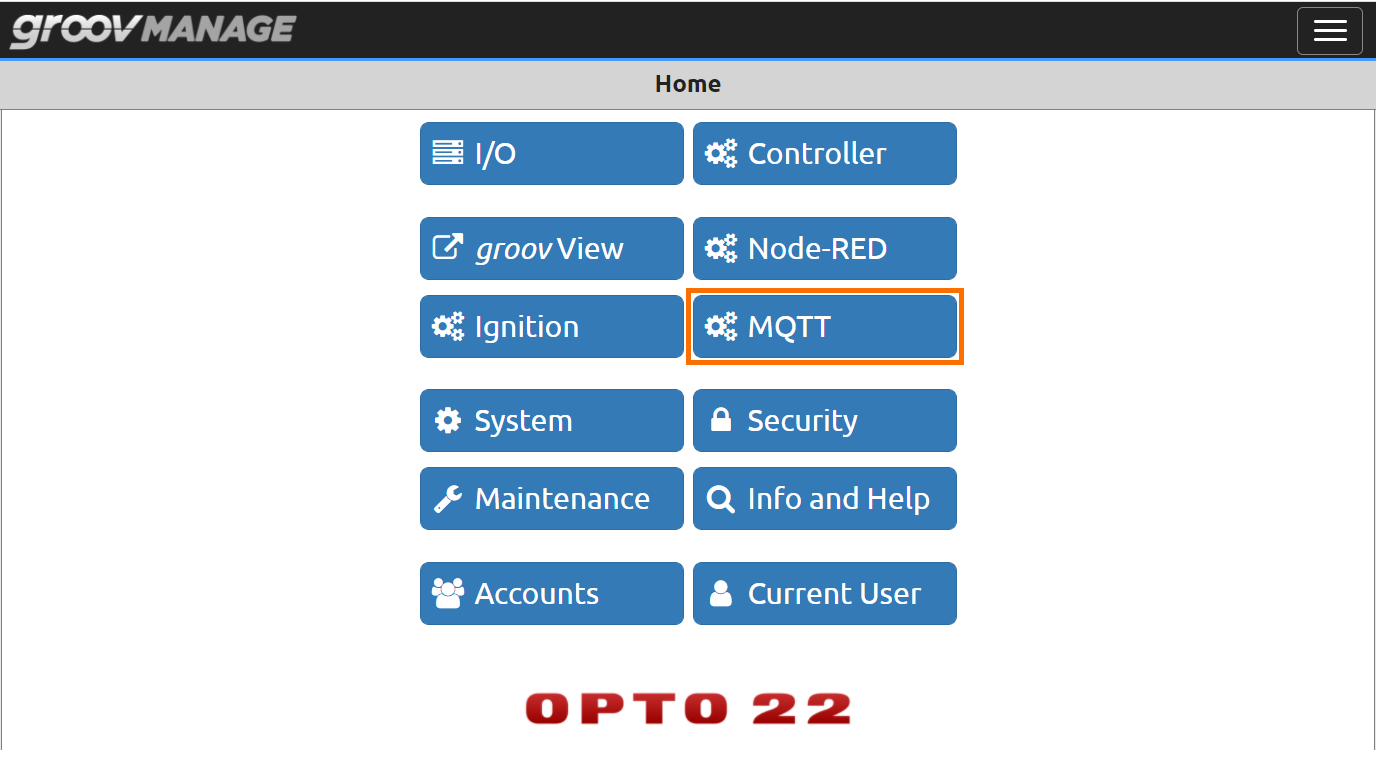
Step 1.1 - From “groov Manage”, Navigate to “MQTT”
Step 1.2 - Select “Configuration”

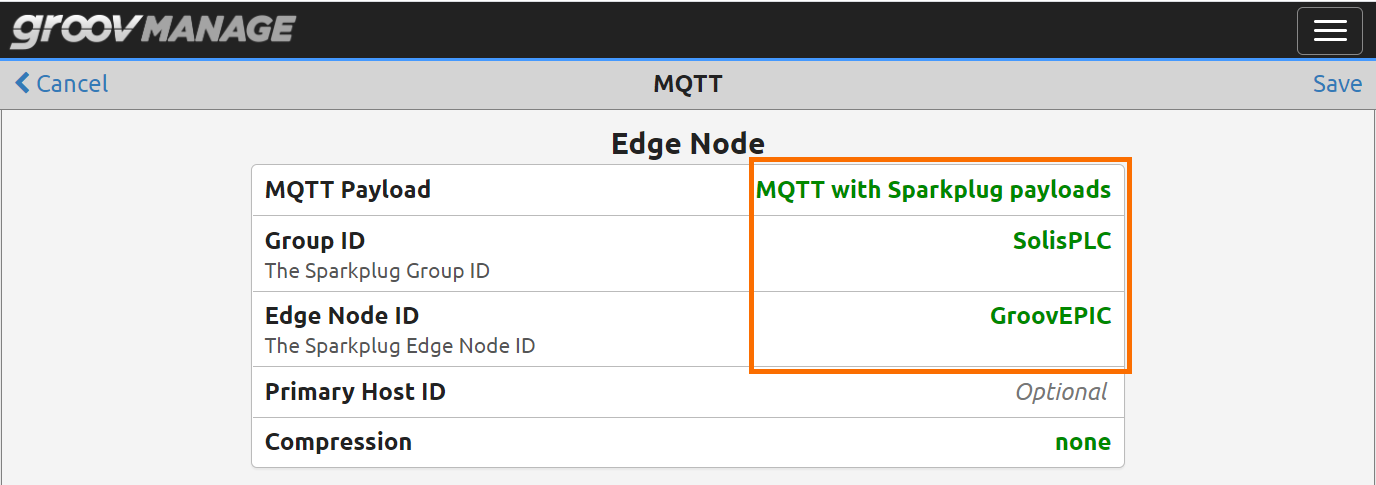
Step 1.3 - Build the MQTT Packet.
We are using Sparkplug for this example; therefore, the first field should be “MQTT with Sparkplug payloads''. You may choose to use string payloads; you’ll have to decrypt the data using a different protocol later on.
The second, third and fourth fields are optional. You’ll use them later to retrieve the data.
Step 2 Configuring the MQTT Broker / Server
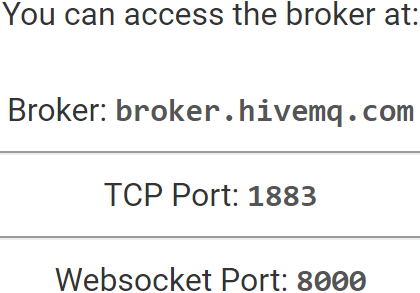
There are multiple MQTT broker software packages available online. One of such solutions is HiveMQ. In addition to the MQTT broker software, HiveMQ provides a public server that is accessible across the globe and can be easily used for testing purposes.
Note: We certainly do not recommend using the public MQTT broker for any production solutions. However, it’s an excellent inexpensive and fast way to test an application.
Step 2.1 - Configure a Connection to the MQTT Broker
Based on the information above, we “Add MQTT Broker” from our Opto 22 groov EPIC.
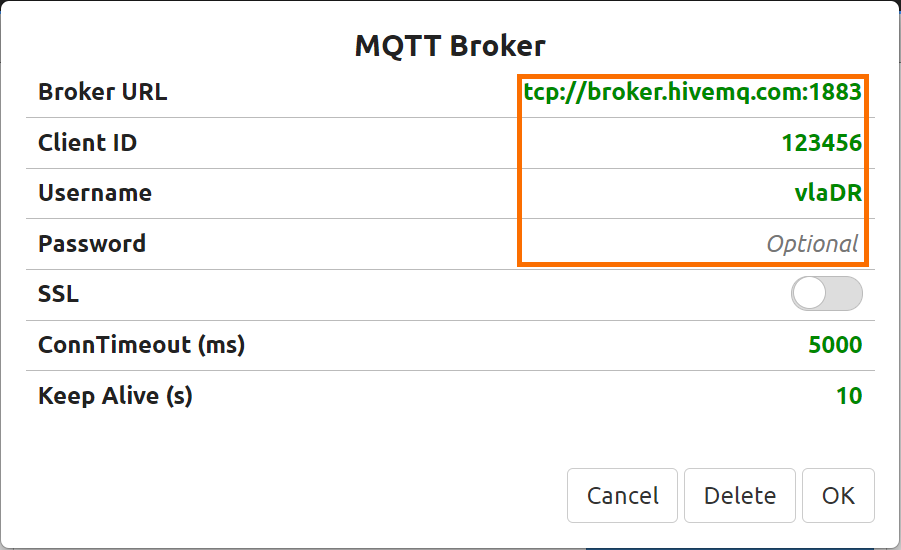
It’s important to note that the “Client ID”, “Username” and “Password” are optional. However, they should be utilized for a production system to maximize security. In our example, we’re publishing to an online public broker; anyone can access the data we’re producing.
Step 3 Configuring I/O Data to be Sent
The Opto 22 groov EPIC PAC works with a wide range of Input and Output modules. The “Demo Centre” we had reviewed in a previous tutorial comes with 4 I/O cards. One of these cards is configured as an Analog Input Card and can read voltage signals.
For the purpose of this example, we’ve wired in an ifm O1D155 distance sensor into input 1 of the analog card.
The configuration of the input can be accessed directly from the “groov Manage”.
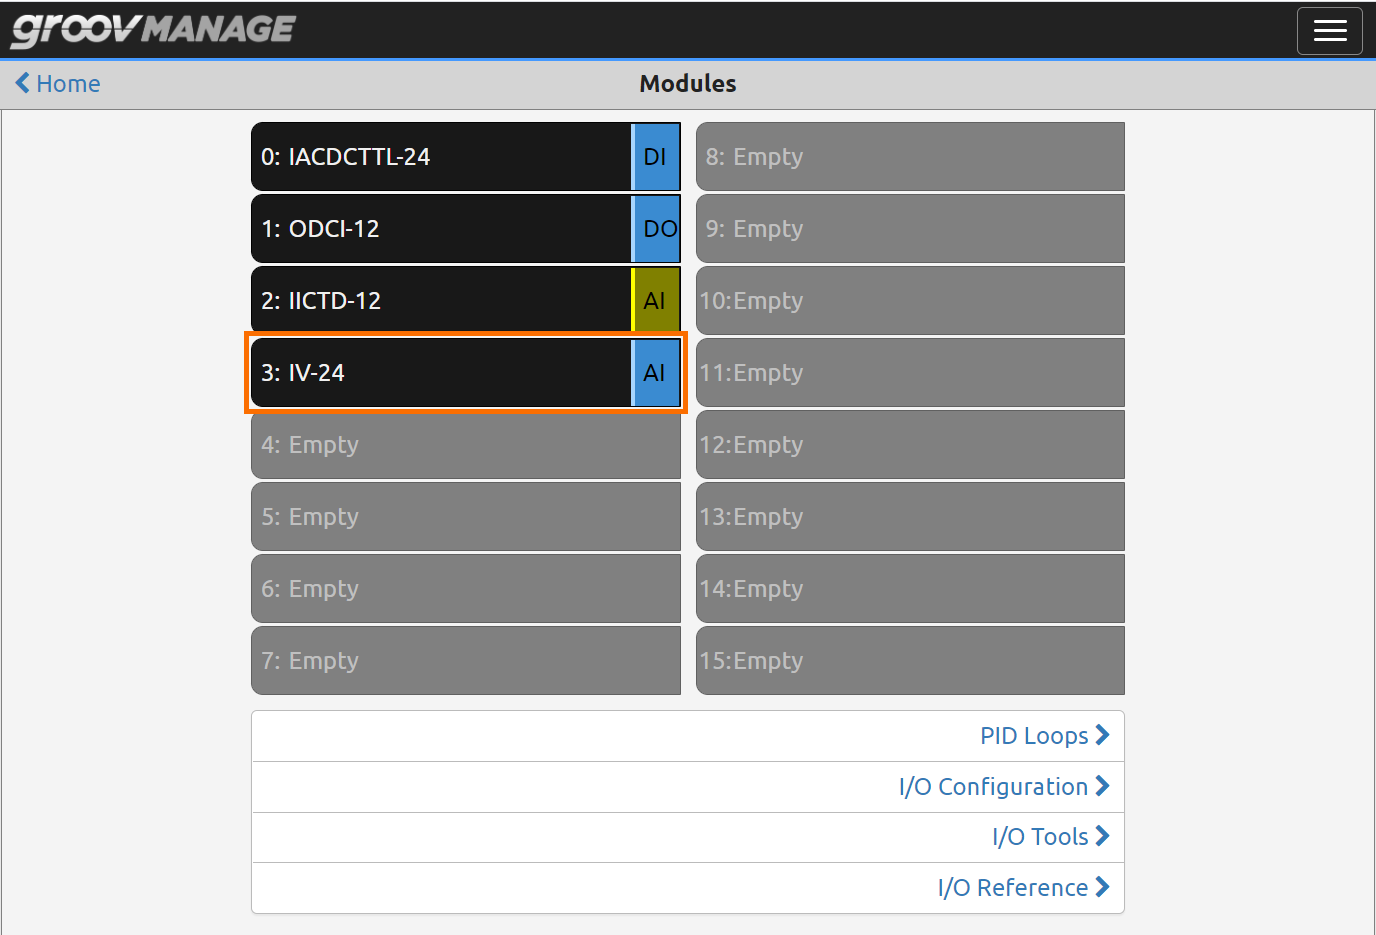
Step 3.1 - From “groov Manage”, Navigate to “I/O”

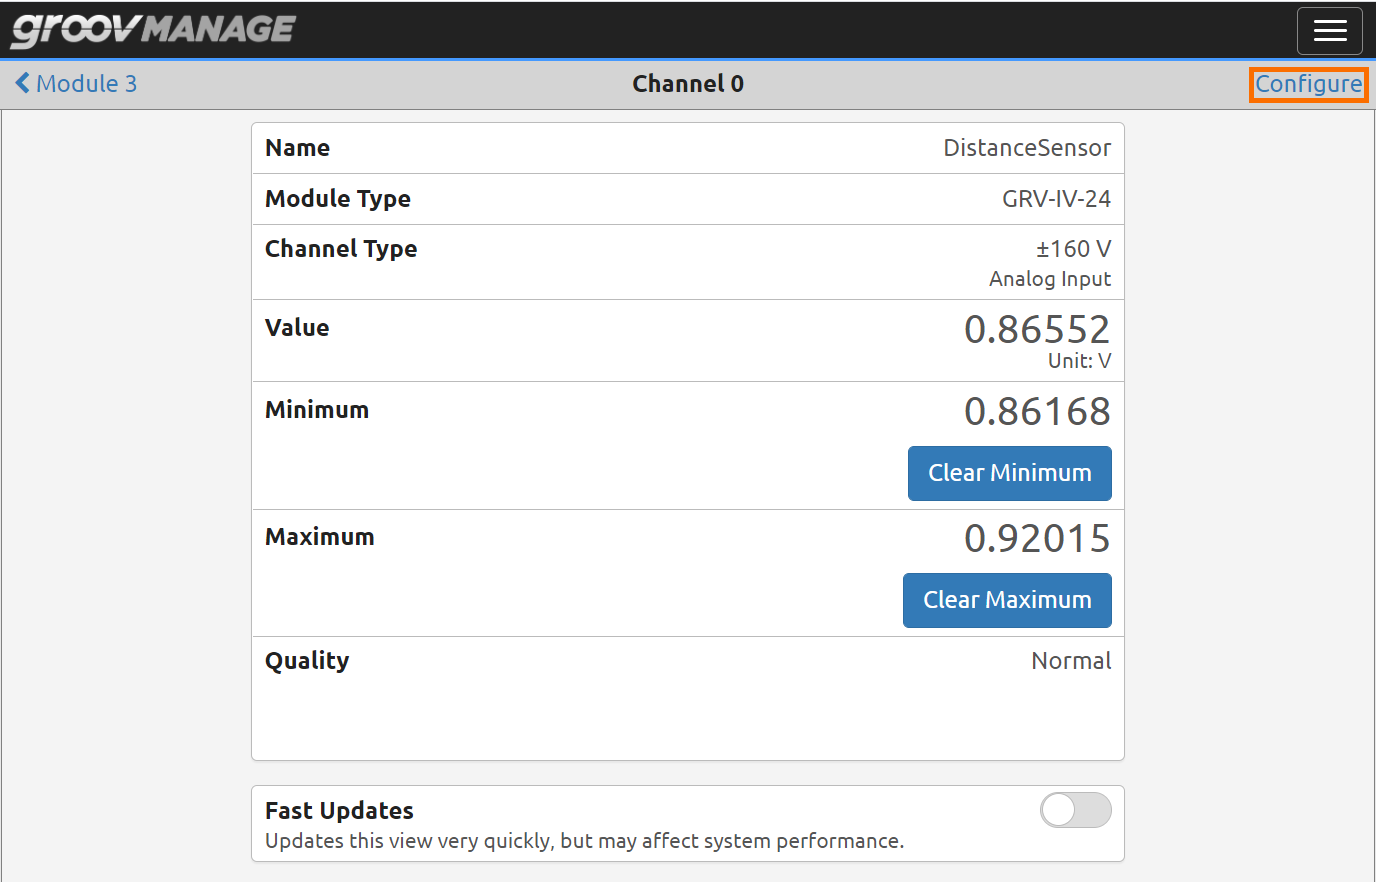
Step 3.2 - Select the Analog Input Card (IV-24)
In our case, the card is in slot 3.
Note: Your card may be different and located in a different slot.
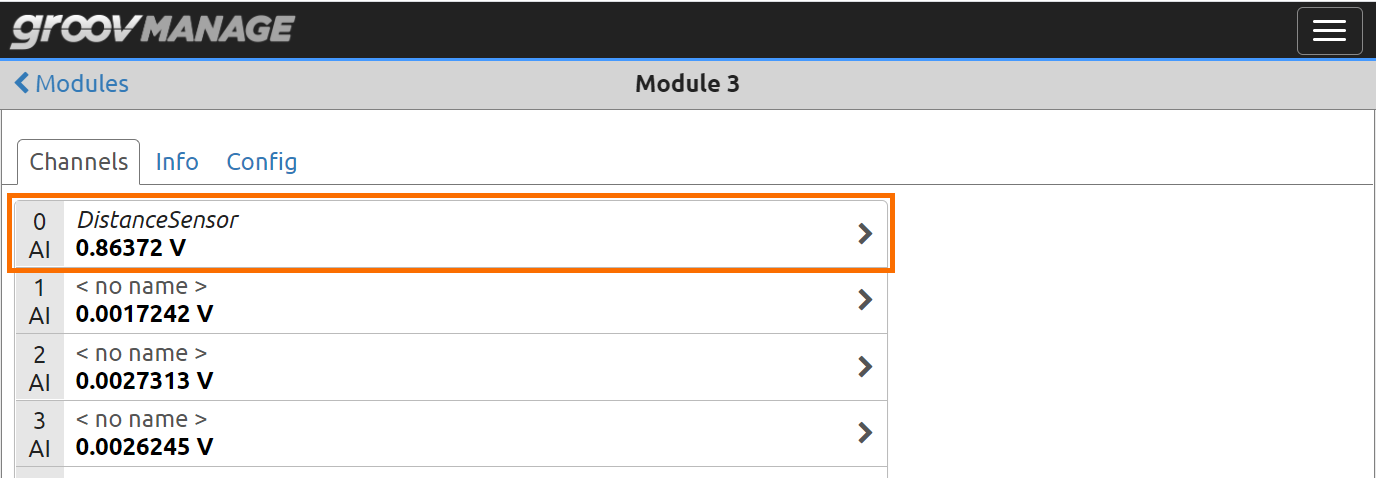
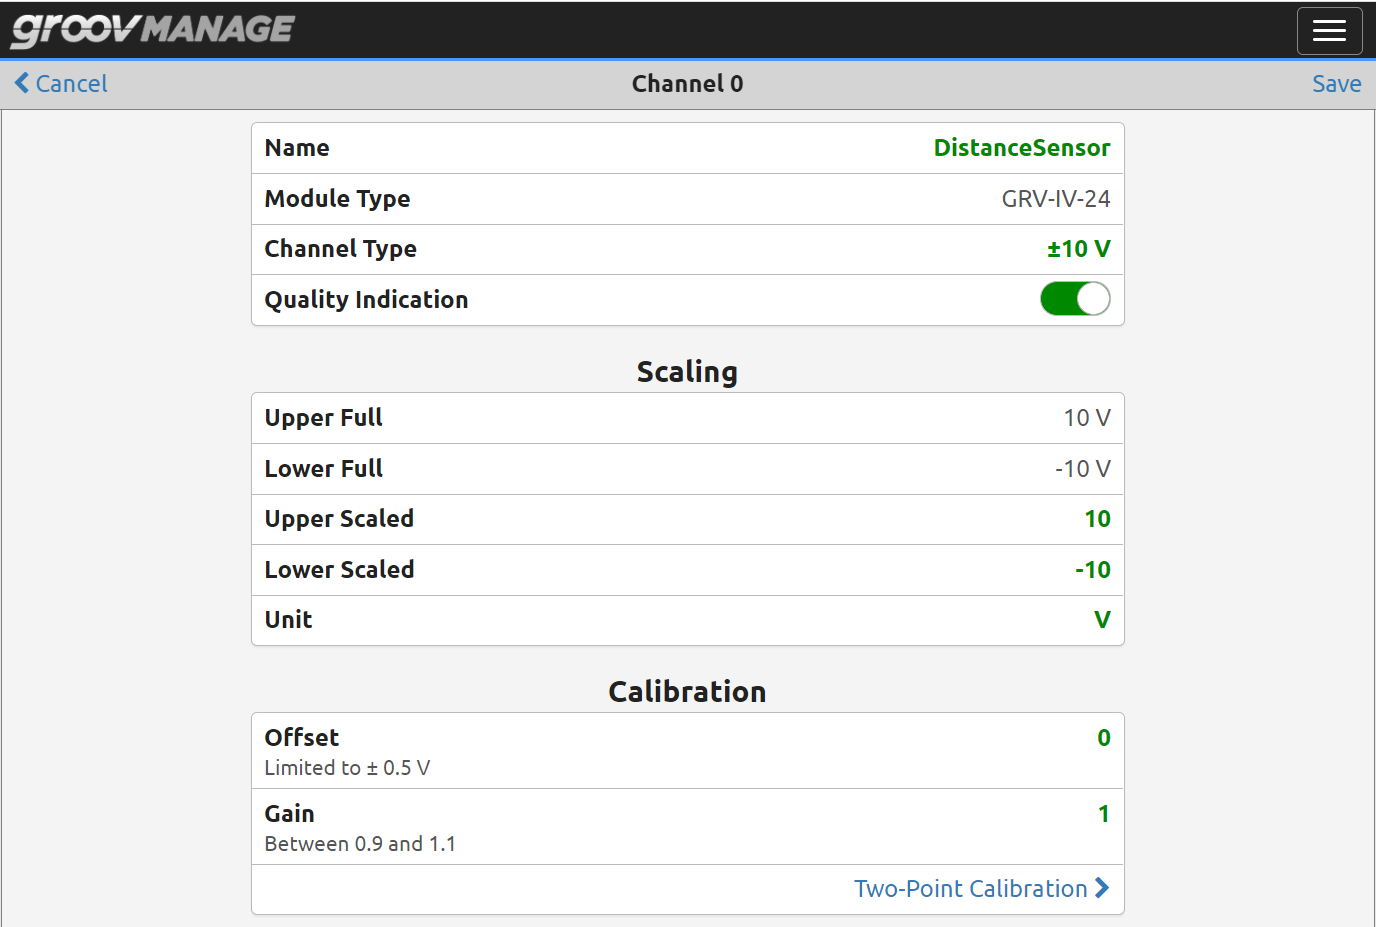
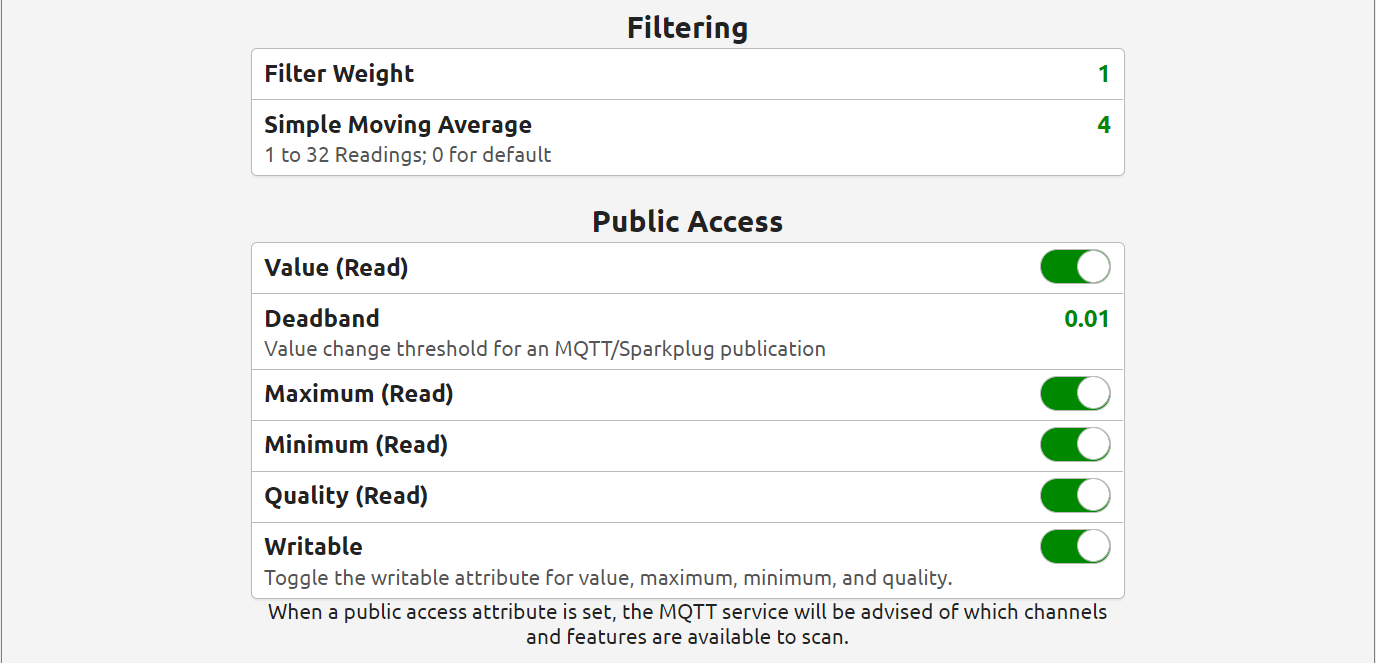
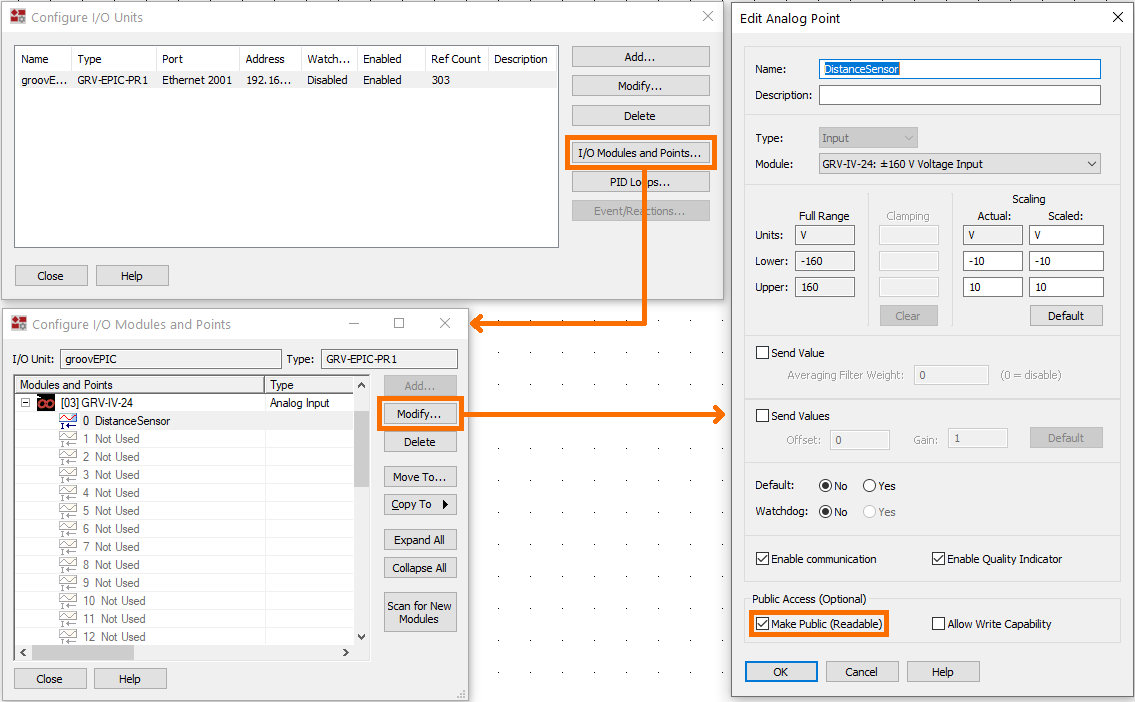
Step 3.3 - Select and Configure the Input for MQTT
As mentioned above, we’ve selected a distance sensor to use in this demo. The same procedure can be applied to a different analog or digital type sensor.
In addition to the configuration above, we need to open “PAC Control Basic” that we’ve looked at in a previous tutorial and open the Input to external providers.
Step 3.4 - Configure the I/O through PAC Control Basic
Open the software and load the program that’s running on the PAC or create a new program.
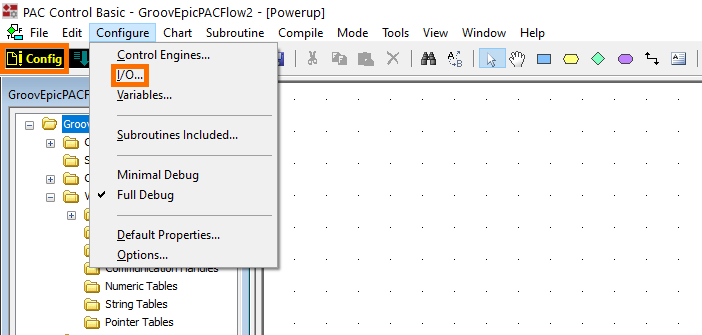
Navigate to the Configuration of the IO channel through the menu and set the channel you want to publish through MQTT to “Public Access”
Step 3.5 - Configure the Controller through groov Manage
The nearly-last step in the MQTT configuration we need to complete is adding the controller as a “Device” and source of data.
Add the PLC per the configuration below. The “Device ID” will be used to poll for data.

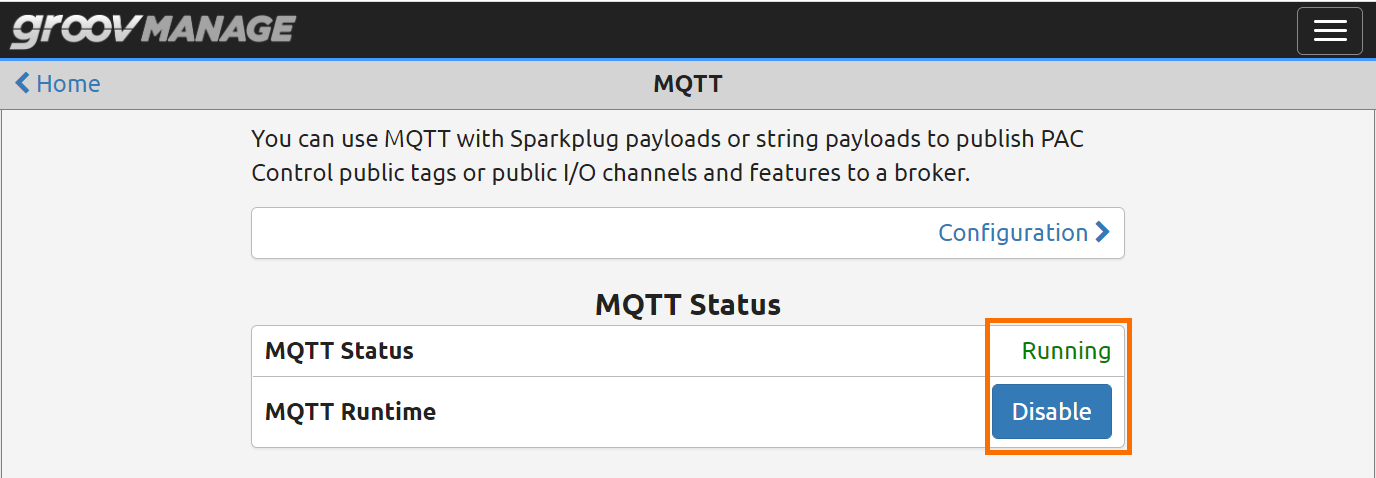
Step 3.6 - Enable MQTT Client on the Device
Now that we’ve finalized the configuration, enable the client on the Opto 22 groov EPIC PAC and make sure that the status is set to “Running”.
Step 4 Receiving Data on MQTT.fx
MQTT.fx is an MQTT client that can request data from an MQTT broker. At this point, our PAC should be publishing data to HiveMQ. We need this software to view the published data.
The tool can be downloaded here: MQTT.fx Download
Step 4.1 - Configure the Server Settings
Launch MQTT.fx and Click the Gear Icon to configure the server.

Configure the server to the same settings we had outlined above.

Use the “Connect” button on the main screen to connect to the server you’ve configured.
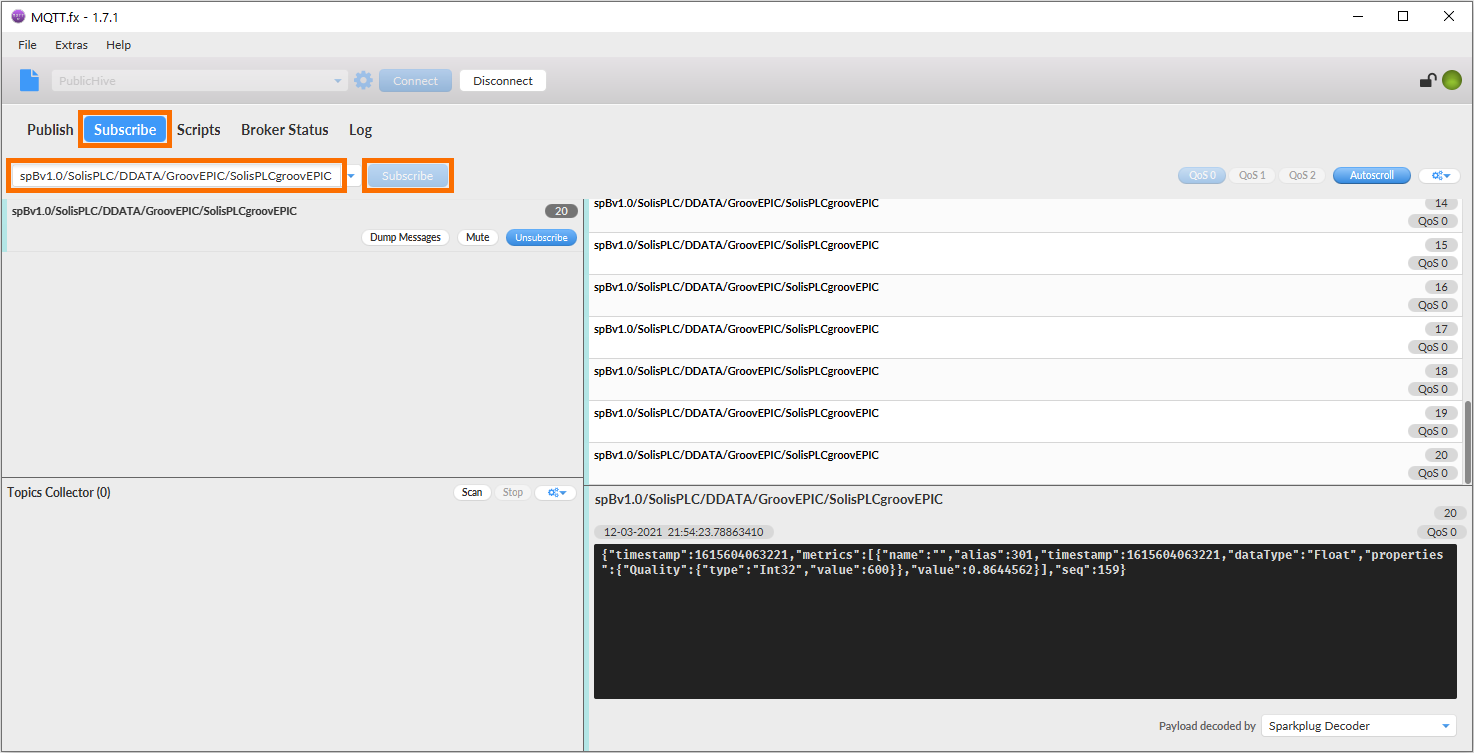
Step 4.2 - Connect to the Server & View the Data
We now need to build the string that would retrieve the data from the server. Let’s look at every element of the string.
- “spBv1.0” | The version of Sparkplug the protocol is using.
- “SolisPLC” | The “Group ID” we configured for the Edge Node.
- “DDATA” | The location of our data.
- “GroovEPIC” | The “Edge Node ID” we configured for the Edge Node.
- “SolisPLCgroovEPIC” | The “Device IF” we configured for our device.
Here’s the string we subscribe to:
Note that there are other strings you can use to see additional data about the processor. You can use the wildcard (“#”) to open your connection to all substrings.
For example, It’s convenient to test with the string “spBv1.0/SolisPLC/#” and see the status of MQTT being enabled and disabled.
Step 5 Understanding the MQTT Data
The GIF below displays the data coming into the MQTT.fx software. This tool is used to retrieve the string from the broker which can be accessed by any other Consumer as needed.
The string we see has the following format:
{"timestamp":1615604651429,"metrics":[{"name":"","alias":301,"timestamp":1615604651429,"dataType":"Float","properties":{"Quality":{"type":"Int32","value":600}},"value":0.86325073}],"seq":230}
The two values most important to us are the “timestamp” and “value”. These represent at which point in time the reading from the input was taken and what was the value at that time in Volts.
Conclusion on MQTT
MQTT is quickly gaining popularity among IIoT device manufacturers. It is a robust, lightweight protocol that is being utilized to centralize data, decrease traffic load on the network and to optimize how data is being distributed across different nodes.
MQTT uses a publisher / subscriber model. The publisher pushes data to the server while the subscriber retrieves the data it requires.
In this tutorial, we’ve implemented a simple MQTT example using the Opto 22 groov EPIC hardware with one of the inputs tied to a distance measurement sensor. We’ve published the data from the sensor to a public HiveMQ broker and retrieved it using the MQTT.fx tool. We’ve learned how to create the data and retrieve the information we need.
