RSLogix 500 Emulate - Creating RSLogix 500 Emulator Environment, Going Online, Connecting to PLC

Introduction
RSLogix 500 Emulator brings a lot of capability & accessibility to those who don’t have access to hardware or simply want to test certain logic before deployment. Working in RSLogix 500 Emulate is straight forward once everything is working & talking properly. However, it’s somewhat tricky to get this going for the first time. In this tutorial, we will be exploring how to get started in RSLogix 500, RSLinx & RSLogix 500 Emulate in order to bring a full program online within our computer.
This tutorial builds upon the last few pieces of content which we’ve released. It is therefore recommended to check them out before jumping into this topic. The links can be found below.
- Downloading RSLogix 500, RSLogix 500 Emulate & RSLinx
- Getting Started with RSLogix 500 & MicroLogix 1100 PLC
Creating an RSLogix 500 Emulate Driver in RSLinx
We’ve looked at how to set up drivers in our previous tutorial on Connecting to MicroLogix 1100 PLC. However, this process is slightly different due to the fact that we have a “virtual” driver which will point to our PC.
Just as before, we navigate into the RSLinx Classic interface and enter into the “Configure Drivers” menu. Once here & while the computer has RSLogix 500 Emulate installed, you should be able to select a driver which is called “SLC 500 (DH485) Emulator driver”. Keep in mind that this driver will only be visible if you’ve properly installed the tools we’ve talked about in the download section. If you haven’t make sure to follow the tutorial link below.
Download RSLogix 500, RSLogix 500 Emulate & RSLinx.
Once you click on “Add New…”, a pop-up will appear and require you to make a few selections. Give your driver a unique name and set the number of your station to 0. This number represents the location of your PC; the default number should be fine.
Now that the driver is in place, you can check that it’s working correctly by expanding it within the main view. At this point, it should only show your workstation in location 00.

Creating a new file in RSLogix 500
Now that we have a connection to our emulator, it’s time for us to start creating the logic which will be running on our virtual PLC. This is done through RSLogix 500. Do note that you may use an existing file which you have from an existing PLC.
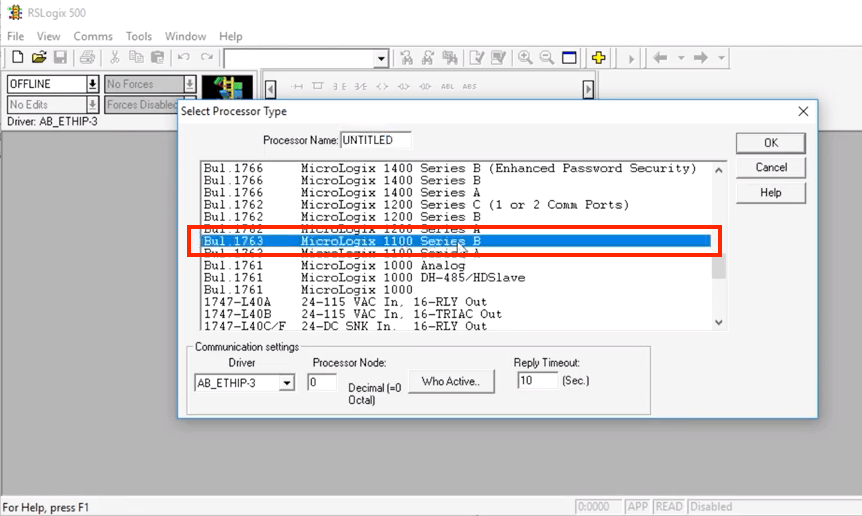
To create the file, open RSLogix 500, click on “File”, “New” & Select a PLC. In this tutorial, I’m using a MicroLogix 1100 simply because it’s a PLC I own. You may create a test environment for a different programmable logic controller.
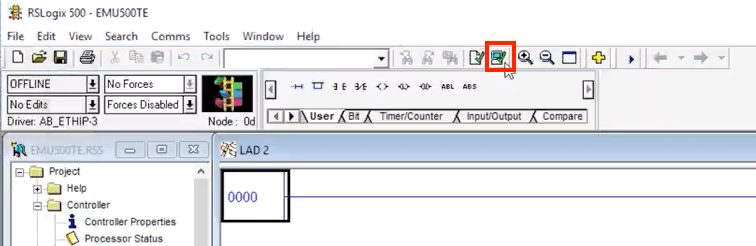
Now that we have a file, we need to take care of two things. The first one is saving the file in a location we can navigate to. This is completed by selecting “File”, “Save As” and saving the file within a directory on our drive. The second step is to make sure that the program we have on our hands has been validated. In order to complete this step, we need to click the “Verify Project” icon. This icon looks like a computer with a green checkmark; an example of this icon can be found below.
Running the Processor from within the RSLogix Emulate500 environment
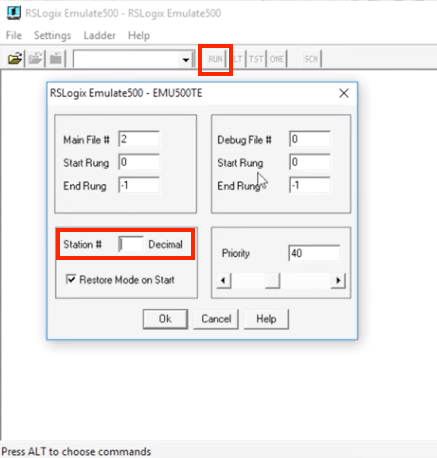
It’s now time to enable our virtual instance by launching RSLogix Emulate500 & assigning the PLC to a specific node. Start by opening the software & launching the “File” menu. This will allow you to select a file which we’ve previously created and to assign it to a specific node within our structure. Since we reserved the “00” position for our workstation, the next logical instance would be 01. Enter this value into the “Station #” field and leave everything else as is.
The instance has been created, but it’s still not running. Click the “RUN” command within the top utility bar in order to start the PLC. This will make sure that we can actually connect to the PLC we’ve instantiated in our software.
Programming & Testing our Ladder Logic Through RSLogix 500
We now have a fully functional virtual environment running on our machine. Connecting to the PLC should be a breeze if you’ve done so before. Simply navigate into RSLogix 500, select the correct path for the processor and click the “Go Online” button. If you’ve followed everything correctly, the program should now be online with the processor. This will be obvious from the spinning ladder as well as an “Online” indicator which will be highlighted in green.
Making changes to the program is somewhat different to a real processor. You’ll need to go offline & repeat the steps of loading a file into an emulator. It’s unfortunately not possible to make online based changes. However, all the other functionalities should be exactly the same.
