PLC Programming | Understanding and Using FIFO’s in Studio 5000

Introduction
At some point in your PLC Programming journey, you are likely to come across a FIFO, or to encounter a situation where using one would solve a problem. It is a great tool to have in your arsenal. In this article, you will learn what a FIFO is, how to set one up in Allen-Bradley’s Studio 5000 software, and how useful they can be.
Understanding FIFOs
FIFO stands for First-In-First-Out, or put another way, first-come-first-served. This refers to the organizing principle of a queue or list. We’ve all encountered this in everyday life; picture a single file line of people waiting to order ice cream.
No matter how fast or slow they are served, or how many people are added to the line, the next person to be served (the next person who will be ‘out’) will always be the one who has been standing the longest (who was ‘first in’). The order in which the people arrive is the order in which they will be processed.
There is another way of organizing a queue that simply reverses this arrangement: LIFO or Last-In-First-Out. This is often used when items are stored in stacks. If you stack ten pallets on top of each other, the last one in will necessarily be the first one out. Or, if you are the last person to get into a packed subway car, you will be the first one out at the next station. LIFOs can also be used in Studio 5000, but this tutorial will focus exclusively on FIFOs. However, the principles are basically the same, so that if you get a handle on the material in this tutorial, I am sure you will be able to figure it out!
Now if you replace the people in the above examples with some kind of data, and you begin to see how this could be used in a PLC programming context. Let’s say you have some conveyors and you need to keep track of the boxes that are in a certain section. You could use a FIFO to track those boxes through a linear section of conveyor.
Another possible scenario is a warehouse where perishable goods are stored. When a stored item is requested for a client, the PLC using FIFO logic will select the oldest item first.
With the basic principle well in hand, let’s move on to a step-by-step tutorial that will show how to FIFOs in the Studio 5000 environment.
Using FIFOs in Studio 5000
Step 1 — Determining what Tags need to be Created
Within the programming environment of Studio 5000 (and this will apply to RSLogix 5000 as well), FIFO’s require a number of elements:
- An array of tags to be filled and emptied by the FIFO. In our example, we will create an array of 11 DINT tags called FIFO_Array.
- A Source tag that will be the value copied to the Array when the FIFO is executed. In our example, we will create a DINT tag called FIFO_Source.
- A Destination tag, which will be the tag where the stored value will move once it is unloaded from the FIFO. In our example, we will use a DINT tag called FIFO_Destination.
- A Control tag to control how and when the FIFO is loaded or unloaded. In our example, we will create a Control tag called FIFO_Control.
- FFL (FIFO Load) and FFU (FIFO Unload) Instructions in the code to actually perform the actual loading and unloading of values.
As always, good programming practices should guide the naming of these tags for real-world applications in order to encourage clarity and simplicity.
Next, we will see how to create these tags.
Step 2 — Creating the FIFO Array Tags
As mentioned in the previous step, we will create an Array of 11 DINTs (Double Integer or 32-bit) tags, of which we are going to use 10. If you’re not sure what DINT tags are, see this tutorial on Data Types.
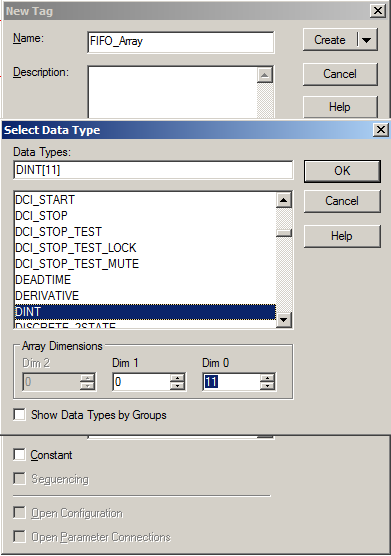
![Creating the Array means creating a new tag with additional dimensions. Click the three dots [...] beside the Data Type to open the dialog box.](https://cdn.prod.website-files.com/63dea6cb95e58cb38bb98cbd/6415da18b071a7e2276ca952_617ffd6b98daee3c6610bb43_ccC3Z001MN5cBJGRp9qolfZzkj5QHVr6TV-GIPvaLOfc6lKupufWUcQ45Wd2lDk5-uJrhsb-dzXvJFi1zD0lOR6lv00q0fKalMYR7vh0orkXHaBnoqwyoPC45wtlrmHm2wjV5WJ1.png)
To create an Array, open the New Tag dialog box, enter in the desired Data Type, and click the “...” button. In the new pop-up dialog box, enter the desired number of elements in the array under Dim 0 (Dimension 0). An array with value X in Dimension 0 will be like a vertical column of X lines, whereas an array with value Y in Dimension 1 will be like a set of columns where Y is the number of columns and X the number of lines per column (I think of it like an excel table). In our example, we will have Dimension 0 = 11 and Dimension 1 = 0.
Advanced Tip: You can create a FIFO Array of User-Defined Tags (UDT) containing a whole set of specific tag types. In some applications, it is necessary to track more than just one tag, and this allows you to do just that. See this tutorial on User-Defined Tags.
Once you have an array, it is time to create the Control tag.
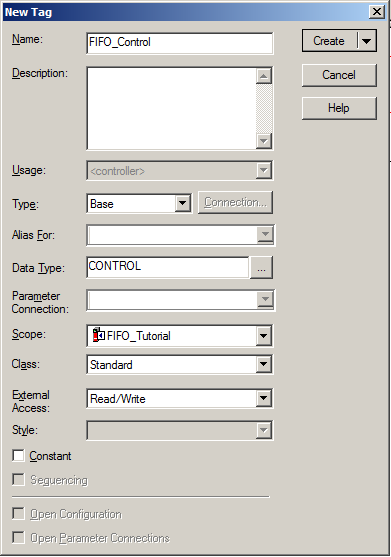
Step 3 — Creating the Control Tag.
A CONTROL tag is a specific category of tag used exclusively for FIFO and LIFO-related instructions in Studio 5000. In fact, within a given CONTROL tag is nestled a whole list of other specific tags. We will discuss the usefulness of some of these a bit later in this tutorial. For now, create the Control Tag by once again opening the New Tag dialog box and this time selecting CONTROL in the Data Type. I recommend including the word Control in your tag name.
Since this is an intermediate tutorial, I will assume you know how to create simple DINT tags to use as Source and Destination for our example.
Having created the needed tags, we will now program a rung that will trigger a FFL (FIFO Load) instruction to load our first value into our FIFO.
Step 4 — Creating a Rung with the FFL (FIFO Load) Instruction
For this tutorial, we will create a simple Rung with a contact and an FFL Instruction. The FFL Instruction is found in the Element Group File/Shift.
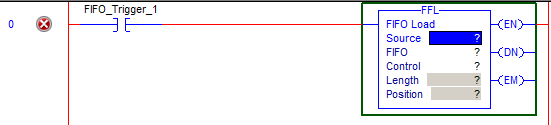
When creating an FFL instruction, it is important to input the right tags. In our example, we will create it like this:

Here is how the FFL Instruction works: When Contact FIFO_Trigger_1 is activated, the FFL Instruction will load the Source value (this can be any tag of the same Data Type as the Array) into the next available position in the FIFO Array.
The Length parameter is where the user enters in how many elements will fit in the FIFO Array. In this example, we will use a Length of 10 since we created our Array with 11 positions and I like to have one to spare.
The Position indicates how many values are in the FIFO Array. Every time a FFL instruction executes, the Position will increment by 1, and every time an FFU (FIFO Unload) instruction executes, the Positions will decrease by 1.
If the FIFO is empty at the moment the instruction executes, the value in Source will be loaded into position [0]. If there are already five values in the FIFO Array (occupying positions [0] to [4]), the next one will load into position [5]. Note that if the Source value is 0 at the time the Rung executes, the FIFO Position will still increment by 1. Also, if the FIFO Array is full, the Source value will not be loaded or overwritten. The FIFO is full and must be emptied before another value can be loaded. For further details, see the detailed FFL Help File associated with it. To access this, click on the FFL instruction and press F1.
In the next line, we will program another contact to unload the FIFO array using the FFU Instruction.
Step 5 — Creating a Rung with the FFU (FIFO Unload) Instruction
The FFU Instruction is the dancing partner of the FFL instruction. It works in a very similar way to the FFL instruction, but unloads one existing element in the Array instead of loading a new one. Here is the Rung for our tutorial:

When contact FIFO_Trigger_2 is activated, the FFU Instruction will unload the FIFO Array into the selected Destination tag (in our example, it is a DINT Tag called FIFO_Destination).
Step 6 — Loading & Unloading the FIFO
Now the fun part - we are ready to put a value into FIFO_Source and trigger the FFL Instruction and the FFU Instruction. Take time to see how it works, where the values go and then experiment with different types of tags, Arrays, and more!
Additional Notes
CONTROL Tag Sub-Elements
It can be very useful to know about some of the CONTROL Tag sub-elements. These can be used in various ways in the PLC program and also in HMI programs to control and monitor the FIFO Array.
- FIFO_Control.EM - Empty. This BOOL subelement will be TRUE if the Array is Empty. This is useful for integrating the FIFO in with the rest of the program.
- FIFO_Control.POS - Position #. This INT subelement will indicate the number of values currently in the FIFO Array. This can be useful not only for advanced control of the system but also for displaying live values on an operator HMI.
One Danger of Using Arrays
When using Arrays in Studio 5000 (or any Allen-Bradley programming software), it is important to be aware of a mistake that can be easy to make but which can have very serious consequences. Simply put, if the program asks the processor to look at an Array position that does not in fact exist in the tags, the controller will throw a Major Fault and stop running the entire program. Depending on the application, that can be a simple inconvenience (a small machine stops) or it can be the worst day of a career (the whole plant grinds to a halt and thousands of dollars of productivity or actual product is lost). Pay careful attention to any aspects of a PLC program that deal with Array positions!
Conclusion
Once the fundamentals are understood, FIFOs can be used by programmers to accomplish a range of functions. A FIFO can be used to calculate an average rolling mean value, such as in this SolisPLC Tutorial. They can be used for tracking thousands of individual boxes in a complex case sorting system, calculating average values, tracking pallets through a palletizer cell, and much more.
In this tutorial, we have covered the basics of FIFOs and how they are used in the Allen-Bradley Studio 5000 environment. By far the best way to get a firm grasp of how the FIFO works is to create one and start working with it. As you get more comfortable with this powerful tool, you will likely find yourself using them to solve problems and improve existing programs.
