

How to Build Recipe Management in WinCC Unified

Introduction
Managing recipe or process parameters across multiple products can quickly become a maintenance headache if your PLC and HMI aren't configured to handle it cleanly. This tutorial walks you through building a robust parameter set control system in TIA Portal and WinCC Unified, using a mixing application as a practical example. Whether you're managing a handful of recipes or planning for dozens down the line, getting this foundation right from the start will save you a lot of rework later. We'll cover everything from the initial PLC and HMI setup to getting parameter sets running smoothly in your browser-based simulation.
PLC Engineering Workflow
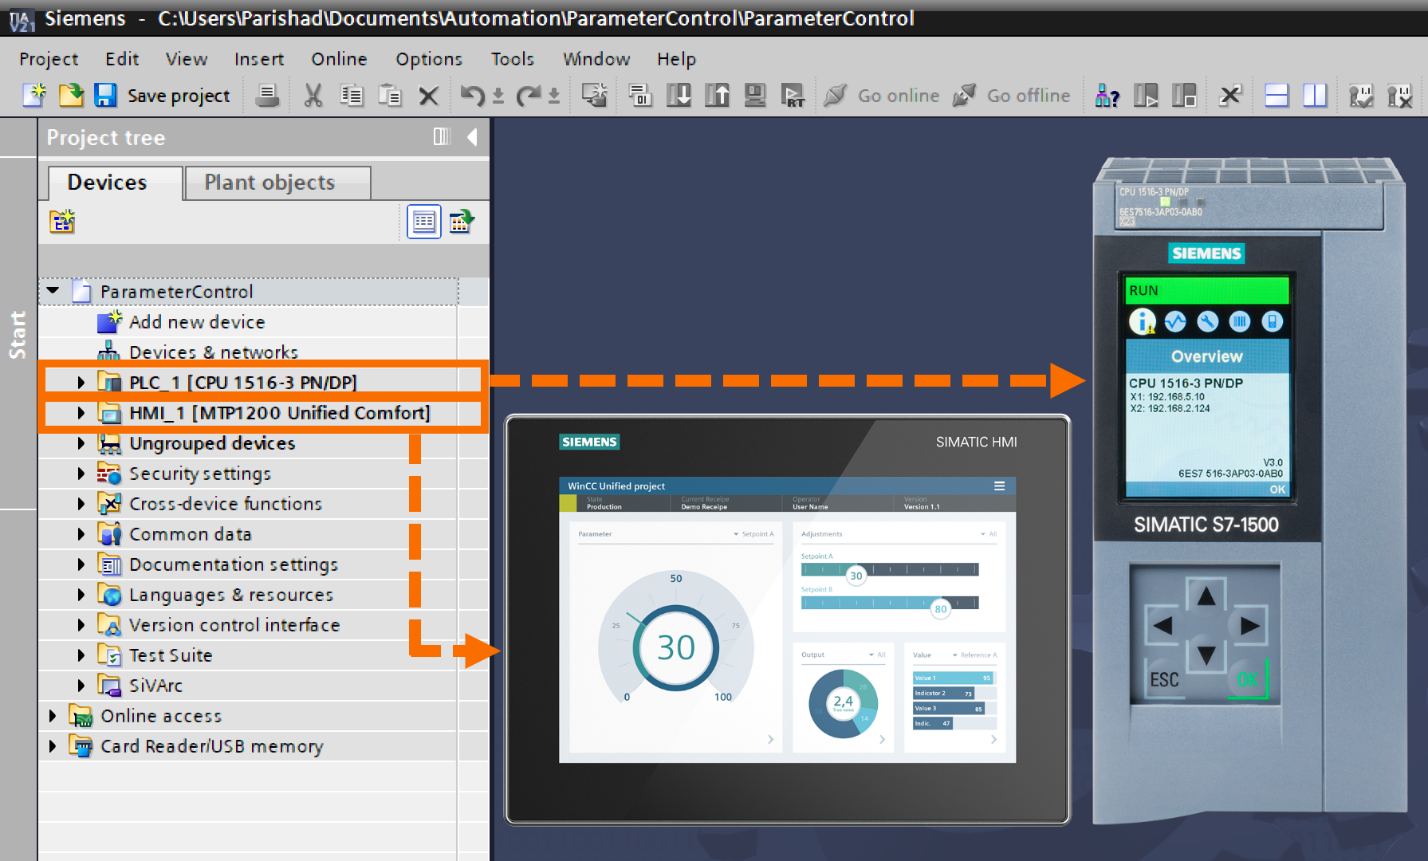
Begin by launching TIA Portal and creating a new project, then giving it a name that reflects the mixing application. For the PLC, insert a 'CPU 1516-3 PN/DP', and for the HMI, insert a 'MTP1200 Unified Comfort Panel', since these are the hardware components required for this setup.
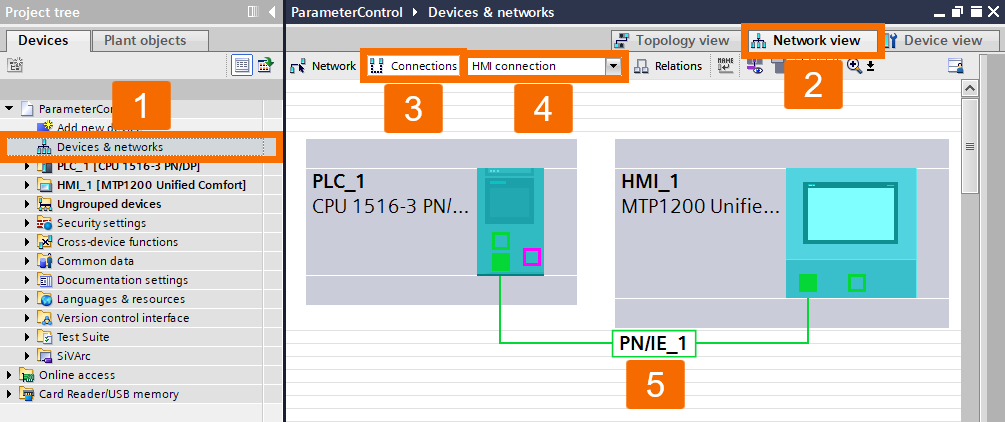
Double-click 'Devices & Networks' in the project tree to open the network configuration editor. In the 'Network View' tab, click the 'Connections' button, then select 'HMI Connection' from the drop-down list positioned beside it. Next, link the appropriate PROFINET ports of the PLC and HMI by dragging a connection line between them.
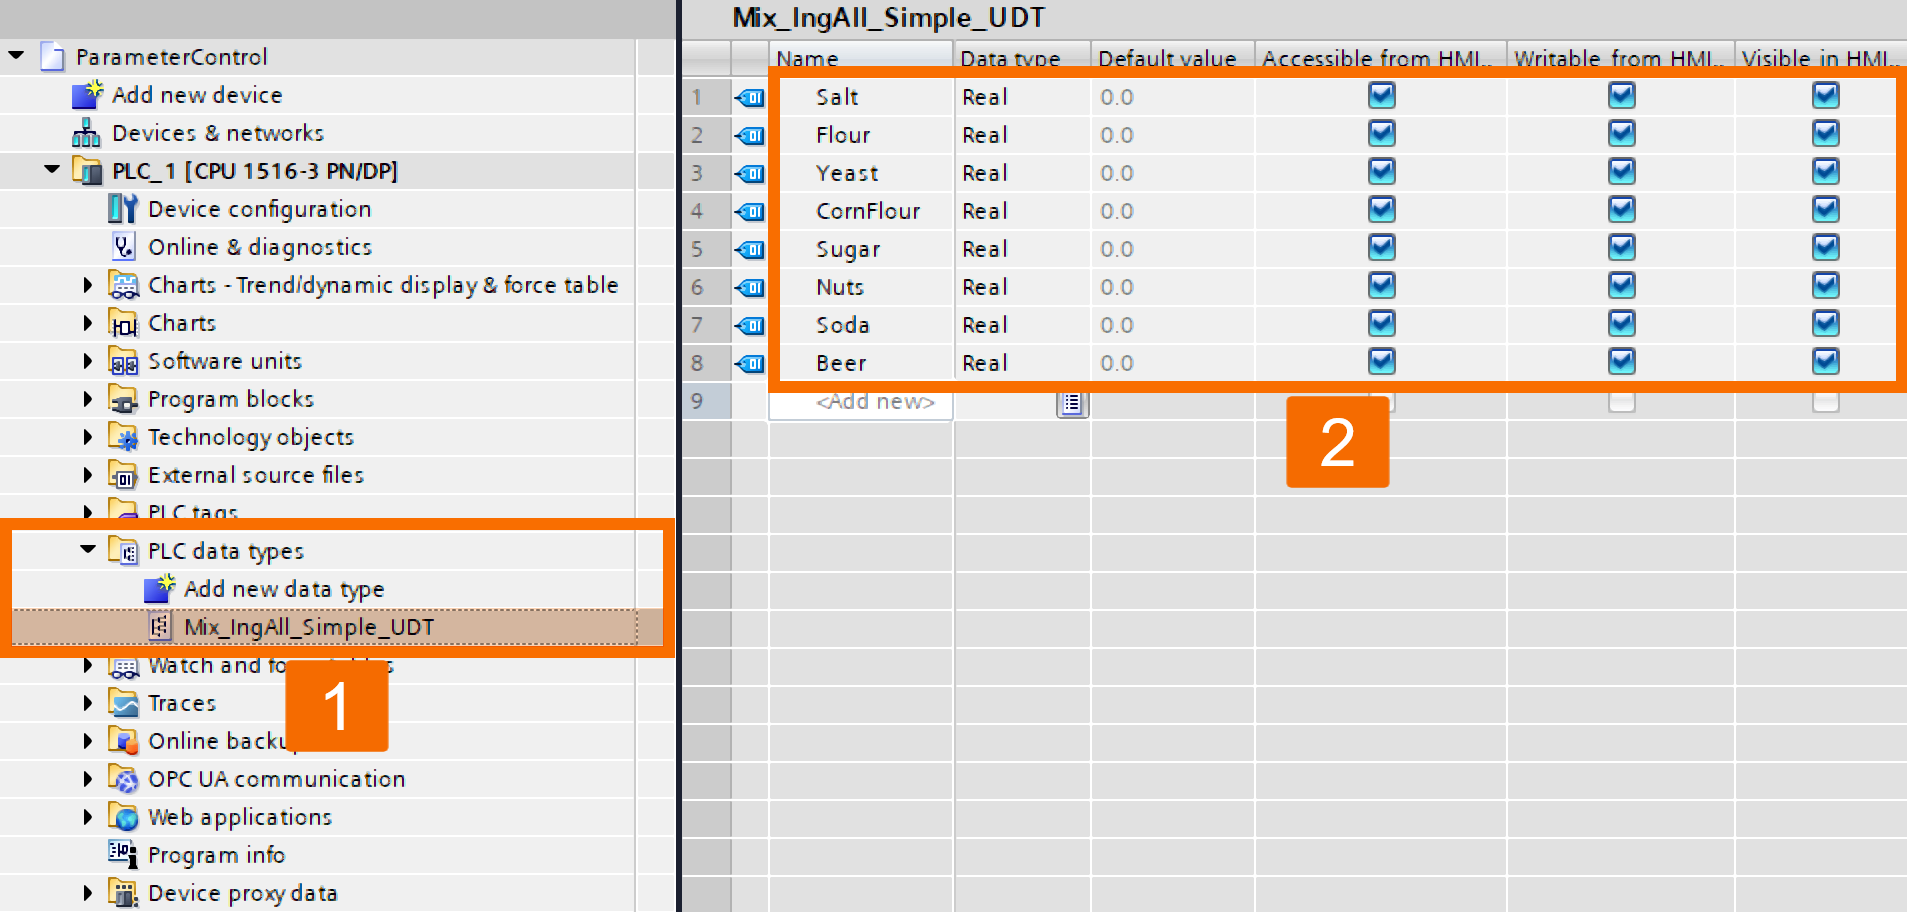
The next step is to create a new PLC data type since it will be reused across multiple data blocks later. Expand the 'PLC data types' folder in the project tree and double-click 'Add new data type' to open the editor. When the new UDT editor appears, rename the data type to 'Mixing_IngAll_Simple_UDT' so you can easily identify it later. Next, begin adding the individual elements that will make up this data type. Click <Add new> and enter your variables one at a time, giving each a clear and descriptive name. Assign the correct data type to each variable as well, matching it to the kind of value it will store. Make sure the 'Accessible from HMI' checkbox is enabled for every element, since this is required for HMI communication to work correctly.
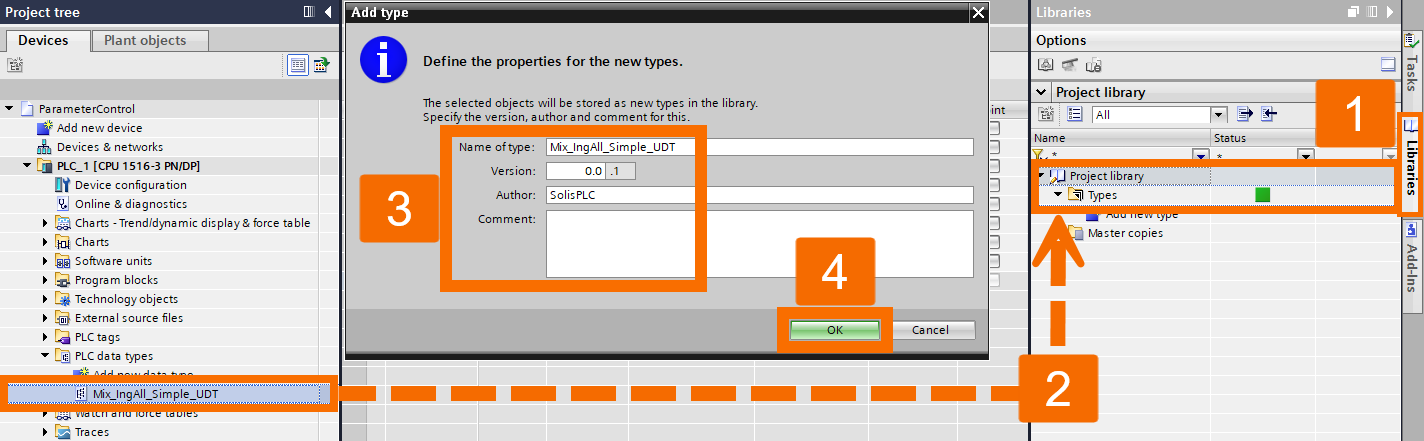
Now add this newly created PLC data type to the project library so it can be reused for future projects. Open the 'Libraries' task card from the right-hand panel of the TIA Portal window. Drag the new data type into the 'Types' folder within 'Project library' and release it there. An 'Add Type' dialog box will appear, prompting you to enter the name, version, author, and an optional comment. Click OK to confirm and save the entry.
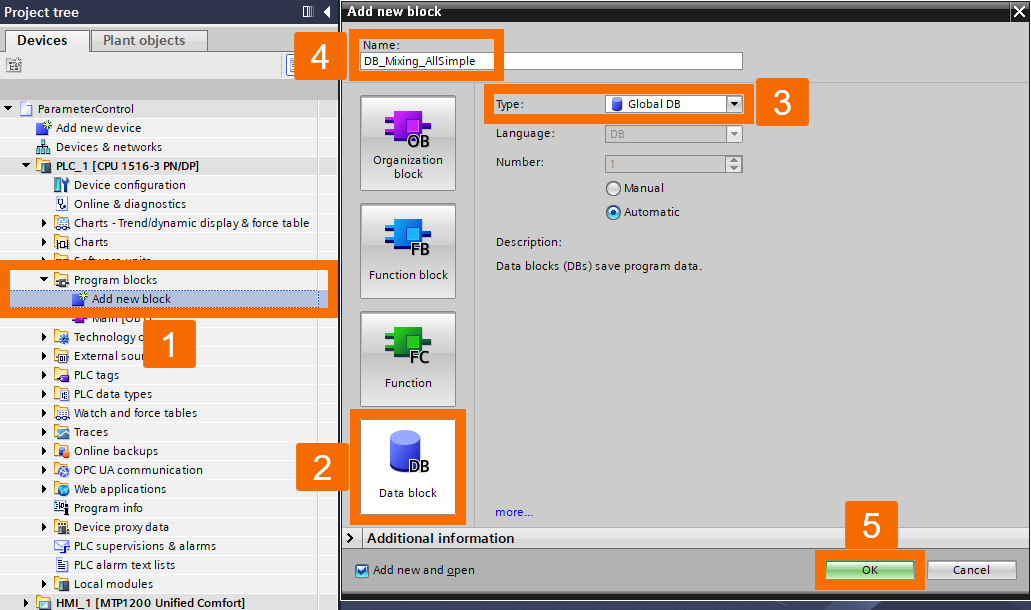
Next, create an instance of the UDT within a new data block. Double-click 'Add New Block' under the PLC's 'Program Blocks' folder to open the creation dialog. In the dialog that opens, select 'Data Block (DB)', enter a suitable name, set the block type to 'Global DB', and click OK.
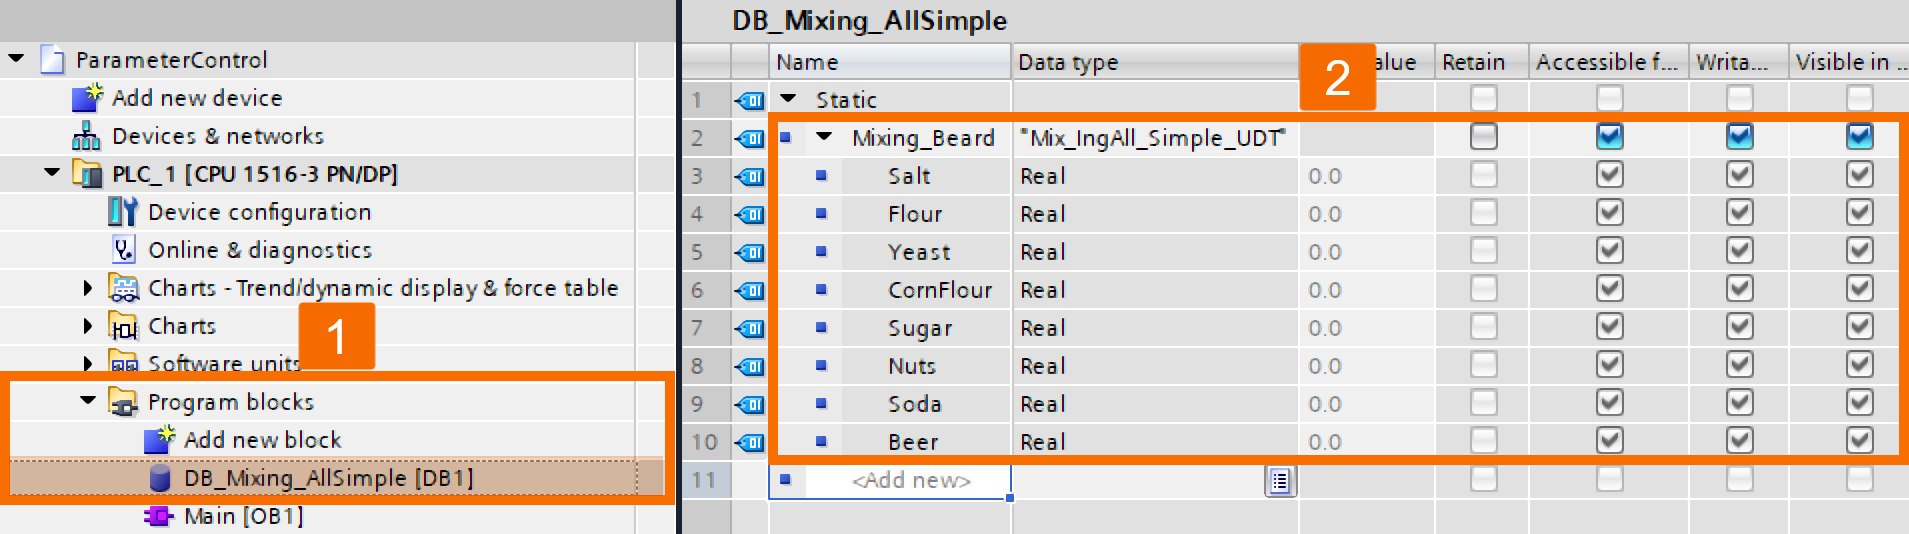
With the DB editor now open, define your static tag inside it. Click <Add new>, name the tag 'Mixing_Bread', and set its data type to 'Mixing_IngAll_Simple_UDT'.
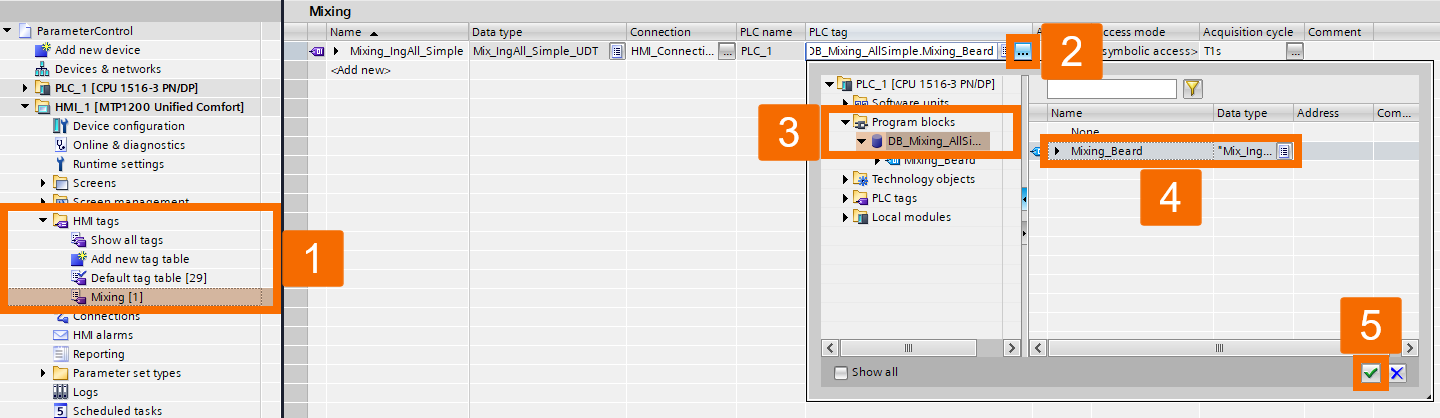
Next, expand 'HMI Tags' in the project tree, add a new tag table, and name it 'Mixing'. Begin defining the HMI tag by entering a name and selecting an appropriate data type. In the Connection column, choose 'HMI_Connection_1'. As a result, the tag is linked to the UDT instance inside the data block.

Under the 'PLC Tag' column, select the 'Mixing_Bread' variable you created earlier in the data block.
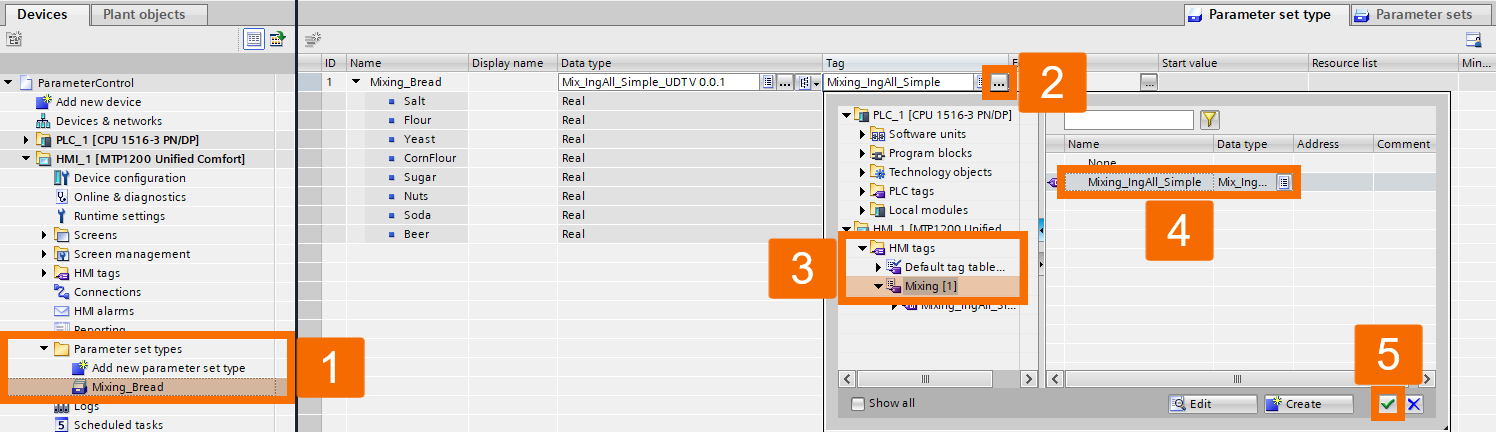
Next, navigate to the parameter set type section under the HMI folder, add a new entry, and name it 'Mixing_Bread'. Set its data type to the 'Mixing' UDT created previously.
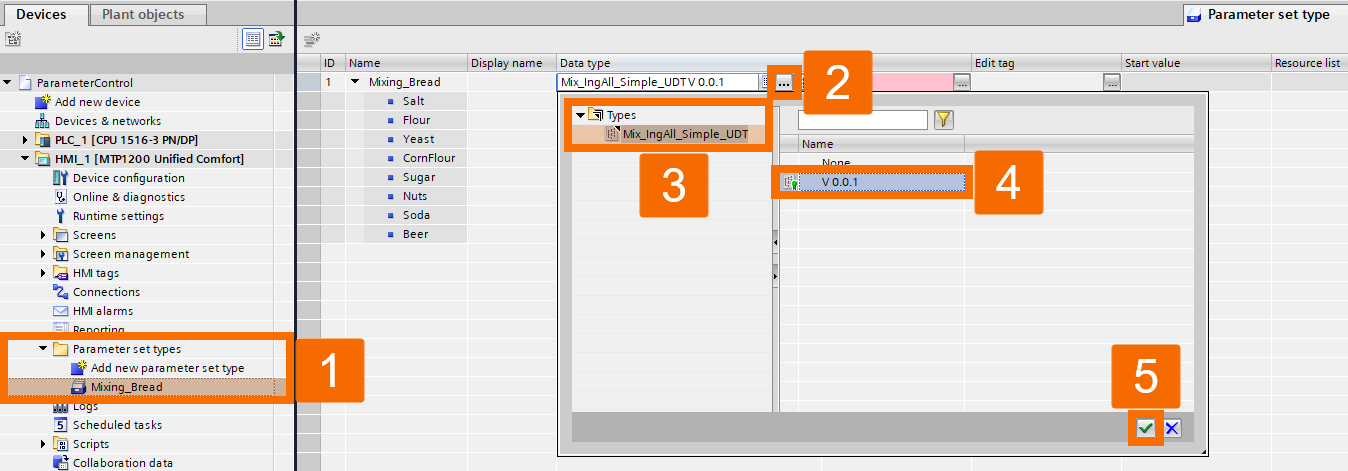
In the Tag column, select the HMI tag you just created to complete the link to the instance.
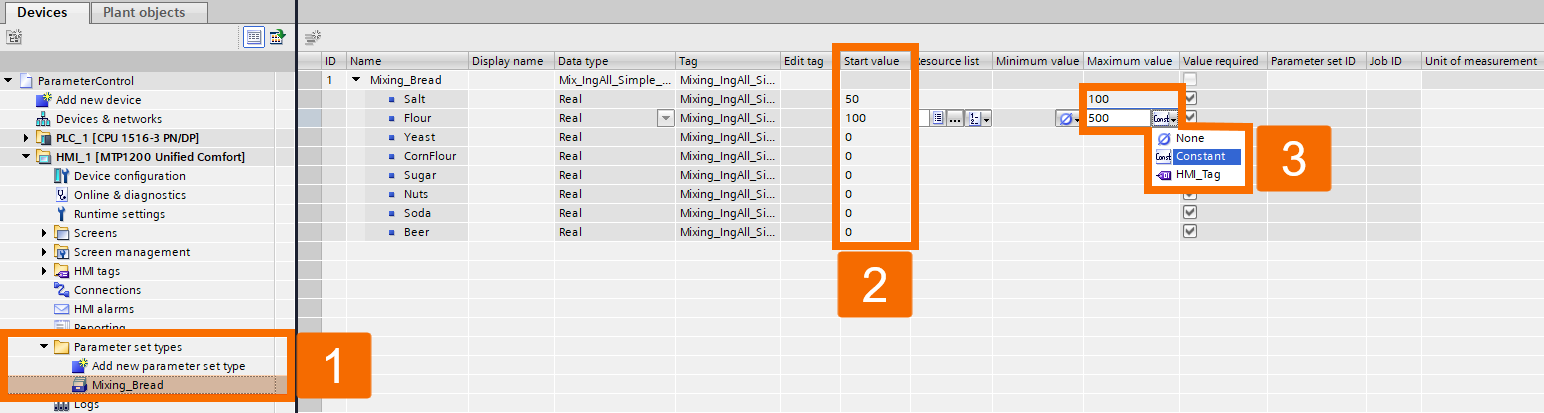
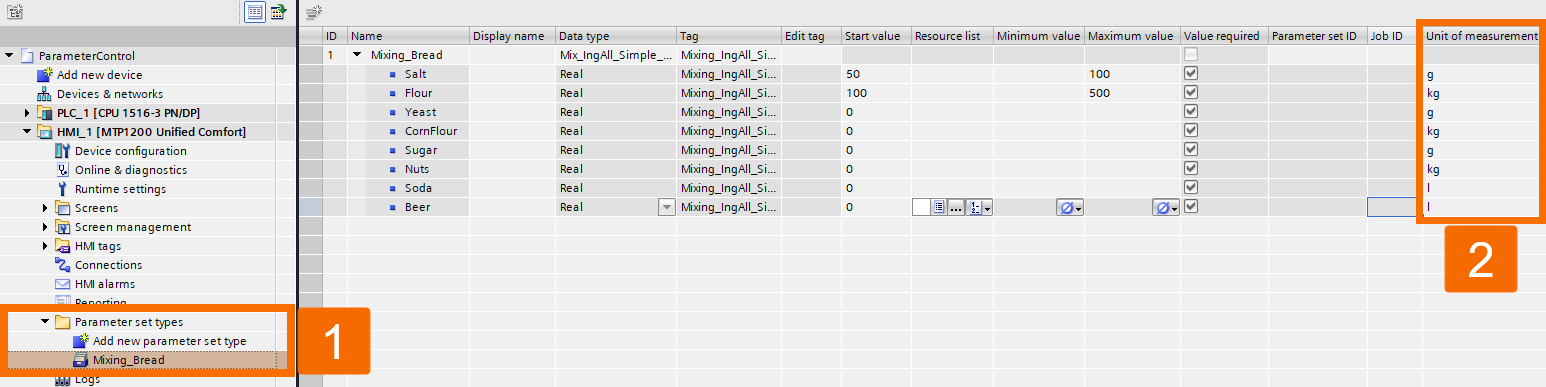
From within this parameter table, you can configure each element's start value, its limits (either constant or tag-based), and its unit of measurement.
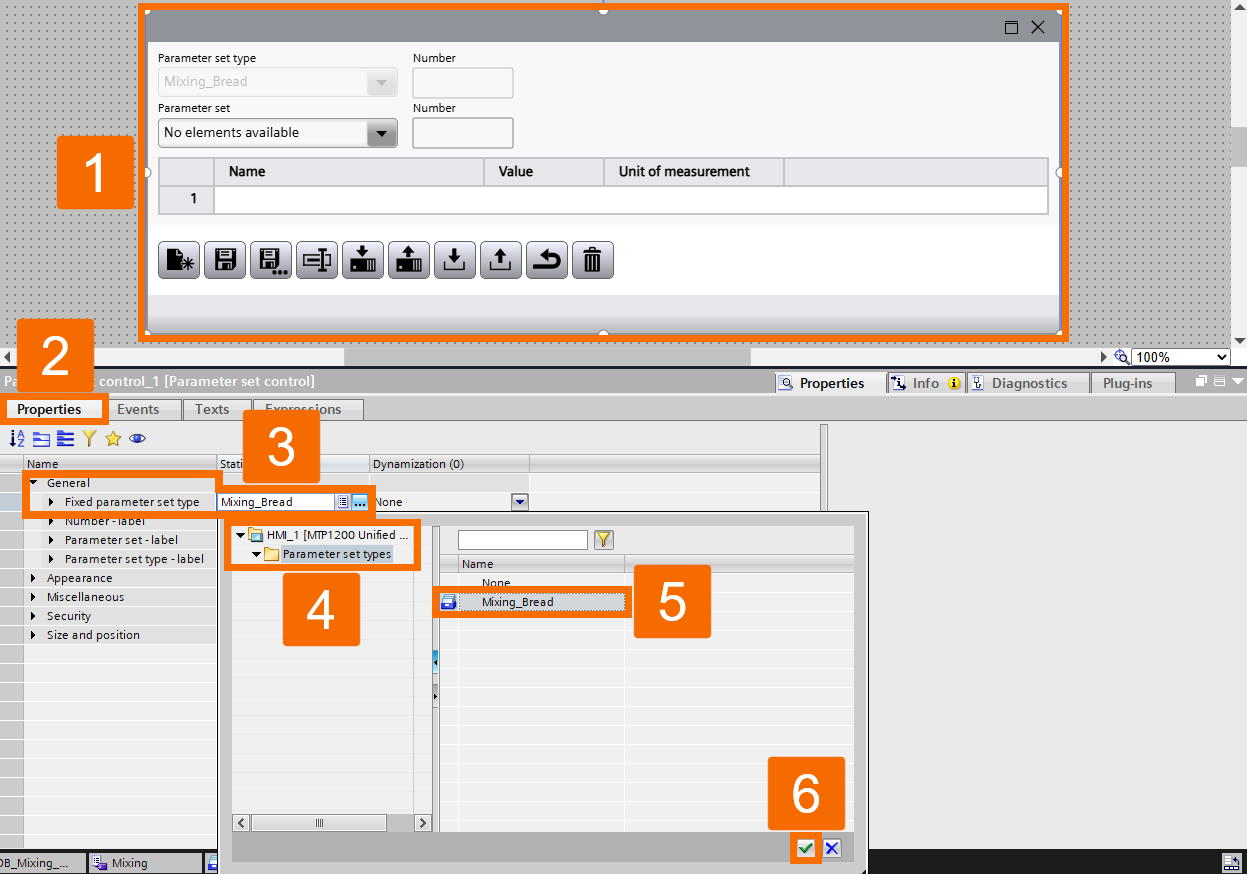
Next, open the screen belonging to your HMI device. From the Controls section of the Toolbox task card, drag the 'Parameter Set Control' object onto the main screen.
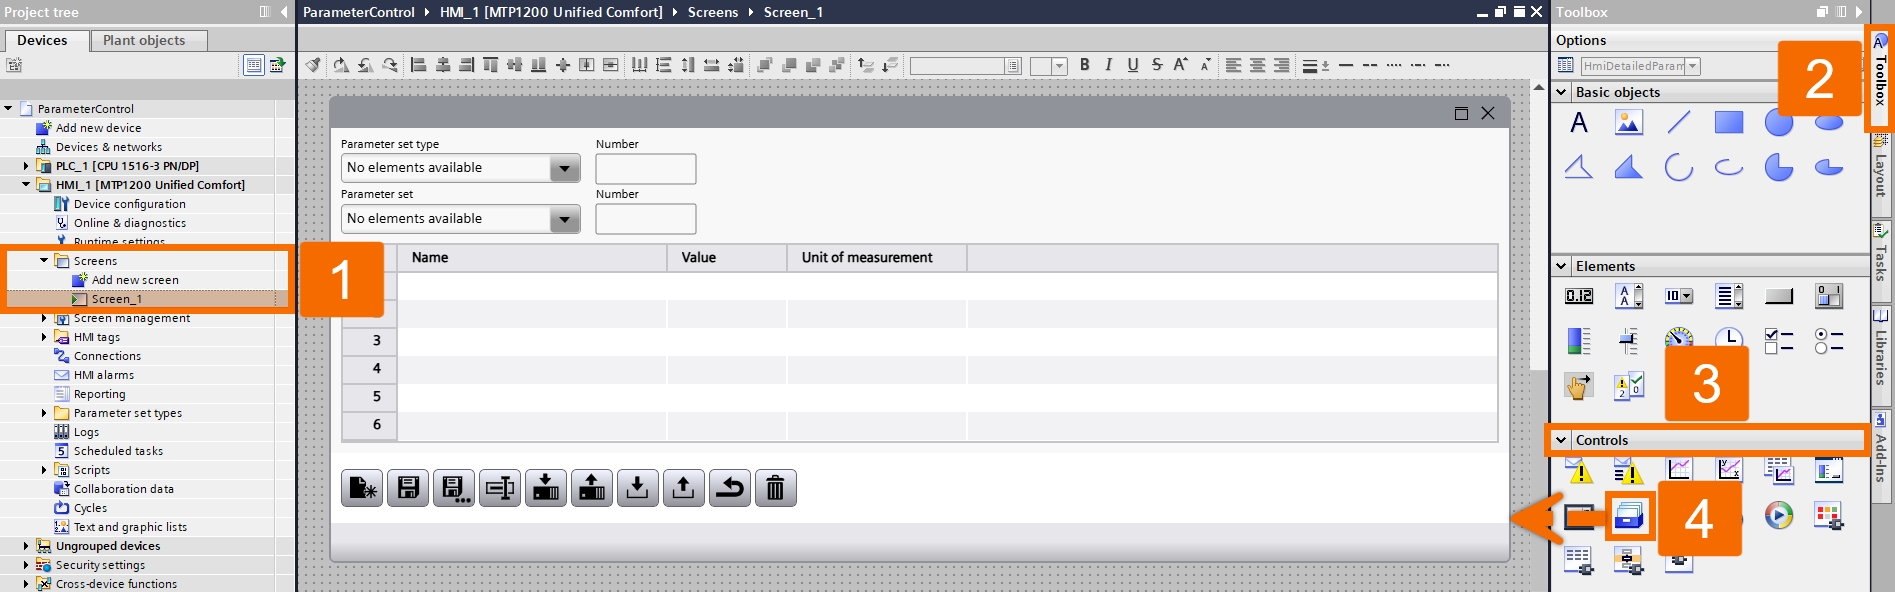
Select the newly placed object, then open the Properties tab within the Inspector window. In the General section, assign the new parameter table to the 'Fixed Parameter Set Type' field.
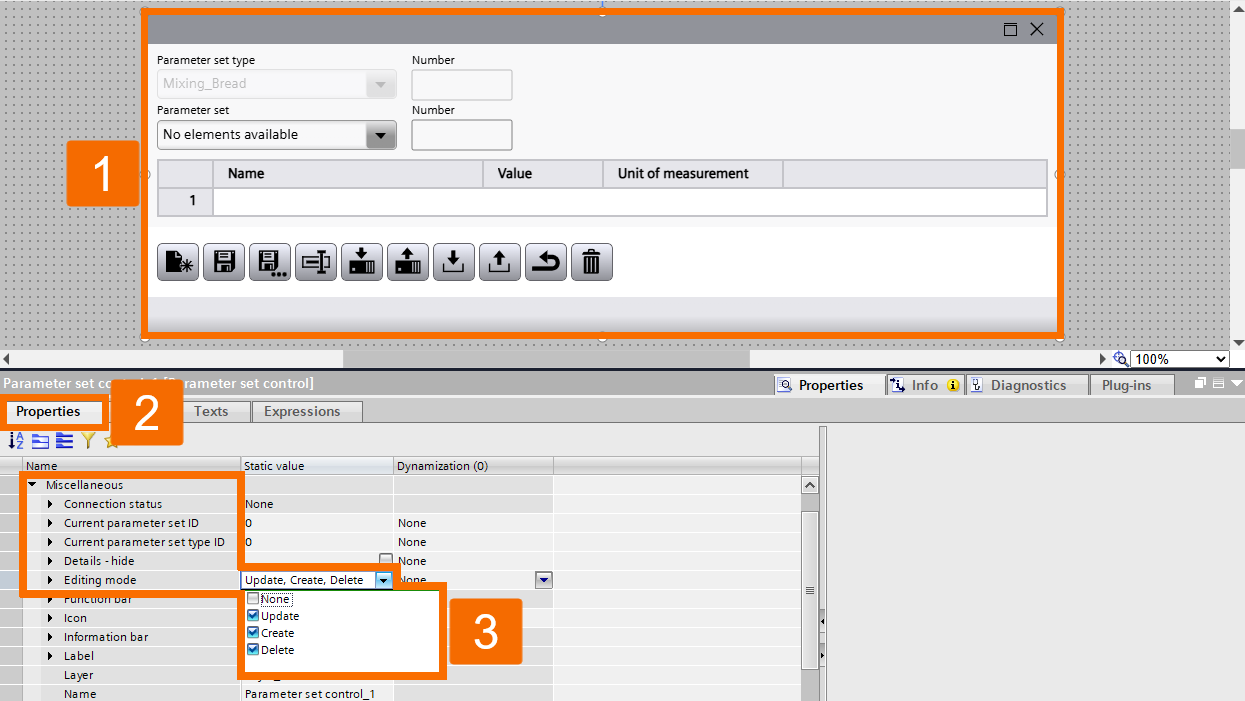
Then locate the 'Editing Mode' setting within the Miscellaneous section. Use this setting to control precisely which actions operators are permitted to carry out at runtime.
HMI Engineering Workflow
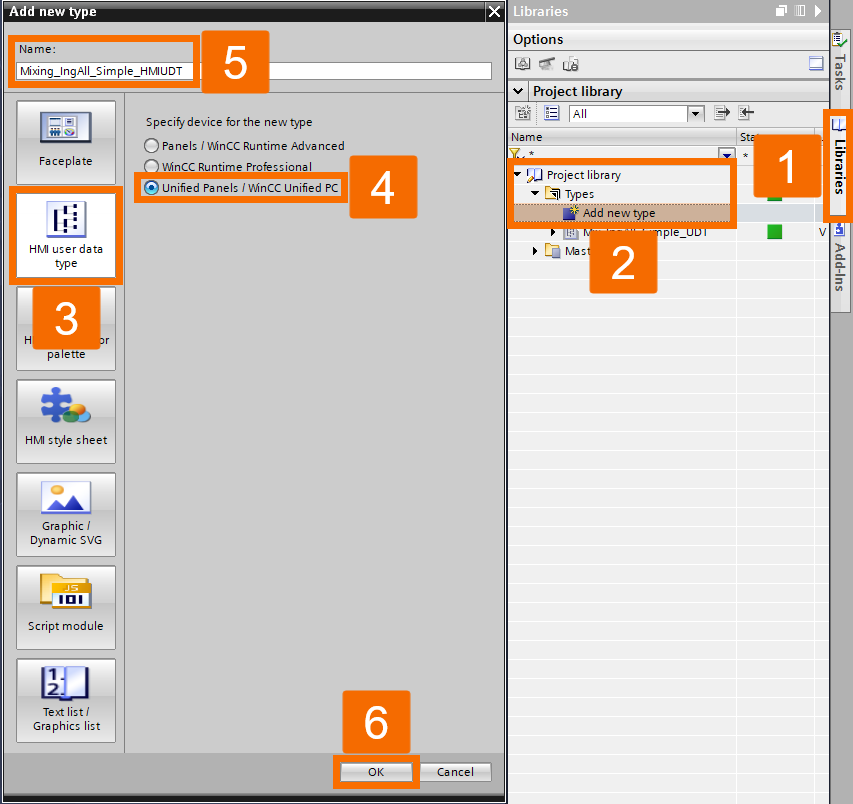
Now let's move on to creating a new WinCC Unified HMI UDT, separate from the PLC-side data type. Open the Libraries task card again from the right-hand panel. Expand 'Types' under 'Project library' and double-click 'Add New Type' to start the process. In the dialog, choose the 'HMI User Data Type' tab, set the type to 'Unified Panels / WinCC Unified PC', and enter a descriptive name.
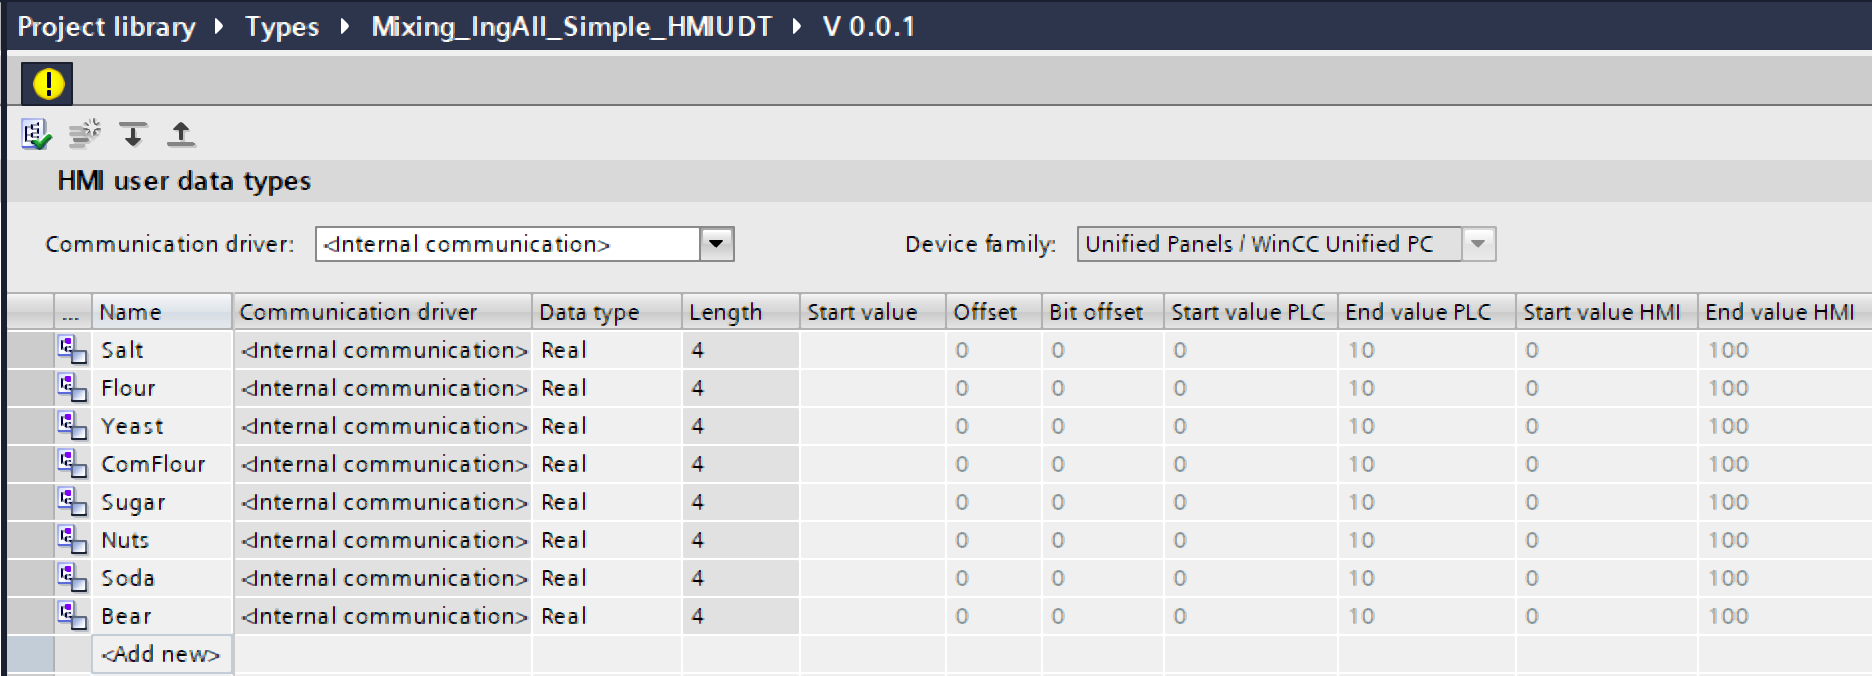
Next, add the necessary elements to this new HMI UDT. Click <Add new>, enter each element in turn, and assign the correct data type to it.
Right-click the newly created HMI UDT and choose 'Release Version' to formally publish it for use. Click OK when the confirmation dialog appears.
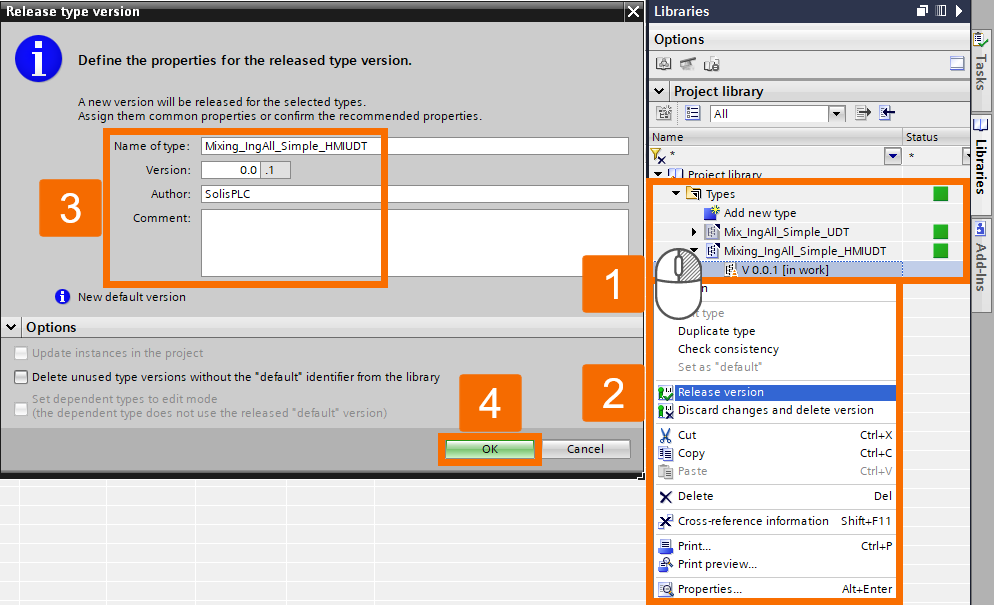
Open the HMI tags table and add a brand-new tag entry. Name it 'Mixing_IngAll_Simple_1', set its data type to the HMI UDT you just built, and set the Connection field to 'Internal tag'.

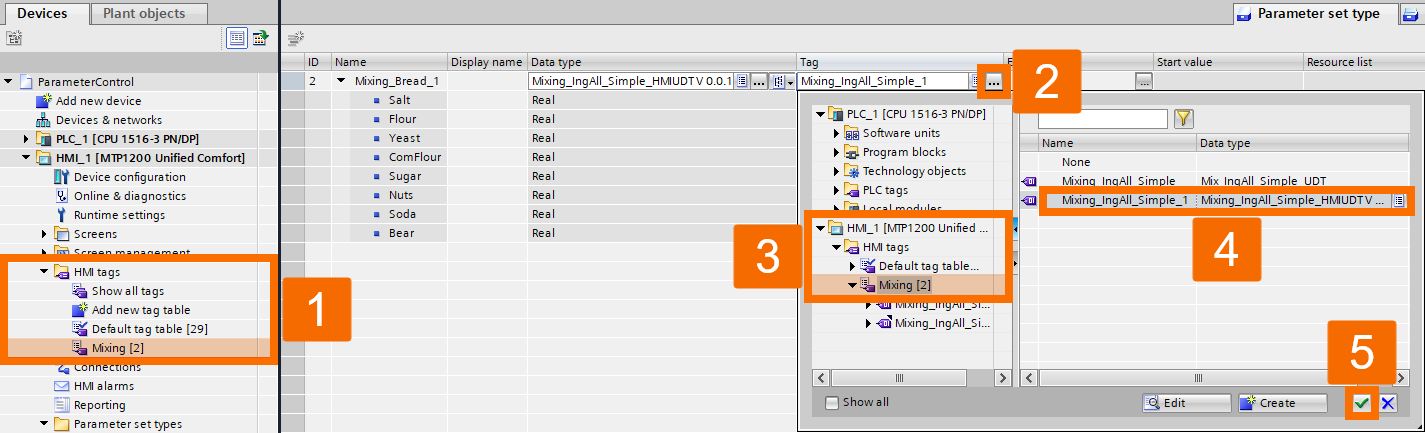
In the project tree, add a new parameter set type to hold this configuration. Name it 'Mixing_Bread_1' and set its data type to the HMI UDT you created earlier in this section.

Link the new HMI tag to this parameter set type to complete the association.
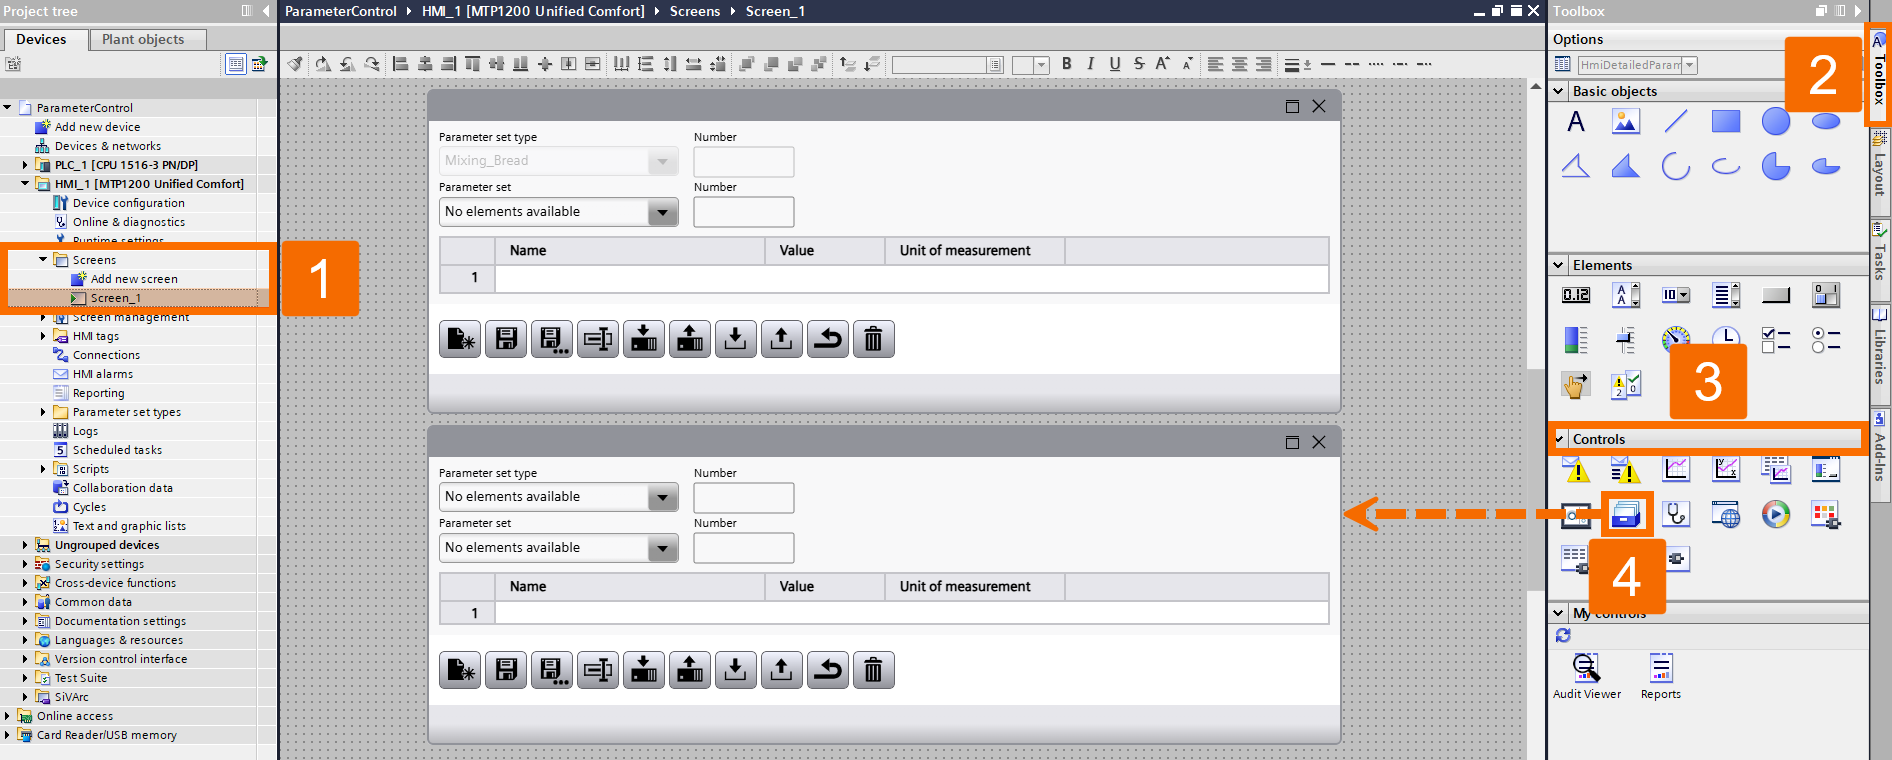
Next, open the HMI device screen. From the Controls section of the Toolbox task card, drag the 'Parameter Set Control' element onto the main screen.
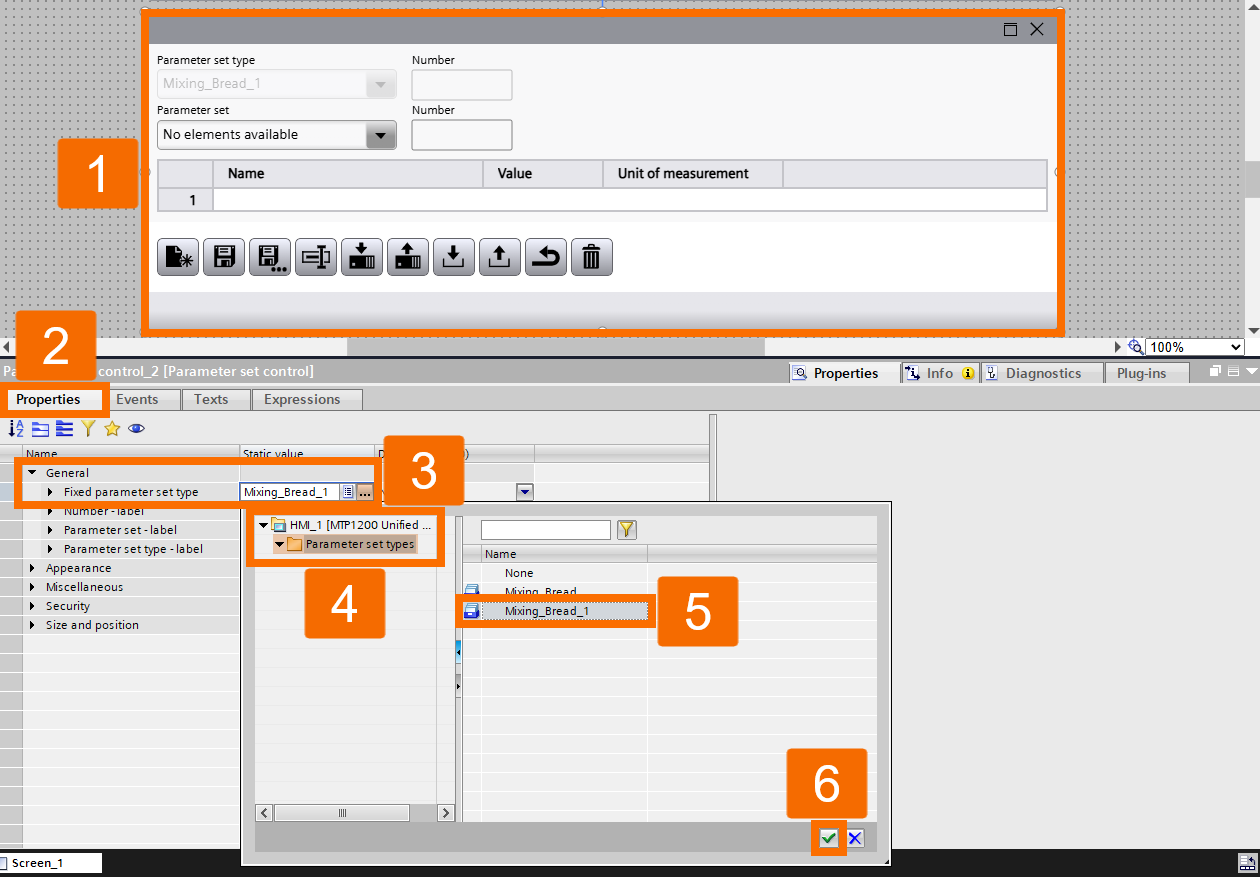
Click the inserted object and open the Properties tab in the Inspector panel. Assign your newly created parameter set type to the 'Parameter set control' object.
Usage & Settings
Compile the completed project and download it to the physical or simulated controller. Click 'Start Simulation' on the top toolbar to launch the HMI screen inside your web browser.
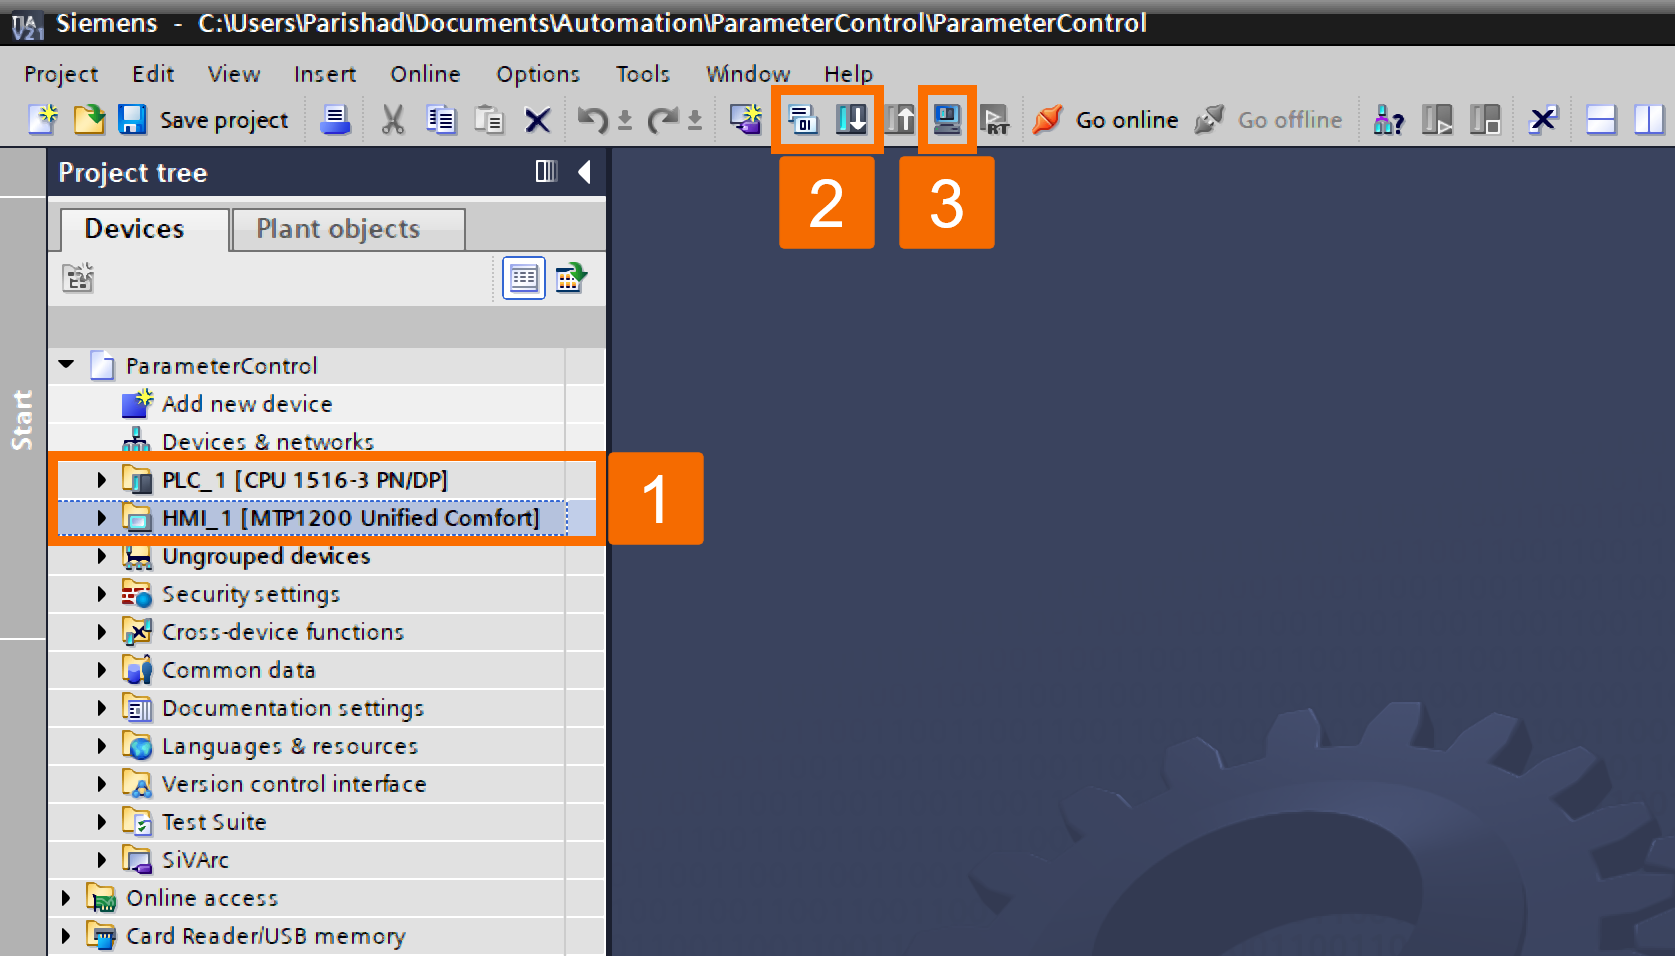
Once the browser window opens, click the 'Create Parameter Set' button to begin. Here, you can create a brand-new data set simply by entering a name and an identifying number. For this example, start by creating the 'Normal_Bread' data set and assigning it the number 1.
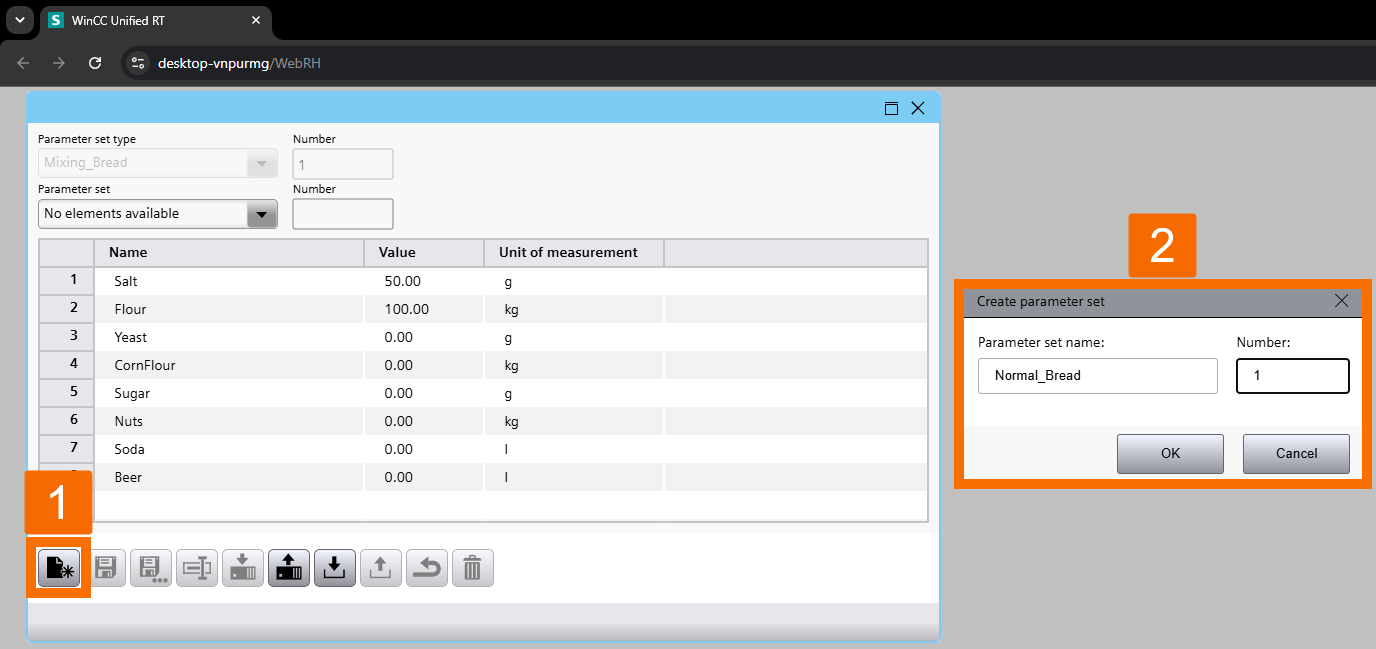
Next, create a second data set named 'Com_Bread' and assign it the number 2.
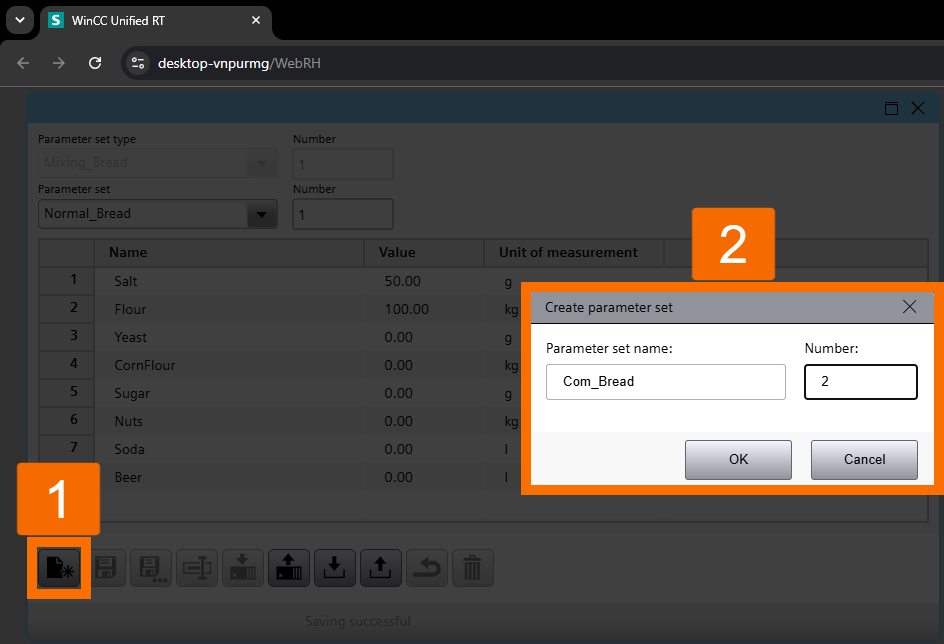
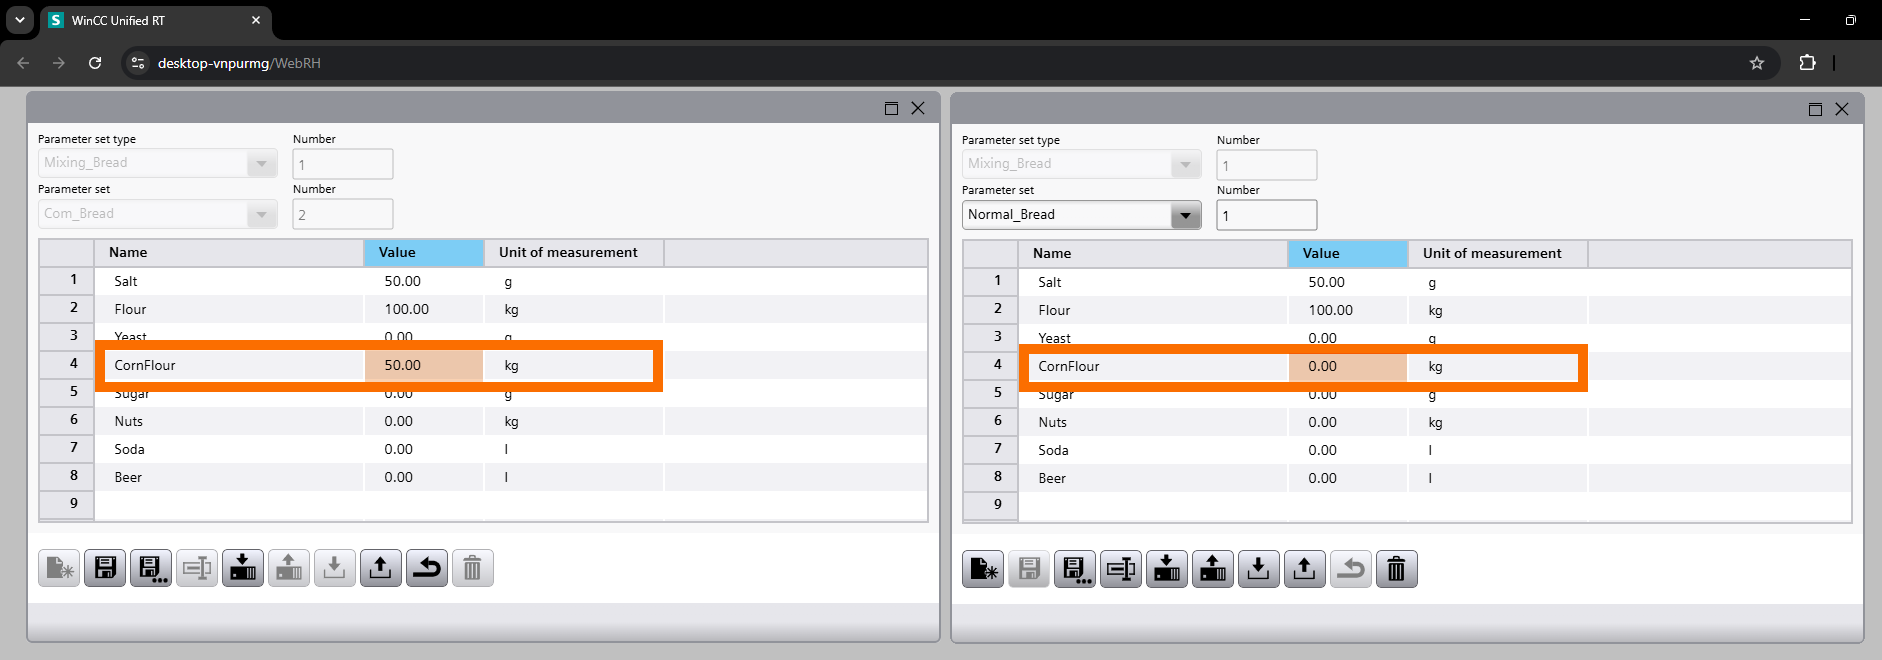
At this point, you can adjust the individual ingredient values as needed. For instance, set the CornFlour value to 50 kg for this recipe. Click Save afterward to store the updated value within the data set.
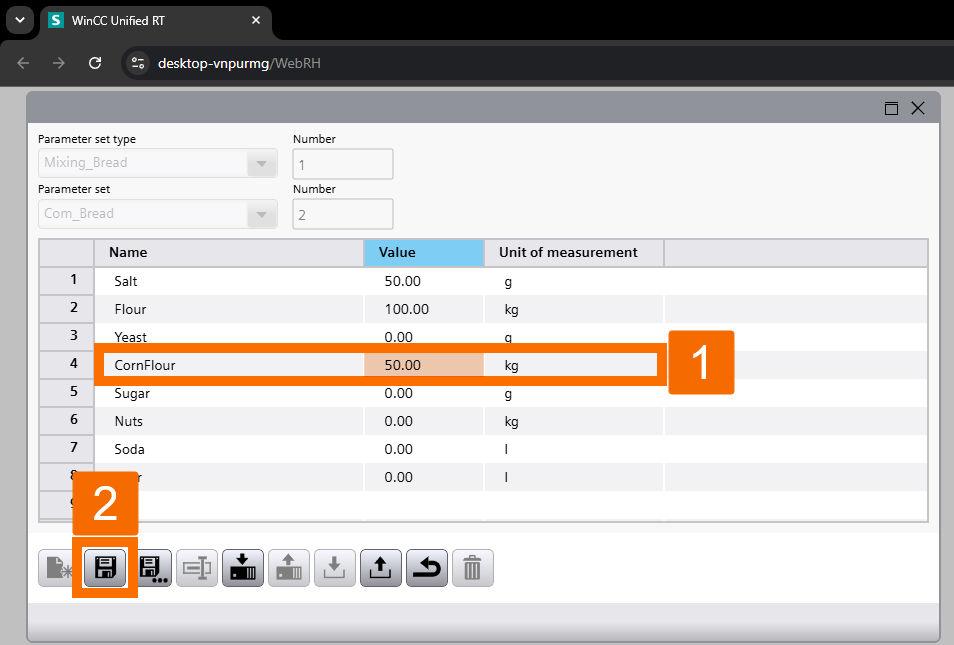
Keep in mind that this change applies specifically to the 'Com_Bread' parameter set, not to 'Normal_Bread'.
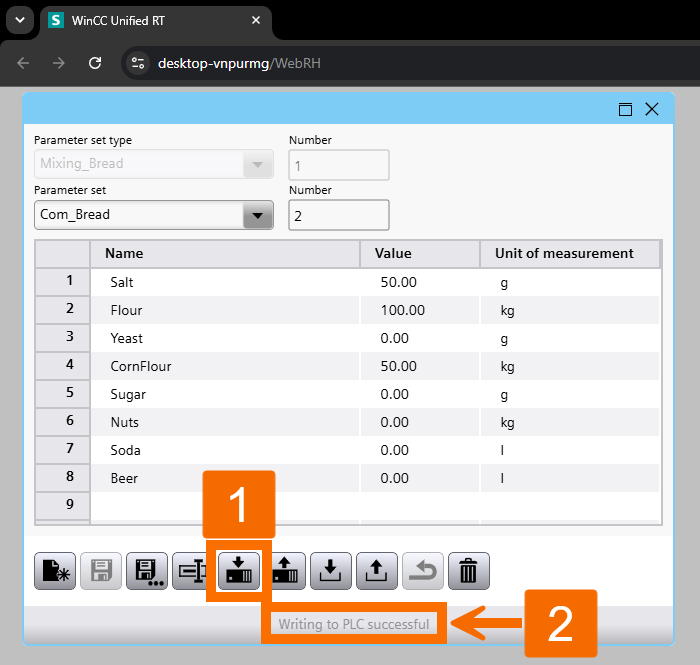
Click 'Download' to write this updated configuration back to the PLC.
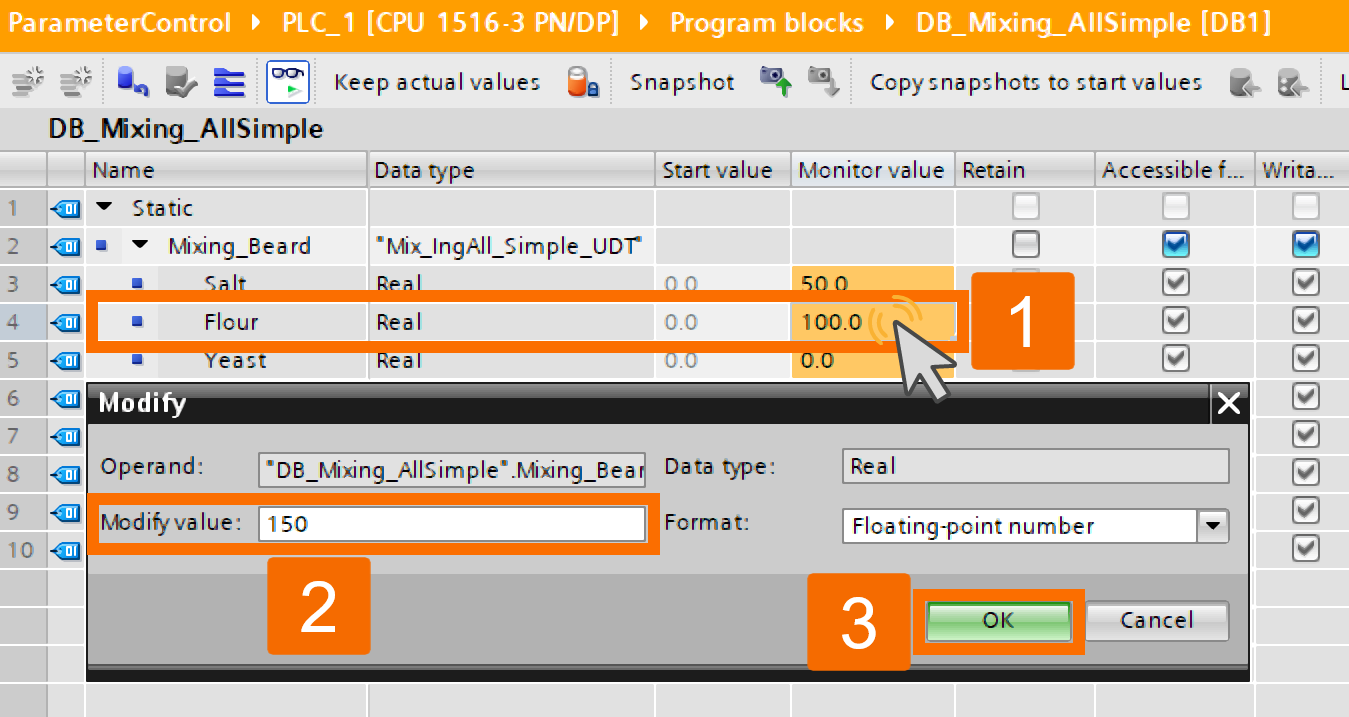
Return to the PLC's data block under the 'Program Blocks' folder and switch the view into online mode.

From this online view, you can now modify the parameters directly on the running PLC. For example, double-click the monitored value for Flour, then use the Modify window to change it from 100 kg to 150 kg.
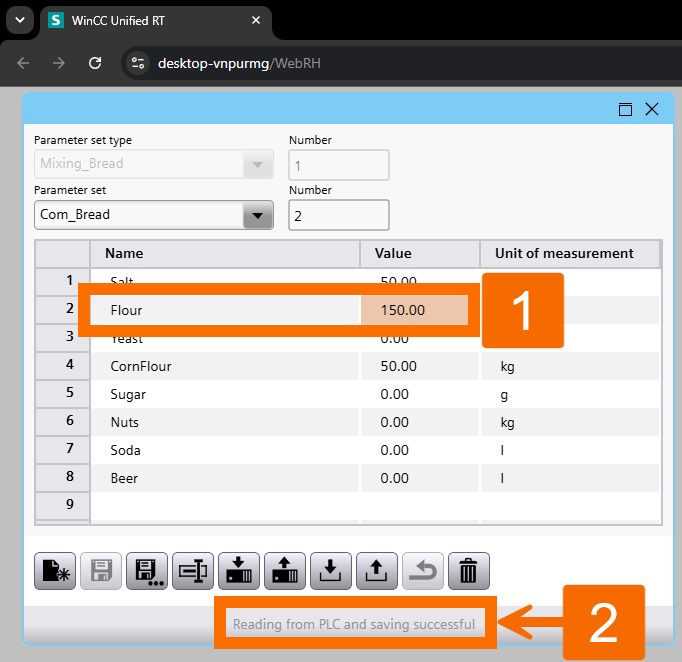
Switch back to the WinCC Unified simulation running in your browser, and click 'Upload' to read the current parameters from the PLC. In the Upload dialog that appears, you can choose either to overwrite an existing parameter set or create an entirely new one for the changed values. Choose to overwrite the modified values into the 'Com_Bread' parameter set.
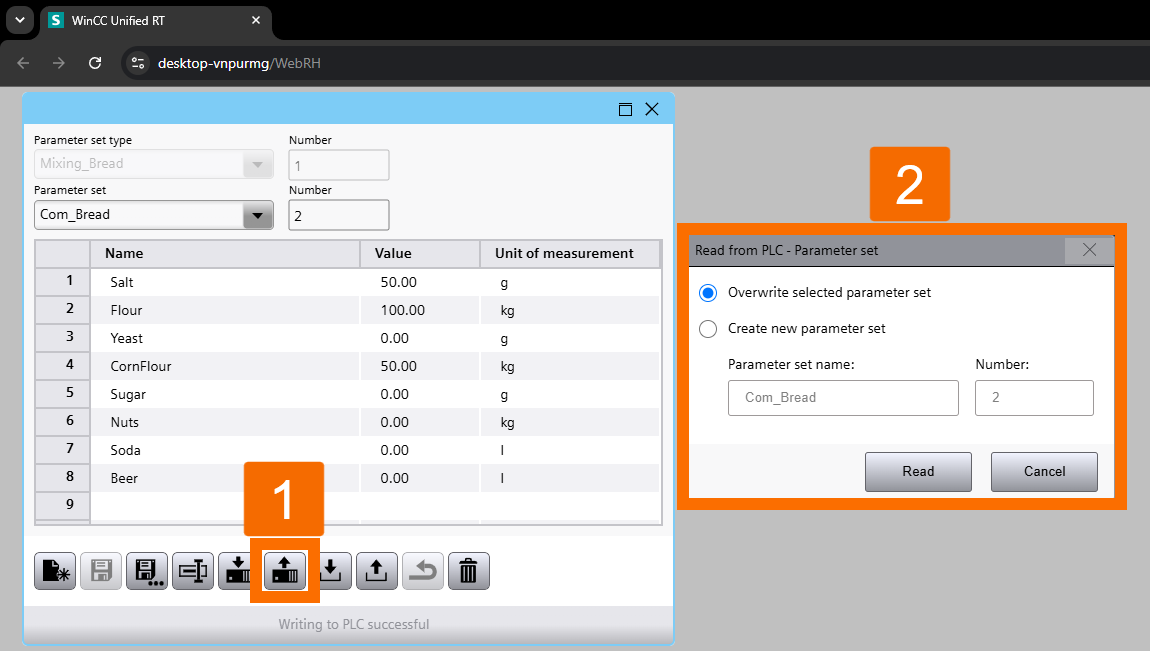
You'll now see the updated Flour value clearly reflected within that parameter set.
Conclusion
In conclusion, you have learned how to build a complete parameter set control workflow that spans both PLC and HMI engineering in TIA Portal. You've created a reusable PLC UDT, linked it to a data block and HMI tags, and configured a parameter set control object to manage recipe data like 'Mixing_Bread'. On the HMI side, you built a separate WinCC Unified UDT, published it, and connected it to its own parameter set control. You also practiced creating multiple data sets, editing ingredient values, and syncing changes between the PLC and HMI using download and upload actions. As a next step, try expanding this framework with additional recipes or ingredients, and explore how editing mode settings can further control operator permissions at runtime.


