Introduction to Add-On Instructions or AOIs

Introduction
In other programming languages (Java, C, C++, Python), programmers are taught functions early on. They are constructs that allow programmers to create custom pieces of code. By doing so, programmers have the advantage of re-utilizing their function and simplifying the code they build.
In PLC programming, AOIs are exactly the same. They are custom functions defined by the programmer. They can be used within a PLC program to standardize the implementation of specific code, shorten development time and reduce possible human mistakes when duplicating code.
It is important to note that although AOIs are a powerful construct, they’ve gained a bad reputation in the eyes of many. Here are these reasons and our arguments against them,
- AOIs are difficult to work with | Just like with any other programming language, a “function” construct needs to be understood by those who work with it. Once you explain how AOIs are implemented to those who will be working with them, they become quite easy to troubleshoot and work with.
- AOIs are unnecessary | We see a wide range of AOI implementations in the field. It is true that in most cases, code can be copied and pasted. However, it becomes extremely inefficient to duplicate large chunks of code; AOIs will save a lot of time.
- Troubleshooting AOIs is difficult | From our experience, the time it takes to learn how to navigate AOIs is well worth the investment in time saved by engineering and maintenance.
Advantages of an AOI
To further expand on the points above, let’s discuss practical advantages of building AOI through various examples.
Example 1 - VFD Motor Faceplates
In a system that uses Variable Frequency Drives, it’s not uncommon to see hundreds of such field devices. By creating a single AOI that encapsulates the control of a single drive, the programmer can save hours of programming by reapplying the same AOI to every single drive. Furthermore, the AOI will be identical and thus reduce the chance of making a typo while copying and pasting the blocks of code.
Example 2 - Proprietary Equipment
In a system that was developed for a non-common purpose, it’s useful to “hide” certain pieces of code from the customer. While adding a password to the entire program may create a sour relationship with the client, password protecting a small chunk of code that is responsible for a specific calculation or execution is acceptable. An AOI can be easily password protected to achieve this result.
Example 3 - Versioning
In a system that requires certain update roll-outs, an AOI can be used to standardize across versions. For example, a manufacturer of a 3rd party servo drive may release v1.0 AOI for their servo motor. As engineers around the world used this servo drive, the manufacturer released an upgraded version of this drive that now requires v1.1 AOI. It’s easy for the manufacturer to manage this roll-out as the programmers now know which version is compatible with each drive and can manage their code accordingly. Furthermore, they can easily get support from the manufacturer by identifying which drive and AOI version they’re dealing with during a support call.
Basic Implementation of an AOI
We believe that the best way to learn the concept is by following a simple example we can all relate to. Let’s build our first AOI.
Task description: Implement an AOI that will convert from Meters to Inches.
Implementation Breakdown:
- The conversion formula from meters to inches is as follows: 1meter = 39.3701inches.
- The AOI will require 1 input that will contain the number of meters to convert.
- The AOI will require 1 output that will contain the number of inches computed.
Building the AOI
Let’s walk through the steps required to build the defined AOI. We’re using a CompactLogic PLC running v30 of Studio 5000.
Step 1 - Go Offline
Note: one of the drawbacks of AOIs is that they must be created and modified Offline.
![RSLogix Studio 5000 Add-On Instruction [AOI] PLC Programming - PLC Offline](https://cdn.prod.website-files.com/63dea6cb95e58cb38bb98cbd/6415d9e483088162b55e7125_60b9e4dbb1673f019751977b_kovo1rszg8iSRvKIzz-OP_jD4NBOu_hOYexjB4dTkj5nl_I94Czxs-oawN2D7Bxboed06Kz_Rp2A7RKwgCgWpMN-UkbY5unlgvELh4qZP3qwfUaUDd5JYp0tSzyN0oodkznVlVLj.png)
Step 2 - Right Click “Add-On Instructions” in the I/O tree and Select “New Add-On Instruction…”
![RSLogix Studio 5000 Add-On Instruction [AOI] PLC Programming - New Instruction](https://cdn.prod.website-files.com/63dea6cb95e58cb38bb98cbd/6415d9e483088123ad5e7123_60b9e4dbaacffb8a09d1427b_8rtGM_S5eCHY2hcllmSzTDvv8-LdMiONahhe40fGCiCcbi3xV0rQ29YZEzxJL0u52_uE4M1BXSSgR2t0VvCQP1w5iW7oC9oHjPEoNaQzI2swYccJ0j--_lbslpR03d6bFCodmR1n.png)
Step 3 - Define the AOI Parameters
- Step 3.1 - Give the Instruction a Name
- Step 3.2 - [Optional] Write a Description that outlines what the AOI does
- Step 3.3 - Specify the Programming Language you’ll use within the AOI
Note: An AOI will need to use the same programming language for the entire implementation; there’s no way to refer to external routines.
- Step 3.4 - Specify the Major and Minor Revisions
- Step 3.5 - [Optional] Specify the Vendor Name
![RSLogix Studio 5000 Add-On Instruction [AOI] PLC Programming - Instruction Parameters](https://cdn.prod.website-files.com/63dea6cb95e58cb38bb98cbd/6415d9e483088115c35e7126_60b9e4dcf83a7004f75e9b6f_dhfoqGYOuSruZhUG35twI2xw4QhOWw1gsgwDySdkHT2eRLpb7ttQJmeFt-gjMaA4iYN5540pyqs5PU4fvtdYutsVm03X09FDJ3KS23QytBMHvxpI3Fbv6oI7kSsWAfppMAvHkB_I.png)
If you have selected “Open Definition” in the menu above, you’ll notice that a new prompt will open as soon as you press on “OK”. Within this menu, we will define additional parameters of the AOI we just created.
Step 4 - [Optional] “Open Definition” of the AOI from the IO Tree
![RSLogix Studio 5000 Add-On Instruction [AOI] PLC Programming - Instruction Definition](https://cdn.prod.website-files.com/63dea6cb95e58cb38bb98cbd/6415d9e48308814a2d5e7122_60b9e4da199dbc012100f178_Em9KT_6XReCdXkGAixOpUpp6hUN94jMHuQdvYFi166Zu-GNOQmBFcvtSncT8qPKKaiwM9aIP2Ql5LkVd-ykG3Qtcep-PEvtPfUdSvlHCBA_ZkKx9wRzauAfoAX-g_l2z894RFJJ6.png)
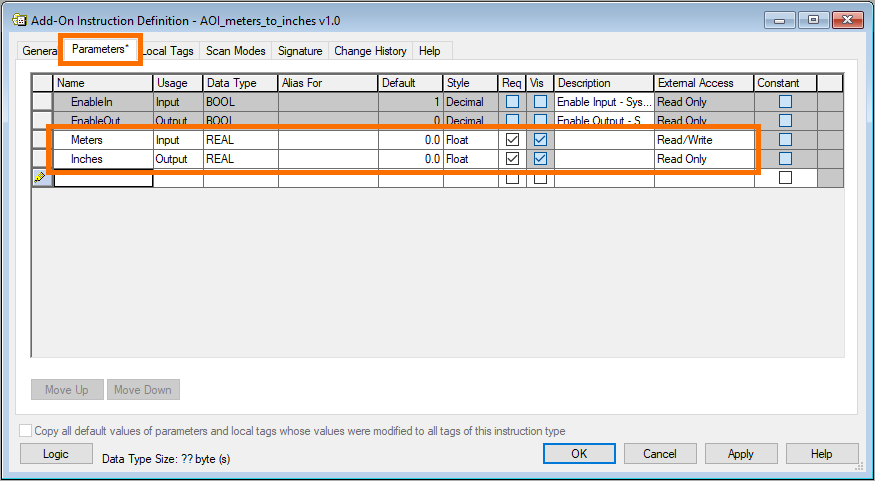
Step 5 - Specify the I/O registers
- Step 5.1 - Open the “Parameters” Tab
- Step 5.2 - Add a “REAL” Input Register used for the meters to convert
- Step 5.3 - Add a “REAL” Output Register used for the inches computed
You must select that both of these parameters are “Req” or Required. This makes it so that every implementation of the AOI will force the user to specify a variable to use for these parameters. If the input or output are not required, the user may choose not to include them. Example: The function can include a conversion to “feet” as an optional parameter.
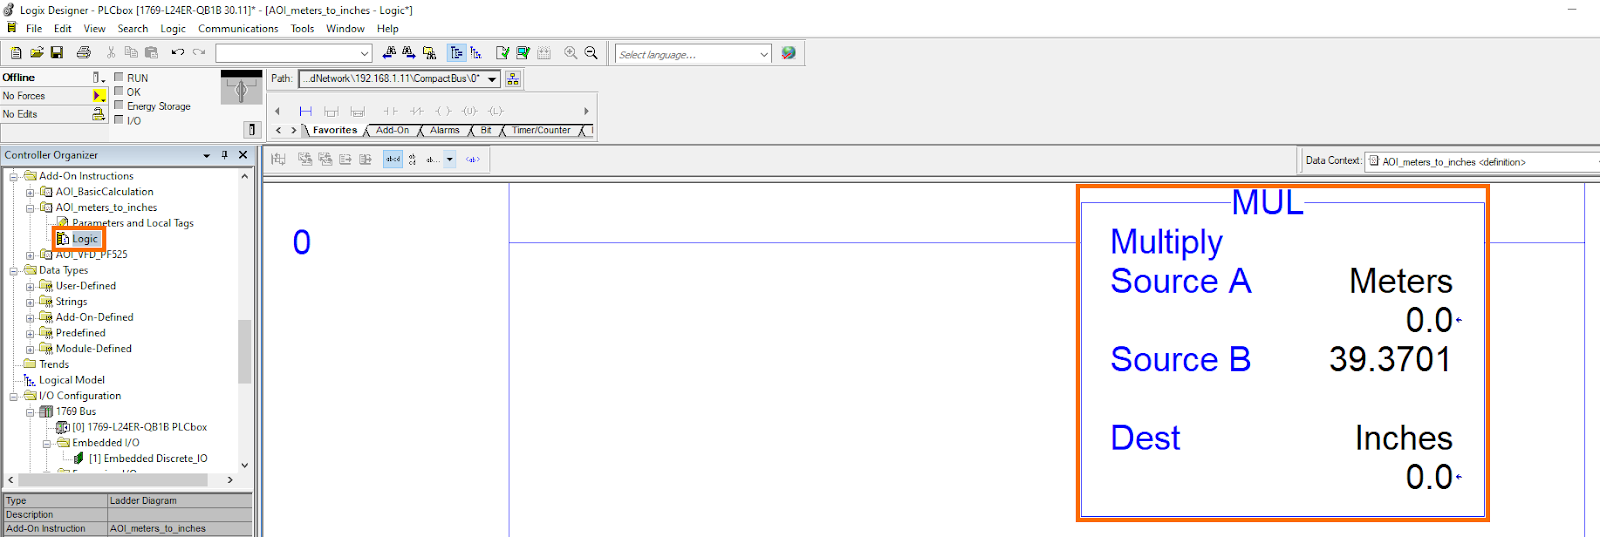
Step 6 - Build the Logic within the AOI
- Step 6.1 - Open the Routine within the AOI in the IO Tree
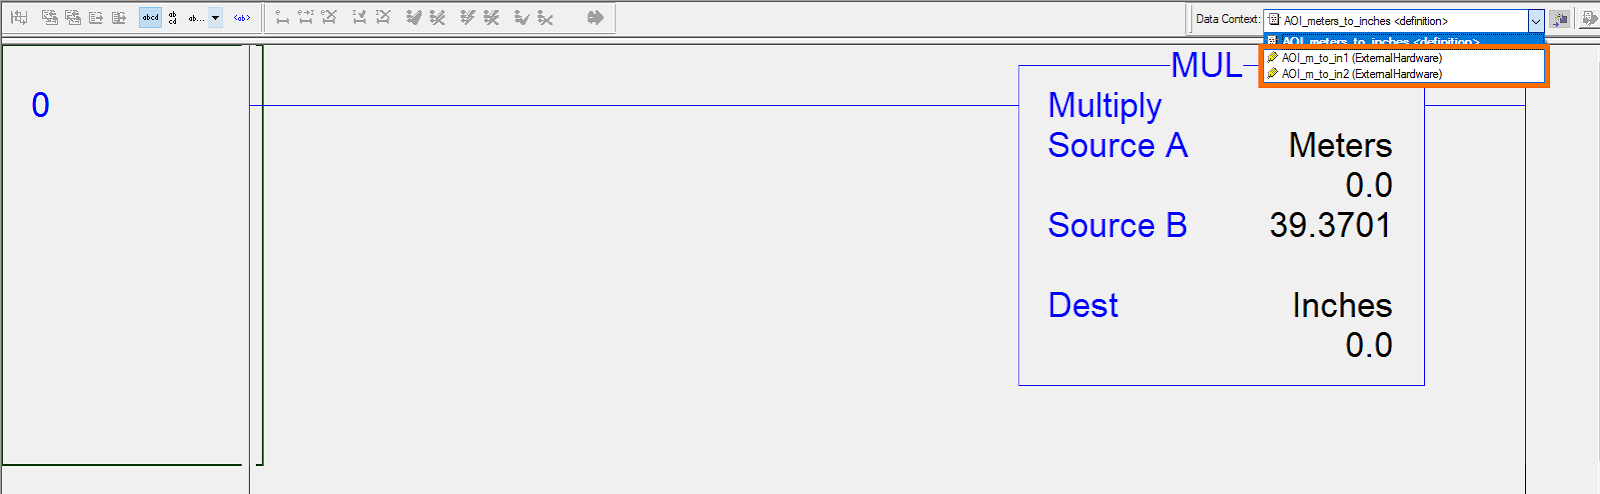
- Step 6.2 - Using the “MUL” instruction to convert the input into the output
Step 7 - Use the AOI in the PLC Program
At this point, you’ve created the most basic AOI possible. It can be used in your PLC program. Before we dive into a more complex example, let’s go over two concepts: how to create an instance of an AOI and how to troubleshoot an AOI (access the right instance).
Implementing AOIs in PLC Programming
Within the “Controller Organizer”, under “Add-On Instructions”, all the AOI definitions will be found (as shown below). As previously mentioned, the programmer may choose to export any existing AOI or to import ones from a different program. The program must contain the AOI you plan to use in your code. Importing code without importing the definitions of AOIs used within it will create an error.
Note: the issue described above is often encountered when a programmer decides to copy/paste an array of ladder rungs (or other type of logic) from one controller into another.
![RSLogix Studio 5000 Add-On Instruction [AOI] PLC Programming - Instructions in Program](https://cdn.prod.website-files.com/63dea6cb95e58cb38bb98cbd/6415d9e483088106405e711b_60b9e4db476d056feacd115d_a8kHeMzbenbOiQFBye9_afktDrjC_xtBSTctkX3-JWY7mSe_h6ZmSV0l65aNBQSKYGSQV709dFKKJAdoPx4R_yYo1r_XOLAV881rm96K1Z3EYNOWq3zJ0g7U3lsu-IinTEDOOP24.png)
To add an AOI into a program, follow the steps outlined below.
Step 1 - Open the Routine you’ll be programming
Step 2 - Insert any Instruction into the Rung
Step 3 - Double Click the Instruction (Not the Name) and Select the AOI
An alternative method is to type in the AOI instruction name.
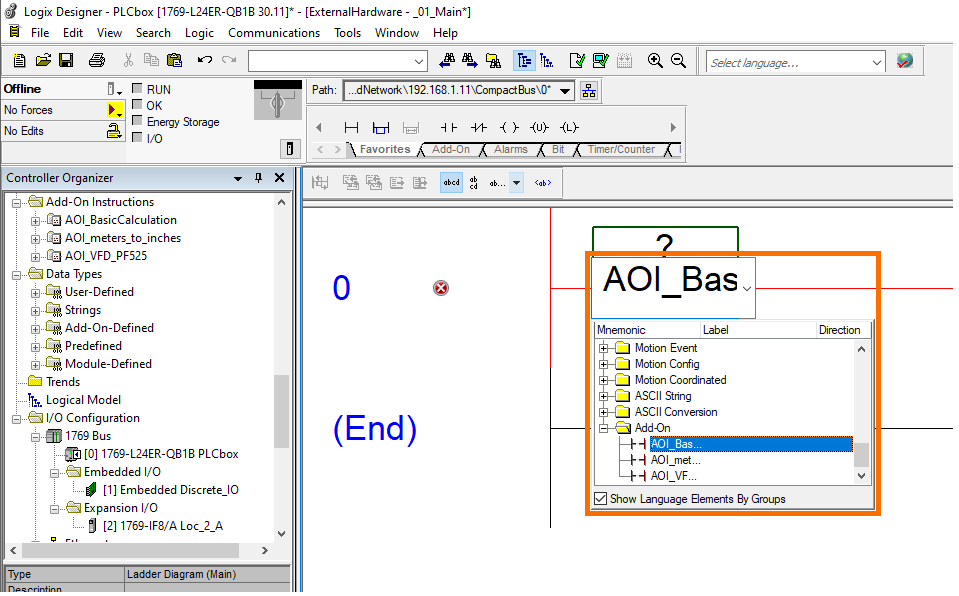
Step 4 - Create an Instance Data-Type for the AOI
After the instruction has been added to the rung, the programmer must create a data-structure that will be referenced by the program. This is not something that needs to be done for basic instructions and is sometimes confusing to new users.
Give the instance a name (we typically add the “AOI_” prefix.) and right click to create an instance.
- Step 4.1 - Specify the Data-Type (Ex: AOI_BasicCalculation)
- Step 4.2 - Specify the Scope. Just like other data types, AOIs can be PLC or local scoped
![RSLogix Studio 5000 Add-On Instruction [AOI] PLC Programming - New Instruction Instance](https://cdn.prod.website-files.com/63dea6cb95e58cb38bb98cbd/6415d9e483088130fb5e711c_60b9e4dbcc77707160ff18f4_dPWz-SurCYBUwY8-io0KD1xxgOFB6fIfkJxIZn57EQPL6zuqrUxpPVtdUmDyQIzr6WJIqPpv0tQuq1CV6evCwLcwhXFpnV4xIJ20vFXrmX8ER6WWBE9zDjZcDDsAWZy5gwt1zixu.png)
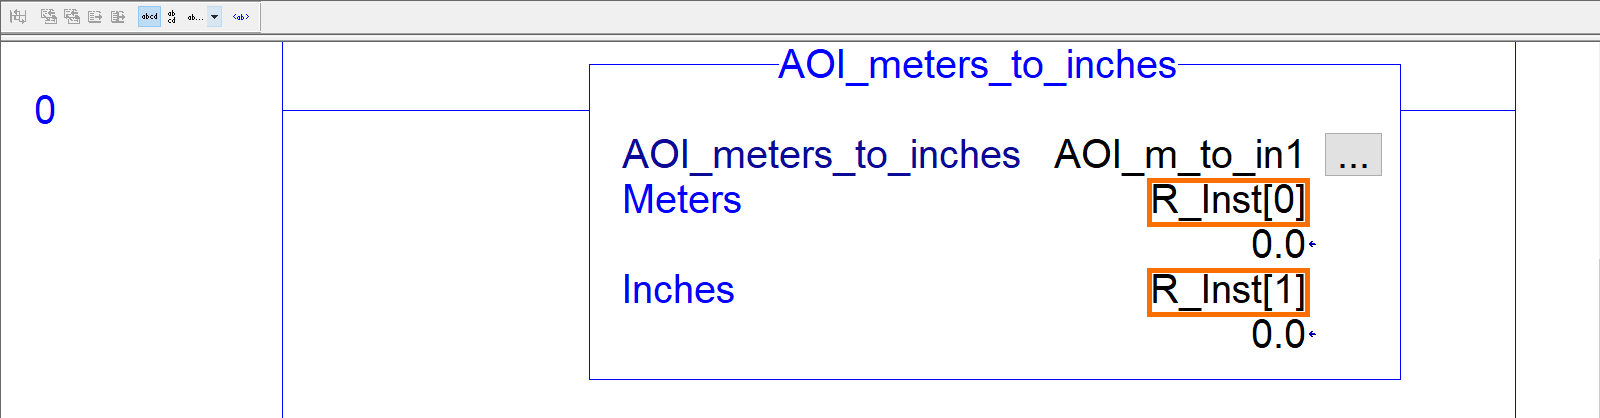
Step 5 - Specify the Input and Output parameters within the Instruction
Step 6 - Download the Program to the PLC & Go Online
Testing an AOI in PLC Programming
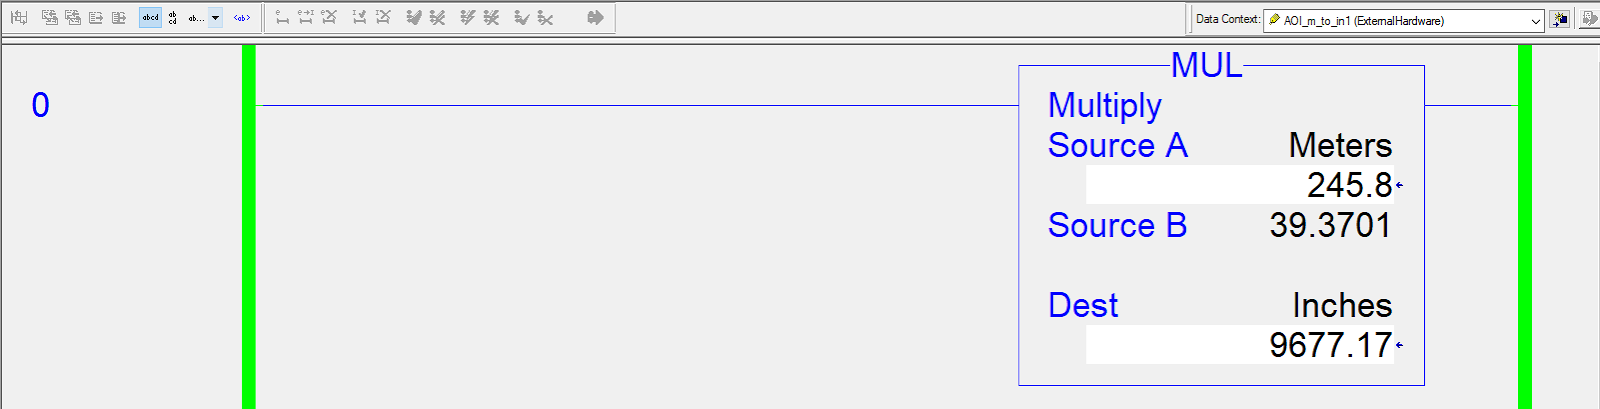
An Add-On Instruction will behave just like any other function in your code. The difference is that other instructions have been pre-defined by the manufacturer (Allen Bradley), while an AOI was created by an end user. The instruction we’ve created above can be easily used and tested within our code. We can either tie a sensor measurement in “Meters” in order to convert it to “Inches”, or we can leave the register as floating and change it ourselves. By changing the R_Inst[0] register which contains the number of meters, we get the following results for the various setpoints.
M = 1.54
![RSLogix Studio 5000 Add-On Instruction [AOI] PLC Programming - Instruction Parameters Example 1](https://cdn.prod.website-files.com/63dea6cb95e58cb38bb98cbd/6415d9e4830881a0e55e7127_60b9e4dc1d9039988e4b539d_uZ4-mpn_vgl7hghQREkIsadaNGQ5eE5LZB8EBI2KZY4w3rFmEJASLkRhJLg5h8GLafPFrL6X24vSHmiwVMVKO_7wDW2_unff3IhqpzlZtmR1Y0q2AApqeW1aHX9APjTmFJda9lOk.png)
M = 2.5
![RSLogix Studio 5000 Add-On Instruction [AOI] PLC Programming - Instruction Parameters Example 2](https://cdn.prod.website-files.com/63dea6cb95e58cb38bb98cbd/6415d9e483088138cb5e712a_60b9e4dc3013b705227219db_sdepkCDOWsKP5Z8uurjsrpQyjh7WiqeexPV_0QKIPKXiZ-oU0tlgTUPAfiWy6uBJPC1hLn5uCXK5q6xlB-OXoOwscLhaHp3YHrkI2z2cWdIi7ai_ANFovAe2YcrWAfz9BN1RX1Hz.png)
M = 245.8
![RSLogix Studio 5000 Add-On Instruction [AOI] PLC Programming - Instruction Parameters Example 3](https://cdn.prod.website-files.com/63dea6cb95e58cb38bb98cbd/6415d9e48308813bb55e711f_60b9e4dc8a6a65ac28bd4bb6_cN1lAlSzV0UliFedQlK5jkQ982sDjbwXGle993SRuCFZm3FfDqhR8vIvaDE6_Lm0pGMZQuu20LP3OQEZwJrBWxIxMGbX3qOFdmRMfrCXClN6HVTcXVJqAsyvGwF3gxifAKDoJRfe.png)
As shown in the three examples above, the instruction will take the input in Meters and convert to Inches during a PLC scan. Based on this example, we can implement a variety of functions from simple to complex.
Creating Multiple Instances of an AOI Instruction in RSLogix / Studio 5000
As mentioned in the introduction, one of the advantages of Add-On Instructions in PLC Programming is that they can be used multiple times across the program; saving you time and helping you avoid mistakes in implementation. Let’s examine how we can create additional instances of the AOI that we developed above.
Step 1 - Create an Additional AOI Block
You may create a new rung below where we inserted the original AOI or in a completely separate routine.
Step 2 - Create a NEW Instance of the Instruction
Each AOI block requires a unique data structure in your program. The first instruction used the “AOI_m_to_in1” structure. The one we’ll create here is going to be using the “AOI_m_to_in2” structure. Note that you can use any name you wish. In the field, it’s common to give each one a descriptive name depending on the use of the instruction.
Similarly, we need to assign data points to our instruction (inputs and outputs). These can take on the same registers. However, just as it would be with an Allen Bradley instruction, it’s best to create unique registers.
We end up with the following implementation of the second instance of the AOI we built above.
![RSLogix Studio 5000 Add-On Instruction [AOI] PLC Programming - Second Instance](https://cdn.prod.website-files.com/63dea6cb95e58cb38bb98cbd/6415d9e4830881465f5e7129_60b9e4dc49fe411a8770b69e_aSS0FpoI2TxaBK-2vwPbKmJNIMKmyP8DDgbU056yIcmSPVL9MIut7yVObVirdwZKU-mgNBh1JrozUDCMpPG0feLD6aR8RVoA7HwgahevwyOjofC6nrzPLNxT6YABMbZjpn8b2qKF.png)
Step 3 - Running the AOI
The AOI we’ve created will behave just like the first one. However, it will apply to the different set of tags that we’ve used for the inputs and outputs.
Troubleshooting an AOI Instance in Allen Bradley RSLogix Studio 5000
The most common pushback we see from our clients is that AOIs are difficult for field engineers and technicians to troubleshoot. We believe that once you go through the steps of the process, it becomes second nature. In other words, it’s not more difficult than any other set of instructions. In fact, it becomes easier to make changes if necessary as it will apply to all instances of the AOIs already in place.
Step 1 - Open the Logic Implementation of the AOI
Navigate to the AOI you wish to troubleshoot / view in the “Controller Organizer” and open the Logic file of that Add-On Instruction.
![RSLogix Studio 5000 Add-On Instruction [AOI] PLC Programming - AOI Logic](https://cdn.prod.website-files.com/63dea6cb95e58cb38bb98cbd/6415d9e483088106cf5e7120_60b9e4dc4cf3267c33560e34_YX6mvqxFP-vVz31rgiv9KfPxyBh1ixNzAUJ_R9YpBq1vxk60IyKuKP4GWUqagYIqOQi5f-F50CiglmQ3iFqQG-MByNbHOoAZQXKiAI1tsDz0gswgXun9SasGmgG6o_qRGpNFLVRz.png)
Step 2 - Choose the Instance of the AOI to Troubleshoot
On the right hand side of the software, you’ll see a dropdown that will allow you to select from a list of currently active instances. By default, the displayed logic will only contain the “implementation” of the function. The “implementation” does not display any values and remains static.
Step 3 - Troubleshoot the Logic
Once you’ve selected an instance, you’ll have access to the variables used within the instruction. It’s important to note that you won’t be able to edit the instructions used, but you can view their state, the values and the execution.
Advanced Implementation of an AOI
We’ve covered a basic implementation of an AOI Instruction. Although we plan to release a separate tutorial on advanced instruction, we believe that if you’ve implemented what we described here, you’ll be off to a good start. Besides what we’ve already covered, AOIs will typically contain UDT structures and advanced logic processing. As you’ve learned from our example, you can create a number of rungs and extend logic as you wish; the possibilities are endless. Furthermore, an Add-On Instruction can leverage versioning control; OEMs that update their equipment or functionalities, typically release new versions of their AOI. Therefore, the software implementation must match the version of the AOI for intended use.
Frequently Asked Questions
What does AOI mean in PLC programming?
AOI stands for Add-On Instruction which is a type of function implementation in Allen Bradley PLC programming. An AOI allows the user to create a custom function with inputs and outputs and to create instances of the functions to be used in the application created in RSLogix / Studio 5000.
Is an AOI a function block?
Function Block Programming or FBD is a programming language while an Add-On Instruction or AOI is a custom function definition or an organizational unit. In other words, the two are completely different. That being said, an AOI can be used in Function Block Programming and other PLC programming languages
What is the difference between AOI and subroutine?
PLC Programs are typically organized into code blocks with subroutines being a way to separate code into specific areas. Some examples include subroutines for initializing I/O, running a specific sequence of the process, communicating with external modules, etc. As explained above, an AOI is completely different from a subroutine and should be thought of as a custom function. If you have a software engineering background, subroutines are different code files while an AOI is a function definition.
How do I edit AOI?
The "downside" of AOIs in Allen Bradley PLC Programming is that they can't be changed or edited online. You need to save your file, go offline, and click the edit link of the AOI to start changing the implementation. The only workaround for editing the AOI of an online file is to add a second version of the AOI and to redirect the code to the new version.
What is the purpose of add on instructions?
Add-On Instructions (AOIs) in industrial automation programming serve several purposes:
- Modularization: AOIs allow programmers to encapsulate commonly used logic or algorithms into reusable modules. This modular approach promotes code organization, simplifies maintenance, and reduces the likelihood of errors.
- Code Reusability: Once created, AOIs can be easily reused across multiple projects or within the same project. This saves time and effort by eliminating the need to rewrite or duplicate code.
- Standardization: AOIs enable standardization of logic across different parts of a system or even across multiple systems within an organization. This ensures consistency in programming practices and facilitates easier troubleshooting and debugging.
- Abstraction: AOIs provide a level of abstraction by hiding complex or detailed logic behind a simple interface. This abstraction makes the code easier to understand and use, especially for less experienced programmers.
- Documentation: AOIs can include documentation within their definitions, making it easier for other programmers to understand their purpose, inputs, outputs, and usage.
- Testing and Validation: By encapsulating logic into AOIs, it becomes easier to test and validate the functionality of specific components or processes independently, which can lead to more robust and reliable automation systems.
Overall, Add-On Instructions enhance the efficiency, maintainability, and scalability of industrial automation programming by promoting modularization, reusability, standardization, and abstraction of logic.
Conclusion on Add-On Instructions in RSLogix Studio 5000
In this tutorial, we’ve covered why you may want to use AOIs in your PLC programming, what you need to know to implement them and how to troubleshoot them. We believe that these constructs are extremely useful and should be understood by most seasoned PLC programmers. If you have any questions on this topic or any other, don’t hesitate to post them on our community forums.
