Integrating an ABB ACS380 VFD Into Studio 5000

Introduction
ABB offers a wide selection of variable frequency drives (VFDs). The ACS380 and 880 drives offer excellent motor control while being user-friendly during the integration process.
The ABB ACS380 and 880 drives can be controlled by start-stop push buttons, analog signal or drive enabled via safety torque off (STO) signals. However, their true advantage becomes clear when integrating with a PLC control system. The ACS machinery drives offer many communication options such as DeviceNet, Profibus, CANopen, EtherCAT, Ethernet/IP, Modbus, and Profinet.
In this tutorial, we will take a look at the ACS380 and 880 drives, review ABB’s Drive Composer, and integrate an ACS380 VFD into Studio5000 via Ethernet/IP communication.
ABB ACS380 & 880 Overview
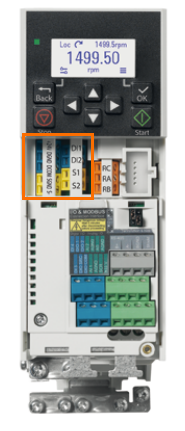
As with most drives, the easiest way to integrate and control them is by using start-stop pushbuttons. To access the drive’s terminals, the cover will have to be removed. If you’re using a start push button, the input must be wired into terminal DI 1. Utilizing a 2 or 3-wire start-stop configuration is a common method of controlling variable frequency drives. However, the ABB ACS machinery drives truly shine when utilized in an automated architecture due to their capabilities.
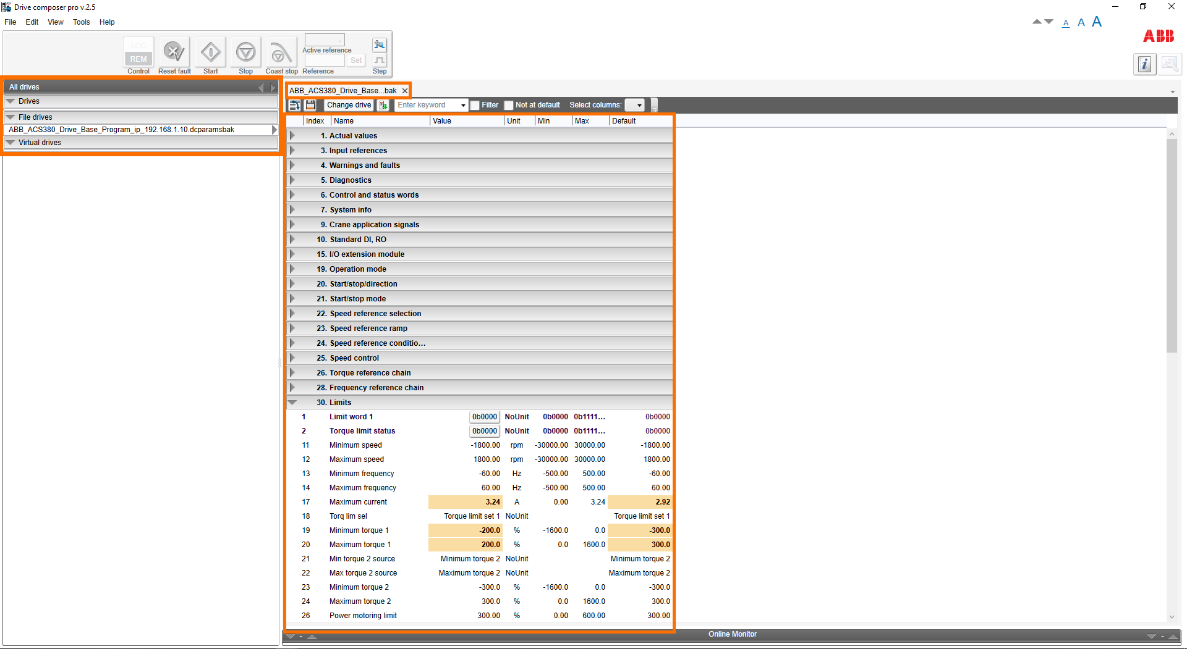
The ABB’s drive parameters are indexed. For example, to change the drive’s maximum speed limit, you would have to locate the parent index number 30 (Limits) and then change the subset parameter number 12’s value.
ACS380 and 880 parameters can be changed locally at the drive or remotely using ABB’s control panel keypad or their drive configuration software, Drive Composer(Figure 1.2). The software allows you to connect and configure multiple drives.
Note that if you’re using the Drive Composer software and the drive control is switched to local, it considers the connected controller, the user’s laptop in this case, to be that local control owner. Before disconnecting and trying to run the drive in local/remote you will have to relinquish the software’s local ownership.
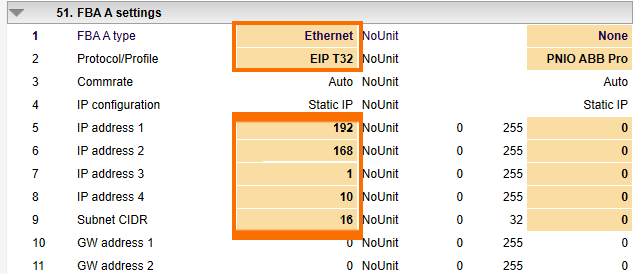
For this tutorial, we’ve already created an ABB ACS380 drive program within Drive Composer. The parameters have been configured to control a 1/2 HP motor. We also configured the communication setup as shown in figure 1.3.
The FBA A (Fieldbus adapter A) settings are within parent parameter number 51. The sub-parameters edited are highlighted in figure 1.3. Notice that we have set the type IP address to 192.168.1.10.
Adding ACS380 Drive into Studio5000 for Ethernet/IP Control
There are two ways of adding the ABB drive Ethernet/IP module into Studio5000. The first way is to utilize the Drive Composer software.
Adding an ABB Drive Ethernet/IP Module into Studio5000 Using Drive Composer
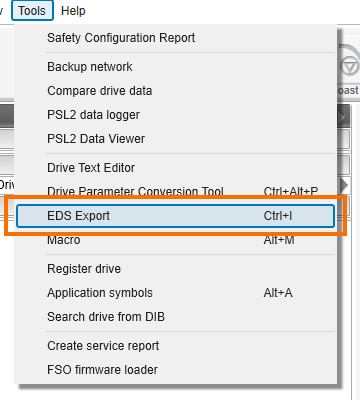
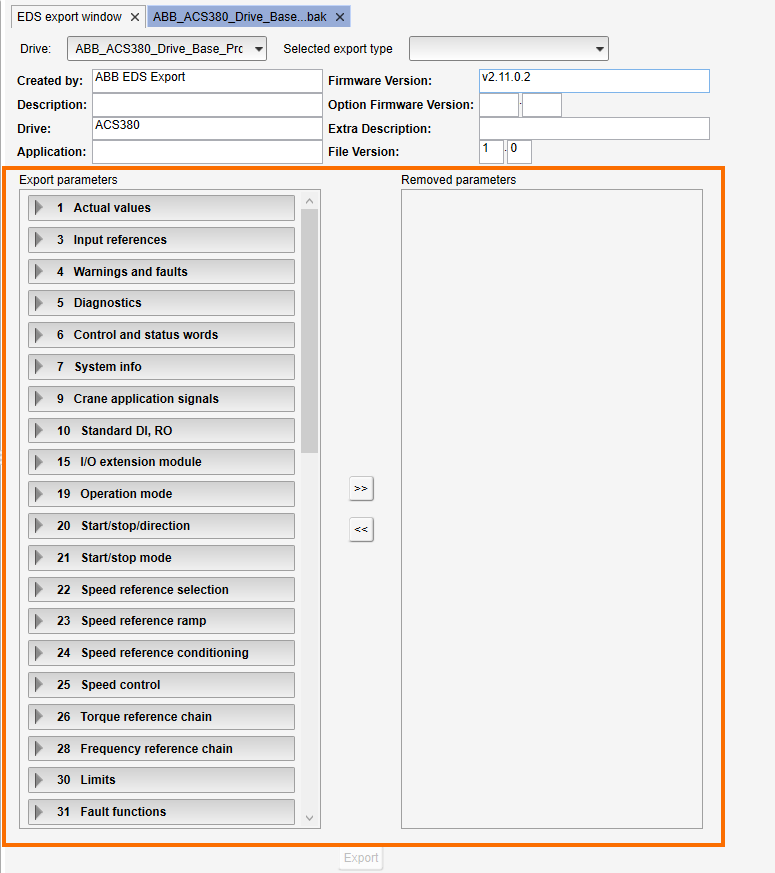
In the top ribbon of Drive Composer, we will begin by selecting the Tool menu drop-down, and selecting EDS Export (see figure 1.4). You can also open the EDS Export window with the shortcut Ctrl+I.
After selecting the EDS export tool, a new window will appear (figure 1.5). Within this window, notice that there are two columns, export and remove parameters. Any of the parameters present in the left side column will be compiled into an EDS file when you click the export button at the bottom of the window. Parameters on the right side will be excluded from the EDS file creation. We can also change the EDS file’s name in the ‘Created by’ field. After exporting the file to your chosen destination, we can open Studio5000.
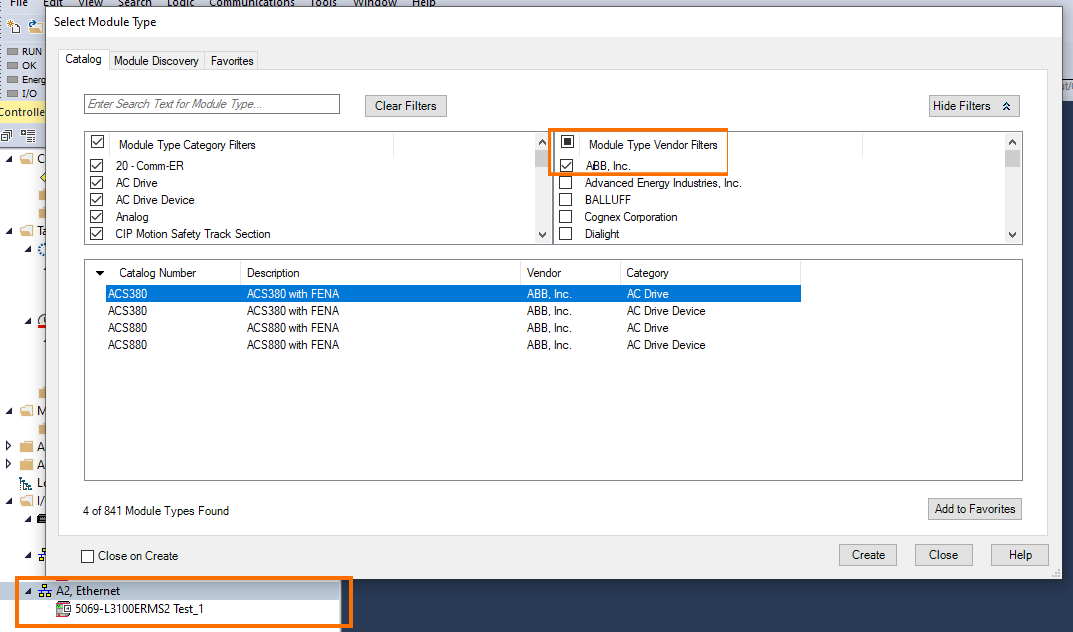
Using the EDS Hardware Installation Tool we will register the file we created for our ACS380 drive. After registering the EDS file we can add the drive’s module into our controller organization tree. We decided to add it to a 5069 PLC controller tree, underneath the ‘A2, Ethernet’ since we assigned a local IP address of 192.168.1.10. Right-click the A2, Ethernet link and select ‘New Module’. Within the Select Module Type window is a filtering tool by module types and vendors. Filtering by the vendors, ABB, will give us the drive we’ve just registered.
After selecting the ACS380 device the New Module window will appear. Begin by inserting a descriptive name so you can easily identify which VFD you’re working with, and insert the IP address.
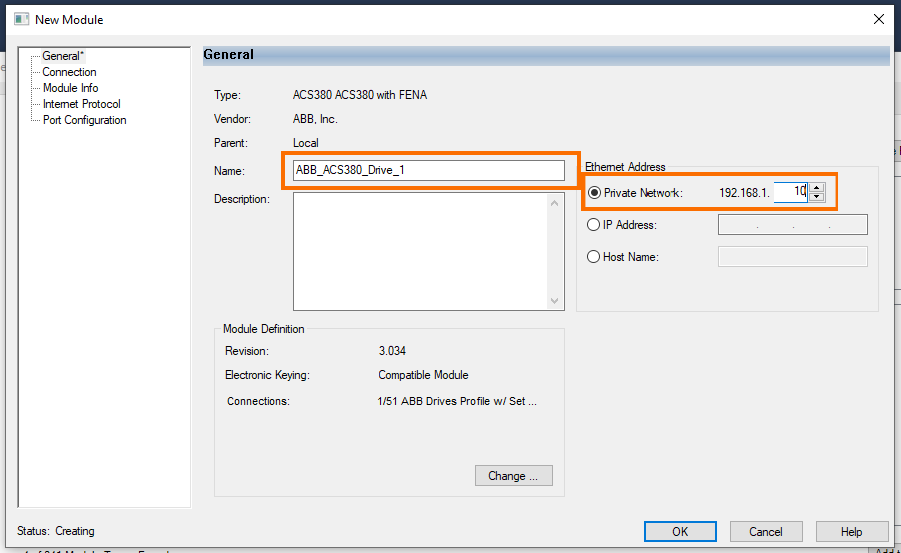
Before accepting the changes, we need to change the connection’s communication protocol. By selecting the Change button under the Module Definition, a new window will open. Here, you’ll find the changes that can be made for module revision, electronic keying, and connection communication protocol. Setup earlier within Drive Composer, the communication protocol should be set to 122/172 transparent32 and using DINT data size.

After accepting these changes, a warning window will appear notifying you that the module definition will be changed. This is normal. Our ACS380 drive is now within our controller organization tree.
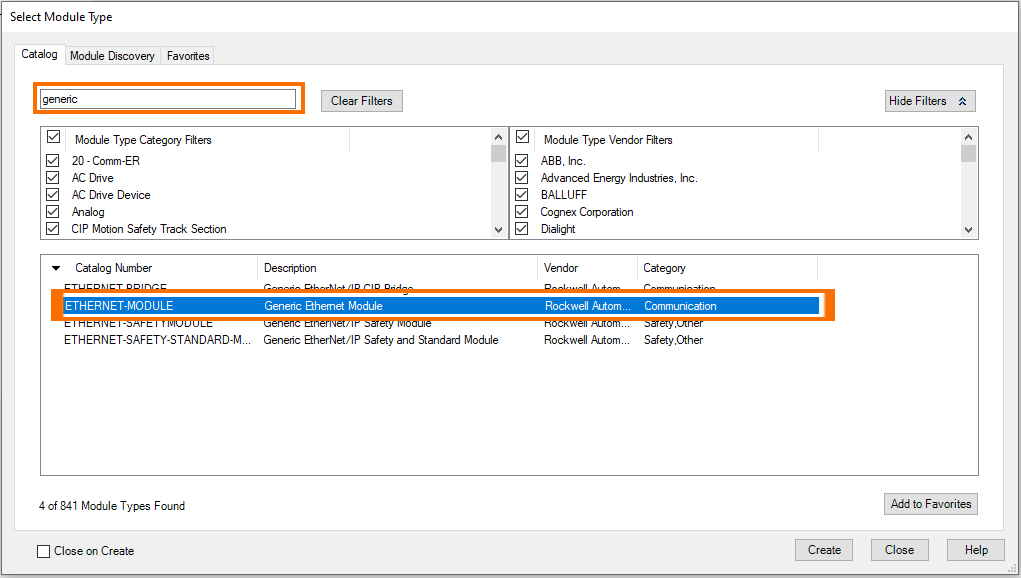
Adding an ABB Drive Ethernet/IP Module into Studio5000 Using a Generic Ethernet Module
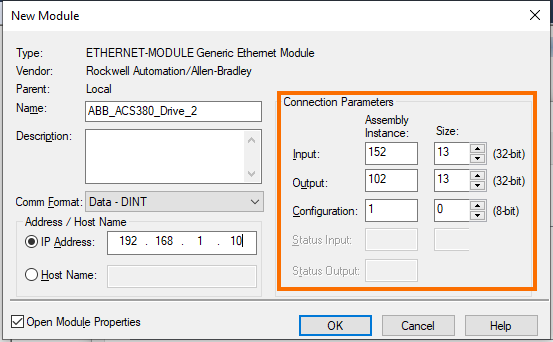
The second way to add an ABB ACS380 drive is by utilizing the generic Ethernet module device. Within the New Module selection window, we can find this device by typing in keywords within the search field or filtering vendors for Rockwell Automation. In figure 1.8 I’ve highlighted the specific module we are using to add tie our ACS380 drive to.
After creating this new module, notice the module information window that opens is different from the first one (reference figure 1.9). For reference purposes, we named this module ‘ABB_ACS380_Drive_2’ communication parameters. This can vary depending on what is necessary, but we will match it to what has already been set up in Drive Composer. Note that we cannot add this device because a module already exists in the project’s controller organization tree with the same IP address.
This project within Studio5000 now has an ABB ACS380 VFD setup to communicate over Ethernet/IP.
Conclusion
In this tutorial, you learned how to integrate an ACS380 VFD into Studio5000 via Ethernet/IP communication.
The ABB ACS380 machinery drives have a multitude of tools for individuals to use. Internal function block diagram (FBD) programming can be used to set up torque limits to sense if a belt is broken or a chain is in a bind. Paired with the capability to run the VFD and motor in scalar form allows systems to gain the maximum efficiency from these devices.
The ACS380 and 880 drives offer excellent motor control while being user-friendly during the integration process. Coupled with communication, over Ethernet/IP for example, allows for total control and closed-loop feedback of information such as descriptive faults, data feedback, and more.
