Securing your HMI in Siemens TIA Portal

Introduction
This tutorial builds on the previous tutorials about Securing your Projects and Programs in Siemens TIA Portal and Securing your PLC Hardware in Siemens TIA Portal.
The previous tutorials taught you how to secure your software project and PLC hardware properly. These form the first two layers of security that must be implanted in your system.
The purpose of the first two layers is to protect your system from external access. However, there are remaining risks due to unwanted or involuntary mishandling from the machine users.
In this tutorial, you will learn how to add the third layer of security, securing your HMI using User administration.
Prerequisites
To follow this tutorial, you will need an installation of TIA Portal. We will use TIA Portal v17, but you can use any other version. No additional hardware or software is required.
Also, you’ll need to have some basics in Siemens HMI programming using WinCC: You can check Designing HMI Screens and Going Online with a Siemens TP700 Series HMI to learn more about HMI programming.
Establishing a secured connexion between the HMI and the CPU
The first thing to do is to create a TIA Portal project, add the CPU of your choice, set its access level to no access, and add a password for each level of access, as shown in the previous tutorial.
NB: This applies to Siemens HMI models only. You must use the “HMI access” level if you're using another HMI brand.
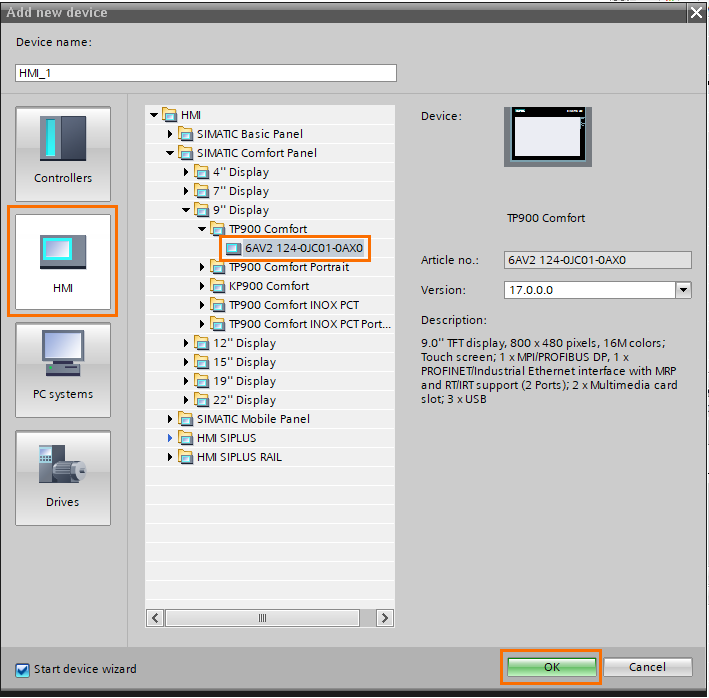
Once done, click on “Add new device.”

In the “Add new device” window, open the “HMI” and select the HMI model you want. I have a sweet spot for Comfort Panels, so I’m choosing a TP900 Comfort panel.
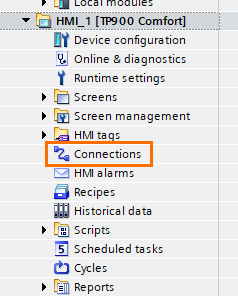
In the Project tree, under the HMI section, click on “Connections.”
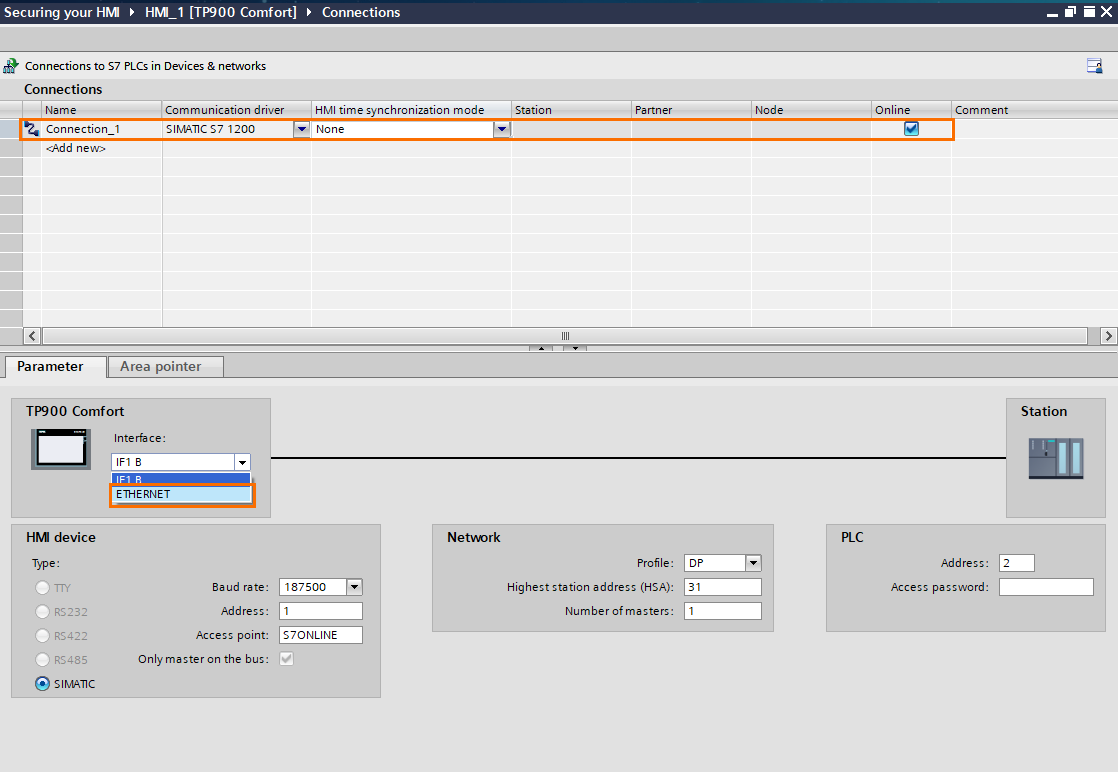
This will open the connections window where we’ll link the HMI we just created to the CPU. Next, click on “<Add new>.”

Upon clicking, a new connection will be automatically created. Always check that the right CPU type is selected in the “Communication driver” section.
In the parameter view below, open the “Interface” scroll and select “ETHERNET”.
Once done, enter the PLC’s IP address and access password (the HMI access password created in Figure 1.1)
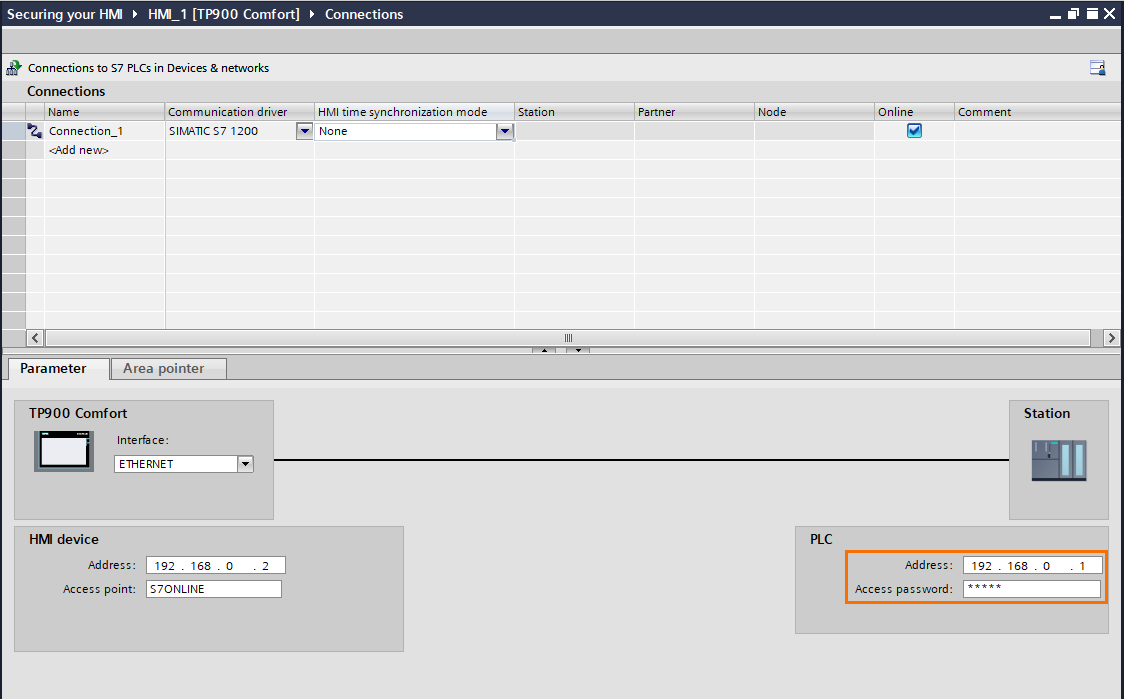
The HMI has now been appropriately configured to communicate safely with the CPU using a password-based identification.
Creating HMI users, user groups, and authorizations using the User Administration
The heart of HMI securing is user administration. Since the role of the HMI is to control and monitor the system, it contains all the means of interaction with the machine: start/stop, automatic/manual modes, parameters, etc.
Unwanted actions can lead to production or machine issues. The HMI must contain a login system with each user IDs and password. To interact with the machine, you must be logged in and have adequate rights. Operators can have the right to start or stop the system but cannot modify parameters.
To do so, we create user groups. Each group can have one or multiple authorizations. Users from a certain group will only be able to perform actions according to their assigned rights.
In addition to adding restrictions to what users can do, this also offers you some security and traceability options like user logs.
In the Project tree, under the HMI section, click on “User Administration”.
Once on the User administration window, you’ll notice that the “Administrator” user is created by default and belongs to the “Administrator group” with full access authorizations. Make sure to change the password and keep it safe.
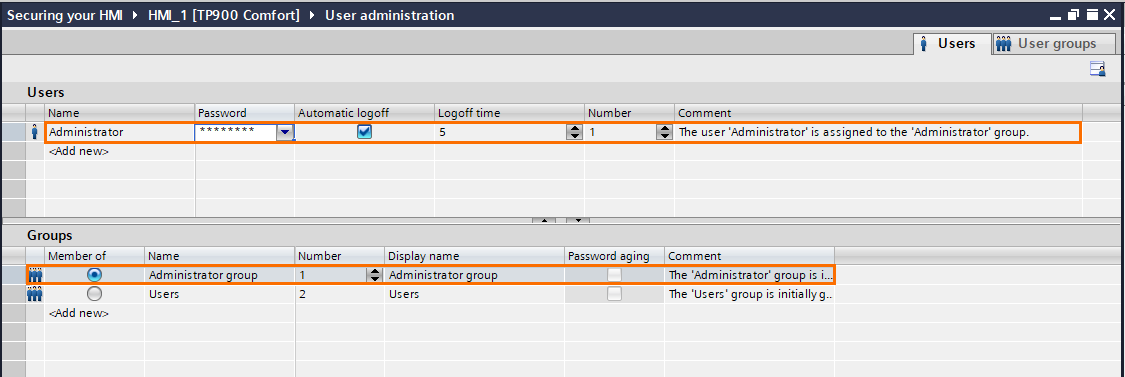
You can also notice that a “Users” group is created by default. You can rename it or keep it as it is. For this tutorial, we will use three different user groups. Rename the “users” group as “Technicians” and click on “<Add new> to create a new user group.

Rename the third user group as “Operators.” Don’t forget to add comments to your groups for more clarity.

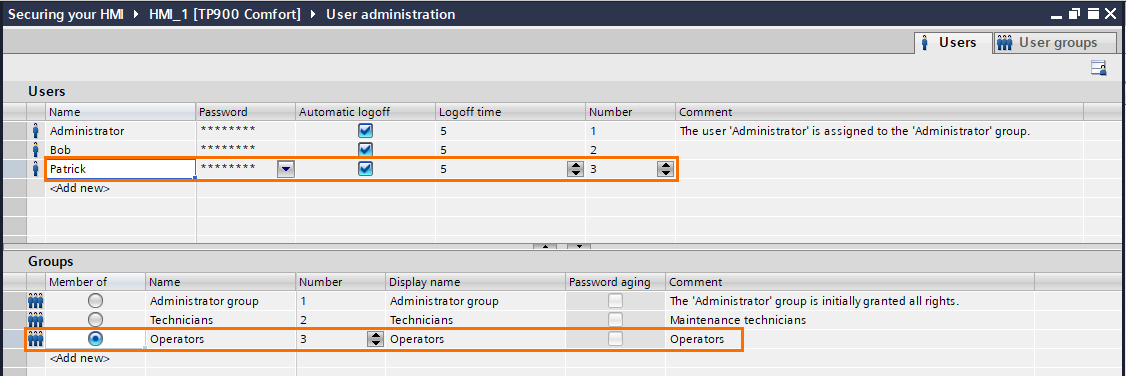
Let’s create new users. Click on “<Add new>,” define a name and a password, and select the user group “Technicians”.
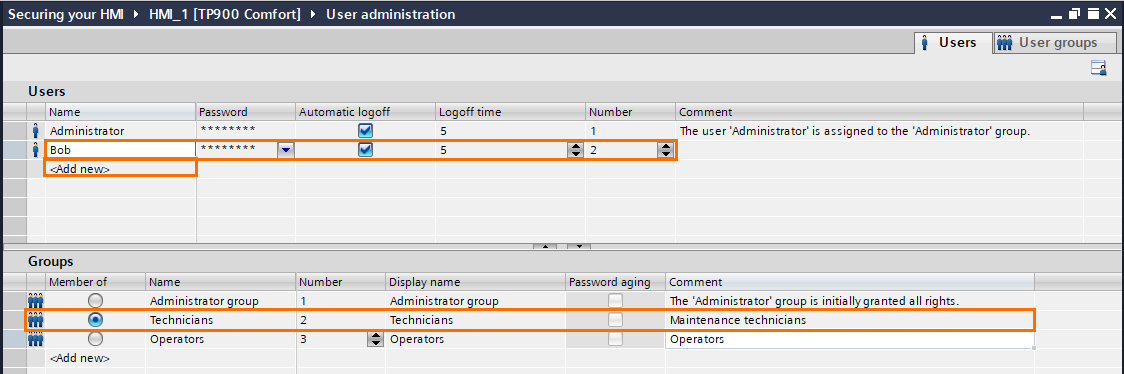
Repeat the operation, but this time, select the “Operators” user group.
One important thing to do is to set proper logoff times. For example, someone may log in with a high-level user and forgets to log off when leaving. To avoid this, you can set timers (expressed in minutes) that will automatically log off after a certain amount of time of inactivity.
Administrators tend to have short log-off times since they are the most critical user group. Also, Maintenance technicians often need to be away from the HMI while working on the issue. Usually, they need longer logoff times to avoid going back and forth to the HMI.

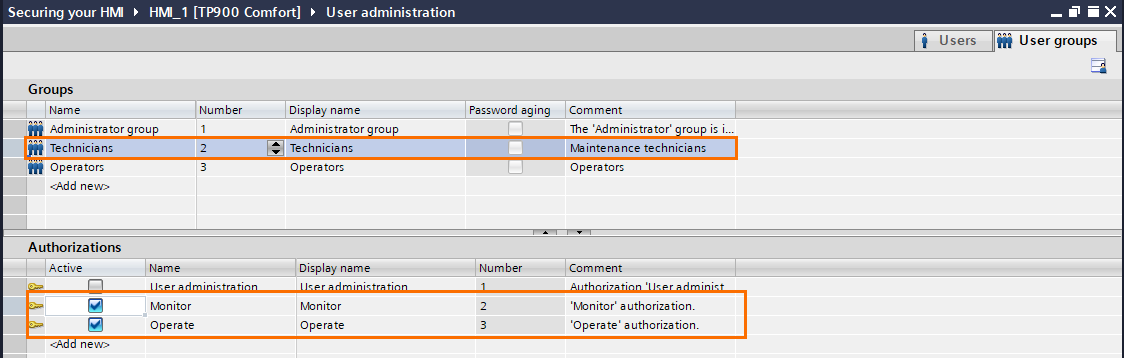
Go to the “user groups” tab in the top right corner. In this section, you can create authorizations and assign them to user groups.
Three authorizations are created by default: Operate, monitor, and user administration. You can keep them, modify or add new ones as you please.
If you click on the administrator group, you’ll notice that it has all the authorizations, which is typical for administrators, as they must have complete control and access.

Next, select the Technicians group. This group is for maintenance technicians so it must have a lower level than the Administrators but higher than the operators. Select the “Monitor” and “Operate” authorizations only.
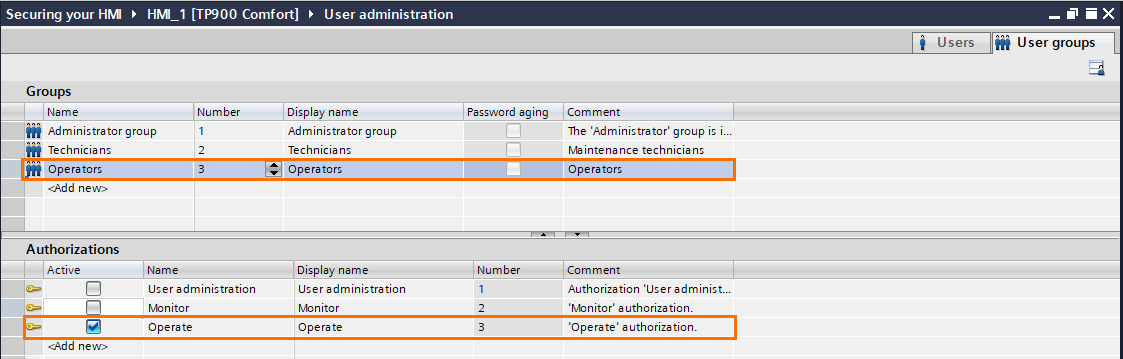
Lastly, the Operators group has the lowest rights; select the Operate authorization only.
Assigning authorizations to HMI elements
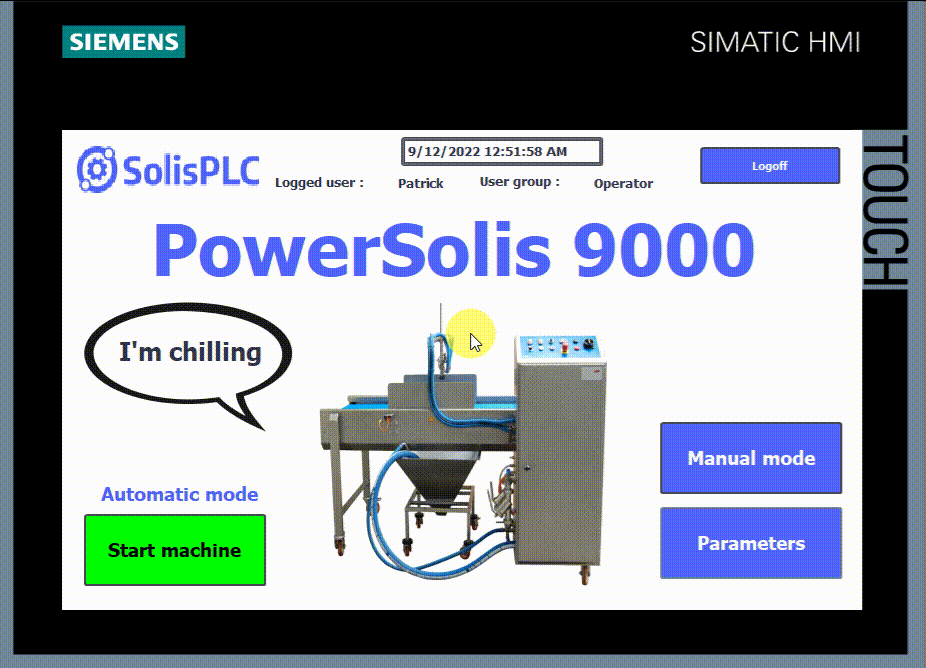
We have a simplified HMI for this tutorial with some of the most basic options you’d expect to find in an industrial system.

- 1 - Login/logoff button.
- 2 - Logged user and his user group.
- 3 - Start/Stop button in automatic mode.
- 4 - Manual mode button.
- 5 - Parameters page button.
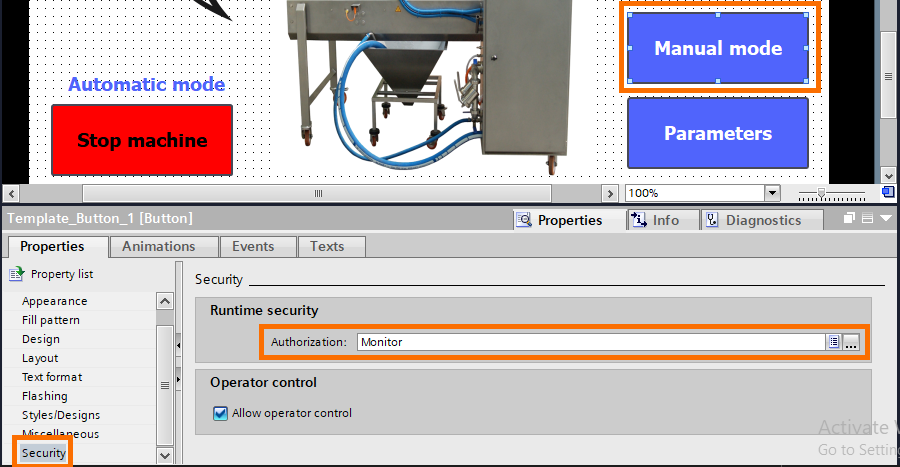
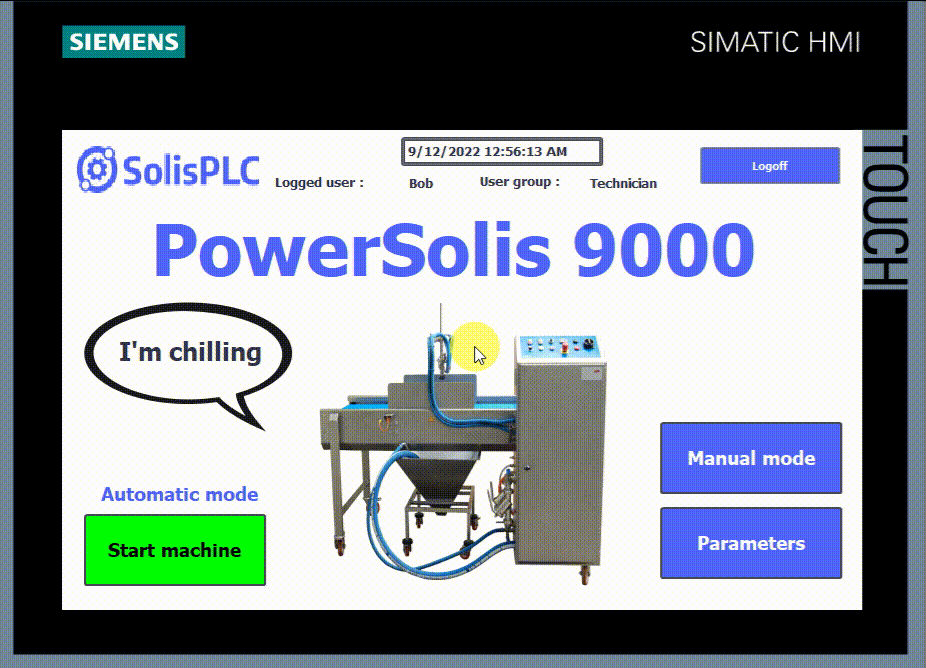
This HMI is programmed so that you must be logged in to perform any action. For example, the start-stop button in automatic mode requires the “Operate” authorization, the Manual mode requires the “Monitor” authorization, and the parameters page requires “User administration” authorization.

- In this last figure, you can see that no user is logged in. Upon clicking on any button, the HMI asks you to log in.
You can assign authorizations by entering the properties of the element (button, input, etc), then open the “Security” tab and select the correct authorization in the “Runtime security” section.
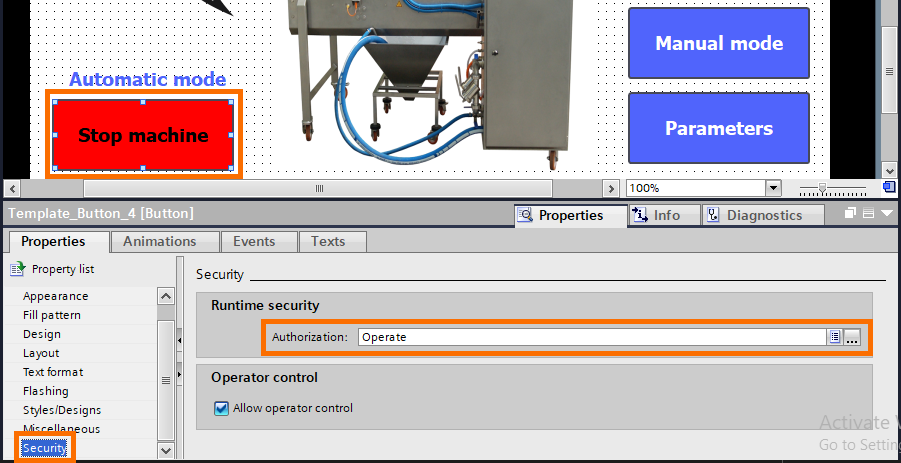

- To have the right to start or stop the machine, you have to be logged in with an “Operator” or higher level. However, the “Operator” level can’t have access to the manual mode or the parameters.

- Manual mode can only be accessed with a “Technician” level or higher. It’ll also allow you to start and stop the machine, but you still can’t access the parameters.
- Finally, you can access all features with the “Administrator” level, which is the highest level.
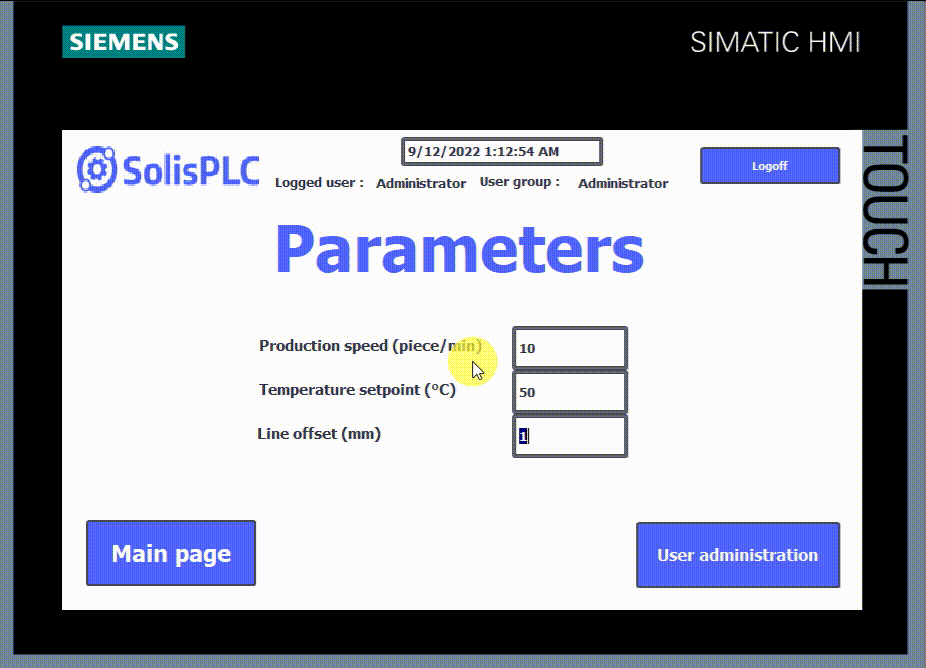
- You can create new users or modify old ones inside the HMI using the control object “User administration.” However, since the employees working on a machine may change over time, you can adapt your users list directly inside the HMI without relying on TIA Portal.
NB: The user administration can only be used with an Administrator user logged in.
To create a user administration table, select the “user administration” icon in the control tools and drop it on your desired screen. Then, create it on a screen that requires “Administrator” authorization.

Inside the User administration, you can modify users' usernames, passwords, user groups, and logoff times. You can also create new ones by clicking in the blank row, entering the new user name, pressing “enter,” and entering the password, user group, and logoff time.
Conclusion
This tutorial taught you how to create and manage uses within your HMI environment.
Human error is and will always be present. By assigning the right authorizations to your HMI elements, you can minimize the impact of human error on your system, particularly in cases where several people may be required to work on the same machine.
With this third layer of protection, your system is safe from the majority of potential threats it may face. Industrial systems are often isolated, which means they only interact with their local components. Securing your software, PLC, and HMI protection covers the largest spectrum of risks. However, there is still one last potential source of risk; external communications. This will be covered in the last tutorial of this cyber security series.
